1. Product Overview
The VEVOR Hybrid Heat Press is a versatile 5-in-1 multifunction machine designed for heat transfer applications on various items, including T-shirts, hoodies, bags, pillows, caps, mugs, and plates. This model features a patented design for enhanced stability and ease of use, ensuring even heat distribution and consistent results.

Figure 1: VEVOR Hybrid Heat Press Main Unit
Key Features:
- 5-in-1 Multifunctionality: Capable of pressing T-shirts, hoodies, bags, pillows, caps, mugs, and plates.
- Superior Heat Pressing: Offers higher pressure compared to automatic models, with a dual heating tube design for even heat and clearer, long-lasting patterns.
- Easy Operation: Features an upgraded time/temperature independent control panel for simple and precise adjustments.
- Reliable and Durable Design: Full-extension drawer minimizes burn risk, and a stable structure prevents tipping or deformation.
- Compact and Space-Saving: Designed to fit various workspaces while offering broad application compatibility with HTV vinyl and heat sublimation projects.
2. Included Components
The VEVOR Hybrid Heat Press comes with the following components:

Figure 2: All Included Components
- 1x VEVOR Hybrid Heat Press Main Unit
- 1x 30 oz Mug Heat Press Attachments
- 1x Mug Press Frame
- 1x Hat Heat Press Attachment
- 1x 8 in/10 in Plate Heat Press Sponge
- 1x Screwdriver
- 1x Starter Pack (materials for initial use)
3. Setup Instructions
Follow these steps to set up your VEVOR Hybrid Heat Press:
- Unpack Components: Carefully remove all items from the packaging. Verify that all components listed in Section 2 are present.
- Position the Main Unit: Place the main heat press unit on a stable, heat-resistant surface. Ensure adequate clearance around the machine for safe operation and heat dissipation.
- Connect Control Box: Connect the independent control box to the main heat press unit using the provided cable. Ensure the connection is secure.
- Install Attachments (as needed): For mug, cap, or plate pressing, attach the corresponding accessory to the main unit according to the specific instructions provided with each attachment. Ensure they are securely fastened before use.
- Power Connection: Plug the heat press into a grounded electrical outlet.
Video 1: General overview of the VEVOR Hybrid Heat Press setup and basic operation.
4. Operating Instructions
This section outlines the general operation and specific procedures for different heat transfer applications.
4.1 General Operation (Control Panel)
- Power On: Press the power button on the control panel.
- Set Temperature: Use the 'TEMP' buttons (+/-) to adjust the desired temperature. The range is 212°F - 410°F (100°C - 210°C).
- Set Time: Use the 'TIME' buttons (+/-) to set the desired pressing duration (0-999 seconds).
- Heating: The machine will begin heating to the set temperature. An audible alert will sound when the target temperature is reached.
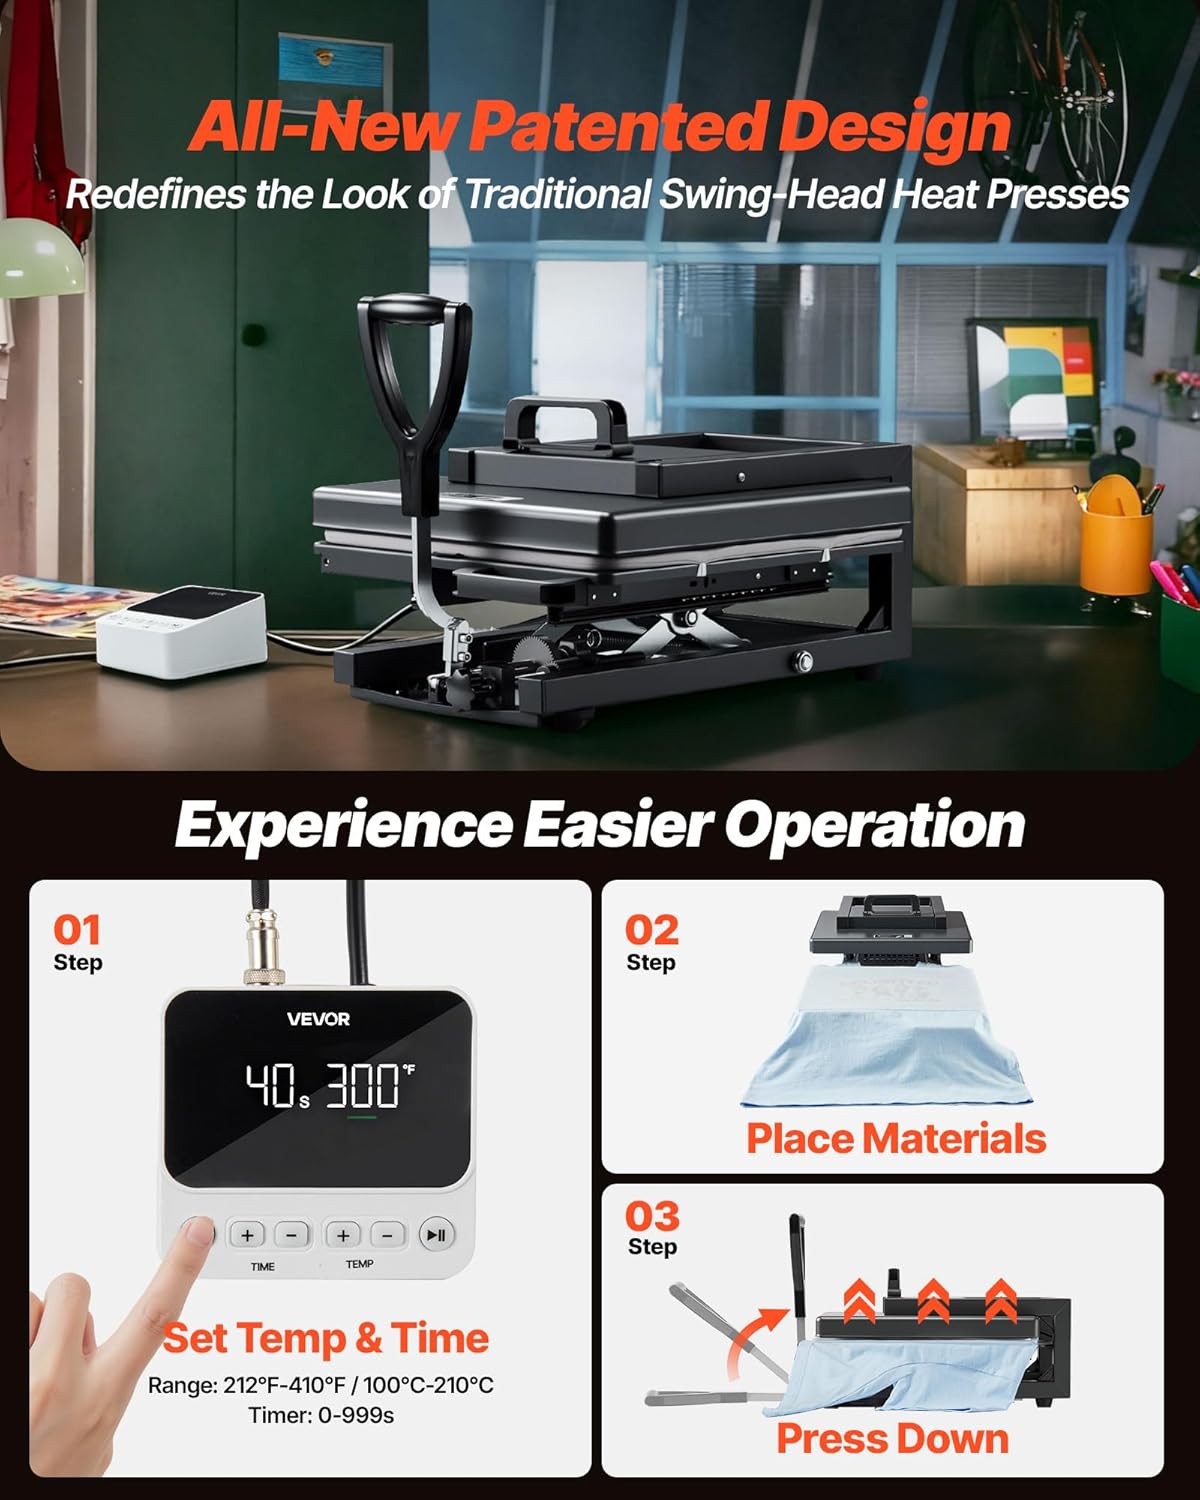
Figure 3: Setting Temperature, Placing Materials, and Pressing
4.2 T-Shirt / Flat Item Pressing
- Pre-heat: Turn on the machine and set the desired temperature and time according to your transfer material's instructions.
- Prepare Garment: Place the T-shirt or flat item onto the pull-out drawer. Ensure it is flat and free of wrinkles. Use a lint roller if necessary to remove any debris.
- Pre-press: Close the heat press for 5-10 seconds to remove moisture and wrinkles from the garment. Open the press and allow the garment to cool slightly.
- Position Transfer: Carefully place your heat transfer design onto the garment. Use heat-resistant tape to secure it if needed.
- Cover: Place a Teflon sheet or parchment paper over the transfer and garment to protect the heating plate.
- Press: Slide the drawer into position and lower the handle to apply pressure. The timer will start automatically.
- Release: Once the timer completes, lift the handle and pull out the drawer.
- Peel: Allow the transfer to cool (if cold peel) or peel immediately (if hot peel) according to your transfer material's instructions.
- Second Press (Optional): For some transfers, a second press for 5-10 seconds after peeling may be recommended to ensure maximum adhesion and durability.

Figure 4: Heat Pressing a Canvas Bag
4.3 Mug Pressing
- Attach Mug Press: Securely attach the mug press attachment to the main unit.
- Set Temperature/Time: Adjust the temperature and time settings on the control panel as recommended for your mug and transfer type.
- Prepare Mug: Wrap your sublimation print around the mug and secure it with heat-resistant tape.
- Press: Place the prepared mug into the mug press attachment. Close the clamp to apply pressure. The timer will start.
- Cool Down: Once complete, open the clamp, carefully remove the hot mug (use heat-resistant gloves), and allow it to cool completely before removing the transfer paper.

Figure 5: Mug Press Attachment
4.4 Cap Pressing
- Attach Cap Press: Securely attach the cap press attachment to the main unit.
- Set Temperature/Time: Adjust the temperature and time settings on the control panel as recommended for your cap and transfer type.
- Prepare Cap: Place the cap onto the cap press platen. Position your heat transfer design.
- Press: Close the cap press to apply pressure. The timer will start.
- Release: Once complete, open the press and carefully remove the cap. Allow it to cool before handling the transfer.

Figure 6: Cap Press Attachment
4.5 Plate Pressing
- Attach Plate Press: Securely attach the plate press attachment to the main unit.
- Set Temperature/Time: Adjust the temperature and time settings on the control panel as recommended for your plate and transfer type.
- Prepare Plate: Place your sublimation print onto the plate and secure it with heat-resistant tape.
- Press: Place the prepared plate into the plate press attachment. Close the clamp to apply pressure. The timer will start.
- Cool Down: Once complete, open the clamp, carefully remove the hot plate (use heat-resistant gloves), and allow it to cool completely before removing the transfer paper.

Figure 7: Plate Press Attachment
5. Maintenance
Proper maintenance ensures the longevity and optimal performance of your heat press.
5.1 Cleaning
- Heating Plate: Allow the heating plate to cool completely. Wipe it with a soft, damp cloth. For stubborn residue, use a non-abrasive cleaner specifically designed for heat press platens.
- Silicone Pad: The silicone pad on the lower platen can be wiped clean with a damp cloth. Avoid using harsh chemicals that may damage the silicone.
- Exterior: Wipe the exterior surfaces with a soft, dry cloth.
5.2 Storage
- Store the heat press in a dry, dust-free environment.
- Ensure the machine is completely cool before storing.
- Keep the machine in a stable position to prevent accidental tipping.
6. Troubleshooting
This section addresses common issues you might encounter with your heat press.
| Problem | Possible Cause | Solution |
|---|---|---|
| Uneven heat transfer / Dull patterns | Uneven pressure; incorrect temperature/time; worn-out silicone pad. | Adjust pressure knob for even distribution. Verify temperature and time settings. Replace silicone pad if damaged. |
| Drawer is difficult to pull out or push in | Pressure setting is too high; mechanism needs lubrication. | Reduce pressure using the adjustment knob. Apply a small amount of high-temperature lubricant to the sliding mechanism. |
| Machine not heating up | Power supply issue; faulty heating element; control panel malfunction. | Check power connection and outlet. Ensure the power button is on. If the issue persists, contact customer support. |
| Audible alarm / Overheat warning | Overheating detected. | Immediately power off the machine and allow it to cool down. Check for any obstructions around the heating elements. Do not operate until the issue is resolved. |
7. Specifications
Technical specifications for the VEVOR Hybrid Heat Press SJY-HGG1M:
| Feature | Specification |
|---|---|
| Model Number | SJY-HGG1M |
| Heating Plate Size | 15 x 15 inches (380 x 380 mm) |
| Temperature Range | 212°F - 410°F (100°C - 210°C) |
| Timer Range | 0-999 seconds |
| Power | 1400W (US), 1350W (EU) |
| Main Material | Steel |
| Net Weight | 41.9 lbs (19 kg) |
| Product Dimensions (Handle Raised) | 19.29 x 15.35 x 14.96 inches (490 x 390 x 380 mm) |
| Product Dimensions (Handle Flat) | 31.50 x 15.35 x 11.81 inches (800 x 390 x 300 mm) |
8. Warranty Information
For detailed warranty information regarding your VEVOR Hybrid Heat Press, please refer to the warranty card included with your product or visit the official VEVOR website. Warranty terms and conditions may vary by region and product.
9. Customer Support
If you require further assistance, have questions about operation, or need technical support, please visit the official VEVOR website for contact information and support resources. Ensure you have your product model number (SJY-HGG1M) and purchase details available when contacting support.


