GOEBLESON ZB01CF05
GOEBLESON 52 Inch Farmhouse Ceiling Fan with Lights and Remote
Model: ZB01CF05
Instruction Manual
1. Introduction
This manual provides detailed instructions for the safe installation, operation, and maintenance of your GOEBLESON 52 Inch Farmhouse Ceiling Fan with Lights and Remote. Please read all instructions carefully before beginning installation and retain this manual for future reference.

Image: Overview of the GOEBLESON 52 Inch Farmhouse Ceiling Fan with Lights and Remote.
2. Safety Information
- Ensure the power is disconnected at the circuit breaker before installation or servicing.
- All wiring must be in accordance with national and local electrical codes.
- The fan must be mounted to a ceiling joist or support structure capable of supporting the fan's weight.
- Do not bend blade holders during installation or cleaning.
- Keep children away from the fan during operation.
3. Package Contents
Verify that all components listed below are included in your package. If any parts are missing or damaged, contact customer support.
- Motor Housing Assembly
- Fan Blades (5, dual-finish)
- Downrods (6-inch and 10-inch)
- Mounting Bracket
- Canopy
- Remote Control with Wall Mount
- Hardware Pack (screws, wire nuts, etc.)
- Instruction Manual

Image: All components included in the GOEBLESON ceiling fan package.
4. Specifications
| Feature | Specification |
|---|---|
| Brand | GOEBLESON |
| Model Name | ZB01CF05 |
| Product Dimensions | 52"D x 52"W x 20"H |
| Blade Length | 52 Inches |
| Number of Blades | 5 |
| Motor Type | Reversible DC Motor |
| Speed Settings | 6 Speeds |
| Noise Level | Below 30 Decibels |
| Air Flow Capacity | 6700 CFM (Max) |
| Wattage | 60 Watts |
| Control Method | Remote Control |
| Timer Functions | 1H/2H/3H/4H/5H/8H |
| Downrod Lengths | 6" and 10" (Included) |
| Bulb Base | 2*E26 (Bulbs not included) |
| Indoor/Outdoor Usage | Indoor |
5. Setup and Installation
Follow these steps for proper installation. Professional installation is recommended if you are unfamiliar with electrical wiring.
5.1 Choose Mounting Location
Ensure the chosen location has a secure ceiling joist or outlet box capable of supporting the fan's weight (approximately 16 lbs). Maintain a minimum clearance of 7 feet from the floor to the fan blades.

Image: Ceiling fan dimensions and recommended ceiling heights for installation.
5.2 Install Mounting Bracket
- Turn off power at the circuit breaker.
- Attach the mounting bracket to the ceiling outlet box using the provided screws. Ensure it is securely fastened.
5.3 Assemble Fan Blades
Attach the five fan blades to the motor housing. The blades are dual-finish (walnut and black); choose your preferred side facing down.

Image: Details of the fan's construction, including blade attachment points and light holder.
5.4 Wiring and Hanging
- Feed the electrical wires from the ceiling through the chosen downrod and canopy.
- Secure the downrod to the motor housing.
- Carefully lift the fan assembly and hang it on the mounting bracket.
- Connect the fan's wires to the household wiring according to the wiring diagram in the full manual. Use wire nuts to secure connections.
5.5 Install Light Kit and Canopy
- Attach the light kit to the bottom of the motor housing.
- Install two E26 base bulbs (not included) into the light sockets.
- Secure the canopy to the mounting bracket, covering the wiring connections.
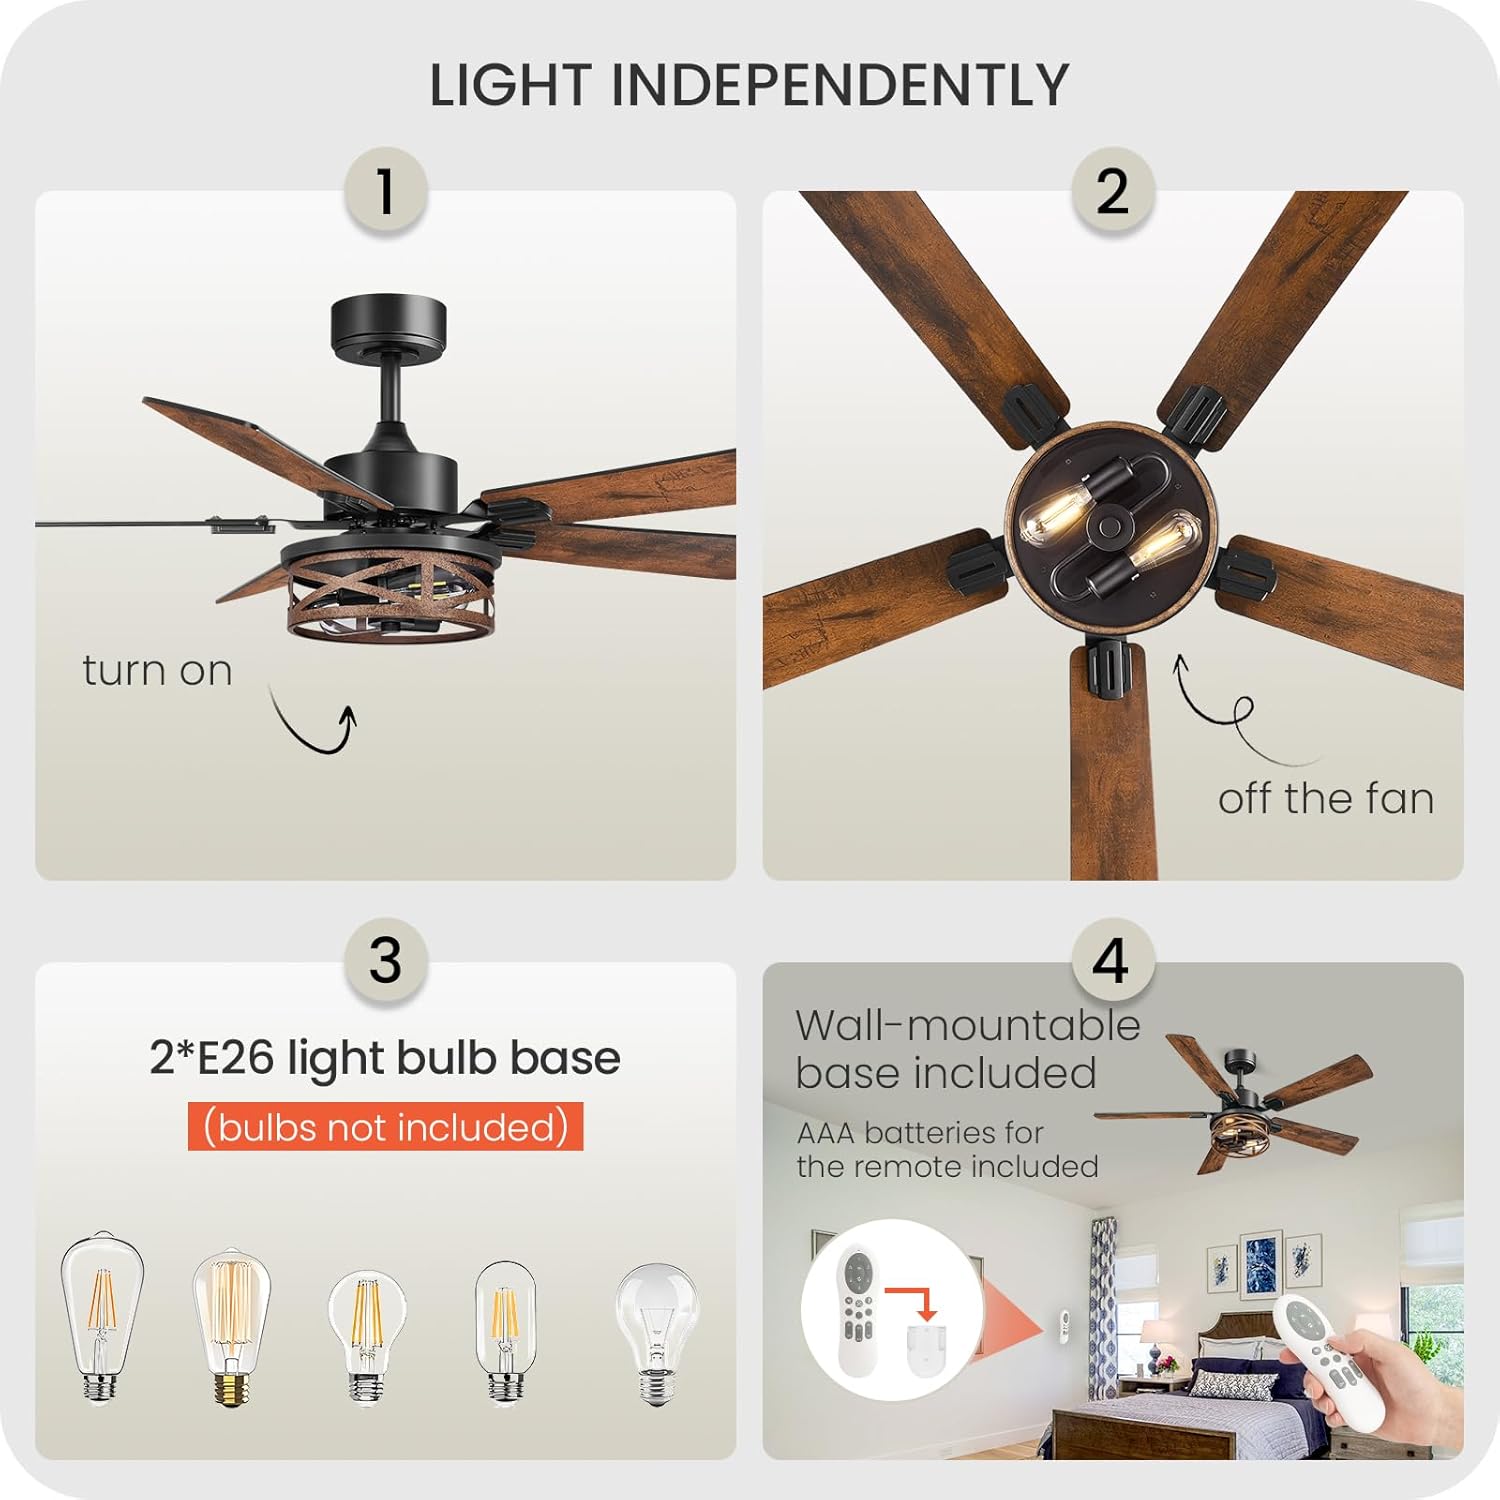
Image: Steps for light installation and remote control features.
6. Operating Instructions
Your GOEBLESON ceiling fan is operated using the included remote control.
6.1 Remote Control Functions
- Power On/Off: Turns the fan on or off.
- Fan Speed: Adjusts between 6 speed settings.
- Light On/Off: Controls the light independently.
- Timer: Sets the fan to turn off after 1H, 2H, 3H, 4H, 5H, or 8H.
- Fan Reverse/Forward: Changes the direction of blade rotation.
- Natural Wind: Simulates natural breeze patterns.
- Silent Mode Switch: Activates a quieter operation mode.

Image: Remote control functions and corresponding fan modes.
6.2 Reversible DC Motor
The fan features a reversible DC motor for year-round comfort.
- Forward Mode (Summer): Downward airflow creates a cooling effect.
- Reverse Mode (Winter): Upward airflow circulates warm air, balancing room temperature.

Image: Illustration of Forward (cooling) and Reverse (warming) modes.
7. Maintenance
Regular maintenance ensures optimal performance and extends the life of your fan.
- Cleaning: Use a soft, damp cloth to clean the fan. Do not use abrasive cleaners or solvents. Ensure power is off before cleaning.
- Blade Inspection: Periodically check blade screws for tightness. Loose blades can cause wobbling and noise.
- Light Bulbs: Replace E26 bulbs as needed. Ensure the power is off before changing bulbs.
8. Troubleshooting
If you encounter issues, refer to the following common problems and solutions:
| Problem | Possible Cause | Solution |
|---|---|---|
| Fan does not start | No power, loose wiring, remote battery dead | Check circuit breaker, verify wiring connections, replace remote batteries. |
| Fan wobbles | Loose blades, improper mounting, unbalanced blades | Tighten blade screws, ensure mounting bracket is secure, use balancing kit if necessary. |
| Light does not work | Bulb faulty, loose wiring, light switch off | Replace bulb, check light kit wiring, ensure light function on remote is active. |
| Remote not working | Dead batteries, remote not paired | Replace batteries, refer to the full manual for remote pairing instructions. |
| Excessive noise | Loose screws, motor issue, blades hitting obstruction | Check all screws, ensure no obstructions, contact support if motor noise persists. |

Image: The fan operates quietly, with noise levels below 30dB.
9. Warranty and Support
Your GOEBLESON ceiling fan is covered by a manufacturer's warranty. Please refer to the warranty card included in your package for specific terms and conditions.
For technical assistance, missing parts, or warranty claims, please contact GOEBLESON customer support through the retailer's platform or the contact information provided in your product packaging.