1. Introduction
Thank you for choosing the GUTINNEEN Heated Outdoor Cat House, Model AIR7034-IN-HP. This product is designed to provide a safe, warm, and comfortable shelter for outdoor cats, especially during colder weather. It features a unique multi-layer insulation design, a high-quality heating pad, and a sturdy solid wood construction to withstand various weather conditions. The two-level design with multiple escape doors ensures safety and accessibility for your feline companions.
This manual contains important information regarding the assembly, operation, and maintenance of your cat house. Please read it thoroughly before use and retain it for future reference.
2. Safety Information
Always prioritize safety when assembling and operating the heated cat house. Failure to follow these instructions may result in injury or damage to the product.
- Electrical Safety: The heating pad is UL-tested and features automatic temperature control (89–116°F) and built-in overheat protection. Ensure the power outlet is suitable for outdoor use and protected from moisture.
- Cord Protection: The heating pad is equipped with a 6.5 ft chew-resistant cord. Despite this, regularly inspect the cord for any signs of damage or wear. Position the cord to minimize exposure to pets and potential hazards.
- Insulation: The cat house includes a 0.78-inch thick, flame-retardant insulated liner to block cold air and retain heat. Ensure the liner is correctly installed.
- Ventilation: While insulated, ensure adequate air circulation. Do not block the entrance/exit points.
- Placement: Place the cat house on a stable, level surface. Consider placing it in a sheltered area to maximize its effectiveness against harsh weather.
- Supervision: Periodically check on pets using the house to ensure their comfort and safety.

Image: The UL-tested heating pad features automatic temperature control and overheat protection for safe operation.
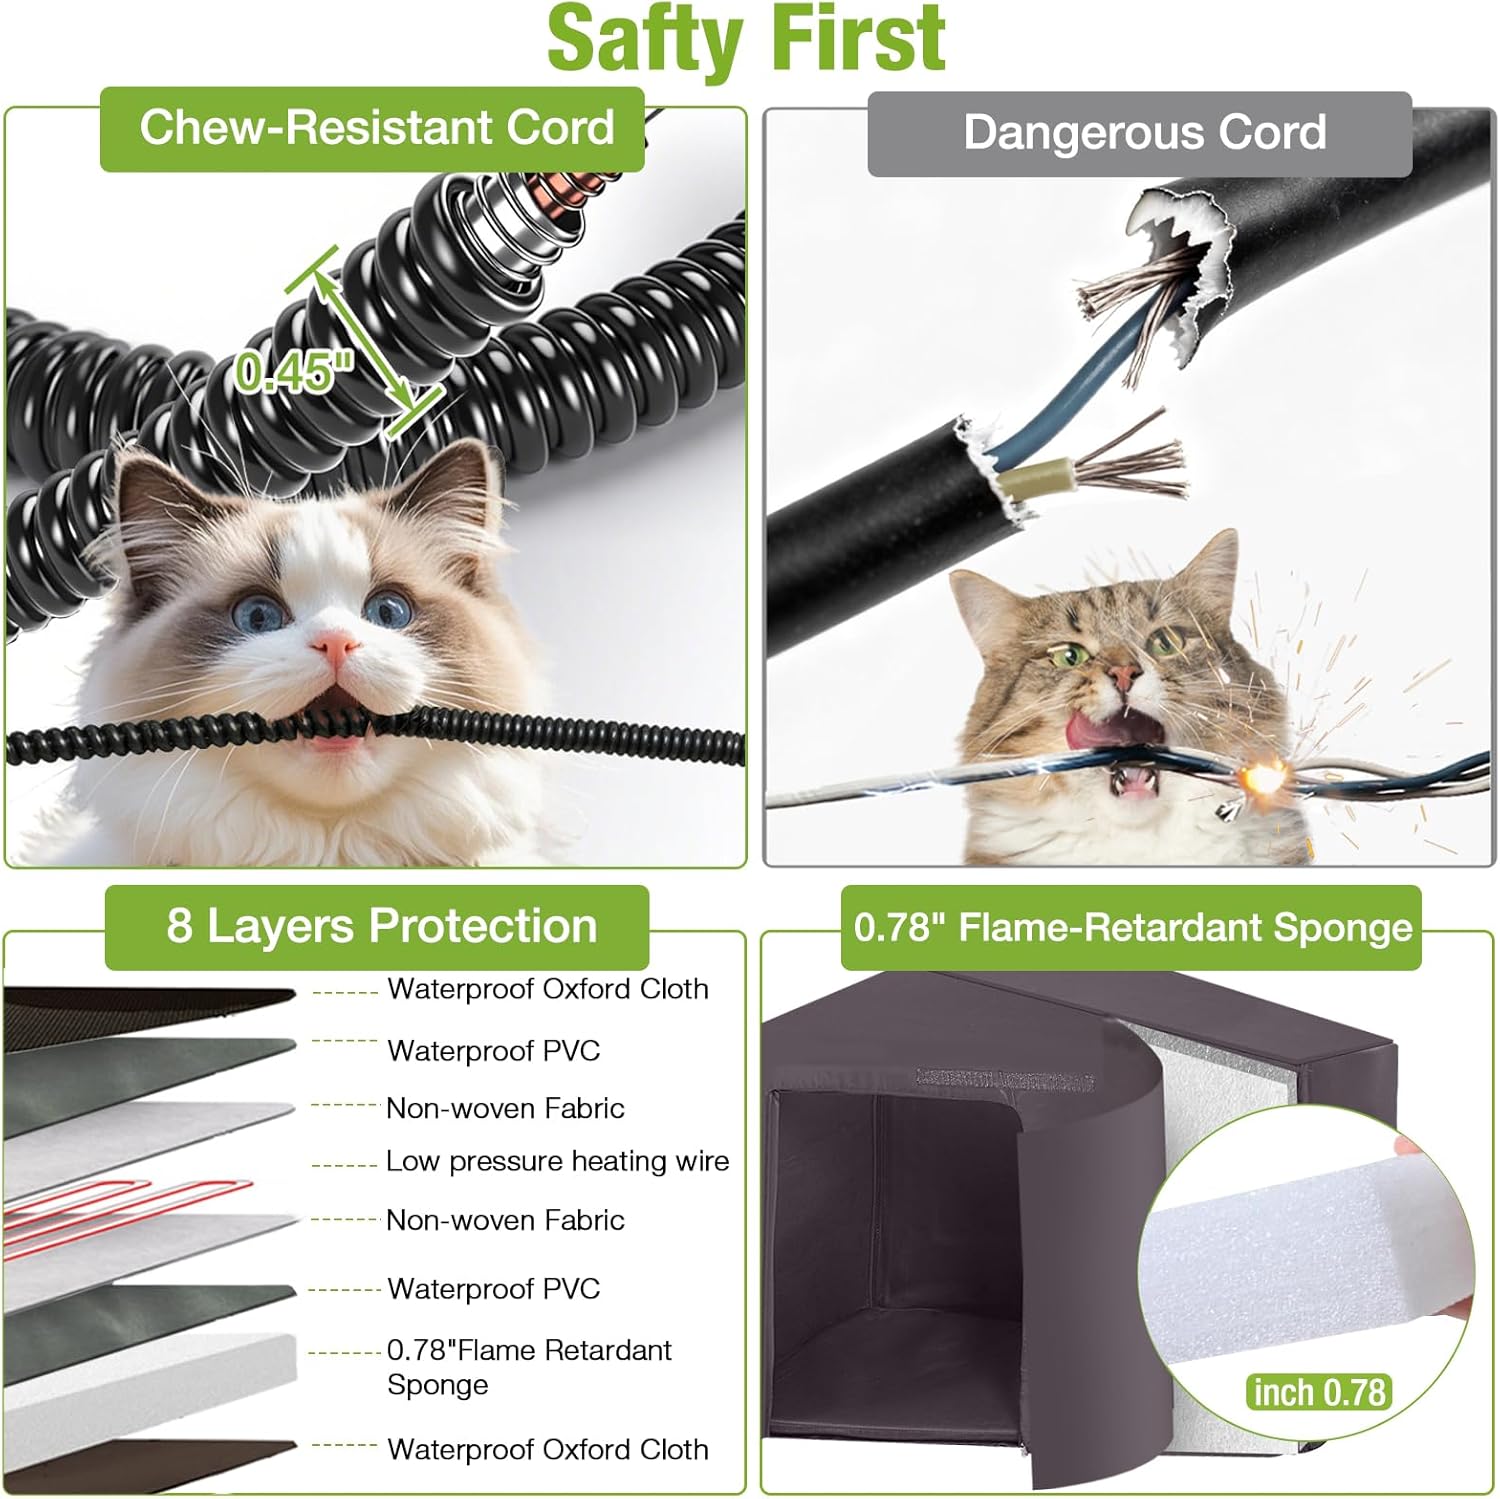
Image: Detail of the chew-resistant power cord and the 8-layer construction of the heating pad, including flame-retardant sponge.
3. Components List
Before assembly, ensure all components are present and undamaged. Refer to the packaging for a complete list of parts. Key components include:
- Pre-cut Fir Wood Panels for the house structure
- Roof Panels (Weatherproof Plastic Roof)
- Support Legs and Base Platform
- Insulated Liner (6-sided, 0.78" thick, flame-retardant)
- Heating Pad with Chew-Resistant Cord
- PVC Strip Doors (3 units)
- Assembly Hardware (screws, bolts, etc.)
- Instruction Manual

Image: Exploded view illustrating the main components: solid wood structure, insulated liner, and heating pad.
4. Setup and Assembly
Assembly is required. Please follow the detailed instructions provided in the product packaging for step-by-step guidance. While assembly is generally straightforward, some users may find a cordless drill or power screwdriver helpful.
- Unpack and Verify: Carefully unpack all components and verify against the parts list in your product packaging. Lay out all pieces to identify them. Note that pieces may not be individually labeled.
- Assemble Base: Begin by assembling the support legs and the main base platform according to the instructions. Ensure all connections are secure.
- Construct House Structure: Attach the side, front, and back panels to form the main body of the cat house. Secure all panels with the provided hardware.
- Install Interior Levels: Insert the interior floor panels to create the two separate levels.
- Attach Roof: Secure the weatherproof plastic roof panels to the top of the house structure.
- Install Doors: Attach the PVC strip doors to the designated openings. These provide easy access while helping to retain warmth.
- Insert Insulated Liner: Place the 6-sided insulated liner inside the cat house, ensuring it fits snugly against all interior surfaces.
- Position Heating Pad: Place the heating pad on the lower level of the cat house. Route the chew-resistant cord safely out of the house and towards a suitable outdoor power outlet.
- Final Check: Inspect the entire structure to ensure all parts are securely fastened and the house is stable.
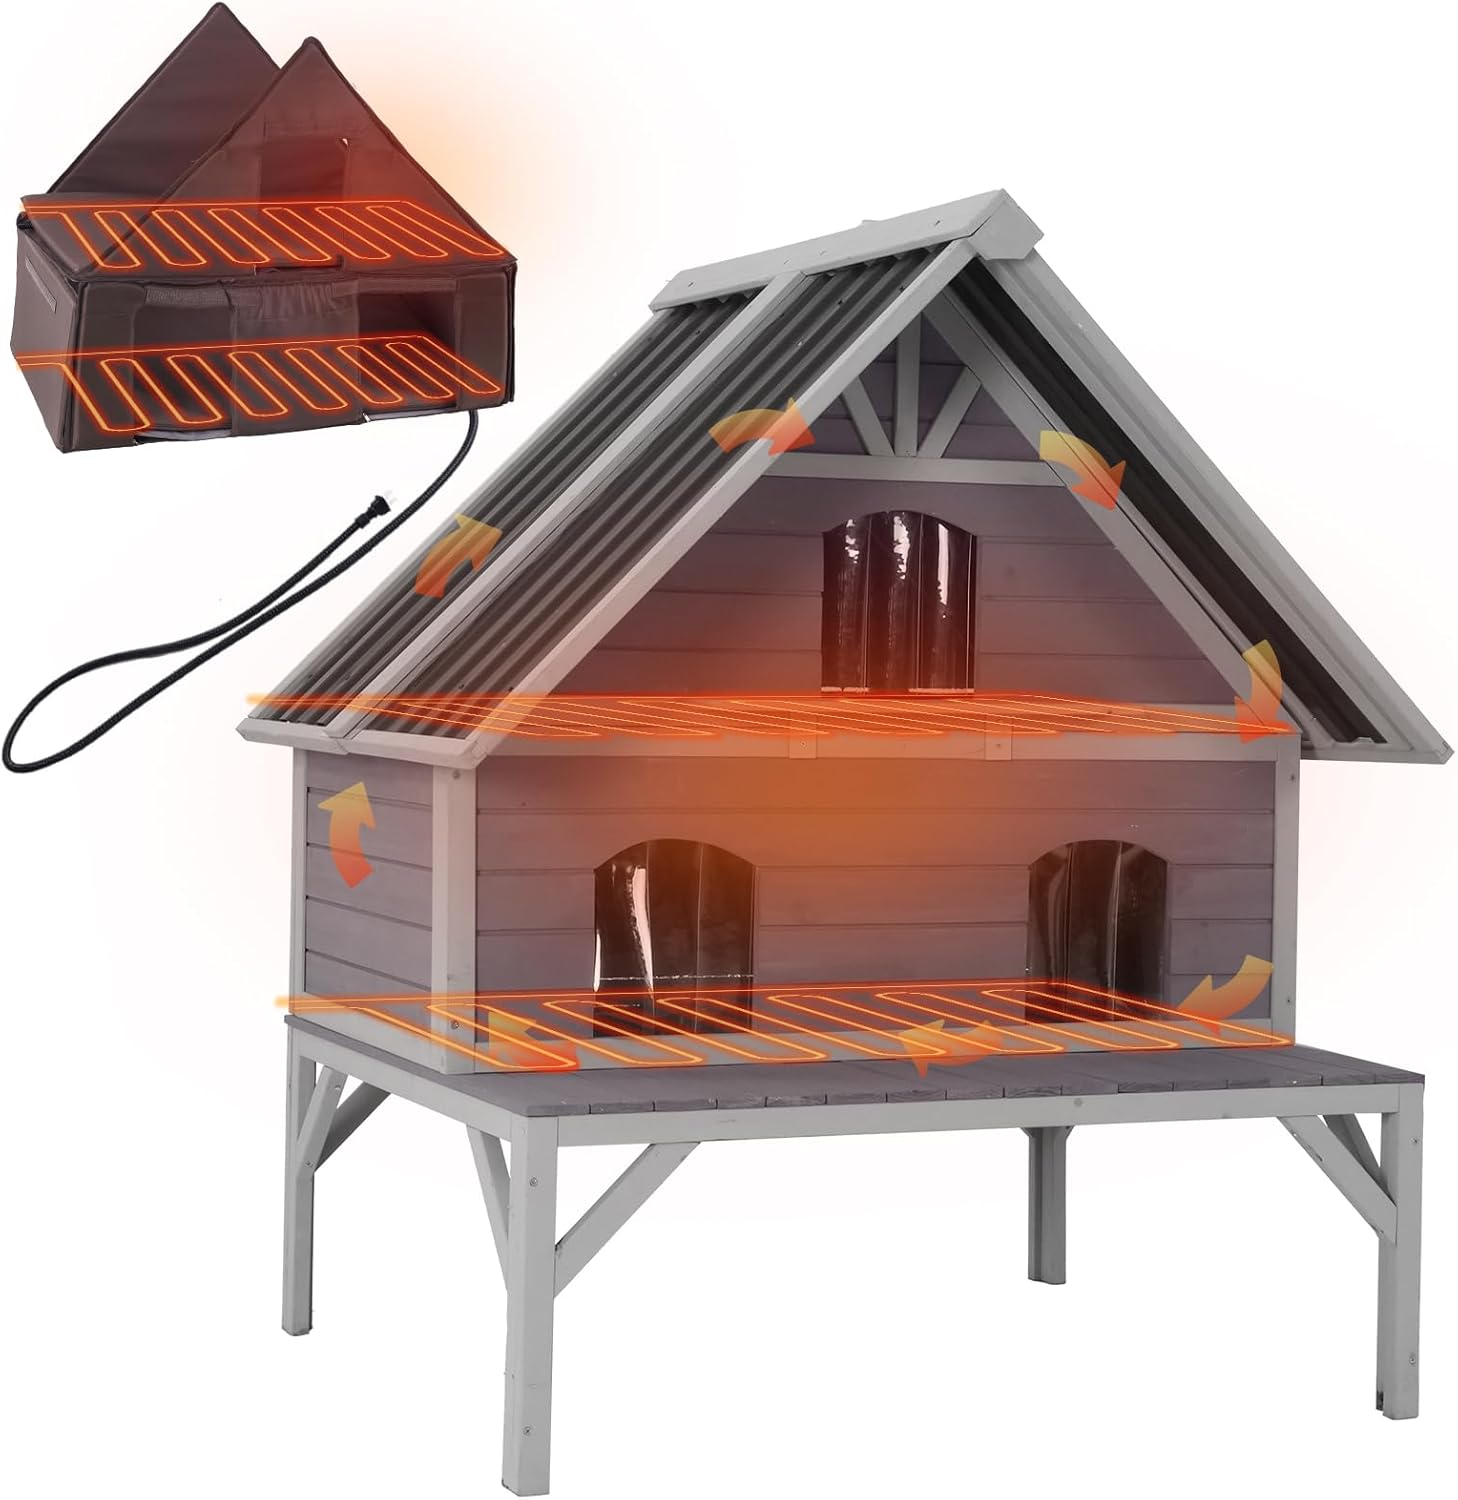
Image: The fully assembled two-story cat house, illustrating the integrated heating system.

Image: Dimensional diagram of the two-story cat house, highlighting the separate levels and access points.
5. Operating Instructions
The GUTINNEEN Heated Outdoor Cat House is designed for simple operation to provide continuous warmth for your pets.
- Power Connection: Once the house is assembled and placed in its desired location, plug the heating pad's chew-resistant cord into a suitable outdoor-rated electrical outlet.
- Automatic Heating: The heating pad features automatic temperature control, maintaining a comfortable range of 89–116°F. It will activate and regulate heat as needed without manual adjustment.
- Entry and Exit: The three PVC strip doors allow cats easy entry and exit while minimizing heat loss. The two separate levels provide ample space for multiple cats or for a single cat to choose their preferred resting spot.
- Optional Bedding: For enhanced comfort and insulation, you may add straw bedding inside the house. Straw is recommended for its insulating properties and moisture absorption, and it is compatible with the heating pad.

Image: The PVC curtain doors provide protection from weather while allowing easy access for cats.

Image: Applying straw bedding can further enhance insulation and comfort for pets inside the heated cat house.
6. Maintenance
Regular maintenance will ensure the longevity and continued effectiveness of your GUTINNEEN Heated Outdoor Cat House.
- Cleaning: The cat house features large rear doors and a raised waterproof base for easy cleaning access. Regularly remove any soiled bedding and clean the interior surfaces with a pet-safe cleaner. Ensure the house is dry before re-inserting the heating pad and liner.
- Heating Pad Care: Disconnect the heating pad from power before cleaning. Wipe the pad with a damp cloth and mild soap if necessary. Do not immerse the heating pad in water.
- Structural Inspection: Periodically check the wooden structure for any signs of wear, damage, or loose fasteners. Tighten screws as needed.
- Weatherproofing: The house is constructed from solid fir wood and features a weatherproof plastic roof. While designed for outdoor use, consider applying a pet-safe wood sealant annually to further protect the wood from prolonged exposure to elements.
- Cord Inspection: Regularly inspect the power cord for any cuts, fraying, or damage. If damage is found, discontinue use immediately and replace the heating pad if possible, or contact customer support.
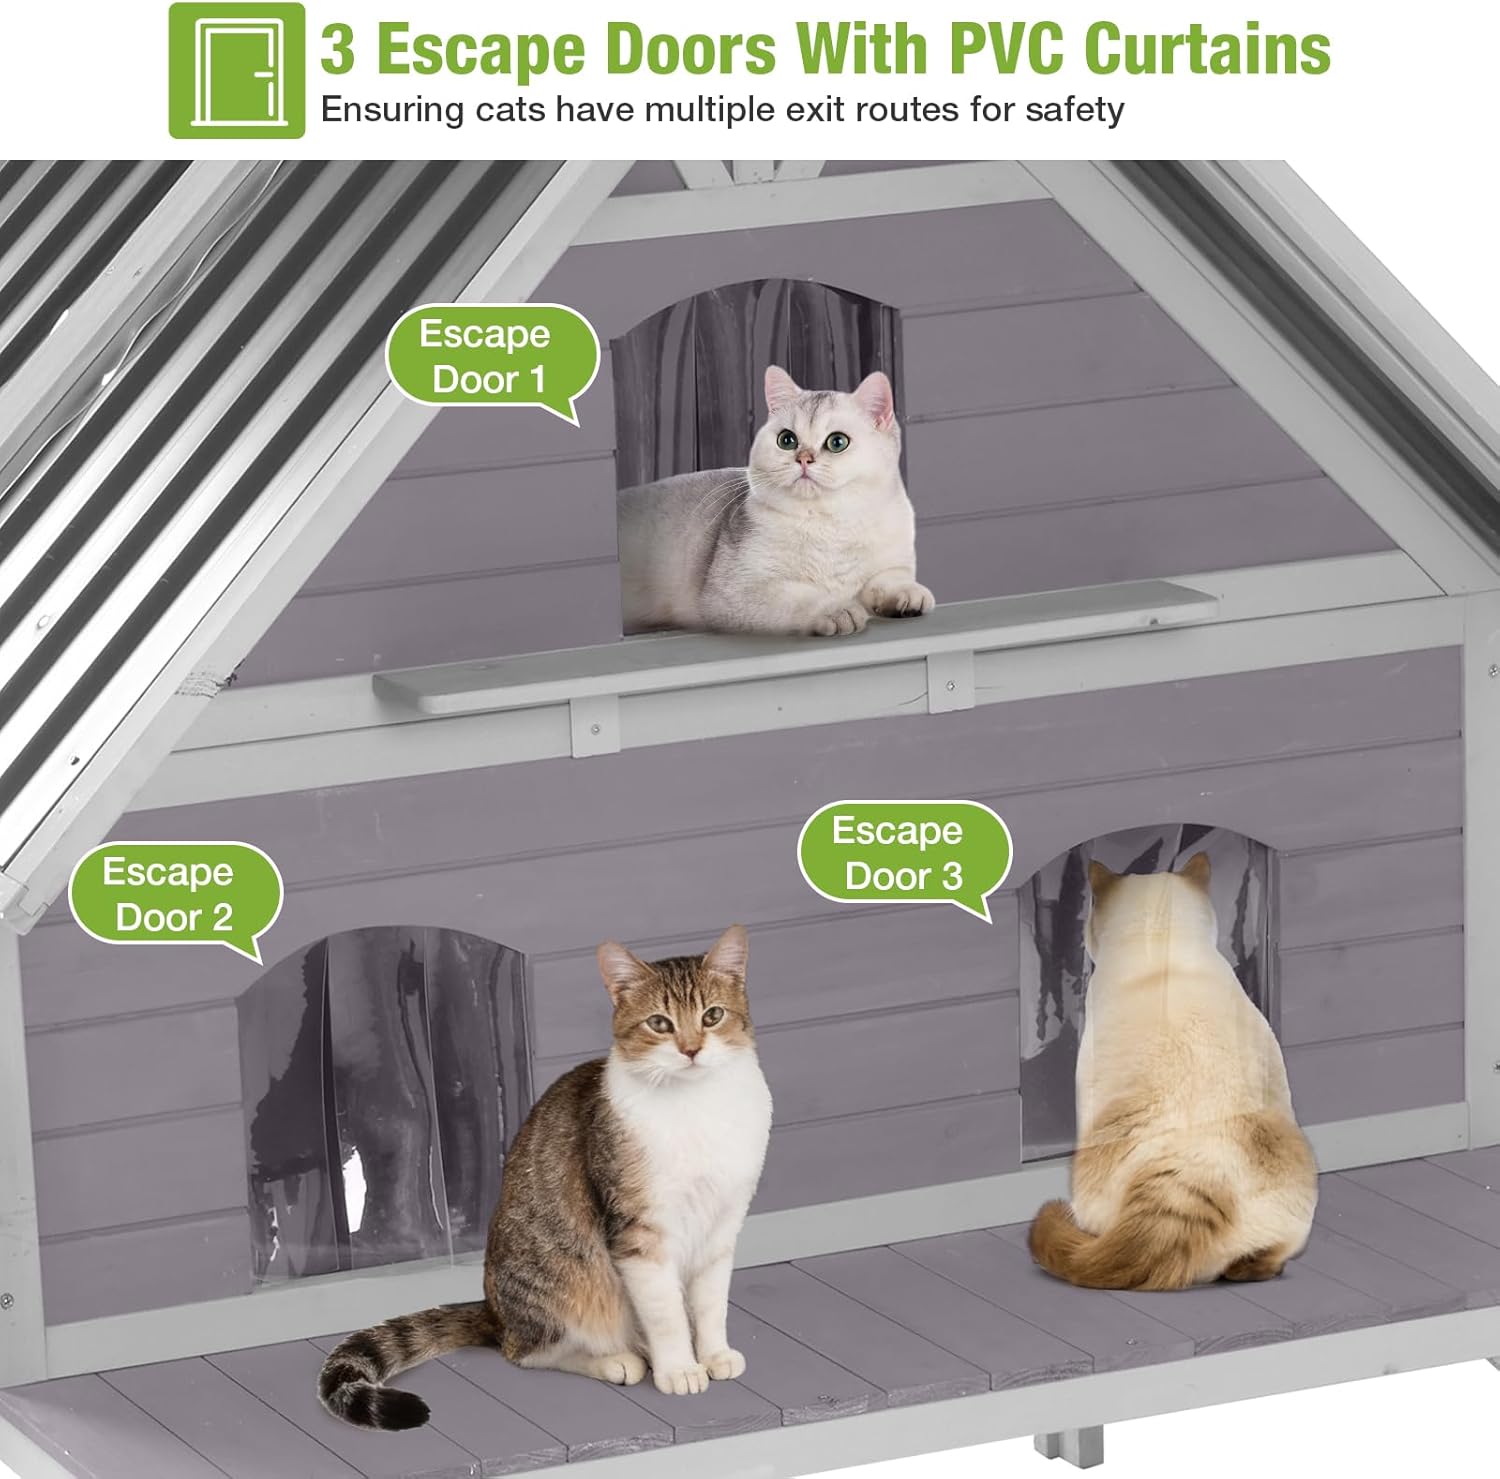
Image: The openable back doors provide convenient access for cleaning the interior of the cat house.

Image: The durable weatherproof plastic roof provides protection against rain, snow, and sun.
7. Troubleshooting
If you encounter issues with your GUTINNEEN Heated Outdoor Cat House, refer to the following common problems and solutions:
| Problem | Possible Cause | Solution |
|---|---|---|
| Heating pad not warming up. | Not plugged in, power outage, faulty outlet, damaged cord, heating pad malfunction. | Ensure the heating pad is securely plugged into a working outdoor-rated outlet. Check your circuit breaker. Inspect the cord for damage. If the cord is damaged, discontinue use. If the issue persists, contact customer support. |
| Cat not using the house. | Unfamiliarity, house location, strong odors, other animals. | Place familiar bedding or a favorite toy inside. Ensure the house is in a quiet, safe location. Allow time for the cat to adjust. Check for strong chemical odors from new materials; air out if necessary. Ensure no other animals are deterring the cat. |
| House feels cold despite heating pad. | Improper insulation installation, extreme weather, open doors. | Verify the insulated liner is correctly installed and covers all interior surfaces. Ensure PVC strip doors are in place. Consider placing the house in a more sheltered spot during extreme cold. |
| Structural instability. | Loose fasteners, uneven ground. | Check and tighten all screws and bolts. Ensure the cat house is placed on a flat, stable surface. |
If you experience a problem not listed here, or if the suggested solutions do not resolve the issue, please contact GUTINNEEN customer support.
8. Specifications
| Feature | Detail |
|---|---|
| Model | AIR7034-IN-HP |
| Dimensions (L x W x H) | 43.32" x 33.07" x 48.5" |
| Material | Fir Wood |
| Color | Grey |
| Levels | 2 Separate Levels |
| Heating Pad | UL-tested, Automatic Temperature Control (89–116°F), Overheat Protection, 6.5 ft Chew-Resistant Cord |
| Insulation | 6-sided Insulated Liner, 0.78" thick, Flame-Retardant Sponge |
| Doors | 3 PVC Strip Escape Doors, Large Rear Doors for Cleaning |
| Target Audience | Cats |
| Usage | Indoor, Outdoor |
9. Warranty Information
The GUTINNEEN Heated Outdoor Cat House, Model AIR7034-IN-HP, comes with a 2-year warranty. This warranty covers manufacturing defects and issues arising from normal use. Please retain your proof of purchase for warranty claims. For specific terms and conditions, refer to the warranty documentation included with your product or contact customer support.
10. Customer Support
For any questions, concerns, or assistance with your GUTINNEEN Heated Outdoor Cat House, please contact our customer support team. Refer to the contact information provided in your product packaging or visit the official GUTINNEEN website for support options.
Note on Videos: No official product videos were available for embedding based on the provided data.