TRYX L-P0CL-DS0M-G0K
TRYX Panorama WB CPU Water Block Instruction Manual
Model: L-P0CL-DS0M-G0K
Introduction
This manual provides detailed instructions for the installation, operation, and maintenance of your TRYX Panorama WB CPU Water Block. Designed for custom liquid cooling systems, this water block features a 6.67-inch 2K AMOLED display, microchannel fins, a copper base, and an integrated VRM fan to ensure optimal thermal performance and visual customization. Please read this manual thoroughly before installation and use.
What's in the Box
Verify that all components listed below are present in your package.
- CPU Water Block
- AMD/Intel Mounting Brackets
- Thermal Paste (α-01)
- 90° Rotary Fittings
- Installation Manual
- Accessories (screws, springs, etc.)

Image: Contents of the TRYX Panorama WB package.
Setup and Installation
Follow these steps carefully to install the TRYX Panorama WB CPU Water Block into your custom liquid cooling system. Ensure your system is powered off and disconnected from the mains before beginning.
1. Prepare Your CPU and Motherboard
- Remove any existing CPU cooler.
- Clean the CPU surface thoroughly with isopropyl alcohol to remove old thermal paste.
- Install the appropriate backplate and mounting standoffs for your CPU socket (Intel LGA 1851/1700/1200/115x or AMD AM4/AM5). Refer to your motherboard manual for specific backplate installation if needed.
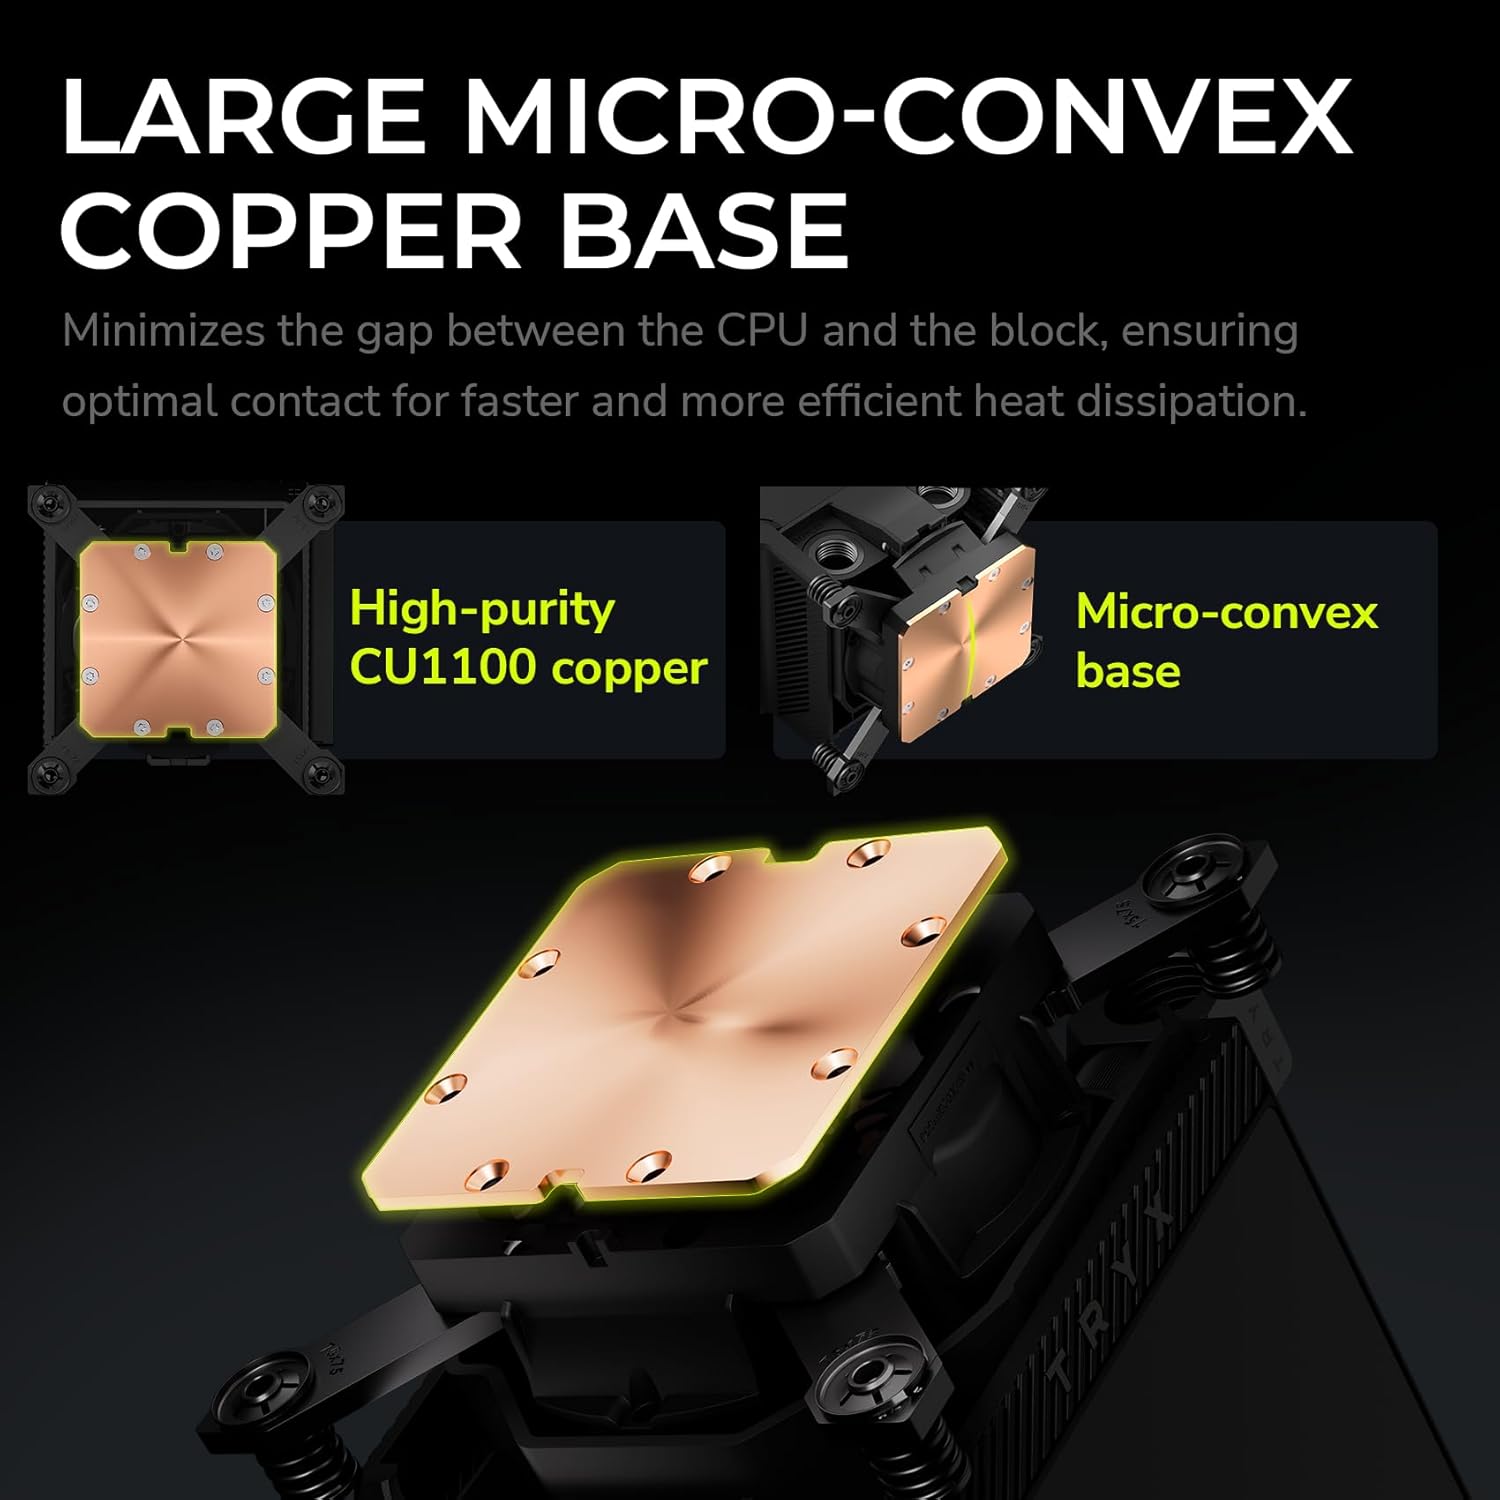
Image: Exploded view of the water block components, including mounting hardware.
2. Apply Thermal Paste
Apply a small amount of the provided thermal paste (α-01) to the center of your CPU's integrated heat spreader (IHS). A pea-sized dot is generally sufficient. The pressure from the water block will spread it evenly.

Image: Detail of the water block's copper base, designed for efficient heat transfer.
3. Mount the Water Block
- Carefully align the water block over the CPU and mounting standoffs.
- Place the adjustable mounting bracket over the water block.
- Secure the water block using the provided screws, tightening them in a diagonal pattern until snug. Avoid overtightening.
4. Connect to Your Liquid Cooling Loop
The TRYX Panorama WB features G1/4" threaded outlets for compatibility with standard liquid cooling components.
- Install the included 90° rotary fittings or your preferred G1/4" fittings into the water block's ports. Ensure a secure, leak-free connection.
- Connect your tubing to the fittings, ensuring proper flow direction within your custom loop.

Image: Detail of the 90° rotary fittings and G1/4" threaded ports for loop integration.

Image: The 90° rotary adapter fitting, highlighting its 360° rotation capability.
5. Power Connections
Connect the necessary cables from the water block to your motherboard or power supply. This typically includes a USB header for display and software control, and a fan header for the integrated VRM fan.
Operating Instructions
The 2K AMOLED Display
The TRYX Panorama WB features a vibrant 6.67-inch 2K AMOLED display operating at 60Hz. This display can show system information, custom images, and videos.

Image: The 6.67-inch curved AMOLED display showcasing its visual capabilities.

Image: Explanation of the triple-layer screen technology for optimal display quality.
KANALI Software Hub
The KANALI Software Hub is your control center for the Panorama WB. It allows for extensive customization of the display and monitoring of system parameters.
- System Monitoring: View real-time CPU temperature, frequency, usage, GPU temperature, and more.
- Content Customization: Upload custom images (PNG, JPG, GIF) and videos (MP4, AVI) up to 1080P and 500MB.
- Split-Screen Functionality: Display different content on separate sections of the screen simultaneously.
- Anamorphic Effects: Apply various visual effects to your content.
- VRM Fan Control: Adjust the speed of the integrated VRM fan.
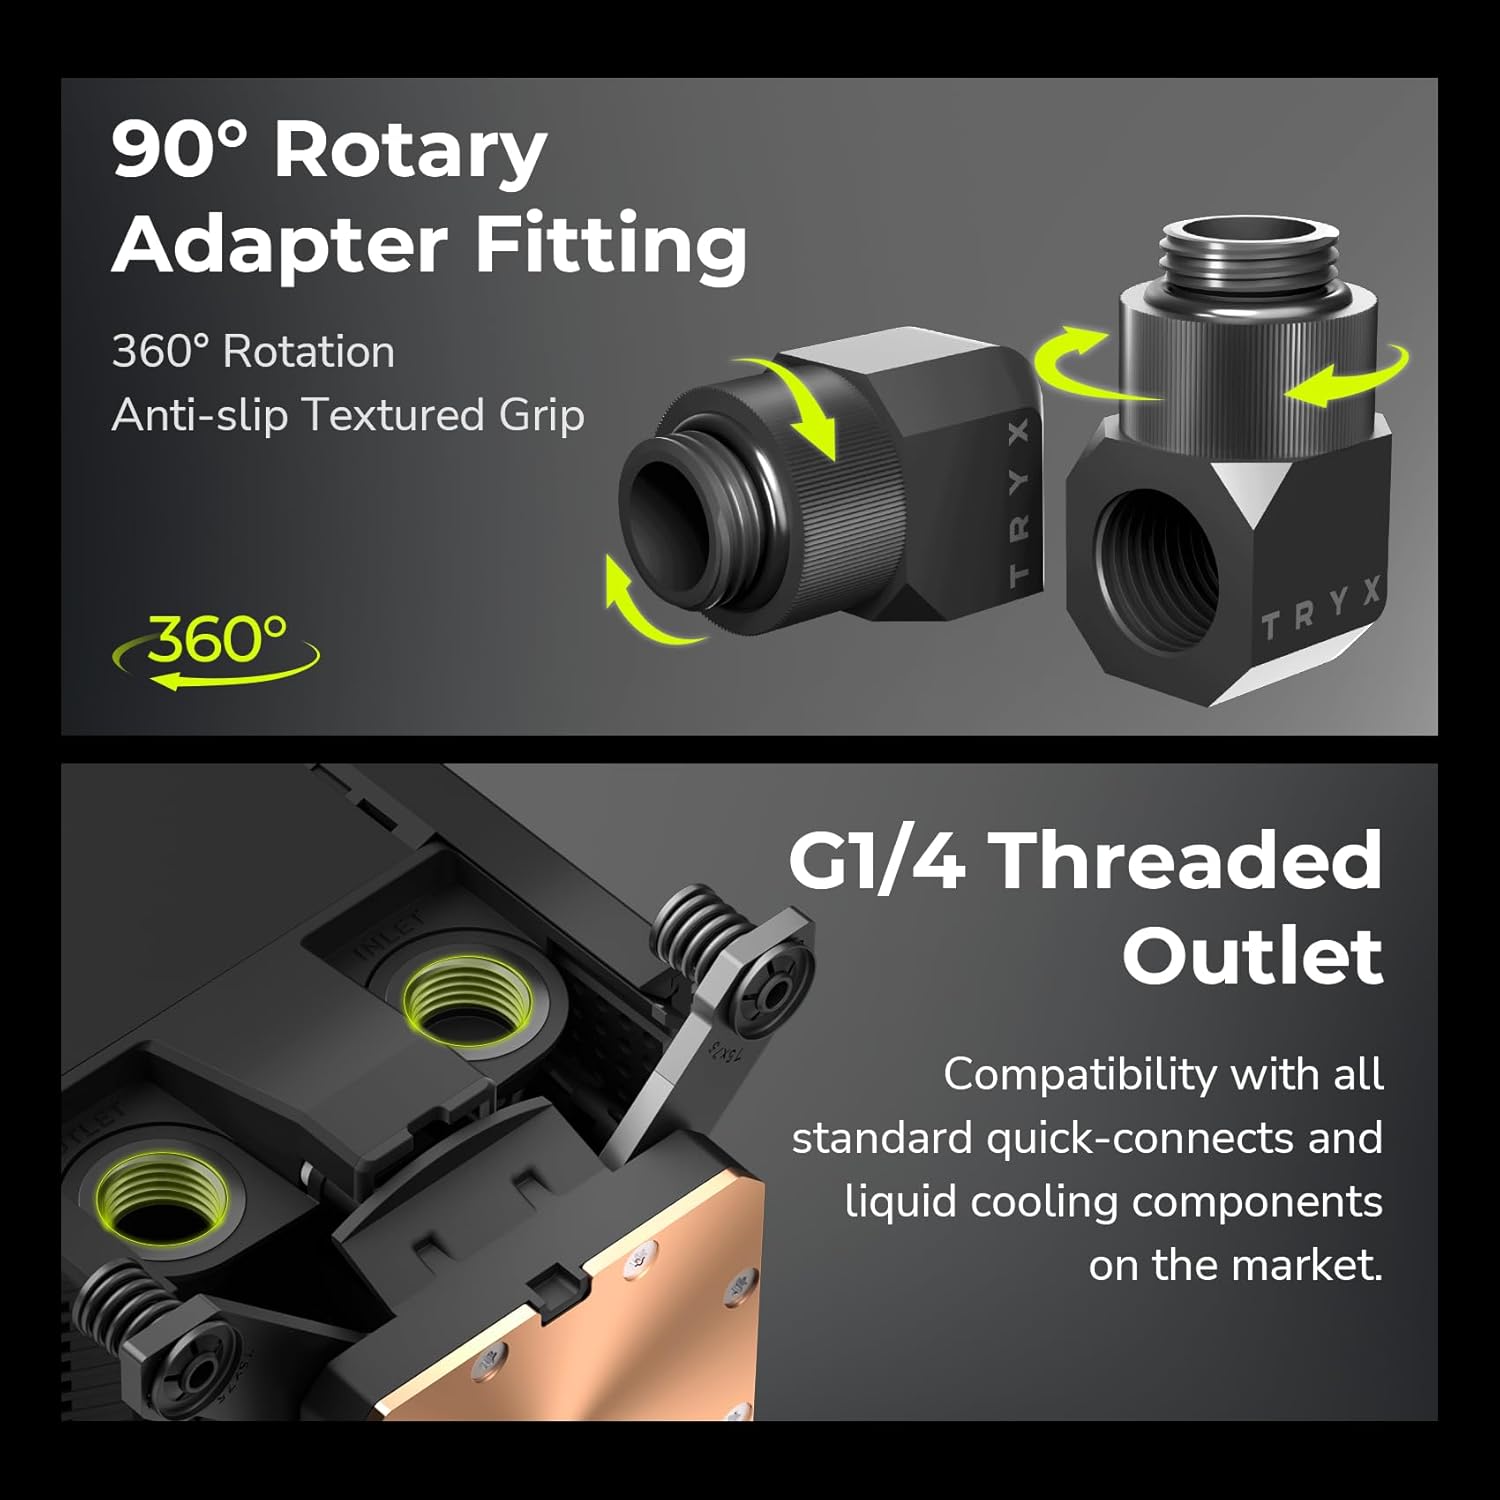
Image: KANALI software interface displaying system information options.

Image: Overview of the KANALI Software Hub for display configuration and system monitoring.

Image: The split-screen display feature in action, showing different content simultaneously.

Image: KANALI's content library options, including preloaded 3D content and custom upload.
Integrated VRM Fan
The integrated VRM fan provides additional cooling to your motherboard's Voltage Regulator Modules (VRMs), contributing to system stability, especially during overclocking. Control the fan speed via the KANALI software.

Image: The integrated VRM fan and its adjustable settings in KANALI software.
Maintenance
Regular maintenance ensures the longevity and optimal performance of your TRYX Panorama WB.
- Display Cleaning: Gently wipe the AMOLED display with a soft, lint-free cloth. For stubborn smudges, use a screen-safe cleaning solution. Avoid abrasive materials.
- Coolant System Check: Periodically inspect your liquid cooling loop for any signs of leaks, kinks in tubing, or coolant discoloration. Address any issues promptly.
- Coolant Replacement: Follow the recommendations of your coolant manufacturer for replacement intervals.
- Dust Removal: Use compressed air to clear any dust accumulation around the VRM fan and water block fins to maintain airflow.
Troubleshooting
If you encounter issues with your TRYX Panorama WB, refer to the following common problems and solutions.
| Problem | Possible Cause | Solution |
|---|---|---|
| Display is blank or not showing content. |
|
|
| High CPU temperatures. |
|
|
| VRM fan is noisy or not spinning. |
|
|
| Software (KANALI) not detecting the device. |
|
|
Specifications
| Feature | Detail |
|---|---|
| Product Dimensions | 9.1"L x 6.1"W x 6.1"H |
| Brand | TRYX |
| Power Connector Type | 4-Pin |
| Voltage | 12 Volts (DC) |
| Cooling Method | Water |
| Compatible Devices | CPU |
| Noise Level | 22 Decibels |
| Material | Aluminum, Copper, Polybutylene Terephthalate |
| Maximum Rotational Speed (VRM Fan) | 3300 RPM |
| Air Flow Capacity (VRM Fan) | 17.4 Cubic Feet Per Minute |
| Item Weight | 2.62 pounds |
| Model Number | L-P0CL-DS0M-G0K |
| Display Type | 6.67-inch Curved 2K AMOLED |
| Display Refresh Rate | 60Hz |
| Fittings | G1/4" Threaded Outlet, 90° Rotary Fittings |
| CPU Socket Compatibility | Intel LGA 1851/1700/1200/115x, AMD AM4/AM5 |
Product Overview Video
Watch this official video for a visual overview of the TRYX Panorama WB CPU Water Block's features and aesthetics.
Video: Official product overview of the TRYX Panorama WB CPU Water Block, demonstrating its design and display features.
Warranty and Support
For detailed warranty information, technical support, or to contact customer service, please visit the official TRYX website or refer to the warranty card included with your product.
Ask a question about this manual
Ask about setup, troubleshooting, compatibility, parts, safety, or missing instructions. Manuals+ will review the question and use this page’s manual context to help answer it.