1. Introduction
This manual provides detailed instructions for the assembly, operation, and maintenance of your AsiaHorse Pegasus Micro ATX PC Case. Please read this manual thoroughly before beginning installation to ensure proper setup and to maximize the performance and longevity of your system. The Pegasus case is designed for Micro ATX and ITX motherboards, featuring a dual-chamber design, 270-degree panoramic tempered glass, and optimized airflow for efficient cooling.
2. Safety Information
- Always disconnect the power supply from the wall outlet before installing or servicing any components inside the PC case.
- Handle tempered glass panels with care. Although durable, they can break if dropped or subjected to sharp impacts.
- Wear anti-static gloves or use an anti-static wrist strap when handling internal components to prevent electrostatic discharge (ESD) damage.
- Keep small parts and screws away from children.
- Ensure all cables are routed properly and do not obstruct fan blades or airflow paths.
3. Package Contents
Verify that all components are present before proceeding with installation:
- AsiaHorse Pegasus Micro ATX PC Case (White)
- Accessory Box (containing screws, standoffs, cable ties, etc.)
- User Manual (this document)
Note: Fans and other PC components are not included and must be purchased separately.
4. Setup and Installation
Follow these steps for assembling your PC within the AsiaHorse Pegasus case.
4.1 Preparing the Case
- Place the case on a flat, stable surface.
- Remove the tempered glass side panel by unscrewing the thumb screws at the rear of the case. Gently slide the panel off and set it aside on a soft, non-abrasive surface.
- Remove the rear panel and any other panels as needed for easier access during installation. The case features a mortise and tenon structure for swift assembly and disassembly.
4.2 Motherboard Installation
The Pegasus case supports Micro ATX and ITX motherboards.
- Install the necessary standoffs for your motherboard form factor.
- Carefully place your motherboard into the case, aligning it with the standoffs and the I/O shield opening.
- Secure the motherboard with screws.
4.3 Power Supply Unit (PSU) Installation
The case supports PSUs up to 200mm in length and features a bottom mount design.
- Mount your PSU into its designated compartment, typically at the rear bottom of the case.
- Secure the PSU with screws.
- Route the necessary power cables through the cable management cutouts to the main chamber. The ultra-sized rear cavity provides ample space for cable management and improved heat dissipation.
4.4 Storage Drive Installation
The case supports 2x 3.5" HDDs and 3x 2.5" SSDs.
- Locate the drive bays/mounts, typically in the rear chamber.
- Install your HDDs and SSDs into the appropriate mounts and secure them with screws.
4.5 Graphics Card (GPU) Installation
The case accommodates GPUs up to 400mm (L) x 180mm (H) with 4 horizontal PCIe slots.
- Remove the necessary PCIe slot covers from the rear of the case.
- Insert your GPU into the PCIe slot on the motherboard and secure it with a screw or latch.
4.6 Cooling System Installation (Fans & Radiators)
The case offers extensive cooling support:
- Fan Support: 9 total mounts (Top x3, Bottom x3, Side x2, Back x1).
- Radiator Support: Top (360mm/240mm), Side (240mm/120mm).
Water Cooling Installation Reminder:
When installing water cooling at the top of the case, ensure the combined thickness of the water cooling unit and fan does not exceed 52mm. If the thickness exceeds 52mm, install the motherboard and CPU power cable in advance, then fit the water cooling last to avoid wiring difficulties.

Figure 4.6.1: Powerful Space Layout for Components

Figure 4.6.2: Mortise and Tenon Structure for Easy Access

Figure 4.6.3: Ultra-Sized Rear Cavity for Cable Management
Video 4.6.1: AsiaHorse Pegasus PC Case Assembly Demo. This video demonstrates the assembly process for the Pegasus PC case, including component installation.
Video 4.6.2: AsiaHorse Pegasus Micro ATX PC Case Overview. This video provides a general overview of the case features, including cooling support and internal layout.
Video 4.6.3: AsiaHorse MATX PC Case Dimensions and Cooling. This video highlights the dimensions and cooling capabilities of the AsiaHorse MATX PC case.
5. Operating the PC Case
Once all components are installed and secured, reattach all panels. Connect your peripherals and power cable to the PSU. The front I/O panel provides convenient access to essential ports.
5.1 Front I/O Panel
The front I/O panel includes:
- 1x USB 3.0 port (for fast data transfer)
- 1x USB 2.0 port (for mouse/keyboard or other peripherals)
- 1x Type-C 3.2 port (for faster transfer speeds and stronger compatibility)
- 1x HD Audio port (for headphones/microphone)
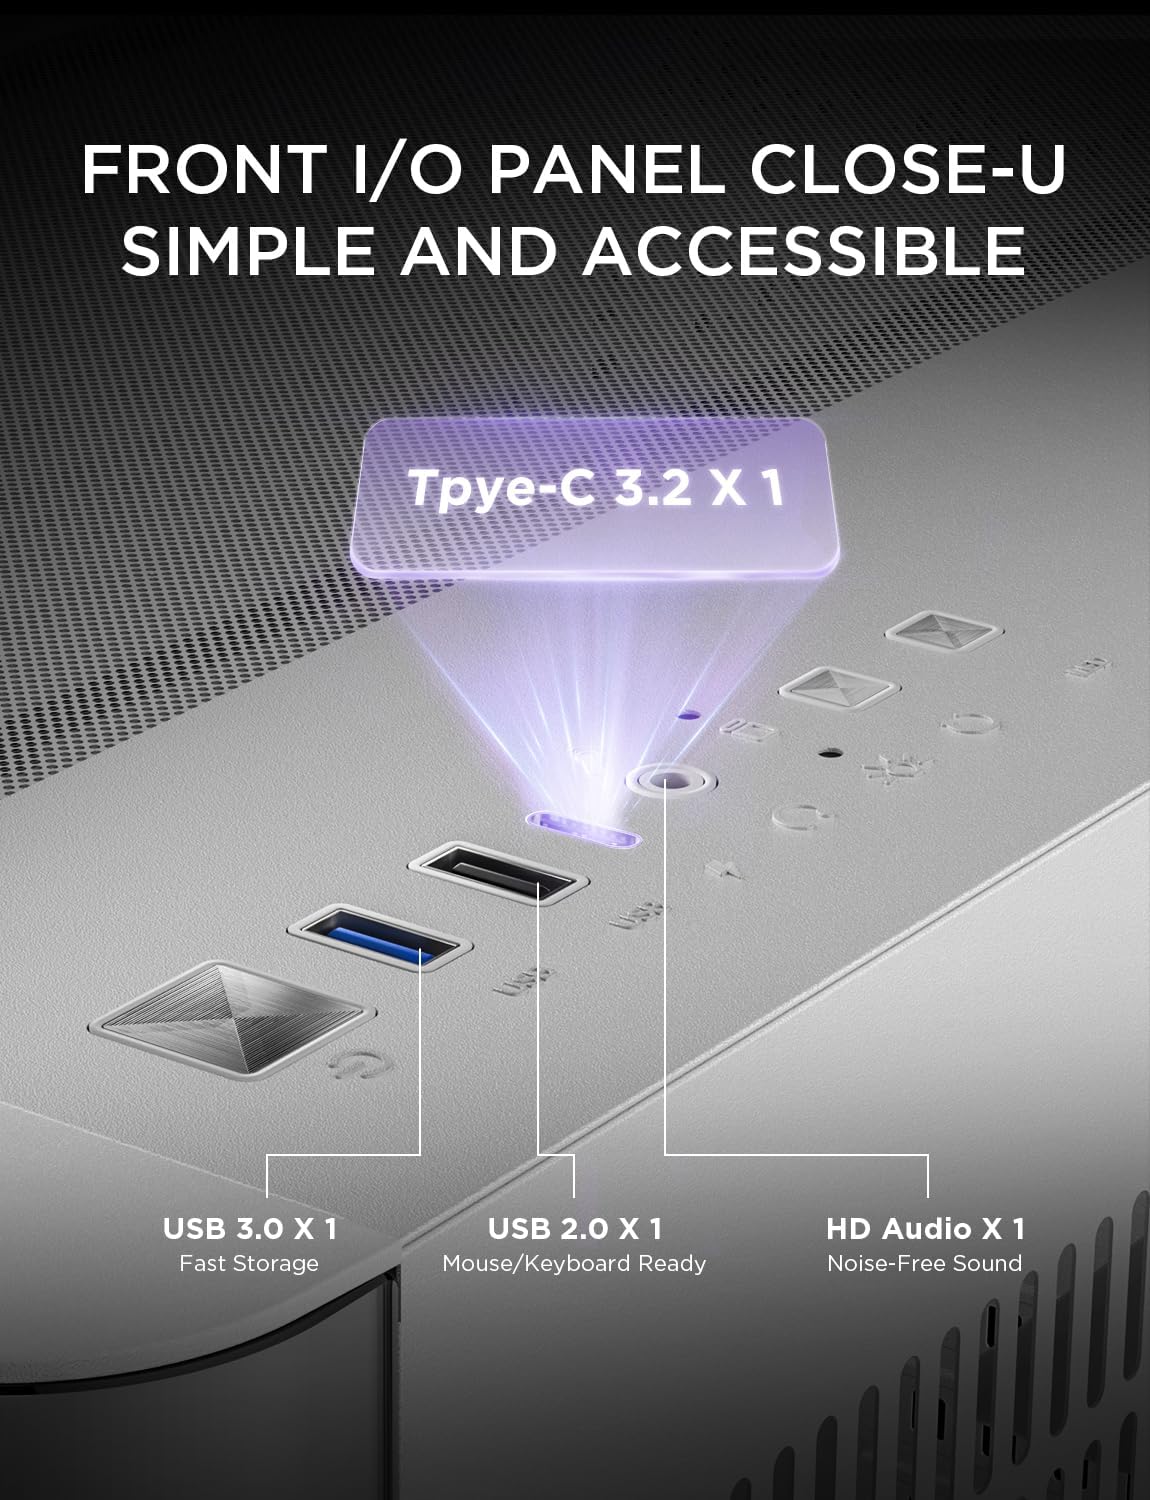
Figure 5.1.1: Front I/O Panel
6. Maintenance
Regular maintenance helps ensure optimal performance and extends the lifespan of your PC components.
6.1 Dust Filters
The AsiaHorse Pegasus case features multiple dust-proof designs to keep your PC spotless:
- Magnetic Dust Filter: Located on the top panel for easy removal and cleaning.
- Pull-Out Bottom Dust Filter: Easily accessible for cleaning without disassembling the case.
Clean dust filters regularly (e.g., monthly) to maintain optimal airflow and prevent dust buildup inside the case.

Figure 6.1.1: Dust Filter Locations and Easy Removal
6.2 Tempered Glass Cleaning
Use a soft, lint-free cloth and a mild glass cleaner (or water) to clean the tempered glass panels. Avoid abrasive cleaners or materials that could scratch the glass.
7. Troubleshooting
If you encounter issues with your PC build, consider the following common troubleshooting steps:
- No Power: Ensure all power cables (PSU to wall, PSU to motherboard, GPU, drives) are securely connected. Check the power switch on the PSU.
- Fans Not Spinning: Verify fan headers are correctly connected to the motherboard or fan controller. Check BIOS settings for fan control.
- No Display: Ensure the monitor cable is connected to the graphics card (not the motherboard I/O unless using integrated graphics). Reseat the graphics card and RAM modules.
- Overheating: Check fan orientation for proper airflow (intake/exhaust). Ensure dust filters are clean and not obstructed. Verify CPU cooler and GPU cooler are properly seated and functioning.
- Front I/O Ports Not Working: Check that the front panel connectors (USB, audio) are correctly plugged into the motherboard headers.
For more complex issues, consult the manuals for your individual PC components (motherboard, GPU, PSU) or seek professional assistance.
8. Specifications
| Feature | Specification |
|---|---|
| Brand | AsiaHorse |
| Model Name | Pegasus-White |
| Case Type | Mid Tower |
| Motherboard Compatibility | Micro ATX, ITX |
| Dimensions (D x W x H) | 17.83"D x 11.02"W x 14.84"H (453mm x 280mm x 377mm) |
| Material | Alloy Steel (SPCC), Tempered Glass |
| Item Weight | 15.21 Pounds |
| Max GPU Length | 400mm |
| Max GPU Height | 180mm (with 4 horizontal PCIe slots) |
| Max CPU Cooler Height | 157mm |
| Max PSU Length | 200mm |
| Drive Bays | 2x 3.5" HDD, 3x 2.5" SSD |
| Fan Support | Top: 3x 120mm, Bottom: 3x 120mm, Side: 2x 120mm, Back: 1x 120mm (Total 9 mounts) |
| Radiator Support | Top: 360mm/240mm, Side: 240mm/120mm |
| Front I/O Ports | 1x USB 3.0, 1x USB 2.0, 1x Type-C 3.2, 1x HD Audio |
| Special Features | 270° Curved Panoramic Glass, Dual Chamber Design, Optimized Airflow, Tool-free Panels, Multiple Dust Filters |
9. Warranty and Support
9.1 Warranty Information
The AsiaHorse Pegasus Micro ATX PC Case comes with a 3-year warranty from the date of purchase. This warranty covers manufacturing defects and ensures the product meets specified quality standards. Please retain your proof of purchase for warranty claims.
9.2 Customer Support
For technical assistance, warranty claims, or any questions regarding your AsiaHorse Pegasus PC Case, please contact AsiaHorse customer support through their official website or the retailer where the product was purchased. Provide your model number (Pegasus) and proof of purchase for efficient service.


