1. Introduction
This user manual provides comprehensive instructions for the NICGIGA 10-Port 10Gbps Unmanaged Ethernet Switch, Model S25-0802T. It covers product features, installation, operation, and troubleshooting to ensure optimal performance and longevity of your device. Please read this manual thoroughly before using the switch.
2. Product Overview
The NICGIGA S25-0802T is an unmanaged Ethernet switch designed to expand your network capabilities with high-speed connectivity. It features a durable metal casing and a fanless design for quiet operation.
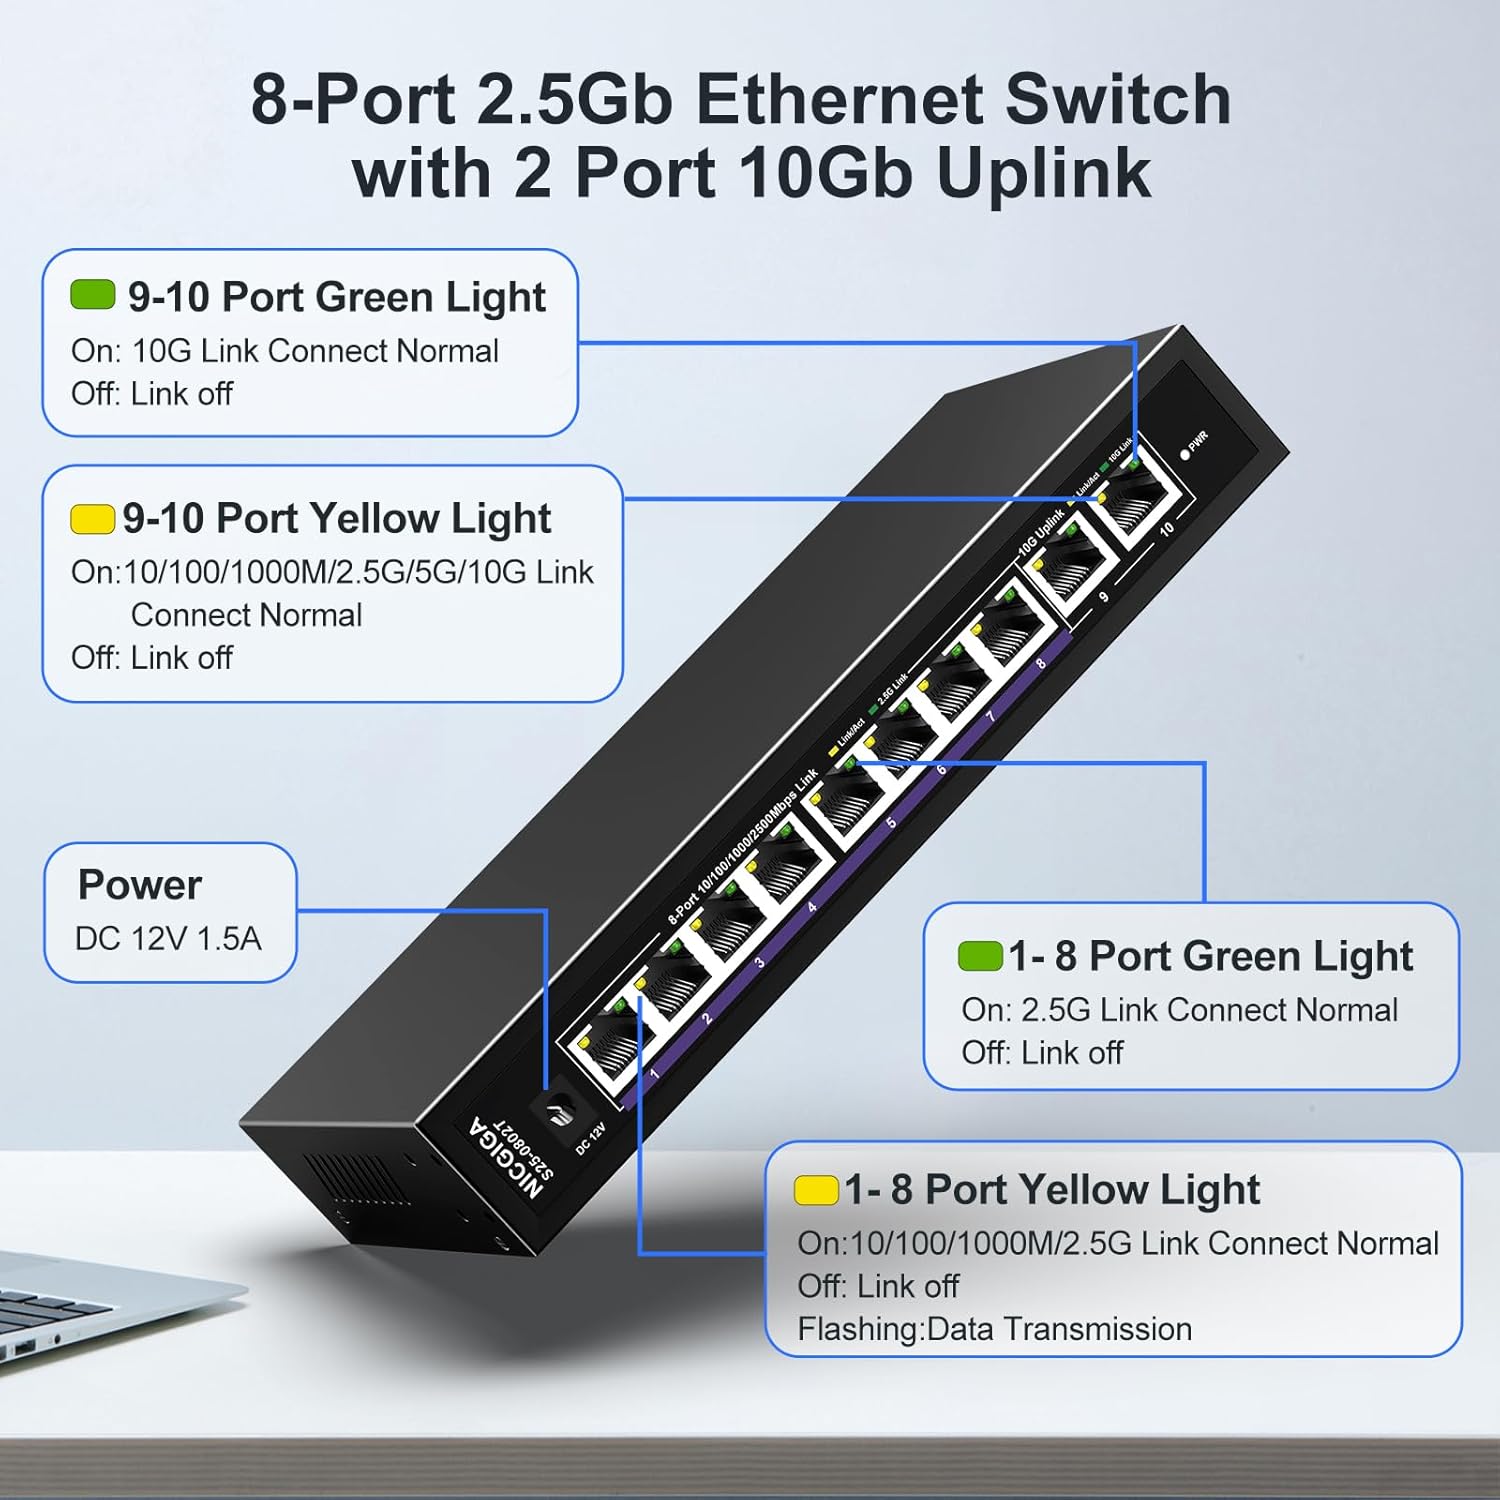
- Port Configuration: 8 x 2.5Gb Base-T RJ45 ports and 2 x 10Gb RJ45 uplink ports.
- Speed Compatibility: Ports 1-8 support 2.5G/1G/100Mbps. Ports 9-10 support 10G/5G/2.5G/1G/100Mbps.
- Auto MDI/MDIX: Automatically detects and adjusts for straight-through or crossover cables.
- Plug and Play: No software configuration required for operation.
- High Switching Capacity: Up to 60Gbps.
- Thermal Design: Fanless for silent operation, with double-sided cooling holes and a metal case for efficient heat dissipation.
- Mounting Options: Supports desktop placement and wall mounting.

3. Package Contents
Verify that all items are present in the package:
- NICGIGA 10-Port Unmanaged Ethernet Switch (Model: S25-0802T)
- Power Adapter (DC 12V 1.5A)
- User Manual (this document)
4. Setup Instructions
The NICGIGA S25-0802T switch is designed for simple plug-and-play operation. No software installation or complex configuration is required.
- Power Connection: Connect the included DC 12V 1.5A power adapter to the switch's power input port and then to a power outlet. The Power LED on the switch will illuminate.
- Network Device Connection: Connect your network devices (e.g., computers, NAS, routers, access points) to any of the RJ45 ports (1-10) on the switch using standard Ethernet cables.
- Verify Connection: Once connected, the corresponding Link/Act LEDs for each port will illuminate, indicating an active connection.

5. Operating Instructions
The switch operates automatically once powered on and devices are connected. It supports auto-negotiation for speed and duplex mode, and auto MDI/MDIX for cable type detection.
- Automatic Speed Detection: The switch ports automatically detect the speed of the connected device (100Mbps, 1Gbps, 2.5Gbps, 5Gbps, or 10Gbps) and adjust accordingly.
- Full Duplex Operation: All ports support full-duplex mode for maximum data throughput.
- Non-Blocking Architecture: The switch provides full wire-speed forwarding on all ports, ensuring efficient data transfer without bottlenecks.

6. Installation
The NICGIGA S25-0802T switch offers flexible installation options:
- Desktop Placement: Place the switch on a flat, stable surface. Ensure adequate ventilation around the device.
- Wall Mount: The switch can be mounted on a wall using appropriate screws (not included) and the mounting slots on the underside of the device. Ensure the mounting surface is sturdy enough to support the switch's weight.


7. LED Indicators
The switch features LED indicators to provide real-time status information for each port and the device itself.
| Indicator | Status | Description |
|---|---|---|
| Power | On | The switch is powered on. |
| Ports 1-8 Green Light | On | 2.5G Link Connect Normal. |
| Off | Link off. | |
| Ports 1-8 Yellow Light | On | 10/100/1000M/2.5G Link Connect Normal. |
| Flashing | Data Transmission. | |
| Off | Link off. | |
| Ports 9-10 Green Light | On | 10G Link Connect Normal. |
| Off | Link off. | |
| Ports 9-10 Yellow Light | On | 10/100/1000M/2.5G/5G/10G Link Connect Normal. |
| Flashing | Data Transmission. | |
| Off | Link off. |
8. Network Cable Compatibility
Using appropriate Ethernet cables is crucial for achieving optimal network speeds.
- For 2.5Gbps Ports (1-8):
- CAT5e Cable (≤100m)
- CAT6/6a Cable (≤100m)
- CAT7 Cable (≤100m)
- For 10Gbps Ports (9-10):
- CAT6 Cable (≤55m)
- CAT6a Cable (≤100m)
- CAT7 Cable (≤100m)


9. Specifications
| Feature | Detail |
|---|---|
| Model Number | S25-0802T |
| Number of Ports | 10 (8 x 2.5Gb RJ45, 2 x 10Gb RJ45) |
| Interface Type | RJ45 |
| Data Transfer Rate | 60 Gigabits Per Second (Switching Capacity) |
| Upper Temperature Rating | 50 Degrees Celsius |
| Item Weight | 1.76 pounds |
| Package Dimensions | 9.8 x 9.61 x 2.99 inches |
| Color | Black |
| Compatible Devices | Desktop, Gaming Console, Laptop, Printer, Router |
| Manufacturer | NICGIGA |
10. Troubleshooting
If you encounter issues with your NICGIGA switch, refer to the following common troubleshooting steps:
- No Power:
- Ensure the power adapter is securely connected to the switch and a working power outlet.
- Verify the power outlet is functional.
- No Link Light:
- Check if the Ethernet cable is securely connected to both the switch port and the network device.
- Try a different Ethernet cable.
- Ensure the connected device is powered on and its network adapter is enabled.
- Verify the cable type is appropriate for the desired speed (refer to Section 8).
- Slow Network Speed:
- Ensure your network cables are rated for the desired speed (e.g., CAT6a or CAT7 for 10Gbps).
- Check the network adapter settings on your connected devices to ensure they are configured for auto-negotiation or the correct speed.
- Confirm that the connected devices themselves support the higher speeds (2.5Gbps or 10Gbps).
- Intermittent Connection:
- Inspect Ethernet cables for damage.
- Ensure the switch is placed in a well-ventilated area to prevent overheating, although its fanless design is optimized for heat dissipation.
- Avoid placing the switch near strong electromagnetic interference sources.
11. Maintenance
To ensure the longevity and optimal performance of your switch, follow these maintenance guidelines:
- Cleaning: Use a soft, dry cloth to clean the exterior of the switch. Do not use liquid or aerosol cleaners.
- Ventilation: Ensure that the ventilation holes on the sides of the switch are not obstructed to allow for proper heat dissipation.
- Environment: Operate the switch within its specified temperature range (-10~50°C) and humidity levels.
- Power Cycle: If the switch becomes unresponsive, disconnect the power adapter, wait for 10 seconds, and then reconnect it.

12. Warranty and Support
NICGIGA provides the following support for this product:
- Warranty: A one-year warranty is provided from the date of purchase.
- Technical Support: Lifetime technical support is available for the product.
For warranty claims or technical assistance, please contact NICGIGA customer support through the retailer where the product was purchased or visit the official NICGIGA website.