1. Introduction
Thank you for choosing the Nicebay Pet Grooming Vacuum Cleaner. This device is designed to provide an efficient and convenient solution for pet grooming and hair removal, combining vacuum suction with various grooming tools. Please read this manual thoroughly before operation to ensure proper use, maintenance, and safety.

Image 1.1: Nicebay Pet Grooming Vacuum Cleaner with included accessories.
This image displays the complete Nicebay Pet Grooming Vacuum Cleaner system, including the main vacuum unit, flexible hose, and all five interchangeable grooming tools: the electric trimmer, grooming comb, slicker comb, crevice tool, and cleaning brush. A small dog and cat are shown in the foreground, illustrating the product's intended use for various pets.
2. Safety Instructions
To reduce the risk of fire, electric shock, or injury, observe the following safety precautions:
- Read all instructions before using the appliance.
- Do not operate any appliance with a damaged cord or plug. If the appliance is not working as it should, has been dropped, damaged, left outdoors, or dropped into water, return it to a service center.
- Do not use outdoors or on wet surfaces.
- Do not allow to be used as a toy. Close attention is necessary when used by or near children.
- Use only as described in this manual. Use only manufacturer’s recommended attachments.
- Do not pull or carry by cord, use cord as a handle, close a door on cord, or pull cord around sharp edges or corners. Do not run appliance over cord. Keep cord away from heated surfaces.
- Do not unplug by pulling on cord. To unplug, grasp the plug, not the cord.
- Do not handle plug or appliance with wet hands.
- Turn off all controls before unplugging.
- Do not use to pick up flammable or combustible liquids, such as gasoline, or use in areas where they may be present.
- Do not pick up anything that is burning or smoking, such as cigarettes, matches, or hot ashes.
- Do not use without dust cup and/or filters in place.
- Store the appliance indoors. Put away after use to prevent accidents.
3. Package Contents
Verify that all items are present in the package:
- Main Vacuum Unit with Hose
- Electric Trimmer
- Grooming Comb
- Slicker Comb
- Crevice Tool
- Cleaning Brush
4. Product Features
The Nicebay Pet Grooming Vacuum Cleaner offers the following key features:
- Versatile 5-in-1 Accessory Kit: Includes an Electric Trimmer, Grooming Comb, Slicker Comb, Crevice Tool, and Cleaning Brush for comprehensive pet care and cleaning.
- Adjustable Suction Power: Three distinct suction levels (Low, Standard, High) allow for customized power based on the grooming task or cleaning requirement.
- Low Noise Operation: Engineered to operate at a maximum noise level of 75 decibels, ensuring a less stressful experience for pets.
- Large 3.0L Dust Cup: A generous dust cup capacity reduces the frequency of emptying, and a one-touch disposal feature simplifies debris removal.
- Detachable Electric Trimmer: The battery-powered electric trimmer can be used independently for precision grooming or connected to the vacuum for integrated hair collection.

Image 4.1: Illustration of the 3L large capacity dust cup.
This image highlights the 3-liter capacity of the dust cup, demonstrating its larger size compared to typical 1-liter alternatives. The arrows inside the transparent dust cup indicate the airflow and collection of pet hair, emphasizing its efficiency in containing groomed hair.
5. Setup
Follow these steps to set up your Nicebay Pet Grooming Vacuum Cleaner:
- Unpack: Carefully remove all components from the packaging.
- Connect Hose: Attach the flexible hose to the main vacuum unit by aligning the connectors and twisting until secure.
- Select Attachment: Choose the desired grooming tool (e.g., Grooming Comb, Slicker Comb, Electric Trimmer) and attach it to the end of the hose. Ensure it clicks into place.
- Power Connection: Plug the power cord into a standard electrical outlet.

Image 5.1: Side base for organizing accessories.
This image shows the integrated side base designed to neatly store all the included accessories. The main vacuum unit is positioned centrally, with dedicated slots for the electric trimmer, various combs, and other tools, promoting organized storage and easy access.

Image 5.2: Power cord storage on the unit's base.
This image illustrates the power cord storage design located on the bottom of the main unit. The power cord can be wrapped securely around the designated area, preventing tangles and facilitating compact storage when the device is not in use.
6. Operating Instructions
Familiarize yourself with the controls and functions before grooming your pet.
6.1 Powering On/Off and Suction Modes
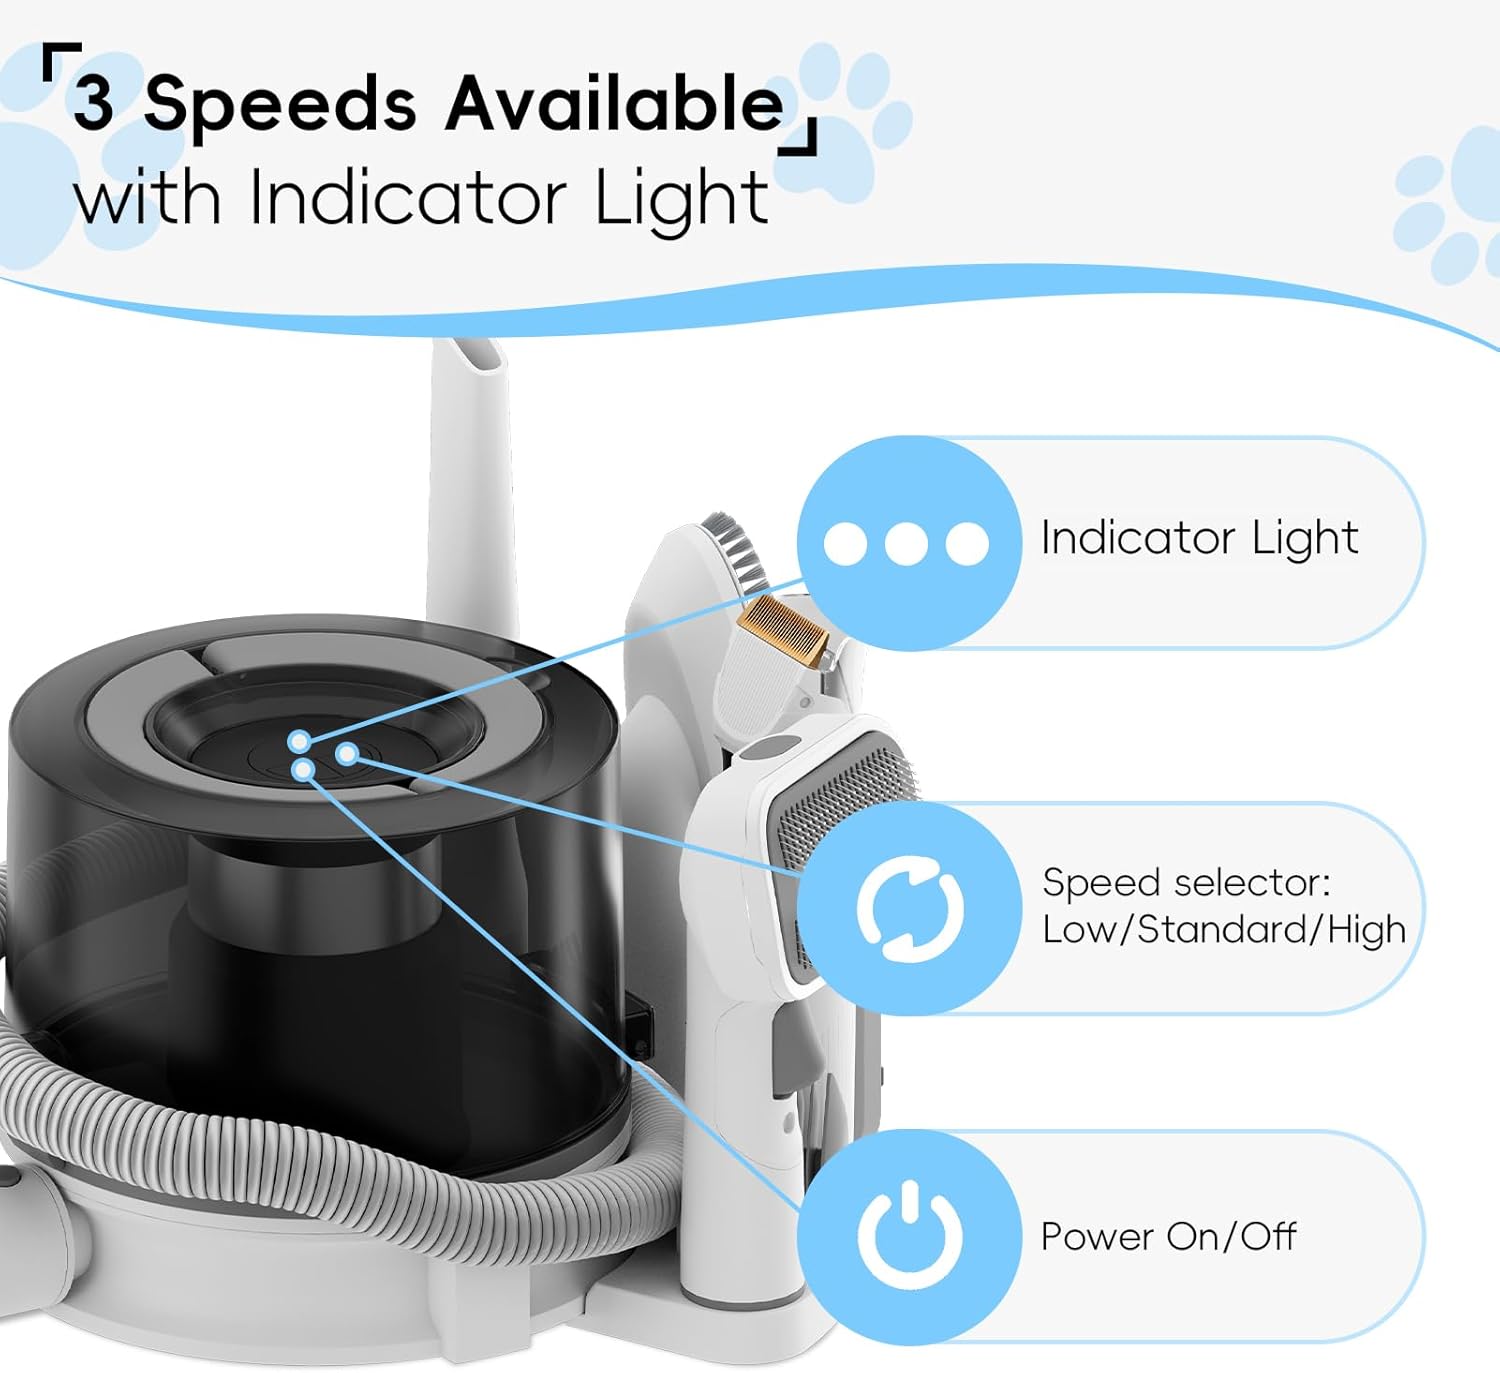
Image 6.1: Control panel for power and suction adjustment.
This image details the control panel on the main unit. It shows the Power On/Off button, the Speed Selector button (allowing selection between Low, Standard, and High suction modes), and indicator lights that display the currently selected suction level.
- Power On: Press the Power On/Off button to start the vacuum.
- Adjust Suction: Press the Speed Selector button to cycle through the three suction modes: Low, Standard, and High. The indicator lights will illuminate to show the active mode.
- Power Off: Press the Power On/Off button again to turn off the vacuum.
6.2 Using Attachments
Select the appropriate attachment for your grooming needs:

Image 6.2: Slicker Comb and Grooming Comb attachments.
This image displays two of the interchangeable brush heads: the Slicker Comb and the Grooming Comb. These tools are designed for different types of pet hair and grooming tasks, such as de-shedding and general brushing.
- Electric Trimmer: Use for precise hair trimming. It can be used independently (battery-powered) or connected to the vacuum for hair collection. Ensure the trimmer is charged before independent use.
- Grooming Comb: Ideal for general brushing and removing loose hair.
- Slicker Comb: Effective for de-shedding and removing tangles, especially for pets with longer coats.
- Crevice Tool: Use for cleaning pet hair from tight spaces, corners, and upholstery.
- Cleaning Brush: Suitable for cleaning the device itself or other surfaces.
7. Maintenance
Regular maintenance ensures optimal performance and extends the lifespan of your grooming vacuum.
7.1 Emptying the Dust Cup

Image 7.1: Steps for detaching and emptying the dust cup.
This image illustrates the two-step process for detaching and emptying the dust cup. Step 01 shows a hand pressing a button to detach the dust cup from the main unit. Step 02 shows the detached dust cup being lifted by its handle, with an indication that the lid can be opened with one click for easy disposal of collected pet hair and debris.
- Ensure the device is turned off and unplugged.
- Press the release button on the main unit to detach the dust cup.
- Lift the dust cup using its handle.
- Press the one-touch disposal button to open the lid and empty the contents into a waste bin.
- Close the lid securely and reattach the dust cup to the main unit.
7.2 Cleaning Filters
Periodically check and clean the internal filters to maintain suction power. Refer to the filter compartment for specific cleaning instructions, typically involving rinsing with water and allowing to air dry completely before reinstallation.
7.3 Cleaning Attachments
After each use, remove any hair or debris from the grooming attachments. They can be wiped clean with a damp cloth. For the electric trimmer, ensure it is turned off and detached before cleaning the blades with the provided cleaning brush.
8. Troubleshooting
If you encounter issues with your Nicebay Pet Grooming Vacuum Cleaner, refer to the following table:
| Problem | Possible Cause | Solution |
|---|---|---|
| No power | Not plugged in; Power outlet fault; Power button not pressed. | Ensure plug is securely in outlet; Test outlet with another device; Press the Power On/Off button. |
| Low suction | Dust cup full; Filters clogged; Hose or attachment blocked. | Empty dust cup; Clean or replace filters; Check hose and attachments for obstructions. |
| Unusual noise | Obstruction in fan/motor; Loose component. | Turn off and unplug the unit. Inspect for obstructions. If noise persists, contact customer service. |
| Electric trimmer not working | Battery low; Blades clogged. | Charge the trimmer battery; Clean hair from blades. |
9. Specifications
| Specification | Detail |
|---|---|
| Model Name | Pet Grooming Vacuum |
| Brand | Nicebay |
| Voltage | 120VAC 60Hz |
| Dust Cup Capacity | 3.0L |
| Power Cord Length | 3M |
| Noise Level | 75dB (maximum) |
| Color | White |
| Special Feature | Detachable Electric Trimmer |
10. Warranty and Support
Our products come with a one-year free warranty from the date of purchase.
If you encounter any issues or require assistance, please contact our customer service team. We are committed to responding to your inquiries within 24 hours.
For support, please refer to the contact information provided with your purchase or visit the official Nicebay website.