1. Introduction
This manual provides detailed instructions for the installation, operation, and maintenance of your new Generic Dryer Heating Element Kit. This kit is designed as a high-quality aftermarket replacement part for various Kenmore dryer models. Please read all instructions carefully before beginning installation to ensure safe and proper operation.
2. Safety Information
WARNING: Risk of Electric Shock, Fire, or Injury.
- Always disconnect power to the dryer at the circuit breaker or fuse box before attempting any repairs or maintenance.
- Wear appropriate personal protective equipment, including gloves and eye protection.
- If you are unsure about any step, consult a qualified appliance technician.
- Ensure all connections are secure and properly insulated after installation.
- Do not operate the dryer if any parts are damaged or improperly installed.
3. Product Overview
The Dryer Heating Element Kit includes the following components:
- Dryer Heating Element: A 5400-watt, 240-volt heating element, pre-assembled with housing, coil, and insulators.
- Dryer Thermostat Kit: Includes one high-limit thermostat (250°F) and one thermal cut-off fuse (309°F), along with jumper wires and female spade terminals.
- Dryer Thermal Fuse: A non-resettable thermal fuse with two 3/16-inch wire terminals.

Image 1: Overview of the Dryer Heating Element, highlighting its 5400 Watts, 240 Volts specification, durable construction, and nickel-chromium alloy material for quality and longevity.
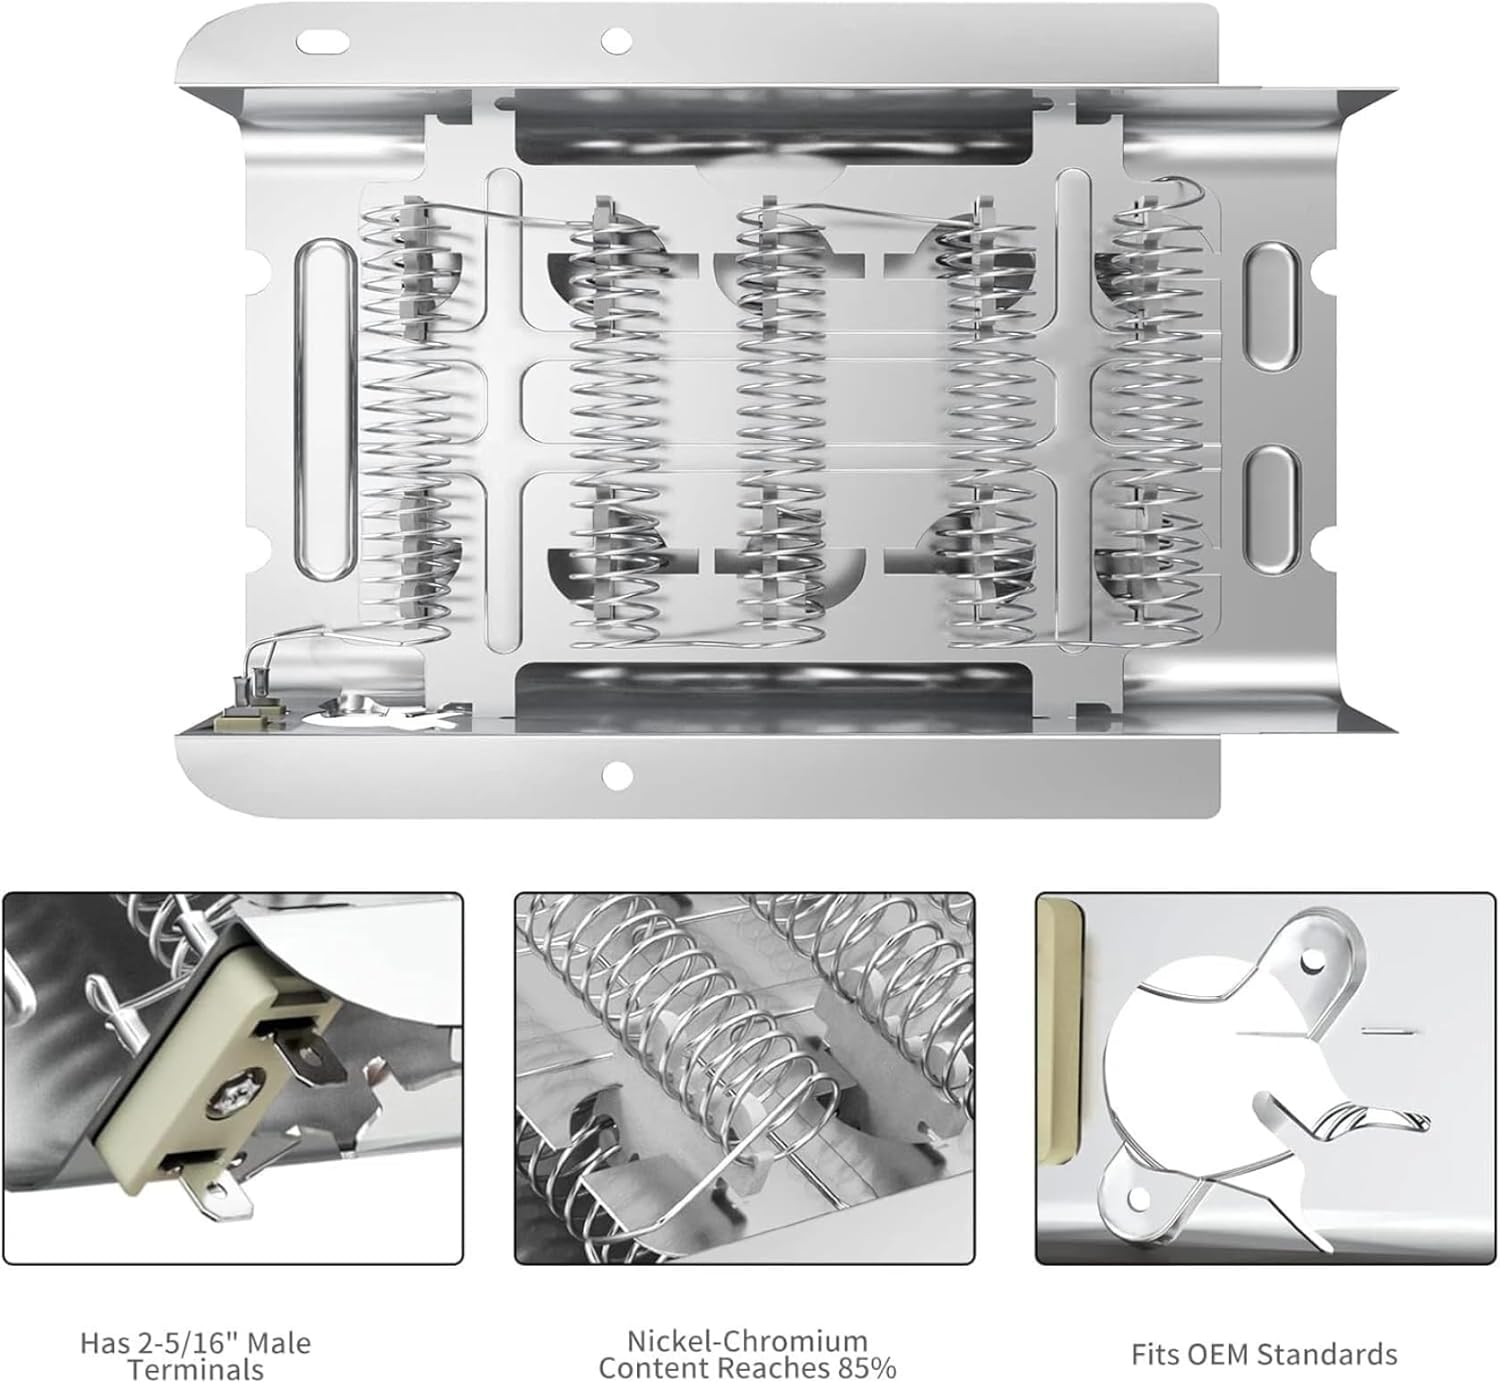
Image 2: Detailed view of the heating element, showing the 2-5/16 inch male terminals, the nickel-chromium content reaching 85%, and confirmation that it fits OEM standards.
4. Setup and Installation
This section provides general guidance for replacing a dryer heating element kit. Specific steps may vary depending on your exact dryer model. Always refer to your dryer's service manual for detailed, model-specific instructions.
- Disconnect Power: Unplug the dryer from the electrical outlet or turn off the circuit breaker supplying power to the dryer.
- Access the Heating Element: Depending on your dryer model, you may need to remove the back panel, front panel, or top panel to access the heating element housing. This typically involves removing screws and possibly disconnecting wire harnesses.
- Remove Old Components: Carefully disconnect the wires from the old heating element, thermostat, and thermal fuse. Note their positions for reinstallation. Remove the mounting screws or clips holding the old heating element assembly in place.
- Install New Heating Element: Position the new heating element assembly in the dryer. Secure it with the appropriate mounting screws or clips.
- Install New Thermostat and Thermal Fuse: Attach the new high-limit thermostat and thermal cut-off fuse from the kit to their respective locations. Connect the jumper wires and new female spade terminals as needed.
- Install New Thermal Fuse: Locate the blower housing and install the new non-resettable thermal fuse. Connect its two 3/16-inch wire terminals.
- Reconnect Wiring: Reconnect all electrical wires to the new components, ensuring a snug and secure fit. Double-check all connections.
- Reassemble Dryer: Reattach any panels removed during the process. Ensure all screws are tightened and panels are securely in place.
- Restore Power and Test: Plug the dryer back in or turn on the circuit breaker. Run a short cycle (e.g., air fluff or low heat) to confirm proper operation and heating. Monitor for any unusual noises or smells.
5. Operating
After successful installation, the dryer should operate as intended, providing consistent heat for effective clothes drying. No special operating procedures are required for the heating element itself; simply use your dryer according to its manufacturer's instructions.
6. Maintenance
To ensure the longevity and efficiency of your dryer and its new heating element kit, consider the following general maintenance tips:
- Clean Lint Filter: Clean the lint filter before or after every load to maintain proper airflow and prevent overheating.
- Inspect Venting: Periodically check the dryer's exhaust vent for blockages. A clogged vent can restrict airflow, causing the heating element to work harder and potentially overheat.
- Avoid Overloading: Do not overload the dryer, as this can hinder airflow and drying efficiency.
7. Troubleshooting
If you encounter issues after installing the heating element kit, consider the following:
- No Heat or Insufficient Drying:
- Verify that the heating element coil is intact and not broken.
- Check the thermal fuse for continuity. If it has blown, it will need replacement. A blown thermal fuse often indicates an underlying issue like restricted airflow.
- Test the high-limit thermostat for continuity. If it's open, it may be faulty or have tripped due to overheating.
- Ensure all electrical connections are secure.
- Dryer Overheating:
- Inspect the dryer's venting system for blockages.
- Ensure the high-limit thermostat and thermal cut-off fuse are functioning correctly to prevent excessive temperatures.
- Verify that the cycling thermostat (if separate from the kit) is operating properly.
- Dryer Not Starting:
- A blown thermal fuse can prevent the dryer from starting. Check for continuity.
- Ensure the door switch is functioning correctly.
For complex issues or if troubleshooting steps do not resolve the problem, it is recommended to consult a professional appliance repair technician.
8. Specifications
| Part Number | 279838 |
| Voltage | 240 Volts |
| Heating Element Wattage | 5400 Watts |
| High-Limit Thermostat | 250°F |
| Thermal Cut-Off Fuse | 309°F |
| Product Dimensions | 10 x 7 x 2.5 inches |

Image 3: Dimensional drawing of the heating element, showing key measurements such as 9.92 inches in length and 6.61 inches in width, with a height of 2.36 inches.
9. Warranty
This product comes with a 30-day return policy. Please refer to the retailer's return policy for specific details regarding returns and exchanges.
10. Support
For further assistance or if you have questions regarding the installation or operation of this heating element kit, please contact the retailer or a qualified appliance repair professional. Always prioritize safety and consult an expert if you are uncertain about any repair procedures.