1. Introduction
Thank you for choosing the Polarlander 7 Inch Android Car Stereo with GPS Navigation. This manual provides essential information for the proper installation, operation, and maintenance of your new car stereo system. Please read this manual thoroughly before using the product to ensure safe and optimal performance.
This unit features a 7-inch retractable touch screen, built-in GPS navigation, Bluetooth connectivity for hands-free calls and music streaming, FM/AM radio, USB/SD playback, AUX input, and support for DVR and phone mirror link functions. It is designed for a single DIN fit and operates on a 12V DC input.
2. Safety Information
- Installation: Ensure professional installation to prevent damage to the unit or your vehicle. Incorrect wiring can cause fire or malfunction.
- Power Supply: This unit is designed for 12V DC negative ground systems only. Do not connect to other voltage systems.
- Driving Safety: Do not operate the unit's complex functions or watch videos while driving. Always prioritize road safety.
- Temperature: Avoid exposing the unit to extreme temperatures, direct sunlight for prolonged periods, or excessive moisture.
- Cleaning: Use a soft, dry cloth for cleaning. Do not use abrasive cleaners or solvents.
- Ventilation: Ensure adequate ventilation around the unit to prevent overheating.
3. Setup and Installation
Proper installation is crucial for the performance and longevity of your car stereo. It is highly recommended to have this unit installed by a qualified professional.
3.1 Included Components
Before installation, verify that all components are present:

Image: Included components: Car stereo unit, GPS antenna, wiring harness, external microphone, and removal keys.
- Main Car Stereo Unit
- GPS Antenna
- Power/Speaker Wiring Harness
- External Microphone
- Removal Keys (2x)
- User Manual (this document)
3.2 Wiring Connections
Refer to the wiring diagram provided with the unit for specific connections. Ensure all connections are secure and properly insulated.
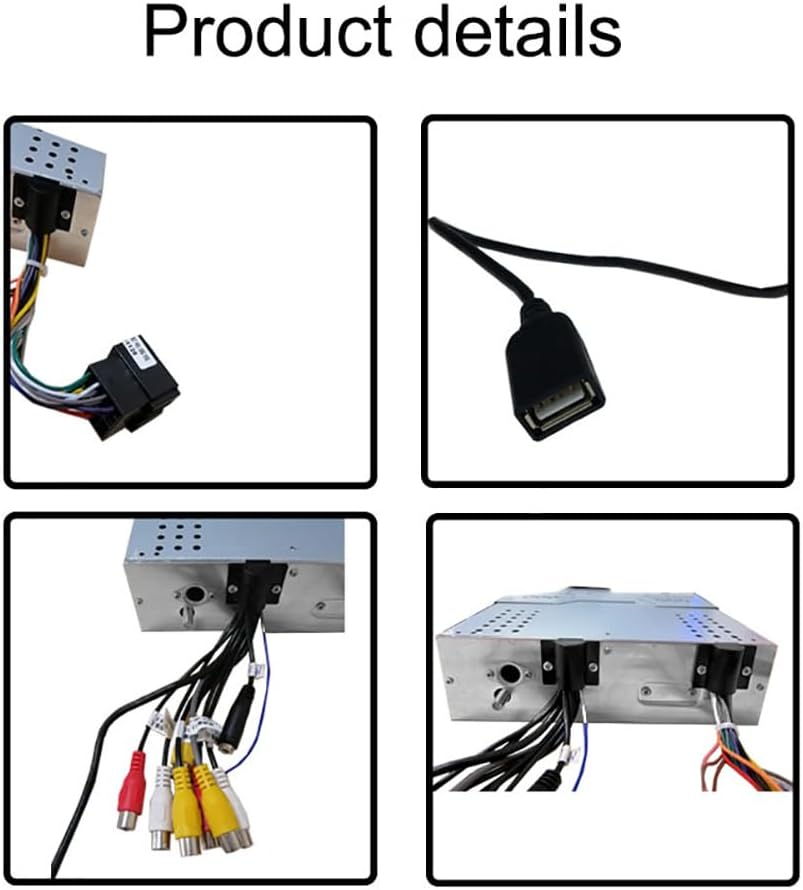
Image: Rear view of the car stereo showing various wiring connections for power, speakers, and auxiliary functions.
- Power: Connect the yellow wire to constant 12V, red wire to accessory 12V, and black wire to ground.
- Speakers: Connect speaker wires according to polarity (e.g., white/white-black for front left, gray/gray-black for front right, etc.).
- GPS Antenna: Connect the GPS antenna to the dedicated port on the rear of the unit and mount it in a location with a clear view of the sky.
- External Microphone: Plug the external microphone into its designated input for improved hands-free call quality.
- AUX Input/Output: Connect external audio sources or amplifiers as needed.
- Reverse Camera Input: Connect a reverse camera (optional) to the video input for automatic display when reversing.
3.3 Physical Installation
This unit is designed for a single DIN slot. Carefully slide the unit into the dashboard opening after all wiring is complete. Secure it using the provided mounting hardware or vehicle-specific brackets.
4. Operating Instructions
4.1 Basic Controls and Retractable Screen
The unit features a retractable 7-inch touch screen. The front panel includes essential buttons and a rotary knob.
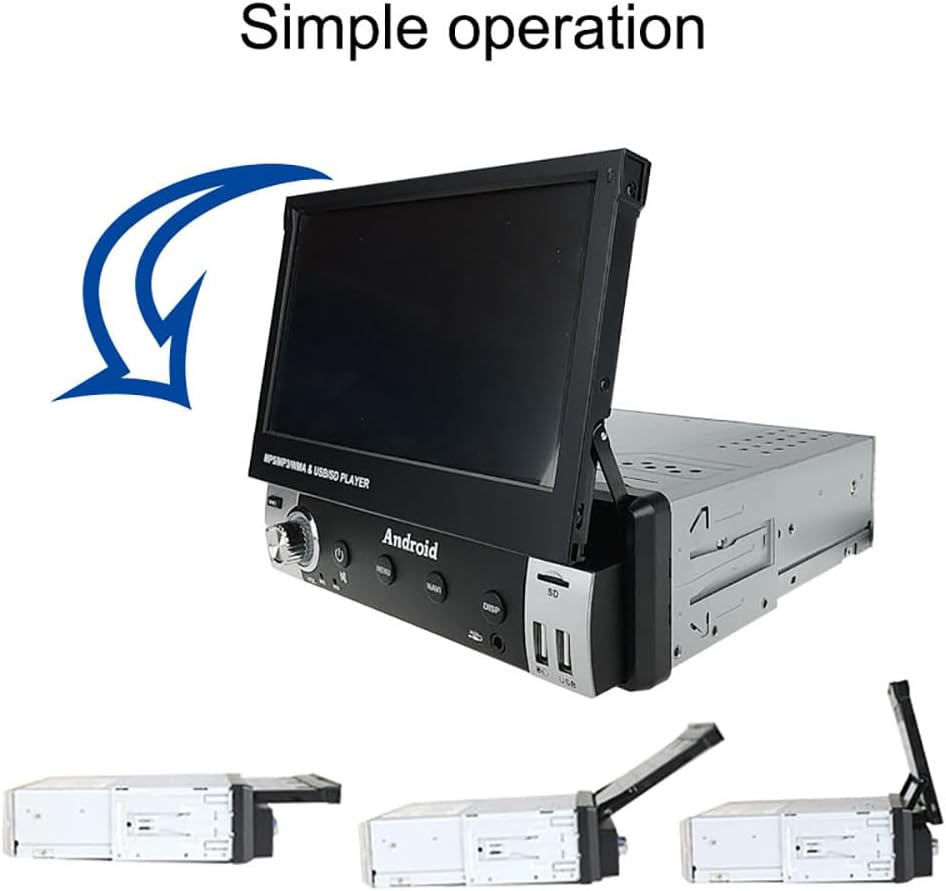
Image: The retractable screen mechanism, illustrating how the display extends and retracts from the single DIN unit.
- Power Button (U): Press to turn the unit on/off.
- Volume Knob (VOL): Rotate to adjust volume. Press to mute/unmute.
- MENU Button: Access the main menu or settings.
- NAVI Button: Quickly launch the navigation application.
- DISP Button: Adjust display settings or turn the screen off.
- AUX Input: Front panel 3.5mm jack for external audio devices.
- USB/SD Slots: Front panel ports for media playback and charging.
4.2 GPS Navigation
The unit comes with built-in GPS navigation, supporting both offline and online maps. Ensure the GPS antenna is properly connected and positioned for optimal signal reception.

Image: The car stereo display showing a navigation interface with a route plotted and estimated travel time.
- Press the NAVI button or select the Navigation icon from the main menu to launch the GPS application.
- Follow on-screen prompts to enter destinations, view maps, and receive turn-by-turn directions.
- Update maps periodically for the most accurate navigation data.
4.3 Bluetooth Connectivity
Connect your smartphone via Bluetooth for hands-free calling and wireless audio streaming.

Image: The car stereo display showing the Bluetooth phone interface, including a dial pad and call options, with a smartphone nearby.
- Go to the Bluetooth settings on the car stereo and enable Bluetooth.
- On your phone, search for available Bluetooth devices and select "Polarlander" (or similar device name).
- Confirm the pairing code if prompted.
- Once connected, you can make/receive calls and play music wirelessly. Caller ID will be displayed on the screen.
4.4 FM/AM Radio
Enjoy your favorite radio stations with the built-in FM/AM tuner.

Image: The car stereo display showing the FM radio interface, indicating the current frequency and options to save stations.
- Select the Radio icon from the main menu.
- Use the touch screen to scan for stations, manually tune, or select from saved presets.
- The unit supports FM frequencies from 87.5 to 108 MHz.
4.5 USB/SD Playback and Charging
Play media files from USB drives or SD cards and charge your mobile phone.

Image: Front panel of the car stereo highlighting the USB and SD card slots, indicating support for mobile phone charging.
- Insert a USB drive into the USB port or an SD card into the SD slot.
- The unit will automatically detect the media and display playable files.
- The USB port also functions as a charging port for mobile phones.
4.6 Other Functions
- AUX Input: Connect external audio devices via the front panel 3.5mm AUX jack.
- DVR Connection: Connect a compatible DVR (Digital Video Recorder) for recording driving footage.
- Phone Mirror Link: Mirror your smartphone screen to the car stereo display for enhanced functionality.
- EQ Sound Settings: Access the equalizer settings to customize audio output to your preference.
- Reversing Image: If a reverse camera is connected, the display will automatically switch to the camera view when the vehicle is in reverse gear.
5. Maintenance
- Screen Cleaning: Use a soft, lint-free cloth to gently wipe the touch screen. For stubborn smudges, slightly dampen the cloth with water or a screen-safe cleaner. Do not spray cleaner directly onto the screen.
- General Cleaning: Keep the unit's front panel and buttons free from dust and debris. Use a soft brush or compressed air for hard-to-reach areas.
- Software Updates: Periodically check the manufacturer's website for any available software or firmware updates to ensure optimal performance and access to new features.
- Avoid Liquids: Prevent any liquids from entering the unit, as this can cause severe damage.
6. Troubleshooting
If you encounter issues with your car stereo, refer to the following common problems and solutions:
| Problem | Possible Cause | Solution |
|---|---|---|
| No power | Incorrect wiring; Blown fuse; Vehicle battery issue. | Check power connections (yellow, red, black wires). Inspect vehicle fuses. Ensure vehicle battery is charged. |
| No sound | Volume muted or too low; Incorrect speaker wiring; Amplifier issue. | Increase volume. Check speaker connections and polarity. Verify external amplifier (if used) is powered on. |
| GPS not working or inaccurate | GPS antenna not connected or poorly positioned; Outdated maps. | Ensure GPS antenna is securely connected and has a clear view of the sky. Update navigation maps. |
| Bluetooth connection issues | Device not in pairing mode; Interference; Incorrect pairing process. | Ensure Bluetooth is enabled on both devices and in pairing mode. Delete previous pairings and try again. Move closer to the unit. |
| Touch screen unresponsive | System freeze; Dirt on screen. | Restart the unit (power cycle). Clean the screen. If issue persists, perform a factory reset (refer to settings menu). |
If the problem persists after trying these solutions, please contact customer support.
7. Specifications

Image: Detailed dimensions of the Polarlander car stereo, including the main unit and the retractable screen.
- Model: 6902A
- Brand: Polarlander
- Screen Size: 7 Inch
- Display Type: LCD Telescopic Touch Screen
- Display Dimensions: 172mm (width) x 114mm (height)
- Unit Dimensions (approx.): 178mm (width) x 50mm (height) x 156mm (depth)
- Voltage Input: 12V DC
- FM Radio Frequency: 87.5 – 108 MHz
- Connectivity: Bluetooth, USB, SD, AUX
- Navigation: Built-in GPS (supports offline/online maps)
- Additional Features: Hands-Free Calling, Music Streaming, DVR Support, Phone Mirror Link, EQ Sound Scene Options, Power-off Memory Function, Reversing Image Support, USB Mobile Phone Charging.
- Safety: Multiple circuit protection (overload, overvoltage, short circuit)
8. Warranty and Support
This Polarlander product is covered by a manufacturer's warranty. Please refer to the warranty card included with your purchase or contact your retailer for specific warranty terms and conditions.
For technical support, troubleshooting assistance beyond this manual, or warranty claims, please contact Polarlander customer service or the authorized dealer from whom you purchased the product. Keep your purchase receipt and model number (6902A) handy when contacting support.
Manufacturer: Polarlander