1. Introduction
The ANDELI MIG-205PRO MAX is a versatile 6-in-1 multi-process welding machine designed for a wide range of welding applications. It supports Aluminum Welding, Gas MIG, Flux Core MIG, Spool Gun, Lift TIG, and Stick welding. Featuring dual-voltage 110V/220V input with automatic identification, this welder delivers reliable and stable performance for both thin and thick materials such as steel, aluminum, and stainless steel. Its smart synergic control technology simplifies setup, making it suitable for both novices and experienced welders. Built-in safeguards ensure durability and extended machine lifespan.
2. Safety Information
Always prioritize safety when operating welding equipment. Read and understand all safety warnings and instructions before use. Failure to do so may result in serious injury or death.
- Wear appropriate personal protective equipment (PPE), including a welding helmet, gloves, and protective clothing.
- Ensure proper ventilation to avoid inhaling welding fumes.
- Keep a fire extinguisher nearby.
- Do not operate the welder in damp or wet conditions.
- Ensure the workpiece is properly grounded.
- Disconnect power before performing any maintenance or adjustments.
3. Package Contents
Verify that all items are present in the package:
- MIG-205PRO MAX Welder (x1)
- MIG Welding Gun (10 ft) (x1)
- Contact Tips (x5)
- Nozzles (x2)
- Electrode Holder (x1)
- Ground Clamp (x1)
- Power Cable with Plug Adapter (x1)
- Graphene Liner (x1)
- Flux-Cored Wire (x1)
- Air Hose (x3)
4. Product Overview
4.1 Front Panel
The front panel features a 4.1-inch LED display for clear visibility and real-time monitoring of welding parameters. It allows for easy selection of welding mode, material, wire type, electrode, and workpiece thickness. Control knobs adjust wire feed speed, voltage, and other settings depending on the selected mode.
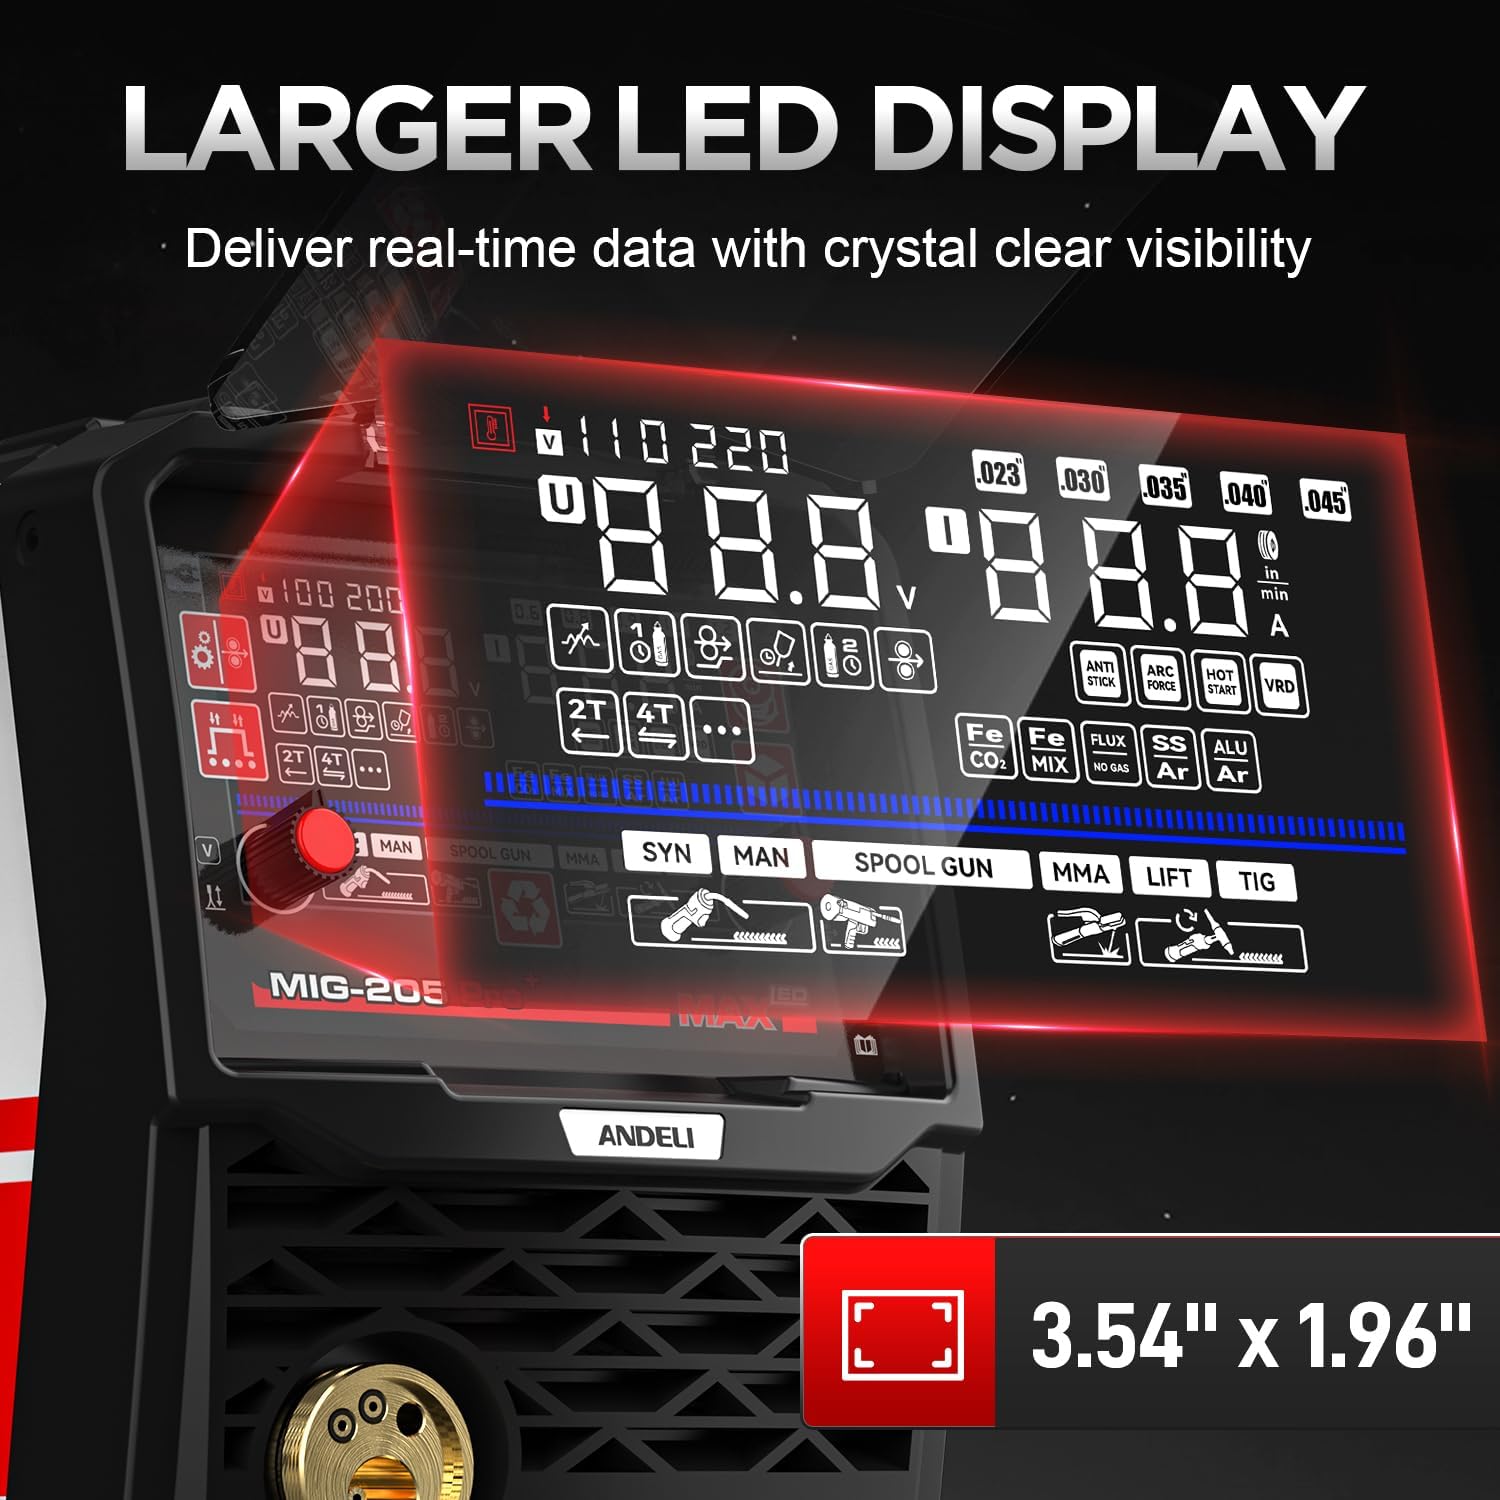
Image: Front panel of the ANDELI MIG-205PRO MAX welder, highlighting the large 4.1-inch LED display and control knobs. The display shows various welding parameters and mode selections.
4.2 Rear Panel
The rear panel includes the gas hook-up, power switch, cooling fan, and input voltage specifications. The power cable is approximately 5 feet 8 inches long.
4.3 Internal Components
The welder features an IGBT inverter and MCU technology for smart synergic control. The wire feeder is constructed from metal for durability, and it supports 2LB/10LB wire spools. Rollers for different wire diameters are easily interchangeable.

Image: Internal view of the welder, showing the MCU technology, IGBT inverter, cooling fan, premium wire feeder, and supported wire spools.
5. Setup
5.1 Power Connection
The MIG-205PRO MAX is a dual-voltage machine (110V/220V) with automatic input voltage identification. Use the provided power cable and plug adapter to connect to the appropriate power source.
5.2 Gas Connection (for Gas MIG/Lift TIG)
Connect the provided gas hose to the gas inlet on the rear panel of the welder and to your gas cylinder. Ensure all connections are secure to prevent leaks.
5.3 Wire Installation (for MIG/Flux Core)
Open the wire feeder compartment. Install the appropriate wire spool (2LB or 10LB) and feed the wire through the feeder mechanism. Select the correct drive roller for your wire diameter (e.g., U-groove for aluminum, V-groove for solid wire, knurled for flux-cored). The welder comes with various rollers: U-groove (1.2/0.9mm), V-groove (0.8/0.6mm), and knurled (0.8/0.9mm).

Image: Display showing wire feed speed and welding current settings, crucial for wire installation and operation.
5.4 Torch and Clamp Connection
Connect the MIG welding gun, electrode holder, or ground clamp to the corresponding terminals on the front panel. Ensure connections are tight and secure.

Image: Visual representation of the 6-in-1 multi-process capabilities, including Gas MIG, Stick, Lift TIG, Flux Core, Spool Gun, and Aluminum MIG welding.
6. Operating Instructions
6.1 Control Panel Overview
The 4.1-inch LED display provides intuitive control. Use the buttons and knobs to navigate through settings.
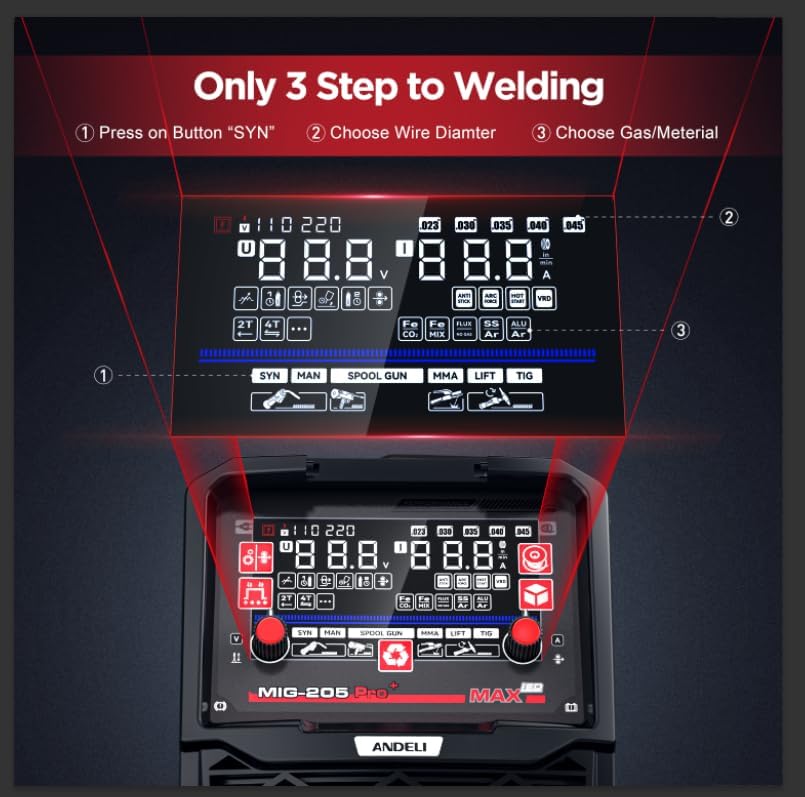
Image: Simplified 3-step guide to welding using the LED display: 1) Press SYN button, 2) Choose Wire Diameter, 3) Choose Gas/Material.
6.2 Mode Selection
Press the 'WELD MODE' button to cycle through the available welding processes: Lift TIG, Stick, Manual MIG, and Synergic MIG. The display will indicate the active mode.
6.3 Parameter Adjustment
- Wire Diameter: In MIG modes, use the 'WIRE DIA' button to select the appropriate wire diameter.
- 2T/4T Mode: Use the 'STEPS MODE' button to switch between 2T (two-touch) and 4T (four-touch) trigger modes.
- Spool Gun: Use the 'SPOOL GUN' button to enable or disable the spool gun function.
- Gas Type: In MIG modes, use the 'GAS' button to select the gas type (CO2 100%, Mixed Gas, Argon 100%, Gasless).
- Wire Feed Speed/Current: The left knob adjusts wire feed speed in MIG modes and current in Lift TIG/Stick modes.
- Voltage: The right knob adjusts voltage in MIG modes.
- Inching: Use the 'INCHING' button to feed wire quickly when changing spools. Press and hold to increase speed.
7. Welding Modes
7.1 Gas MIG Welding
For welding with shielding gas. Select 'Manual MIG' or 'Synergic MIG' mode. Synergic control automatically matches recommended voltage and wire feed speed based on material and wire selection.
7.2 Flux Core MIG Welding
For gasless welding using flux-cored wire. Select the appropriate MIG mode and 'Gasless' option.
7.3 Spool Gun MIG Welding
Ideal for aluminum welding. Enable the 'SPOOL GUN' function and use a compatible spool gun (additional purchase required).
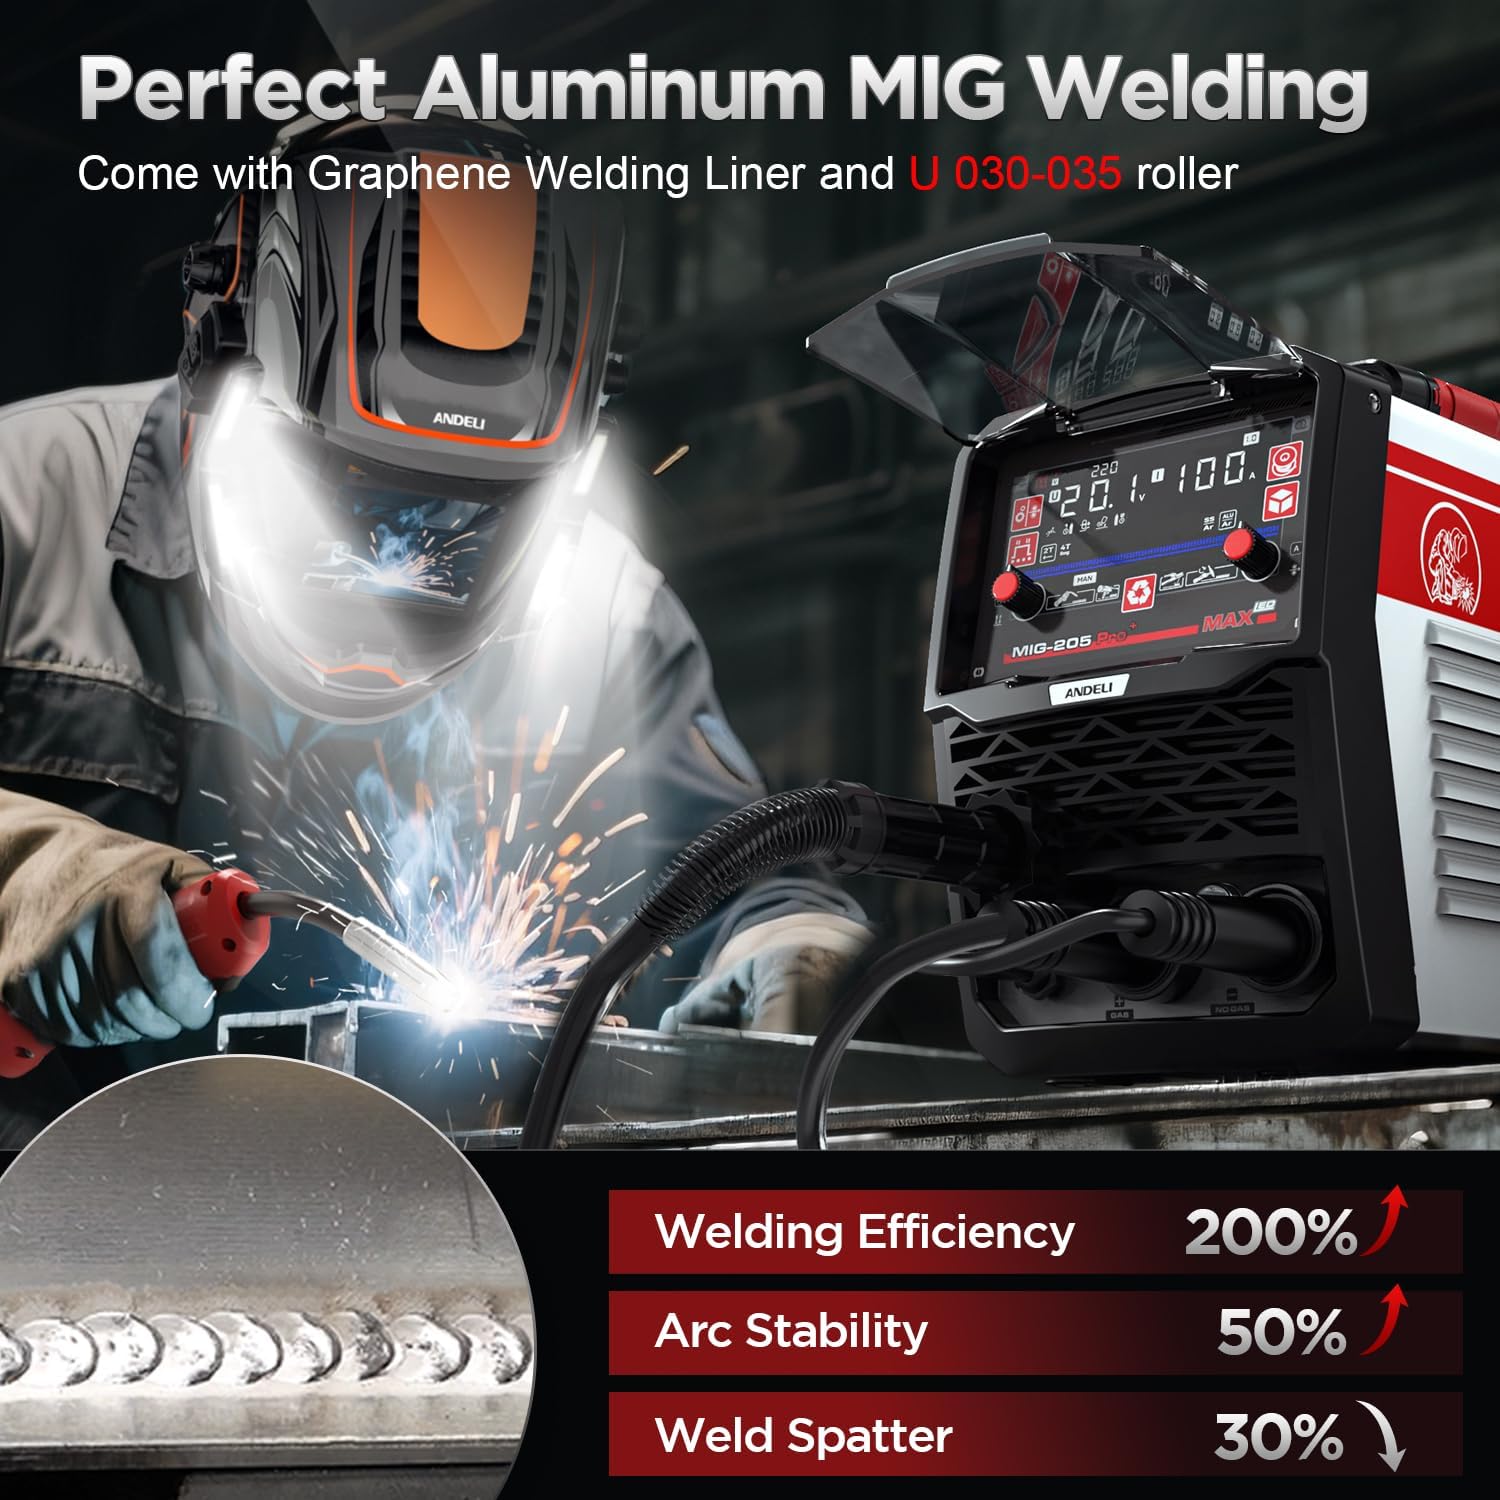
Image: Welder performing aluminum MIG welding, emphasizing the use of a Graphene Welding Liner and U 030-035 roller for optimal performance.
7.4 Lift TIG Welding
For precise welding with a Lift TIG torch (additional purchase required). Select 'Lift TIG' mode and adjust current with the left knob.
7.5 Stick Welding (MMA)
For welding with coated electrodes. Select 'Stick' mode and adjust current with the left knob.
8. Maintenance
Regular maintenance ensures optimal performance and longevity of your welder.
- Cleaning: Keep the welder clean and free from dust and debris. Use compressed air to clean the cooling fan and internal components periodically.
- Connections: Regularly check all electrical and gas connections for tightness and wear.
- Consumables: Inspect and replace contact tips, nozzles, and drive rollers as needed.
- Storage: Store the welder in a dry, clean environment when not in use.
9. Troubleshooting
The welder features advanced protection systems for over-current, overload, overheating, and over-voltage. If an issue occurs, the welder may automatically shut down or display an error code.
- No Power: Check power cable connections, circuit breaker, and input voltage.
- No Arc: Ensure proper grounding, correct electrode/wire setup, and appropriate welding parameters.
- Overheating: Allow the welder to cool down. Ensure the cooling fan is unobstructed and operating correctly.
- Poor Weld Quality: Adjust wire feed speed, voltage, gas flow, or electrode type. Check for contaminated workpiece or worn consumables.
10. Specifications
| Feature | Detail |
|---|---|
| Model Number | AMZMIG205-USFBA |
| Style | MIG-205PRO MAX |
| Input Voltage | 110V/220V Dual Voltage (Automatic Identification) |
| Max Amperage | Up to 205Apm |
| Welding Processes | Aluminum Welding, Gas MIG, Flux Core MIG, Spool Gun, Lift TIG, Stick |
| Protection Features | Automatic voltage compensation, over-current, overload, overheating, over-voltage protection |
| Technology | IGBT, MCU, Synergic Control |
| Display | 4.1 inches LED Display |
| Item Weight | 15 kg |
| Parcel Dimensions | 55.88 x 33.65 x 31.75 cm |
11. Warranty and Support
For warranty information, technical support, or service inquiries, please refer to the contact details provided with your purchase documentation or visit the official ANDELI website. Keep your purchase receipt as proof of purchase.