1. Introduction
Thank you for choosing the suevery All-in-One PC. This manual provides essential information for setting up, operating, and maintaining your new computer. The suevery All-in-One PC is designed for productivity, entertainment, and various applications, featuring a 21.5-inch Full HD display, Intel Core i5 processor, 16GB RAM, and a 256GB SSD. It comes equipped with a built-in HD webcam, Wi-Fi 6, and includes a keyboard and mouse for a complete out-of-the-box experience.
2. What's in the Box
Please check the contents of your package. If any items are missing or damaged, contact customer support.
- suevery 21.5-inch All-in-One PC
- Power Adapter
- Keyboard
- Mouse
- User Manual (this document)
3. Product Overview
3.1 Front View and Display
The All-in-One PC features a 21.5-inch Full HD (1920x1080) IPS Anti-glare display, providing clear and vibrant visuals. The display is tiltable for ergonomic adjustment.

Figure 3.1: Front view of the suevery All-in-One PC, showcasing its 21.5-inch display.
3.2 Built-in Audio-Video Components
The PC integrates a high-definition camera, microphone, and speakers, eliminating the need for external peripherals for video communication.

Figure 3.2: Illustration of the integrated speaker, camera, and microphone for video communication.
3.3 Ports and Interfaces
The device provides various ports for connectivity. Refer to the diagram below for port locations and types.
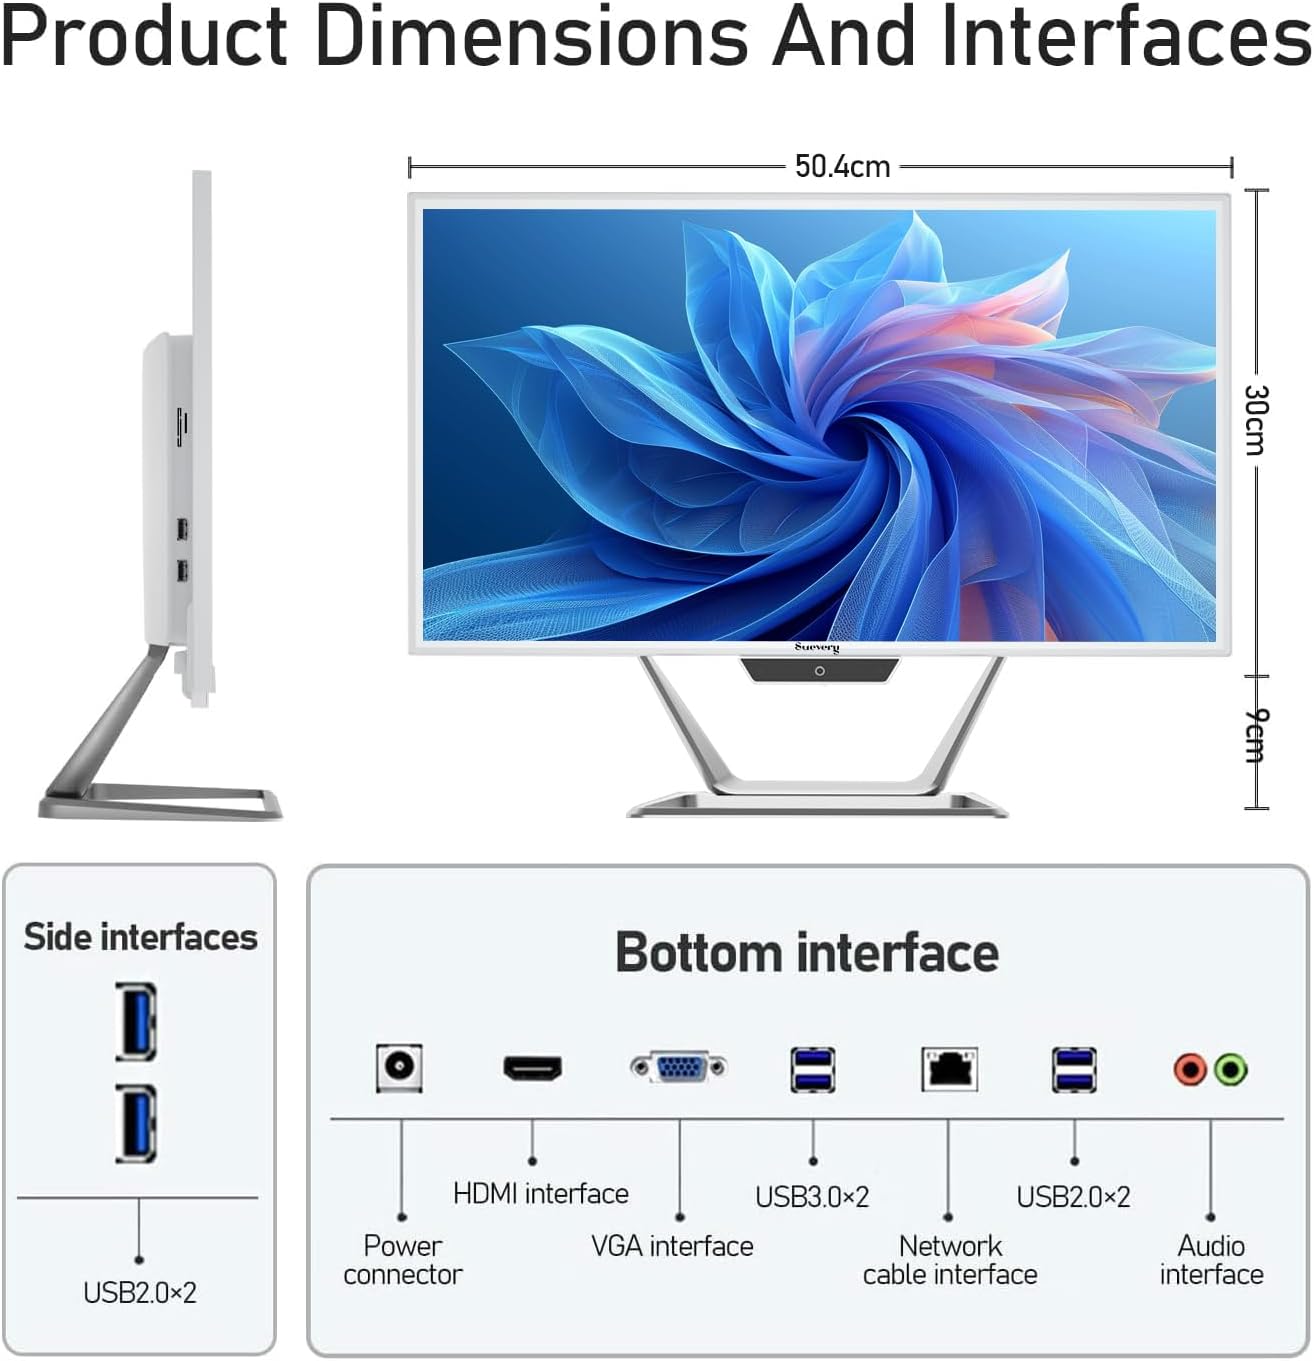
Figure 3.3: Product dimensions and interface layout. Includes USB 2.0, USB 3.0, HDMI, VGA, Network, Audio, and Power ports.
- Power Connector: For connecting the power adapter.
- HDMI Interface: For connecting to external displays.
- VGA Interface: For connecting to older external displays.
- USB 3.0 x 2: High-speed data transfer ports.
- USB 2.0 x 4: Standard data transfer ports (2 on side, 2 on bottom).
- Network Cable Interface: For wired Ethernet connection.
- Audio Interface: For connecting external headphones or speakers.
4. Setup Guide
Follow these steps to set up your suevery All-in-One PC.
- Unpack the PC: Carefully remove the All-in-One PC and all accessories from the packaging. Place the PC on a stable, flat surface.
- Connect Keyboard and Mouse: Connect the included keyboard and mouse to the available USB ports on the back or side of the PC.
- Connect Power: Connect the power adapter to the power connector on the PC, then plug the power cord into a wall outlet.
- Power On: Press the power button, usually located on the bottom bezel or side of the display. The PC will boot up.
- Initial Operating System Setup: Your PC comes with DOS pre-installed. You will need to install your preferred operating system (e.g., Windows, Linux) following its specific installation instructions. This typically involves booting from a USB drive or DVD.
- Connect to Network: Once the OS is installed, connect to your network via Wi-Fi 6 or an Ethernet cable.
5. Operating Instructions
5.1 Basic Operation
- Power On/Off: Press the power button to turn the PC on. To turn off, use the operating system's shutdown function. A short press on the power button can put the PC to sleep.
- Display Adjustment: The display can be tilted from -5 to 25 degrees to achieve an optimal viewing angle. Gently adjust the top or bottom edge of the screen to tilt it.

Figure 5.1: The display supports tilt angle adjustment for ergonomic viewing.
5.2 Using Integrated Peripherals
- Webcam: The built-in 5MP HD webcam is ready for video calls and conferences. Ensure your operating system and applications have permission to access the camera.
- Microphone: The integrated microphone captures audio for calls and voice commands. Adjust microphone levels in your operating system's sound settings.
- Speakers: The built-in speakers provide audio output. Adjust volume using your operating system's sound controls or external keyboard media keys.
5.3 Connectivity
- Wi-Fi 6: Connect to wireless networks for internet access. Configure Wi-Fi settings through your operating system.
- Ethernet: For a stable wired connection, plug an Ethernet cable into the network port.
- USB Ports: Use the USB 2.0 and USB 3.0 ports to connect external devices such as USB drives, printers, or additional peripherals.
- HDMI/VGA: Connect an external monitor or projector using the HDMI or VGA port for extended display options.
6. Maintenance
Proper maintenance ensures the longevity and optimal performance of your PC.
- Cleaning the Screen: Use a soft, lint-free cloth slightly dampened with water or a screen cleaner specifically designed for electronics. Do not spray cleaner directly onto the screen.
- Cleaning the Chassis: Wipe the exterior surfaces with a soft, dry cloth. Avoid abrasive cleaners or solvents.
- Ventilation: Ensure the ventilation openings on the back and sides of the PC are not blocked to prevent overheating.
- Software Updates: Regularly update your operating system and drivers to ensure security and performance.
- Data Backup: Periodically back up important data to an external drive or cloud storage.
7. Troubleshooting
If you encounter issues, refer to the following common problems and solutions.
| Problem | Possible Solution |
|---|---|
| PC does not power on. | Check if the power adapter is securely connected to both the PC and the wall outlet. Ensure the power outlet is functional. |
| No display on screen. | Ensure the PC is powered on. If an external monitor is connected, check its power and cable connection. Try restarting the PC. |
| Keyboard or mouse not responding. | Check USB connections. Try plugging them into different USB ports. If wireless, ensure batteries are charged and dongle is connected. |
| No internet connection (Wi-Fi/Ethernet). | For Wi-Fi, check if Wi-Fi is enabled in your OS settings and if you're connected to the correct network. For Ethernet, ensure the cable is properly connected to both the PC and the router/modem. Restart your router/modem. |
| Webcam or microphone not working. | Check privacy settings in your operating system to ensure applications have permission to access the camera and microphone. Ensure drivers are up to date. |
8. Specifications
Detailed technical specifications for the suevery All-in-One PC (Model: I22X W1-99).
| Feature | Detail |
|---|---|
| Brand | suevery |
| Model Number | I22X W1-99 |
| Operating System | DOS (User-installable OS) |
| CPU Model | Intel Core i5 7300U |
| CPU Speed | 2.6 GHz (up to 3.5 GHz Turbo) |
| RAM Memory Installed | 16 GB DDR3 |
| RAM Memory Maximum Size | 32 GB |
| Memory Storage Capacity | 256 GB SSD (PCIE x 2) |
| Graphics Coprocessor | Intel HD Graphics 620 (Integrated) |
| Screen Size | 21.5 Inches |
| Display Resolution Maximum | 1920x1080 Pixels (Full HD) |
| Display Type | LED IPS Anti-glare |
| Connectivity Technology | Ethernet, Wi-Fi 6 |
| Video Output Interface | HDMI, VGA |
| Total USB Ports | 6 (2x USB 3.0, 4x USB 2.0) |
| Built-In Media | Webcam (5MP), Speakers, Microphone |
| Power Consumption | 90 Watts |
| Color | White |
9. Warranty Information
The suevery All-in-One PC comes with a 1-Year Limited Warranty from the date of purchase. This warranty covers manufacturing defects and workmanship under normal use. It does not cover damage caused by misuse, accidents, unauthorized modifications, or external factors. Please retain your proof of purchase for warranty claims.
10. Customer Support
For technical assistance, troubleshooting beyond this manual, or warranty inquiries, please contact suevery customer support through the retailer where you purchased the product or refer to the official suevery website for contact information.
Please have your product model number (I22X W1-99) and proof of purchase ready when contacting support.