1. Introduction
This manual provides detailed instructions for the assembly, operation, and maintenance of your IDEALHOUSE Rolling Kitchen Island. Please read all instructions carefully before beginning assembly or using the product to ensure safe and efficient operation. Keep this manual for future reference.

Figure 1.1: IDEALHOUSE Rolling Kitchen Island in use.
2. Safety Information
Please observe the following safety guidelines to prevent injury or damage to the product:
- Ensure all parts are properly secured before use. Regularly check and tighten all fasteners.
- Use caution when moving the island on uneven surfaces to prevent tipping.
- Do not allow children to play on, with, or around the cart.
- Always follow the included assembly manual carefully for proper assembly and stability.
- Do not overload shelves or drawers. Distribute weight evenly.
- Keep liquids away from the charging station to prevent electrical hazards.
3. Package Contents
Before assembly, verify that all components are present and undamaged. If any parts are missing or damaged, please contact customer support.
- Main Body Panels (Side panels, back panel, bottom panel)
- Countertop (Main surface and Drop-Leaf extension)
- Drawers (Fronts, sides, bottoms, slides)
- Cabinet Doors and Hinges
- Adjustable Shelves and Shelf Pins
- Side Racks/Spice Rack Components
- Charging Station Unit
- Lockable Casters (5 units)
- Hardware Pack (Screws, dowels, cam locks, handles, etc.)
- Assembly Instructions Manual
4. Setup and Assembly
Assembly is required for this product. A detailed assembly instruction manual is included in the packaging. Please follow the step-by-step instructions provided in that manual carefully. Assembly typically involves:
- Unpacking all components and verifying against the parts list.
- Assembling the main frame of the island.
- Installing drawer slides and assembling drawers.
- Attaching cabinet doors and hinges.
- Mounting the countertop and drop-leaf mechanism.
- Installing the charging station.
- Attaching the lockable casters to the base.
- Installing side racks and internal shelves.
While the instructions are designed to be clear, assembly can be time-consuming and may require two people for certain steps. Ensure all connections are secure before use.

Figure 4.1: Product dimensions and component breakdown.
5. Operating Instructions
5.1. Drop-Leaf Countertop
The kitchen island features a drop-leaf countertop to expand your workspace or dining area. To extend, gently lift the drop-leaf section until it is horizontal and supported by the triangular wooden frame underneath. To retract, lift the drop-leaf slightly, push the support frame inwards, and lower the leaf until it is flush with the side of the island.

Figure 5.1: Drop-leaf countertop mechanism.
5.2. Charging Station
The built-in charging station includes three AC outlets (125V/12A) with a maximum power of 1500 Watts. The power cord is 4.9 feet long. To use, plug the island's power cord into a standard wall outlet. You can then plug your devices into the outlets on the island. Ensure devices do not exceed the maximum power rating.

Figure 5.2: Charging station and caster details.
5.3. Mobility and Stability (Casters)
The island is equipped with five 360° rotation casters for easy movement. Each caster can be locked to secure the island in place. To lock a caster, press down on the lever located on the wheel. To unlock, lift the lever. Ensure all casters are locked when the island is stationary to prevent accidental movement.
5.4. Storage Features
The island offers various storage options:
- Utility Drawers: Three wide utility drawers provide space for utensils and smaller kitchen items.
- Cabinet Storage: A large cabinet with doors offers ample space for appliances or larger items. Some cabinets may include smooth slide-out trays for easy access to contents.
- Side Racks: Open shelving or spice racks on the side provide convenient storage for bottles, spices, or frequently used items.
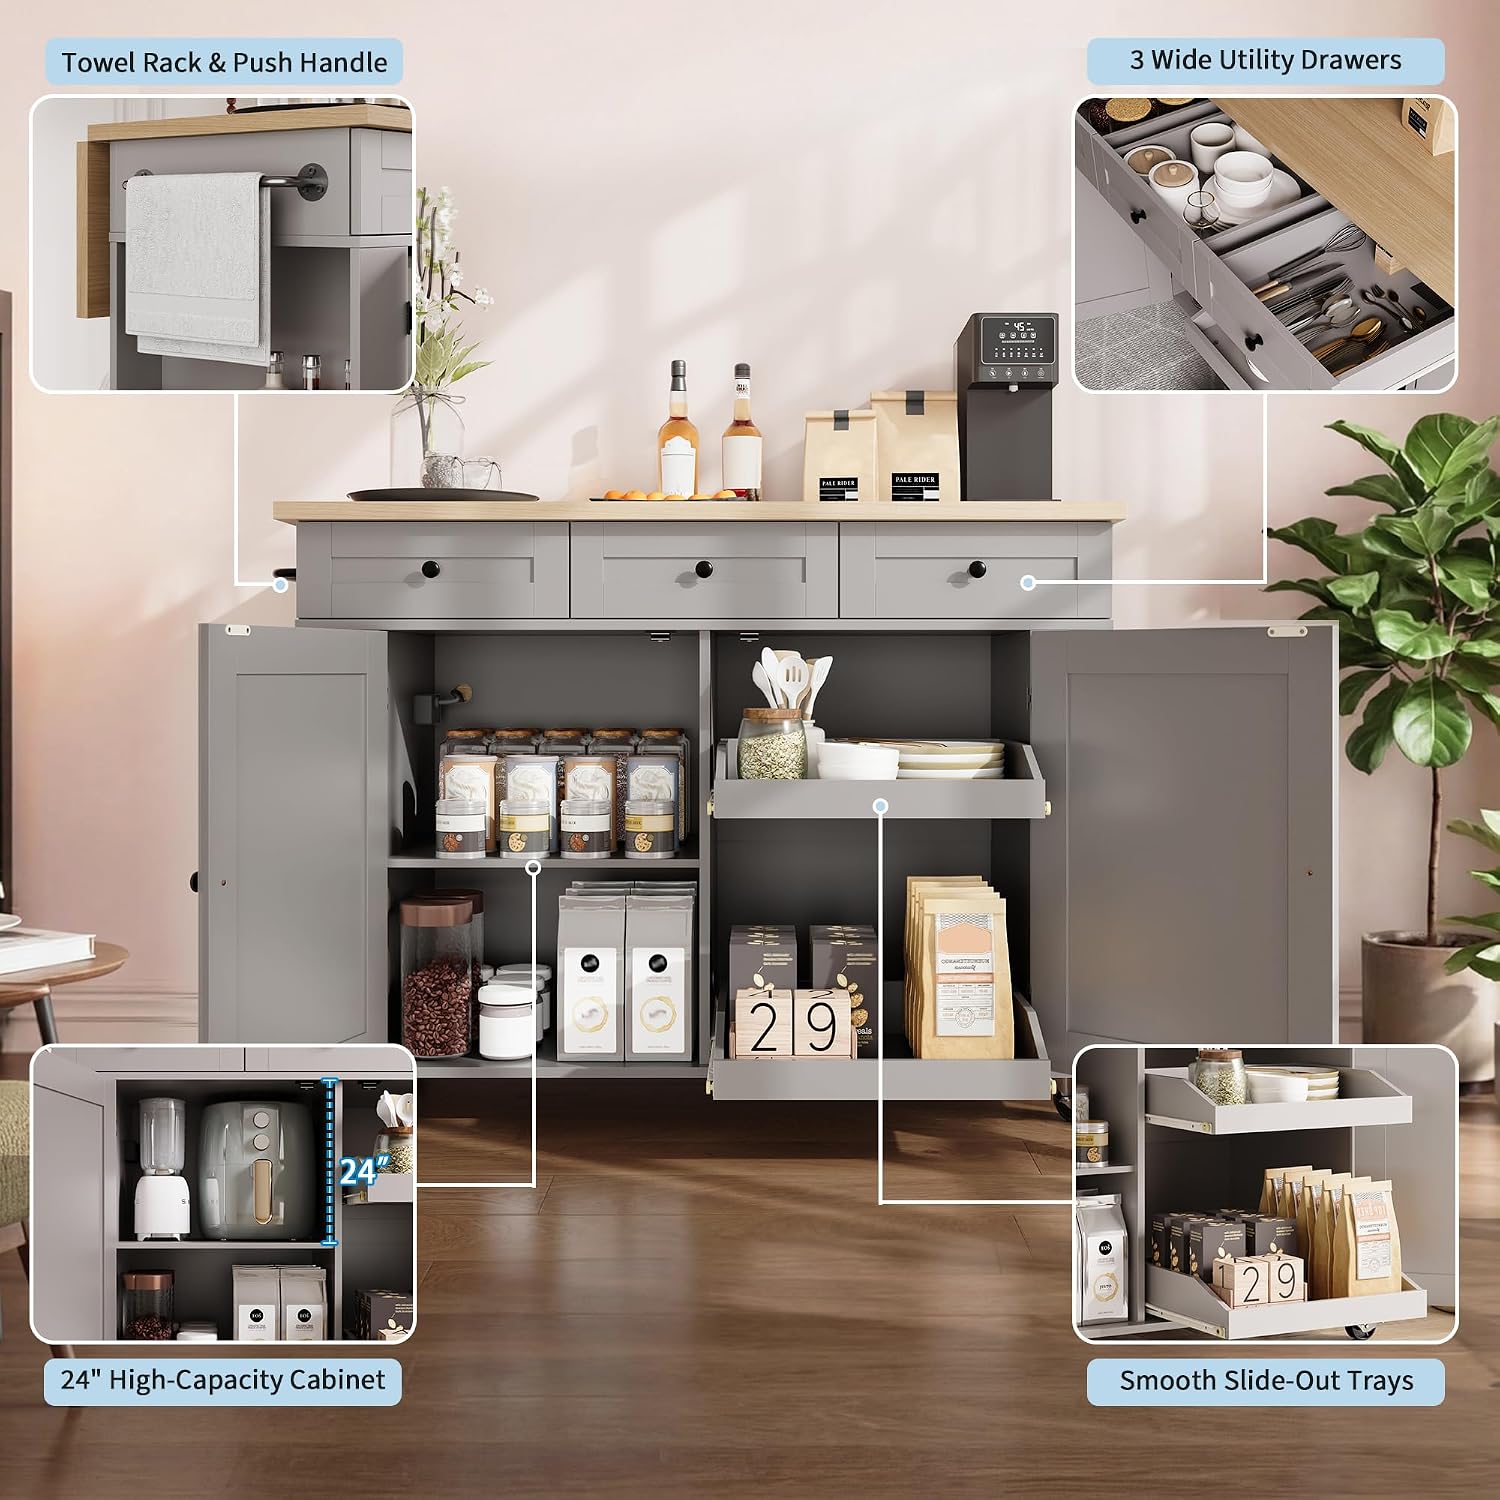
Figure 5.3: Internal storage and drawer details.
6. Maintenance
To ensure the longevity and appearance of your kitchen island:
- Cleaning: Wipe surfaces with a soft, damp cloth. Avoid harsh chemicals or abrasive cleaners that may damage the finish.
- Spills: Clean up spills immediately to prevent staining, especially on the countertop.
- Hardware: Periodically check all screws and fasteners to ensure they are tight. Retighten as necessary to maintain stability.
- Casters: Keep casters free of debris to ensure smooth movement. Lubricate if necessary.
7. Troubleshooting
If you encounter issues with your kitchen island, refer to the following common problems and solutions:
- Drawers do not close smoothly or align:
Check that the drawer slides are correctly installed and aligned. Ensure no obstructions are preventing the drawer from closing fully. Verify that all assembly hardware for the drawers and slides is securely tightened. - Casters do not lock or move properly:
Ensure the locking mechanism is fully engaged or disengaged. Check for any debris (e.g., hair, lint) wrapped around the wheels that might impede movement. - Island feels wobbly:
Recheck all assembly hardware and tighten any loose screws. Ensure the island is on a flat, level surface. - Charging station not working:
Verify that the island's power cord is securely plugged into a functional wall outlet. Check if the device you are trying to charge is working correctly. Do not exceed the maximum power rating of 1500 Watts.
If problems persist after attempting these solutions, please contact customer support.
8. Specifications
| Product Dimensions (D x W x H) | 47.24" x 29.92" x 36.42" |
| Material | Engineered Wood |
| Item Weight | 138.94 Pounds |
| Number of Shelves | 3 |
| Charging Station Outlets | 3 AC Outlets |
| Charging Station Voltage/Amperage | 125V/12A |
| Charging Station Max Power | 1500 Watts |
| Power Cord Length | 4.9 Feet |
| Casters | 5 Lockable 360° Rotation Casters |
| Assembly Required | Yes |
9. Warranty and Support
For warranty information or customer support, please refer to the documentation included with your purchase or contact IDEALHOUSE customer service through the retailer where the product was purchased. Please have your model number (PHO_34NJJD8H-HUI-V4586FF4dS) and purchase date available when contacting support.


