1. Introduction
This manual provides essential information for the safe and effective operation of your AWT MIG-140PRO-LED 140Amp 3-in-1 Welding Machine. Please read it thoroughly before use and retain it for future reference. This machine supports Flux Core/Gasless MIG, MMA/Stick, and Lift TIG welding processes.

Image: The AWT MIG-140PRO-LED welding machine in use, demonstrating its 3-in-1 capabilities for Flux Core, MMA, and Lift TIG welding.
2. Safety Information
Always prioritize safety when operating welding equipment. Failure to follow safety guidelines can result in serious injury or death.
- Electrical Safety: Ensure the machine is connected to a properly grounded 110V power source. Avoid welding in damp or wet conditions.
- Personal Protective Equipment (PPE): Always wear a welding helmet with appropriate shade, flame-resistant clothing, welding gloves, and safety shoes. Protect bystanders from arc rays and sparks.
- Fume Ventilation: Weld in a well-ventilated area to avoid inhaling hazardous fumes.
- Fire Prevention: Keep flammable materials away from the welding area. Have a fire extinguisher readily available.
- Machine Protection: The welder is equipped with VRD (Voltage Reduction Device), over-current overload, and overheating protection systems to enhance safety during operation. The metal casing provides additional protection.

Image: The AWT MIG-140PRO-LED welding machine highlighting its safety and protection features.
3. Product Overview and Components
Familiarize yourself with the main components of your AWT MIG-140PRO-LED welding machine.
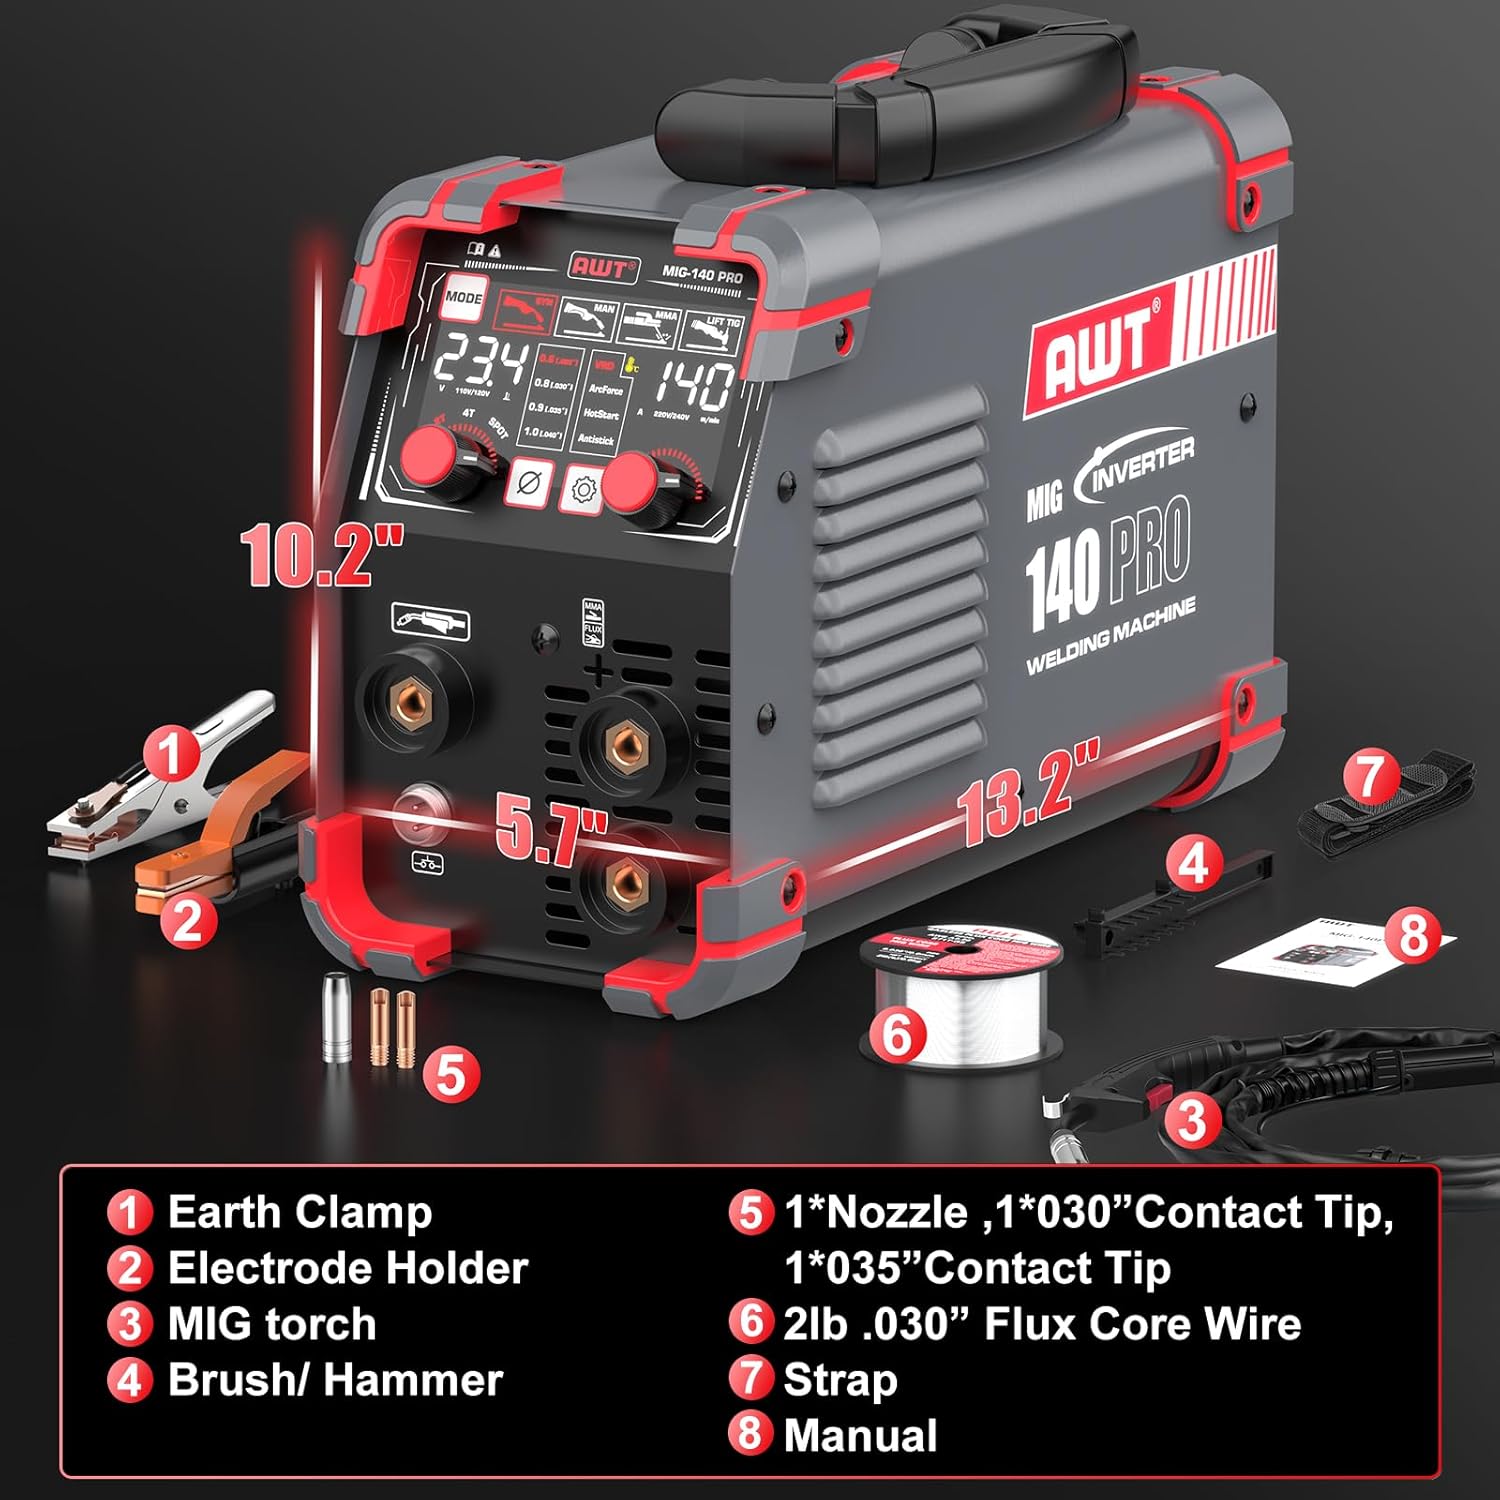
Image: An exploded view diagram of the AWT MIG-140PRO-LED welding machine, showing its dimensions and included accessories.
- Earth Clamp
- Electrode Holder
- MIG Torch
- Brush/Hammer
- Nozzle, .030" Contact Tip, .035" Contact Tip
- 2lb .030" Flux Core Wire
- Strap
- Manual (this document)
4. Setup
4.1 Power Connection
Connect the welding machine to a standard 110V power outlet. Ensure the power switch on the rear panel is in the OFF position before connecting.
4.2 Wire Feed System (for MIG Welding)
The machine features a reliable wire feed system for smooth operation.

Image: An internal view of the welding machine showing the wire feed system with the 2lb spool roll, wire pressing wheel, wire feeding wheel, and automatic wire feed mechanism.
- Open the side panel to access the wire spool compartment.
- Install a 2lb spool of flux core wire (.030" or .035" diameter).
- Thread the wire through the wire feeding wheel and secure it with the wire pressing wheel.
- Ensure the wire feeds smoothly through the MIG torch liner.
4.3 Accessory Connections
Connect the appropriate welding accessories based on the desired welding process.

Image: Diagrams illustrating the correct connections for Flux Core, MMA (Stick), and Lift TIG welding modes on the AWT MIG-140PRO-LED.
- Flux Core (Gasless MIG): Connect the MIG torch to the designated MIG output. Connect the earth clamp to the negative (-) terminal.
- MMA (Stick): Connect the electrode holder to the positive (+) terminal and the earth clamp to the negative (-) terminal.
- Lift TIG: Connect the TIG torch (not included) to the negative (-) terminal and the earth clamp to the positive (+) terminal.
5. Operating Instructions
5.1 Control Panel Overview
The AWT MIG-140PRO-LED features an LED digital display and intuitive controls for easy operation.

Image: A close-up of the control panel, indicating the welding process selector, MIG diameter setting, MMA/MIG function, 2T/4T/SPOT WELD button, and current/wire feed speed adjustment knob.
- Welding Process Selector: Choose between MIG (Flux Core), MMA (Stick), or Lift TIG modes.
- MIG Diameter Setting: Select the appropriate wire diameter (.030" or .035" for flux core).
- Function of MMA/MIG: Adjust specific parameters for MMA or MIG welding.
- 2T/4T/SPOT WELD Button: Select trigger modes for MIG welding (2-touch, 4-touch, or spot weld).
- Current and Wire Feed Speed Adjustment Knob: Adjust welding current and wire feed speed. The LED display provides clear visibility of these settings.
5.2 Welding Modes
- Flux Core (Gasless MIG): Ideal for outdoor use and welding without shielding gas. The machine offers synergic control, automatically optimizing parameters based on wire diameter. Manual adjustments are also possible.
- MMA (Stick): Suitable for welding with E6013 electrodes.
- Lift TIG: Provides precise welding for various materials (TIG torch not included).

Image: Visual representation of the three welding processes supported by the AWT MIG-140PRO-LED: Gasless MIG, MMA (Stick), and Lift TIG.
5.3 Synergic Control
The synergic control feature automatically optimizes welding parameters (voltage, wire feed speed) based on the selected wire diameter (.030" or .035" flux). This simplifies setup for beginners and provides a good starting point for experienced welders. Manual adjustments can be made to fine-tune settings.

Image: A welder utilizing the synergic control feature to easily weld a metal sculpture, demonstrating simplified operation.
5.4 Welding Capacity and Materials
The AWT MIG-140PRO-LED can weld up to 5/32" (4.0mm) mild steel. It is suitable for a wide range of materials.

Image: A visual representation showing the welding capacity of the machine, capable of welding materials up to 5/32 inches (4mm) thick.

Image: A collage of different metal types, including square pipe, mild steel, cast iron, sheet metal, and stainless steel, indicating the wide range of materials the welder can handle.
6. Maintenance
Regular maintenance ensures the longevity and optimal performance of your welding machine.
6.1 Cooling System
The machine features an efficient heat dissipation system with a high-speed cooling fan and 'Fan-On-Demand' technology to prevent overheating.

Image: A cutaway diagram illustrating the internal cooling system of the AWT MIG-140PRO-LED, highlighting advanced IGBT technology, high-speed cooling fan, overheat/overload protection, thermal protection, and low-noise operation with Fan-On-Demand.
- Keep the ventilation openings clear of dust and debris to ensure proper airflow.
- Periodically clean the internal components with compressed air, ensuring the machine is unplugged.
6.2 General Cleaning
- Wipe down the exterior of the machine with a clean, dry cloth.
- Inspect cables and connections for wear or damage before each use. Replace any damaged components immediately.
- Check the MIG torch nozzle and contact tip regularly for spatter buildup and replace as needed.
7. Troubleshooting
This section provides solutions to common issues you might encounter.
| Problem | Possible Cause | Solution |
|---|---|---|
| No power to the machine | Power cord unplugged, circuit breaker tripped, power switch off | Check power connections, reset circuit breaker, ensure power switch is ON. |
| No arc when welding | Poor earth clamp connection, incorrect settings, worn contact tip/electrode | Ensure good contact for earth clamp, verify welding parameters, replace consumables. |
| Wire feed issues (MIG) | Wire tangled, incorrect wire tension, clogged liner, wrong contact tip size | Check wire spool, adjust wire tension, clean or replace liner, use correct contact tip. |
| Overheat protection activated | Exceeded duty cycle, blocked ventilation | Allow machine to cool down, ensure clear ventilation. |
8. Specifications
Key technical specifications for the AWT MIG-140PRO-LED welding machine.
| Feature | Specification |
|---|---|
| Model Number | MIG-140PRO-LED |
| Manufacturer | AWT |
| Input Voltage | 110V |
| Output Current | Up to 140A |
| Welding Processes | Flux Core/Gasless MIG, MMA/Stick, Lift TIG |
| Max Welding Thickness | 5/32" (4.0mm) mild steel |
| Compatible Wire Diameter | .030" / .035" flux core |
| Compatible Electrodes (MMA) | E6013 |
| Inverter Technology | IGBT |
| Item Weight | 10 pounds (approx. 9.9 lbs) |
| Package Dimensions | 17.28 x 13.11 x 7.6 inches |
| Operating Temperature Range | -20°C to 50°C |

Image: A visual representation of the welding machine's operational temperature range, from -20°C to 50°C.
9. Warranty and Support
AWT is committed to providing high-quality products and customer satisfaction.
9.1 Customer Support
For any questions or assistance, please contact AWT customer service. We offer 24-hour service and are dedicated to helping you.
Contact information can typically be found on the AWT official website or through your purchase platform.