Introduction
Thank you for choosing the Fydeamer Gas Spring Monitor Arm. This manual provides detailed instructions for the safe and efficient installation, operation, and maintenance of your new monitor arm. Please read this manual thoroughly before installation and keep it for future reference.

Image: The Fydeamer Gas Spring Monitor Arm, designed for ergonomic display positioning.
Safety Information
WARNING: Failure to read and follow these instructions may result in serious personal injury or property damage.
- Ensure your monitor's weight is within the specified load capacity (2-9kg).
- Verify your monitor's VESA mounting pattern (75x75mm or 100x100mm) is compatible.
- Do not overtighten screws during assembly, as this may cause damage.
- Keep children and pets away during installation.
- If you have any doubts about installation, consult a qualified professional.
Package Contents
Please check that all components are present and undamaged before proceeding with installation.
- Monitor Arm Assembly
- Desk Clamp Base
- Grommet Mount Base
- VESA Plate
- Hardware Kit (screws, washers, Allen keys)
- Instruction Manual
Setup
1. Choose Mounting Method
Your monitor arm supports two installation methods: C-clamp and Grommet mount. Select the method that best suits your desk and preferences.

Image: Illustration of the two mounting options: C-clamp for desk edges and Grommet for desks with a pre-drilled hole.
- C-Clamp Installation:
- Suitable for desk thickness: 10-70mm.
- Attach the C-clamp base to the edge of your desk and tighten securely.
- Grommet Mount Installation:
- Suitable for desk thickness: 10-60mm.
- Requires a desk hole diameter: 10-60mm.
- Insert the grommet base through the desk hole and secure it from underneath.
Note: Not suitable for glass, marble, or plastic desks.
2. Install the Arm
- Slide the monitor arm assembly onto the pole of the installed base.
- Adjust the arm to your desired height and tighten the collar screw to secure it.
3. Attach Monitor (VESA Mount)
Follow these steps to securely attach your monitor to the VESA plate.

Image: A visual guide demonstrating the four steps to mount a display onto the monitor arm's VESA plate.
- Step 1: Attach the VESA plate to the back of your monitor using the provided screws and washers. Ensure the screws are not fully tightened yet, leaving about 5mm gap.
- Step 2: Carefully hang the monitor onto the arm's VESA head.
- Step 3: Insert the remaining two screws and washers into the bottom holes of the VESA plate and tighten them slightly.
- Step 4: Fully tighten all four screws to secure the monitor to the arm.
Operating
Adjusting the Monitor Arm
The Fydeamer monitor arm offers full motion adjustment for optimal viewing comfort.

Image: An illustration detailing the monitor arm's adjustable features, including left/right swivel (±90°), tilt (+90°/-45°), and 360° rotation.
- Height Adjustment: The gas spring mechanism allows for smooth vertical adjustment from 7cm to 45cm. Gently push or pull the monitor to your desired height.
- Swivel: The arm can swivel 360° horizontally, allowing you to share your screen or change viewing angles easily.
- Tilt: Adjust the monitor's tilt angle from +90° to -45° to reduce glare and find the perfect ergonomic position.
- Rotation: Rotate your monitor 360° to switch between landscape and portrait orientations.
Gas Spring Tension Adjustment
The gas spring tension needs to be adjusted according to your monitor's weight to ensure stable positioning.
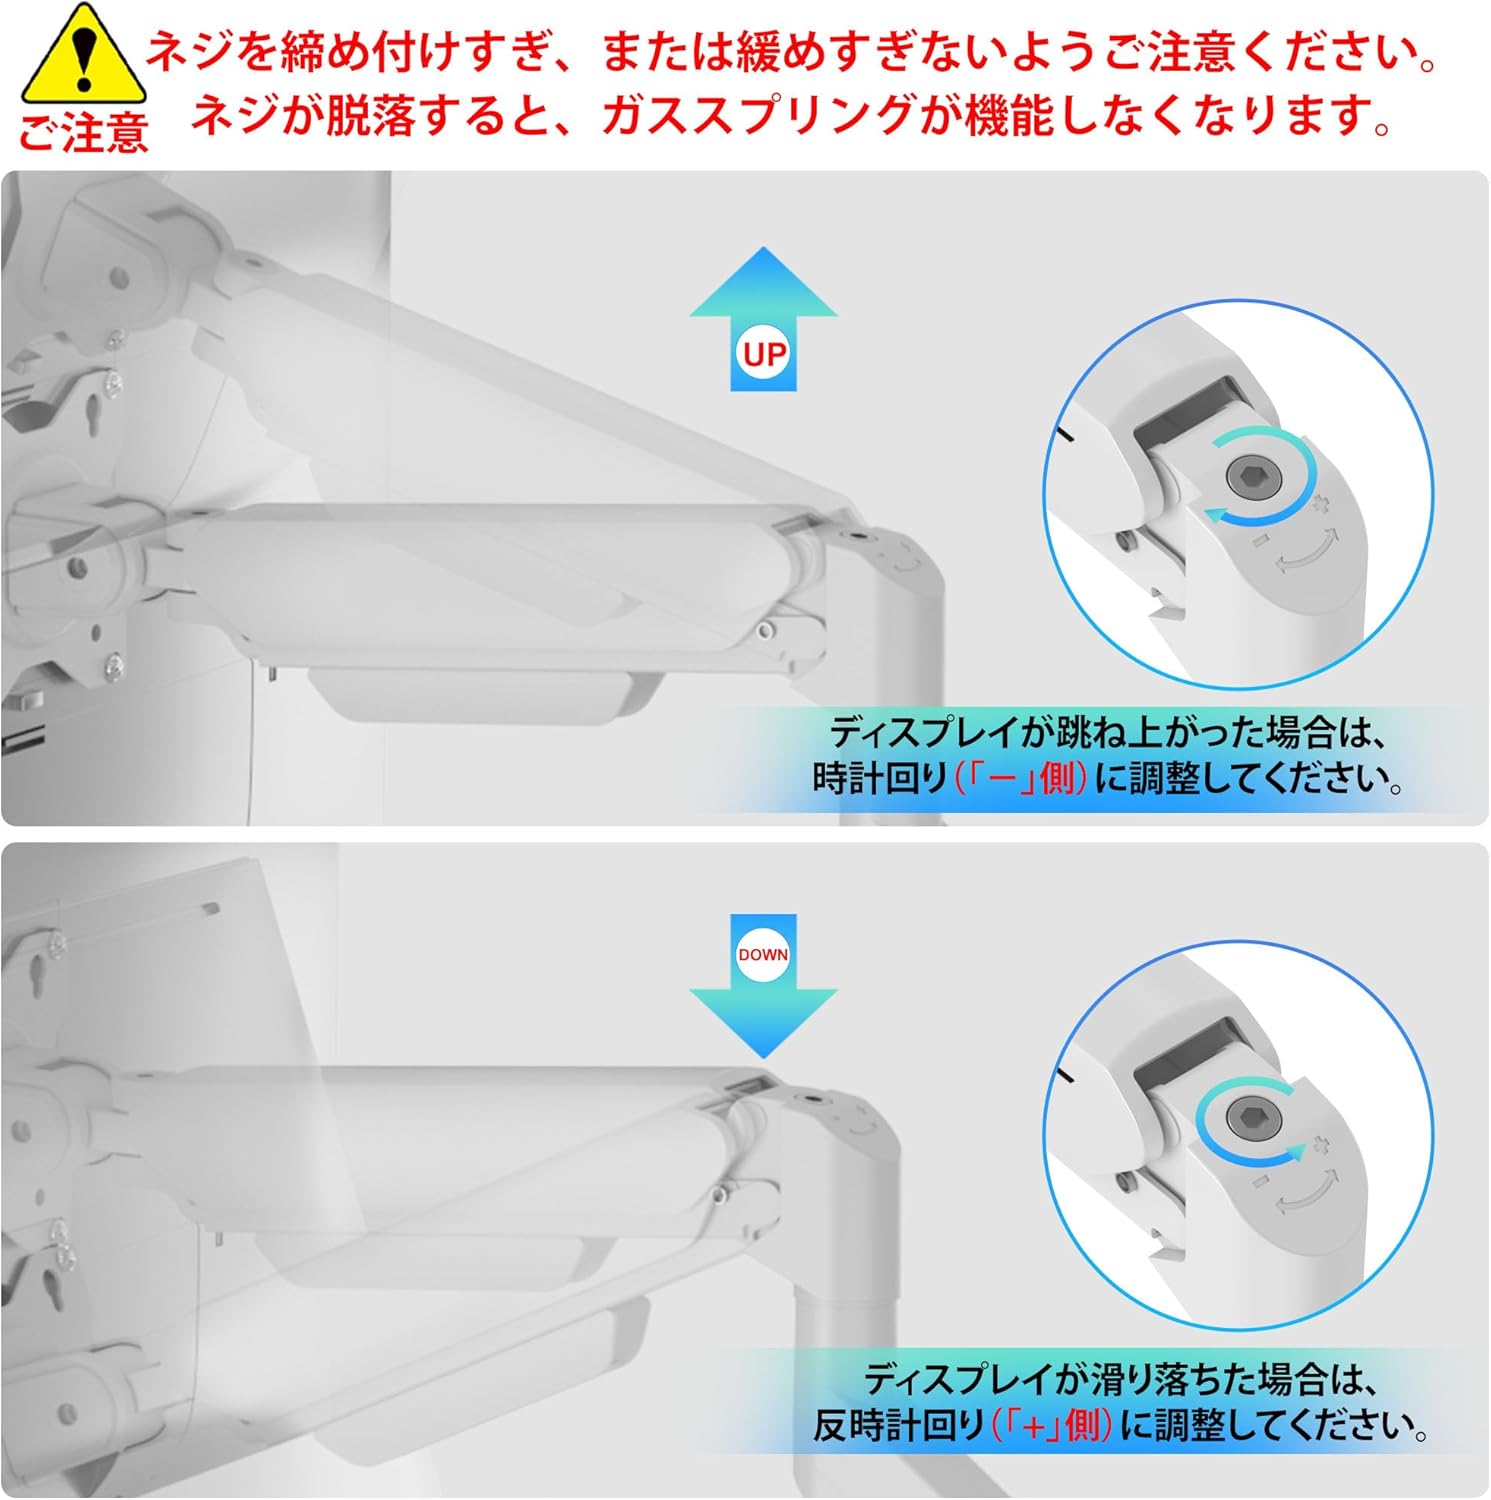
Image: A close-up view of the gas spring adjustment mechanism, showing how to use an Allen key to increase or decrease tension. Clockwise rotation for 'UP' (heavier monitor), counter-clockwise for 'DOWN' (lighter monitor).
- If the display springs up, turn the screw clockwise towards the "-" side to decrease tension (for heavier monitors).
- If the display slides down, turn the screw counter-clockwise towards the "+" side to increase tension (for lighter monitors).
- Adjust gradually until the monitor stays in place when released.
Cable Management
Maintain a clean and organized workspace by routing cables through the integrated cable management system.

Image: A detailed view of the monitor arm's cable management feature, illustrating how power and display cables can be neatly tucked away within the arm's channels.
Open the cable covers on the underside of the arm. Route your monitor's power and display cables through these channels and close the covers. This keeps your desk tidy and prevents cable clutter.
Maintenance
To ensure the longevity and optimal performance of your Fydeamer monitor arm, follow these simple maintenance guidelines:
- Regularly check all screws and connections to ensure they are secure. Retighten if necessary.
- Clean the arm with a soft, damp cloth. Avoid abrasive cleaners or solvents.
- Do not apply excessive force when adjusting the arm; use the gas spring adjustment if the monitor is too heavy or light.
Troubleshooting
| Problem | Possible Cause | Solution |
|---|---|---|
| Monitor sags or falls | Gas spring tension is too low for monitor weight. | Increase gas spring tension by turning the adjustment screw towards the "+" side. |
| Monitor springs up | Gas spring tension is too high for monitor weight. | Decrease gas spring tension by turning the adjustment screw towards the "-" side. |
| Arm is unstable | Mounting clamp/grommet is not tightened sufficiently. | Ensure the C-clamp or grommet mount is securely fastened to the desk. |
| Monitor does not attach properly | Incorrect VESA pattern or screw size. | Verify monitor VESA compatibility (75x75mm or 100x100mm) and use correct screws from hardware kit. |
Specifications
| Feature | Detail |
|---|---|
| Model Number | MYTC51BWW-SBT-JP |
| Screen Size Compatibility | 17-32 inches |
| Load Capacity | 2-9 kg (4.4-19.8 lbs) |
| VESA Compatibility | 75x75mm, 100x100mm |
| Height Adjustment Range | 7-45 cm (2.7-17.7 inches) |
| Tilt Range | +90° to -45° |
| Swivel Range | 360° |
| Rotation Range | 360° |
| Mounting Options | C-Clamp, Grommet |
| Desk Thickness (C-Clamp) | 10-70mm |
| Desk Thickness (Grommet) | 10-60mm |
| Grommet Hole Diameter | 10-60mm |
| Color | White & Black |
Warranty and Support
The Fydeamer Gas Spring Monitor Arm comes with a 1-year product warranty from the date of purchase. This warranty covers manufacturing defects and ensures the product is free from defects in material and workmanship under normal use.
For any questions, concerns, or technical support, please contact our customer service team. We offer dedicated support to assist you with any issues you may encounter.
Contact Information:
- Email: support@fydeamer.com
- Website: www.fydeamer.com