1. Introduction
This manual provides detailed instructions for the safe and effective use of your Neoteck MY2610D Clamp Meter. This True RMS digital clamp multimeter is designed for various electrical measurements in household, automotive, industrial, and HVAC applications. Please read this manual thoroughly before operation and retain it for future reference.
2. Safety Information
Your safety is paramount. Always observe the following safety precautions to prevent electric shock, injury, or damage to the meter.
General Safety Guidelines
- Always adhere to CAT III 600V safety standards.
- The meter features intelligent anti-burnout and overload protection. However, do not attempt to measure voltages or currents exceeding the specified maximums.
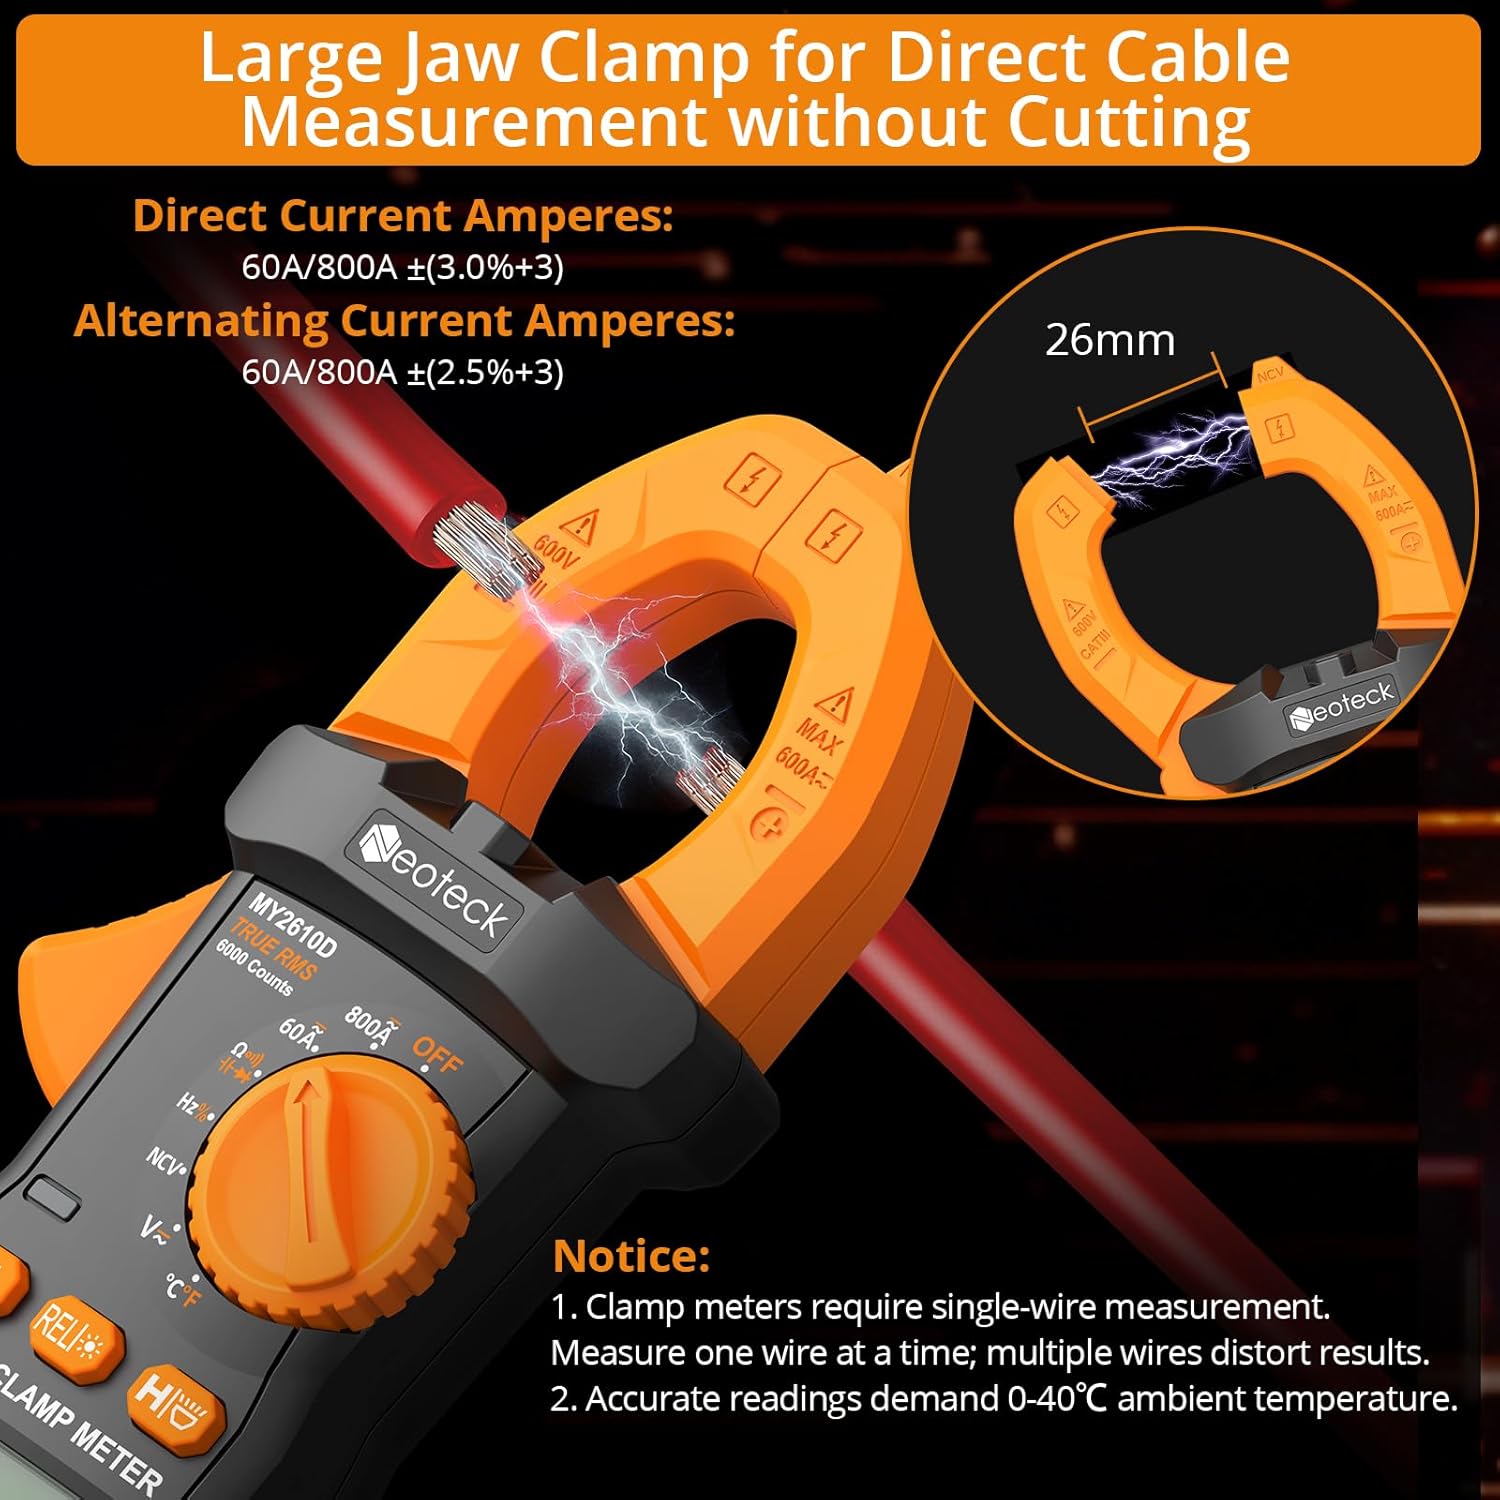
- When measuring current with the clamp jaw, ensure only a single wire is within the clamp. Measuring multiple wires simultaneously will result in inaccurate readings.
- For accurate current measurements, the ambient temperature must be maintained within the range of 0°C to 40°C.
- Inspect test leads for damage (e.g., cracked insulation, exposed metal) before each use. Do not use damaged leads.
- Always turn off the device and disconnect test leads from the circuit before opening the battery compartment or performing any maintenance.
- Do not operate the meter in wet environments or when your hands are wet.

3. Product Overview
Key Features
- 6000 Counts Display: Provides high-resolution readings.
- 800A AC/DC Current Measurement: Capable of measuring high currents.
- 26mm High-Capacity Jaw: Easily clamps around thick wires.
- True RMS: Ensures accurate readings for both sinusoidal and non-sinusoidal waveforms.
- Multiple Measurement Functions: Measures AC/DC Voltage, Resistance, Capacitance, Frequency, Duty Cycle, Temperature, Diode, and Continuity.
- Non-Contact Voltage (NCV) Detection: For safe identification of live wires.
- User-Friendly Features: Includes Data Hold, Backlight, Flashlight, and 15-minute Auto Power-Off.
Components

The complete package includes:
- 1 x Neoteck MY2610D Clamp Meter
- 1 x Pair of Test Leads
- 3 x AAA Batteries (pre-installed or included separately)
- 1 x User Manual
- 1 x Storage Pouch
- 1 x Screwdriver
- 1 x K-type Thermocouple
- 1 x Pair of Alligator Clips

4. Setup
Battery Installation
The Neoteck MY2610D Clamp Meter requires 3 AAA batteries (included).
- Ensure the meter is powered off by rotating the central dial to the "OFF" position.
- Locate the battery compartment on the back of the meter.
- Use the included screwdriver to open the battery compartment cover.
- Insert the 3 AAA batteries, observing correct polarity (+/-) as indicated inside the compartment.
- Replace the battery compartment cover and secure it with the screw.
Connecting Test Leads
For voltage, resistance, capacitance, frequency, diode, and continuity measurements, connect the test leads to the appropriate input terminals.
- Insert the red test lead into the "INPUT" terminal.
- Insert the black test lead into the "COM" terminal.
5. Operating Instructions
Power On/Off
Rotate the central dial from "OFF" to any desired measurement function to power on the meter. Rotate the dial back to "OFF" to power off the meter. The meter features a 15-minute auto power-off function to conserve battery life if no operation is detected.
AC/DC Current Measurement (Clamp Jaw)
To measure AC or DC current, rotate the dial to the "800A" or "60A" AC/DC current range. Open the clamp jaw by pressing the trigger and enclose a single conductor (wire) within the jaw. The current reading will be displayed.
Important: Only clamp around a single conductor (wire) at a time. Clamping around multiple wires will result in an incorrect reading. Ensure the wire is centered in the jaw for optimal accuracy.
AC/DC Voltage Measurement
Rotate the dial to the "V~" (AC Voltage) or "V-" (DC Voltage) range. Connect the red test lead to the positive point and the black test lead to the negative or common point of the circuit. The voltage reading will appear on the display.
Video demonstrating the Neoteck MY2610D Clamp Meter performing various measurements, including AC voltage measurement in a circuit breaker box and DC voltage measurement on a 9V battery.
Resistance, Capacitance, Diode, Continuity Measurement
Rotate the dial to the appropriate function symbol (Ω for Resistance, ∔ for Capacitance, ⇋ for Diode, )))) for Continuity). Use the "SEL" button to cycle between functions if they share a dial position. Connect the test leads across the component to be measured.

Non-Contact Voltage (NCV) Detection
Rotate the dial to "NCV". Place the NCV sensor probe near a live AC conductor. The meter will emit an audible alarm and provide a visual indication (warning light) if AC voltage is detected, without requiring direct contact.

Frequency and Duty Cycle Measurement
Rotate the dial to the "Hz%" range. Use the "SEL" button to switch between Frequency (Hz) and Duty Cycle (%). Connect the test leads to the circuit to measure the frequency or duty cycle of a signal.
Data Hold Function
Press the "HOLD" button to freeze the current reading on the display. Press it again to release the hold and resume live readings.
Backlight and Flashlight
Press the backlight button (often integrated with HOLD or a separate button) to turn on the LCD backlight for improved visibility in dim lighting. The integrated flashlight can be activated for illuminating dark work areas.
6. Maintenance
Cleaning
Wipe the meter with a damp cloth and mild detergent. Do not use abrasive cleaners or solvents, as these may damage the casing or display.
Battery Replacement
When the battery indicator appears on the display, replace the batteries as described in the "Battery Installation" section (Section 4.1). Prompt battery replacement ensures accurate readings and proper device function.
Storage
If the meter is not used for an extended period, remove the batteries to prevent leakage and potential damage. Store the meter in its protective pouch in a dry, cool environment, away from direct sunlight and extreme temperatures.
7. Troubleshooting
Refer to the following common issues and solutions:
- No Display/Meter Does Not Power On:
Check battery installation and ensure batteries are charged. Verify that the rotary dial is not in the "OFF" position. - Inaccurate Current Reading:
Ensure that only a single wire is within the clamp jaw. Measuring multiple wires will cause incorrect measurements. Confirm the ambient temperature is within the specified range of 0°C to 40°C. - "OL" (Overload) on Display:
This indicates an overload or an out-of-range measurement. Select a higher measurement range if available, or verify that the circuit parameters are within the meter's maximum capabilities. - No Continuity Beep:
Ensure test leads are properly connected to the meter and the component. Verify the component is not open-circuited. - NCV Not Detecting Voltage:
Ensure the NCV sensor is placed close enough to the live conductor. Verify the voltage is within the NCV detection range (typically 90V-1000V AC).
8. Specifications
| Parameter | Value |
|---|---|
| Model Number | MY2610D |
| Display | 6000 Counts |
| AC/DC Current Range | 800A |
| Jaw Opening | 26mm |
| Safety Rating | CAT III 600V |
| Power Source | 3 AAA Batteries (included) |
| Product Dimensions | 7.28 x 2.76 x 1.38 inches |
| Item Weight | 6.74 ounces (191 Grams) |
| Functions | AC/DC Voltage, Resistance, Capacitance, Frequency, Duty Cycle, Temperature, Diode, Continuity, NCV |
9. Warranty & Support
For warranty information, technical assistance, or customer support regarding your Neoteck MY2610D Clamp Meter, please refer to the official Neoteck website or contact their customer service directly. You can also visit the Neoteck Store on Amazon for additional product information and support resources.


