1. Introduction
Thank you for choosing the Hodozzy 4 Channel 2K Dash Cam. This device is designed to provide comprehensive video surveillance for your vehicle, offering 360° coverage with a 2K front camera, an inside camera, and a rear camera. It features advanced functions such as night vision, parking monitoring, G-Sensor collision detection, loop recording, and WiFi connectivity for easy access via a dedicated app. Please read this manual carefully to ensure proper installation, operation, and maintenance of your dash cam.
2. Product Overview
2.1 Key Features
- Complete 360° Coverage: Features a 2K front camera, an inside camera, and a rear camera for comprehensive vehicle surveillance.
- Superior Night Vision: Advanced technology ensures clear footage in low-light conditions.
- Smart Parking Monitor: Automatically records motion around your parked car to detect incidents.
- 8 Versatile Display Modes: Customize your view with single, dual, or quad camera feeds on the 3-inch screen.
- Built-in WiFi & App: Connects to your smartphone for instant viewing, downloading, and sharing of recordings.
- G-Sensor (Gravity Sensing): Automatically locks footage upon detecting a collision, preserving vital evidence.
- Loop Recording: Ensures continuous recording by overwriting the oldest unlocked files when the memory card is full.
- Reverse Assistance: Provides guidelines for safer and easier parking.
- Includes 64GB Memory Card: Ready to use out of the box.
2.2 Package Contents and Device Layout
The package includes the Hodozzy 4 Channel 2K Dash Cam, a power cord, an extended line for the rear camera, anti-slip mats, a 64GB memory card, and this user manual.

Image: Diagram showing the dash cam with its dimensions and labeled components, including brackets, reset hole, HD lens, infrared light, speaker, microphone, menu key, flip up button, power button, down-page button, OK button, Type-C port, TF card slot, and AV-IN port. Also shown are the power cord, extended line, anti-slip mats, and user manual.

Image: Illustration demonstrating the 360-degree coverage provided by the front, rear, left internal, and right internal cameras, showing their respective wide-angle views.
3. Setup and Installation
3.1 Dash Cam Installation Steps
Follow these steps to properly install your Hodozzy 4 Channel 2K Dash Cam:
- Step 1: Clean the Windshield. First, use a clean rag to wipe the glass surface where you intend to mount the dash cam. Ensure the area is free of dust and grease for optimal adhesion.
- Step 2: Attach Mounting Bracket. Secure the mounting bracket to the dash cam. Remove the protective film from the dust sticker on the bracket and firmly press it onto the cleaned windshield in the desired position.
- Step 3: Connect Rear Camera. Connect the rear camera cable to the main dash cam unit. Route the cable neatly along the vehicle's interior to the rear of the car.
- Step 4: Connect Power Supply. Connect the power cord to the dash cam and plug the other end into your vehicle's cigarette lighter socket.
- Step 5: Adjust Angle. Adjust the angle of the dash cam and all cameras to ensure optimal viewing angles for recording. The installation is now complete.
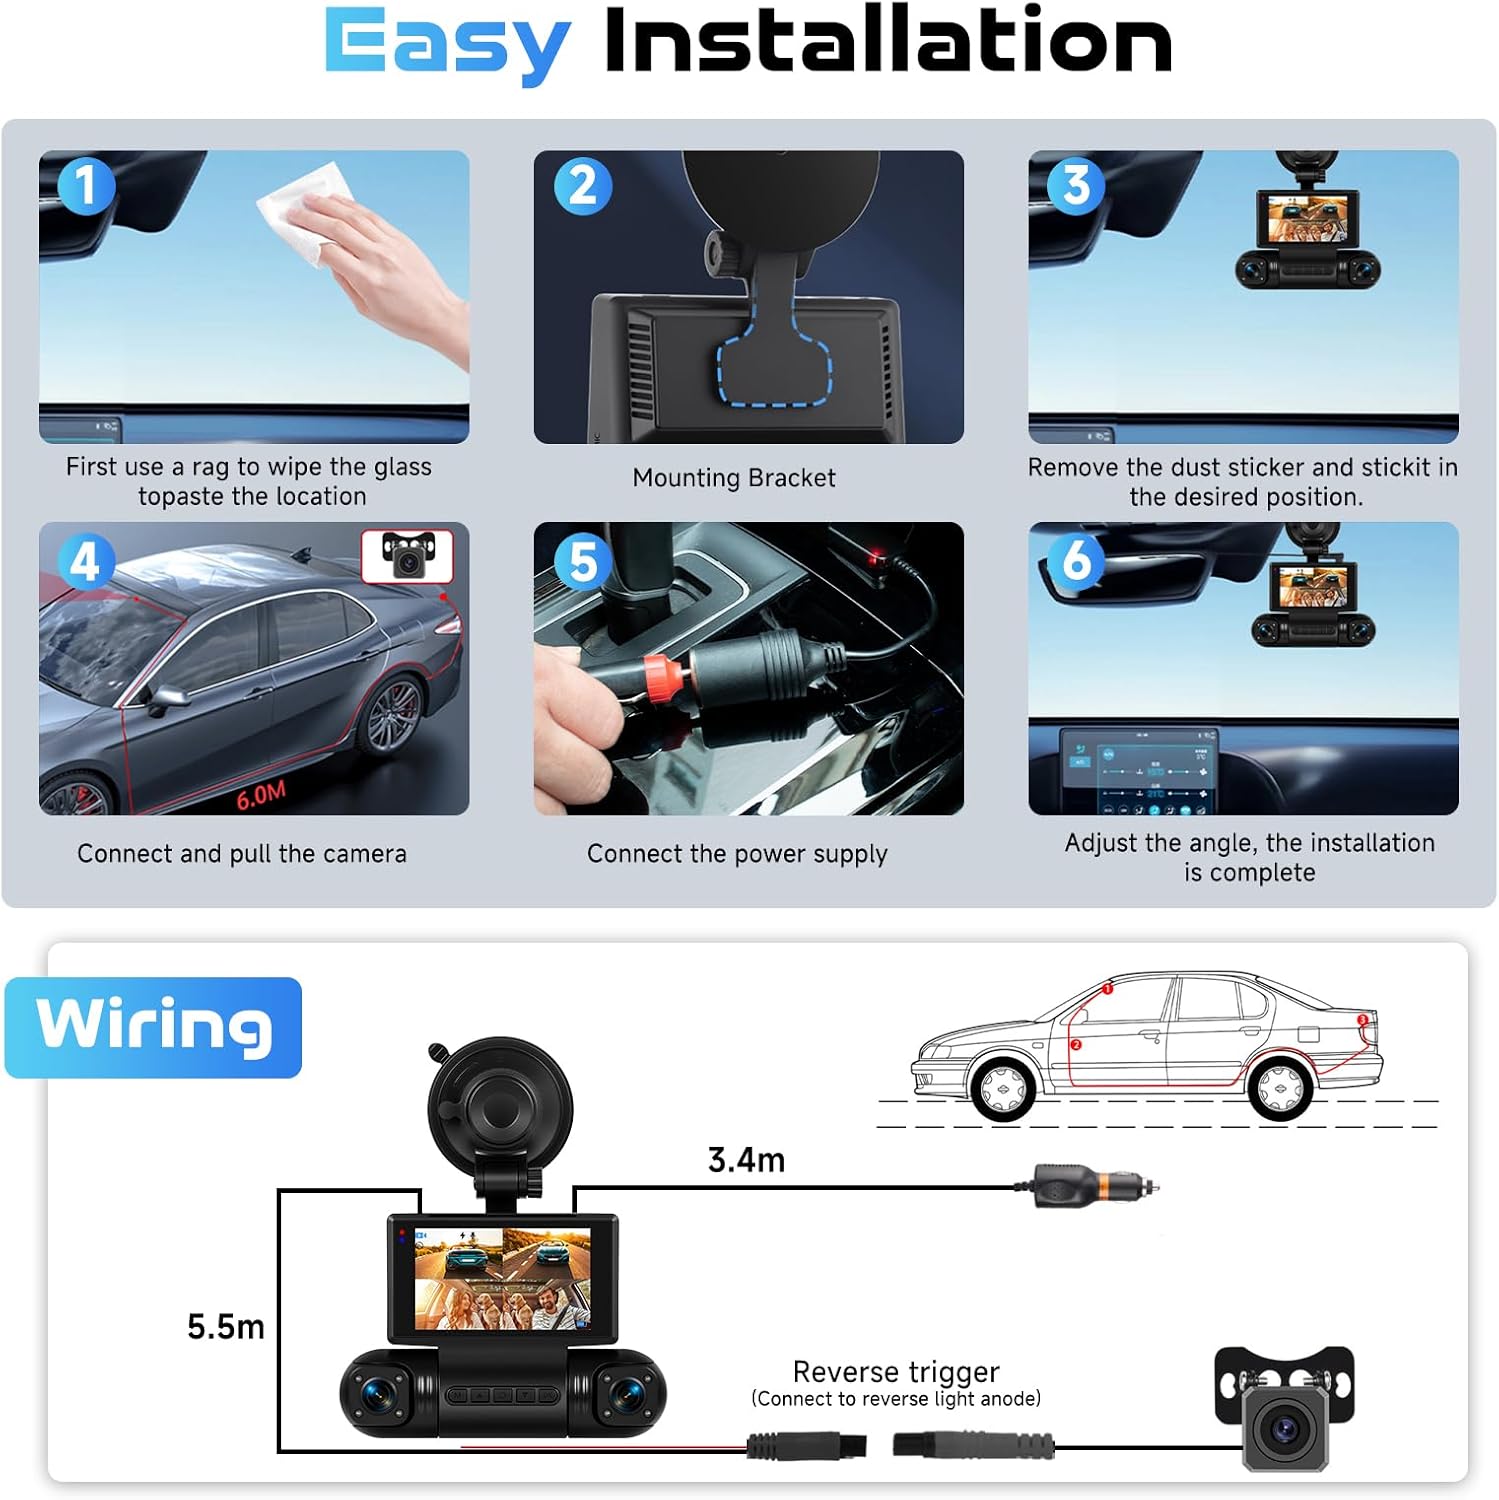
Image: Step-by-step visual guide for installing the dash cam, showing cleaning the windshield, attaching the mounting bracket, connecting the rear camera, connecting power, and adjusting the camera angle.
3.2 Wiring Diagram
The dash cam requires power from the vehicle's 12V socket. The rear camera connects to the main unit and can be optionally connected to the reverse light anode for reverse assistance functionality.

Image: Diagram illustrating the wiring connections for the dash cam, including the main unit, power cord, and rear camera with its reverse trigger connection.
4. Operating Instructions
4.1 Powering On/Off
The dash cam will automatically power on and begin recording when your vehicle's ignition is turned on. It will power off automatically when the ignition is turned off.
4.2 Display Modes
The dash cam offers 8 versatile display modes, allowing you to customize the view on the 3-inch screen. You can switch between these modes to view single, dual, or quad camera feeds according to your preference.

Image: Visual representation of the 8 different display modes available on the dash cam, showing various combinations of front, inside (left/right), and rear camera views.
4.3 Recording Functions (Loop Recording & G-Sensor)
The dash cam continuously records footage. When the memory card is full, the Loop Recording feature automatically overwrites the oldest unlocked video files to ensure uninterrupted recording. The G-Sensor (Gravity Sensing) detects sudden impacts or collisions. When triggered, it automatically locks the current video segment, preventing it from being overwritten by loop recording, thus preserving critical evidence.

Image: Illustration showing how loop recording continuously records and how the G-Sensor locks important footage during an accident, preventing it from being overwritten.
4.4 Night Vision
The dash cam is equipped with advanced night vision technology, ensuring clear and detailed video recordings even in low-light conditions or at night. This feature automatically adjusts to ambient light to optimize video quality.
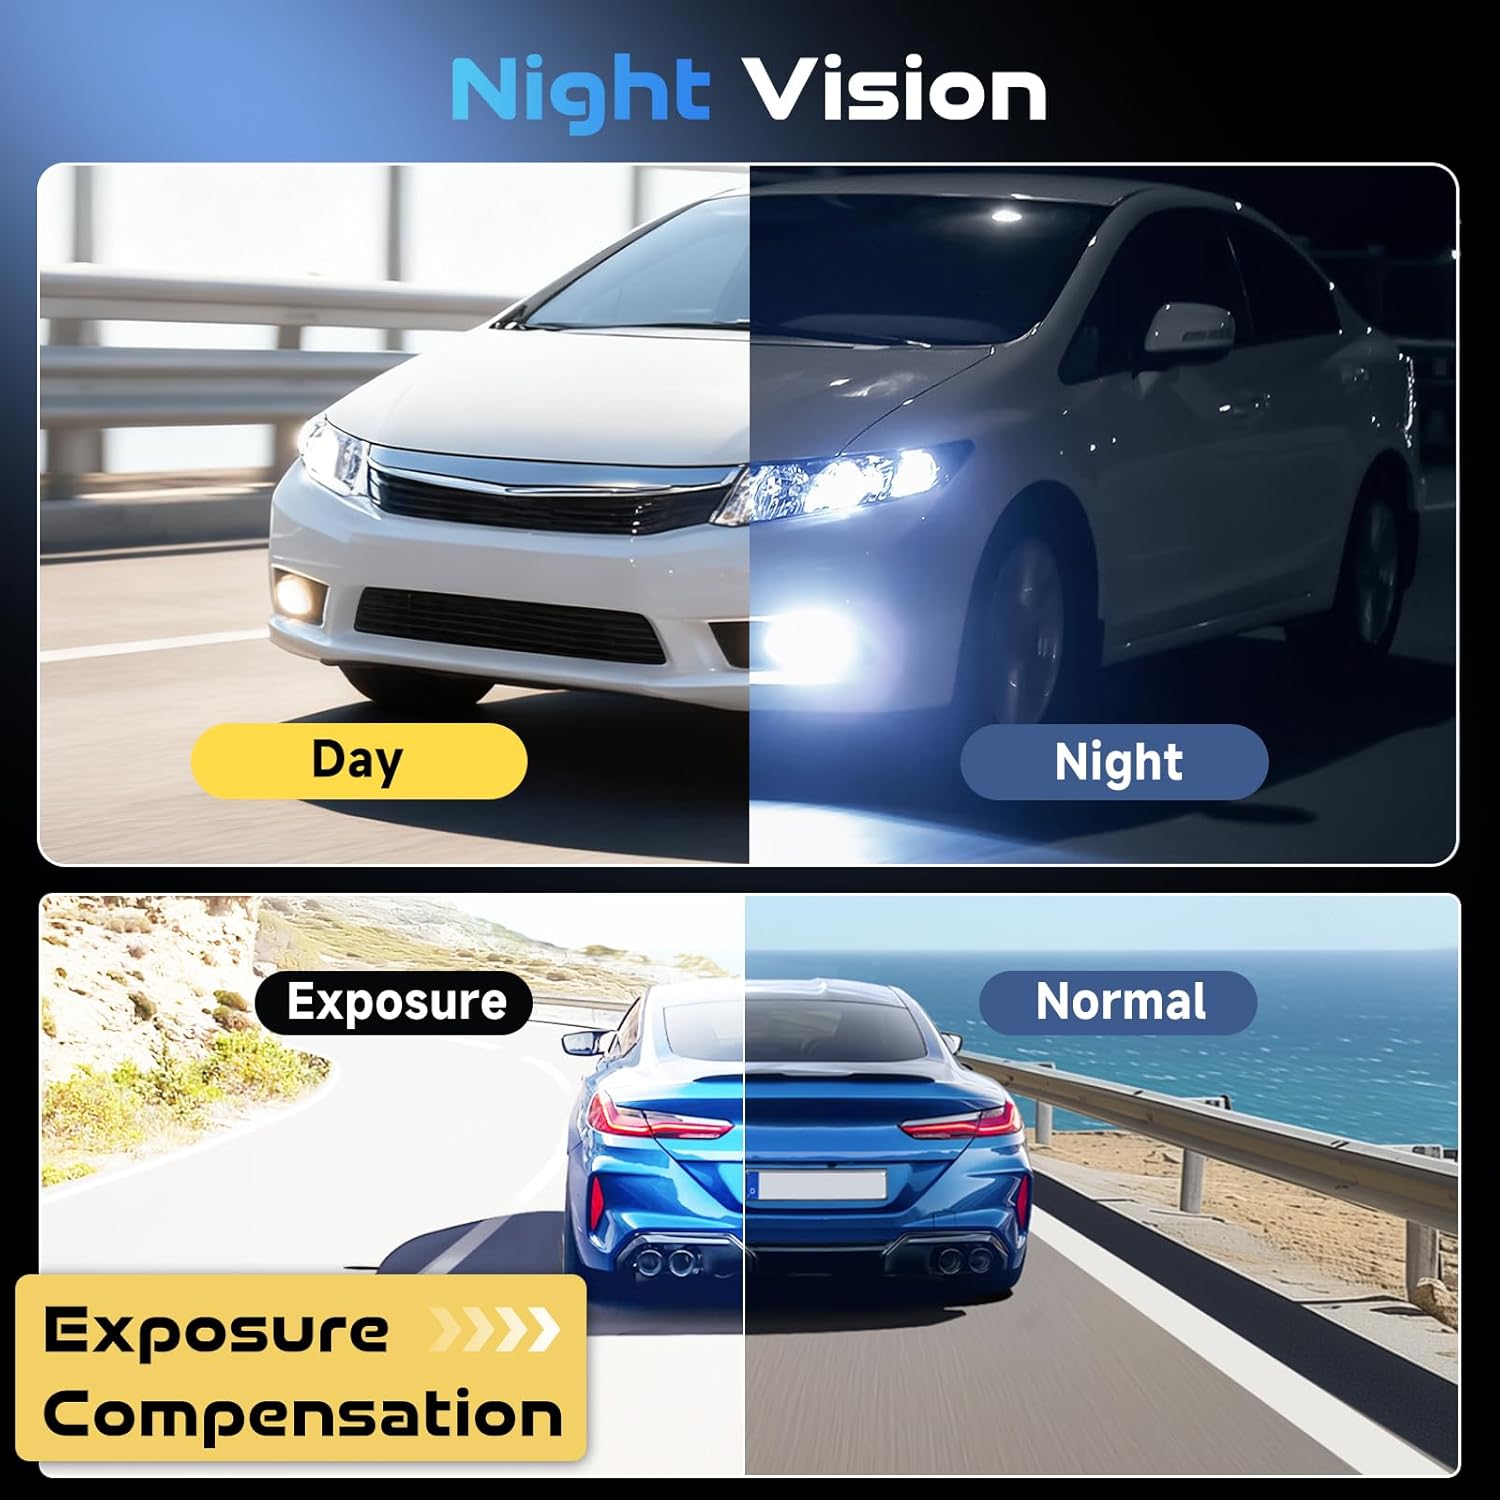
Image: Comparison showing the difference between day and night recording, and how exposure compensation improves visibility in challenging light conditions.
4.5 Parking Monitor
When your vehicle is parked and the ignition is off, the built-in Parking Monitor activates. If any motion or impact is detected around your parked car, the dash cam will automatically start recording, providing surveillance against hit-and-runs, vandalism, or attempted break-ins.
4.6 WiFi Connectivity & App Access
The dash cam features built-in WiFi, allowing you to connect it to your smartphone via a dedicated app (e.g., Viidure). This enables you to view live footage, download recorded videos, and share them directly from your phone without needing to remove the memory card.

Image: Step-by-step guide on how to connect the dash cam to a smartphone via WiFi using the Viidure app, showing scanning a QR code, connecting to WiFi, and starting recording.
4.7 Reverse Assistance
When the vehicle is shifted into reverse (and the rear camera is correctly wired to the reverse light anode), the dash cam automatically displays the rear camera feed with parking guidelines on the screen, assisting you in safer and easier parking maneuvers.
5. Maintenance
- Clean Lenses: Regularly clean the camera lenses with a soft, lint-free cloth to ensure clear video quality. Avoid abrasive materials that could scratch the lenses.
- Memory Card Management: Periodically format the memory card (at least once a month) to maintain optimal performance and prevent data corruption. Back up any important footage before formatting.
- Firmware Updates: Check the Hodozzy official website or app for any available firmware updates. Keeping your dash cam's firmware up-to-date can improve performance and add new features.
- Temperature Control: Avoid exposing the dash cam to extreme temperatures for extended periods. If the vehicle is parked in direct sunlight, consider removing the dash cam or using a sunshade.
- Cable Inspection: Periodically inspect all cables for any signs of wear or damage. Replace damaged cables immediately to prevent malfunctions.
6. Troubleshooting
- Dash Cam Not Powering On:
- Ensure the power cable is securely connected to both the dash cam and the vehicle's power outlet.
- Check if the vehicle's power outlet is functioning correctly (e.g., by plugging in another device).
- Try a different power cable if available. - Recording Stops or Freezes:
- Format the memory card. A corrupted or full memory card can cause recording issues.
- Ensure you are using a high-speed (Class 10 or U3) memory card.
- Check for firmware updates. - Poor Video Quality:
- Clean the camera lenses.
- Ensure the protective film has been removed from the lenses.
- Adjust the camera angle to avoid glare or obstructions.
- Check video resolution settings in the menu. - WiFi Connection Issues:
- Ensure WiFi is enabled on the dash cam.
- Restart both the dash cam and your smartphone.
- Make sure you are within close proximity to the dash cam when connecting via WiFi. - G-Sensor Too Sensitive/Not Sensitive Enough:
- Adjust the G-Sensor sensitivity setting in the dash cam's menu. Lower sensitivity for fewer false triggers, higher for more detection. - Rear Camera Not Displaying:
- Check the connection of the rear camera cable to the main unit.
- Ensure the rear camera itself is not damaged.
7. Specifications
| Feature | Specification |
|---|---|
| Product Dimensions | 3 x 3 x 3 inches (7.62 x 7.62 x 7.62 cm) |
| Item Weight | 1.1 pounds (0.5 kg) |
| Connectivity Technology | Wi-Fi |
| Special Feature | Built-In WiFi, G-Sensor, Loop Recording, Parking Monitor, Night Vision, Reverse Assistance |
| Video Capture Resolution | 2160p (2K Front Camera) |
| Mounting Type | Rearview Mirror Mount (Suction Cup) |
| Included Components | Dash Cam, Power Cord, Extended Line, Anti-slip Mats, 64GB Memory Card, User Manual |
| Vehicle Service Type | Car |
| Manufacturer | Hodozzy |
8. Warranty and Support
For warranty information and customer support, please refer to the warranty card included with your product or visit the official Hodozzy website. If you encounter any issues not covered in this manual, please contact Hodozzy customer service for assistance.
Additional protection plans may be available for purchase through authorized retailers. Please check with your point of purchase for details.