
Amliber GT-500
Amliber Heavy Duty Ratchet Grommet Tool Kit (Model GT-500) - User Manual
Model: GT-500
1. Introduction
This manual provides detailed instructions for the safe and effective use of your Amliber Heavy Duty Ratchet Grommet Tool Kit, Model GT-500. This tool is designed for installing 12mm chrome-plated grommets on various materials such as fabric, tarp, and leather. Please read this manual thoroughly before operation to ensure proper usage and to maximize the tool's lifespan.

Figure 1: Amliber Heavy Duty Ratchet Grommet Tool Kit. The image displays the grommet tool, a box of 300 pairs of 12mm chrome-plated grommets, a hole cutter, and a gasket, with the tool being used on a green tarp.
2. Safety Information
Always observe the following safety precautions when using the Amliber Grommet Tool:
- Wear appropriate personal protective equipment, such as safety glasses, to protect against flying debris.
- Keep hands and fingers clear of the grommet setting area during operation to prevent pinching.
- Ensure the material being worked on is stable and properly positioned.
- Do not force the tool. If resistance is encountered, re-evaluate the material and grommet placement.
- Keep the tool out of reach of children.
- Store the tool in a dry, secure place when not in use.
3. Package Contents
Your Amliber Heavy Duty Ratchet Grommet Tool Kit includes the following items:
- 1 x Amliber Ratchet Grommet Tool
- 300 Pairs x 12mm Chrome-Plated Grommets (Eyelets and Washers)
- 1 x 12mm Hole Cutter
- 1 x Gasket (for protecting surfaces during hole punching)
- 1 x Storage Box for Grommets

Figure 2: Kit Contents. This image visually details all components included in the Amliber Heavy Duty Ratchet Grommet Tool Kit.
4. Product Features
The Amliber Grommet Tool is designed with several features to enhance usability and performance:
- Durable Construction: Crafted from high-quality steel for long-lasting performance and reliability.
- Ratchet Mechanism: Reduces effort by approximately 60% and increases efficiency, making grommet installation easier.
- Self-locking Mechanism: Ensures a secure and precise grip during operation, automatically locking when the handle is released.
- Magnetic Mold Design: Facilitates quick and accurate placement of grommets and washers.
- Ergonomic Handle: Designed for comfortable grip, minimizing hand strain during extended use.
- Chrome-Plated Grommets: 300 pairs of 12mm grommets are included, offering superior durability and resistance to rust, corrosion, and fading compared to other plating types.

Figure 3: Key Features of the Grommet Tool. This image illustrates the magnetic mold, self-locking release, and ergonomic handle design.

Figure 4: Ratchet Mechanism. The image shows the tool being used, emphasizing the ratchet gear for effort reduction.
5. Setup
Before installing grommets, ensure your workspace is clean and well-lit. Prepare your material and the grommet tool as follows:
- Inspect the Tool: Check the grommet tool for any damage or loose parts. Ensure the molds are clean.
- Prepare Grommets: Separate the eyelets (the top part with the barrel) from the washers (the flat ring).
- Material Preparation: Lay your material (fabric, tarp, leather) flat. For thicker materials, pre-punching holes is recommended using the included 12mm hole cutter and gasket. Place the gasket under the material to protect your work surface.
- Insert Molds (if necessary): The tool comes with 12mm molds pre-installed. If you need to change sizes (for other kits), ensure the correct molds are securely in place. The magnetic design assists in holding the molds.
6. Operating Instructions
Follow these steps to install grommets using your Amliber Ratchet Grommet Tool:
- Unlock the Handle: Press the unlock handle or release mechanism to open the tool jaws.
- Place Washer: Place one washer into the lower mold of the tool. The magnetic design will help hold it in place.
- Place Eyelet: Place one eyelet onto the upper mold, ensuring the barrel faces downwards towards the washer. The magnetic design will secure it.
- Position Material: Carefully position the material between the upper and lower molds, aligning the desired grommet location with the center of the molds. If a hole was pre-punched, align the hole with the eyelet barrel.
- Press the Handle: Slowly and firmly press the handles together. The ratchet mechanism will engage, allowing you to apply consistent pressure with less effort. Continue pressing until the grommet is fully set and the tool clicks or reaches its maximum closure.
- Release and Inspect: Release the handle. The self-locking mechanism will disengage. Carefully remove the material and inspect the installed grommet to ensure it is securely crimped and flat.
- Repeat: For additional grommets, repeat steps 1-6.
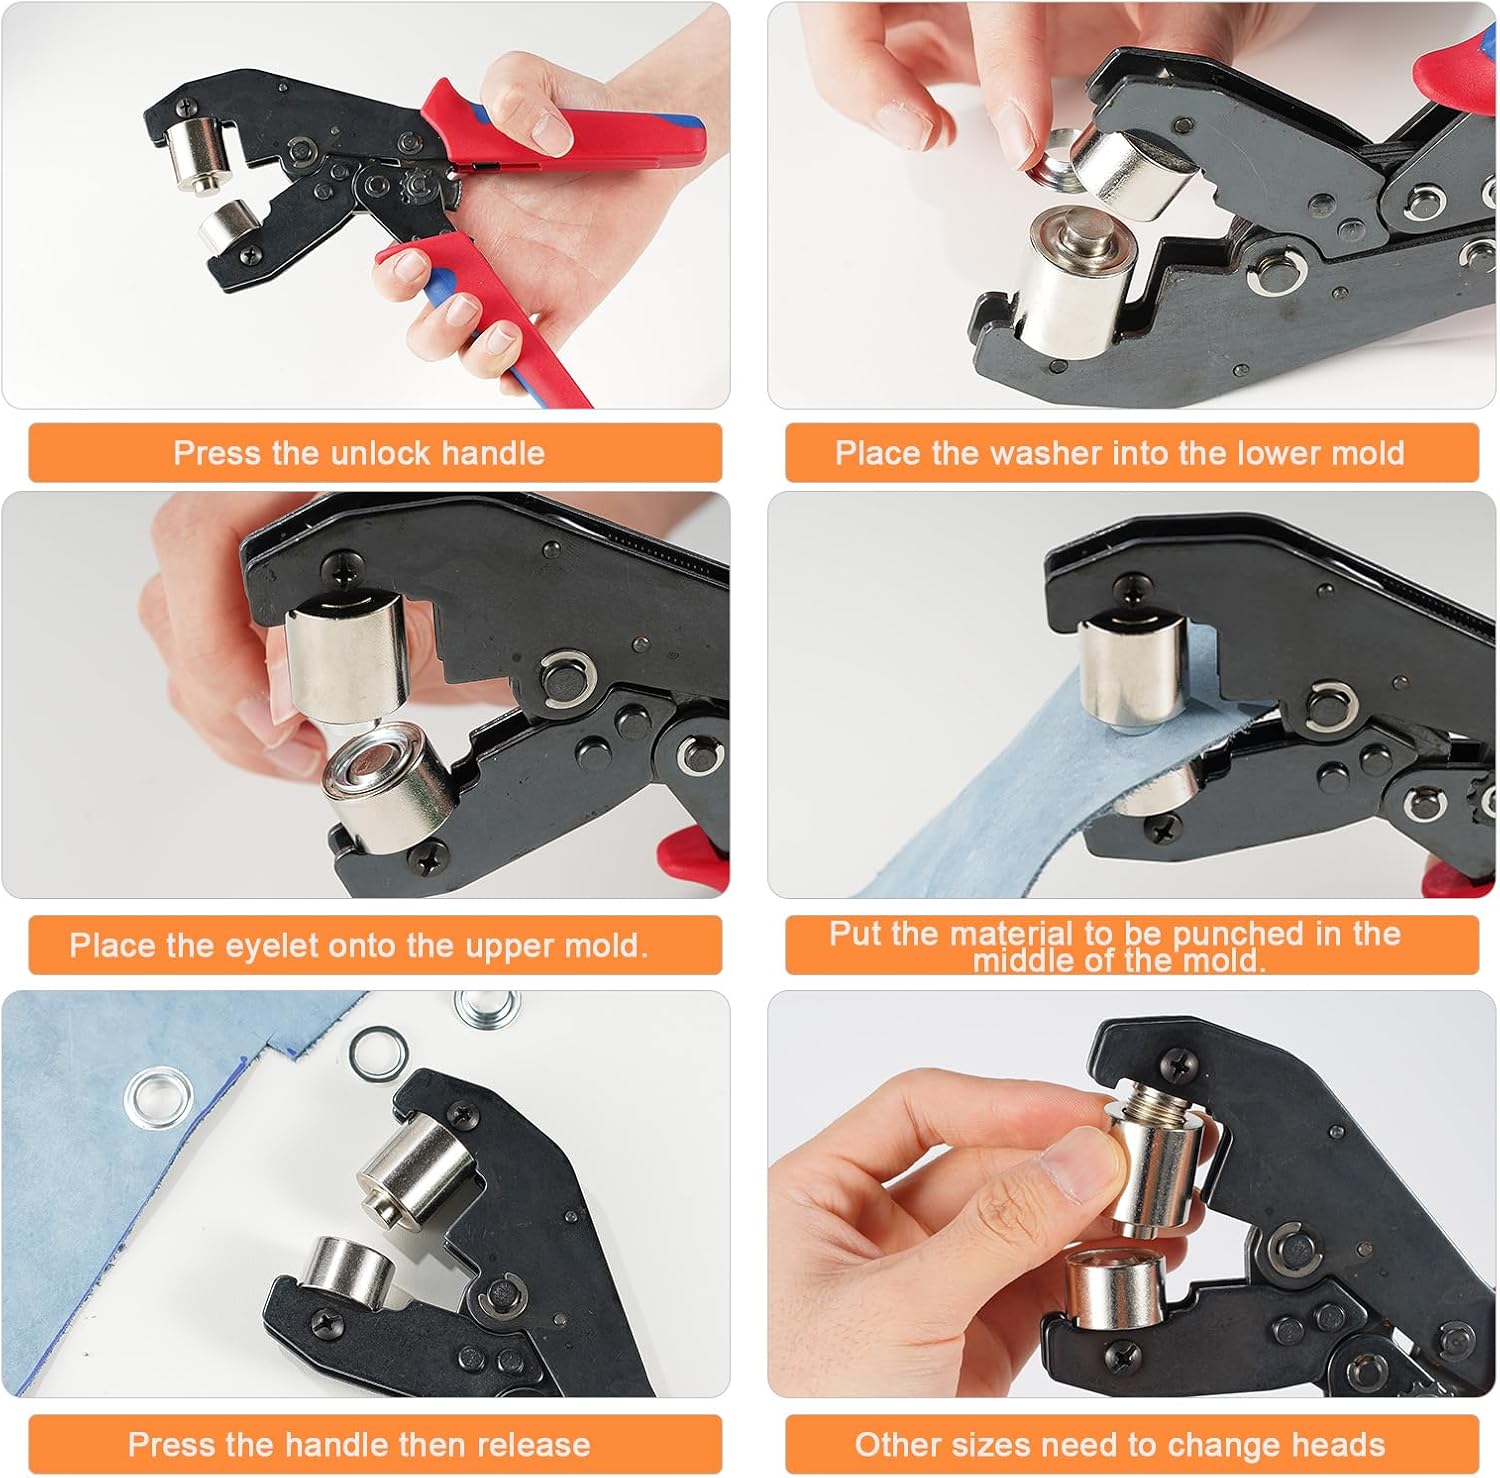
Figure 5: Grommet Installation Steps. This image provides a visual sequence for correctly using the tool to install grommets.
7. Maintenance
Proper maintenance will extend the life of your grommet tool:
- Cleaning: After each use, wipe down the tool with a clean, dry cloth to remove any dust or debris.
- Lubrication: Periodically apply a light machine oil to the pivot points and ratchet mechanism to ensure smooth operation.
- Storage: Store the tool and grommets in their original packaging or a suitable storage box in a dry environment to prevent rust and damage.
- Hole Cutter Care: The included hole cutter may dull over time, especially with frequent use on tough materials. Sharpen or replace the cutter as needed to maintain optimal performance.
8. Troubleshooting
| Problem | Possible Cause | Solution |
|---|---|---|
| Grommet not fully crimped or looks uneven. | Insufficient pressure applied; material too thick; grommet or washer misalignment. | Ensure full pressure is applied until the ratchet mechanism completes its cycle. For very thick materials, consider pre-punching the hole. Verify grommet and washer are perfectly aligned before pressing. Sometimes, rotating the tool and pressing again can help. |
| Hole cutter is dull or not cutting cleanly. | Normal wear and tear from use, especially on dense materials. | Sharpen the hole cutter or replace it if severely worn. Ensure the gasket is used underneath the material to provide a clean cutting surface. |
| Tool handles stick or are difficult to press. | Lack of lubrication; debris in the mechanism. | Clean the tool thoroughly and apply a light machine oil to all moving parts and pivot points. |
| Grommets fall out or are loose. | Improper crimping; incorrect grommet size for material thickness. | Ensure the grommet is fully crimped. If the material is too thin, the grommet may not hold securely. Consider adding a reinforcing layer to the material. |
9. Specifications
- Model: GT-500
- Grommet Size: 12mm (0.47 inches)
- Grommet Material: Chrome-plated steel
- Tool Material: High-quality steel
- Item Weight: Approximately 2.15 pounds (0.97 kg)
- Package Dimensions: Approximately 9.76 x 5.12 x 3.03 inches (24.8 x 13 x 7.7 cm)
- Manufacturer: Amliber
10. Versatile Applications
The Amliber Heavy Duty Ratchet Grommet Tool Kit is suitable for a wide range of applications, including but not limited to:
- Tarps and covers
- Banners and signage
- Leather goods and crafts
- Clothing and accessories
- Tents and outdoor gear
- Curtains and drapes
- Paper file bags and other stationery

Figure 6: Examples of Applications. This image displays several common uses for the installed grommets.
11. Warranty & Support
Amliber stands behind the quality of its products. For warranty information, technical support, or any questions regarding your Amliber Heavy Duty Ratchet Grommet Tool Kit, please contact Amliber customer service through the retailer where the product was purchased or visit the official Amliber website for contact details.
Please retain your proof of purchase for warranty claims.
Related Documents - GT-500
 |
Amliber Waterproof Automotive Electrical Connector Operating Instructions Step-by-step guide on how to use Amliber waterproof automotive electrical connectors, including stripping wires, crimping terminals, and assembling connectors for secure connections. |
 |
Amliber Automotive Electrical Connector Crimping and Installation Guide Comprehensive guide detailing the step-by-step process for crimping and connecting Amliber waterproof automotive electrical terminals and connectors, including essential pull tests and tool usage. |
 |
Kartboy End Link Rebuild Kit Application Guide - Front & Rear Comprehensive application guide for Kartboy KB-017 and KB-017X series end link rebuild kits. Find the correct kit for your Subaru WRX, STI, Legacy GT, and Forester models. |
 |
Keyence GT Series Digital Contact Sensors: Features and Specifications Explore the Keyence GT Series of general-purpose digital contact sensors, highlighting their ease of use, durability, error-free operation, and cost reduction benefits. This document details sensor head and amplifier unit specifications, applications, and optional accessories. |
 |
Gaotu Flexible Solar Panels - Product Manual and Specifications Comprehensive product manual and specifications for Gaotu's high-efficiency flexible solar panels, including GT-SP and GT-DSP series. Discover technical details, performance data, and application suitability for renewable energy solutions. |
 |
Hino 500 Series GT 1322 4x4 Truck Specifications and Features Detailed specifications, key features, and dimensions for the Hino 500 Series GT 1322 4x4 truck, including engine, driveline, cab, chassis, and warranty information. |
Ask a question about this manual
Ask about setup, troubleshooting, compatibility, parts, safety, or missing instructions. Manuals+ will review the question and use this page’s manual context to help answer it.