1. Introduction
This manual provides essential instructions for the safe assembly, operation, and maintenance of your LINKHOO 12x10 Ft Storage Shed Outdoor. Please read all instructions carefully before beginning assembly and retain this manual for future reference.
The LINKHOO 12x10 Ft outdoor storage shed offers a spacious 120 sq.ft area, ideal for gardening tools, seasonal equipment, or as a compact workshop. It features 4 air vents and a translucent window to help prevent humidity damage and ensure proper ventilation.
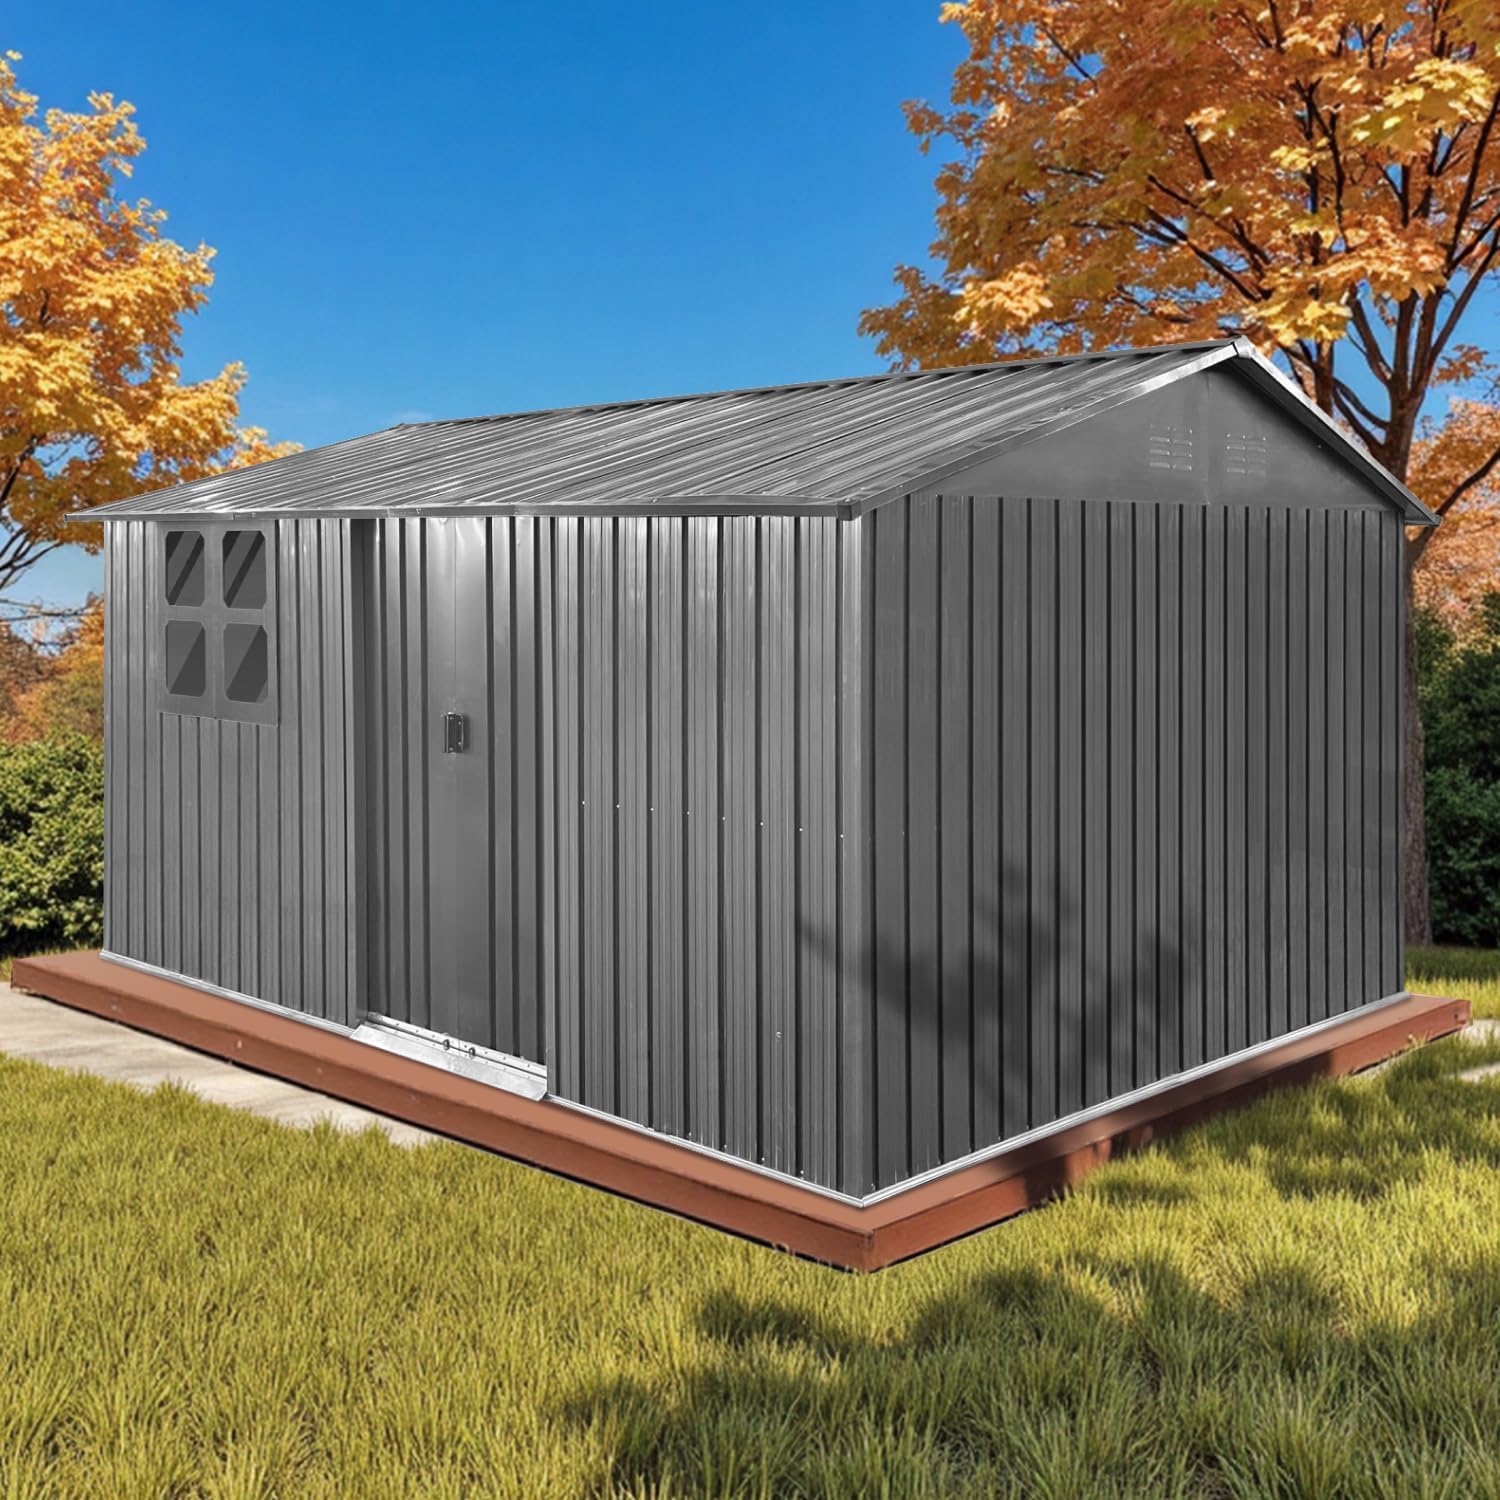
Figure 1: LINKHOO 12x10 Ft Storage Shed Outdoor
2. Safety Information
Your safety is paramount. Please adhere to the following guidelines during assembly and use:
- Wear Protective Gloves: Metal components may have sharp edges. Always wear protective gloves during handling and assembly to prevent injuries. Two pairs of protective gloves are included with your purchase.
- Two-Person Assembly: For safe and efficient assembly, it is strongly recommended that two people work together.
- Level Foundation: Ensure the shed is assembled on a solid, level foundation. An uneven surface can compromise the structural integrity and stability of the shed.
- Anchoring: Anchor the shed to a raised wooden base (not included) or a concrete slab for storm resistance and moisture protection. This is crucial for stability in high winds (up to 6 Beaufort winds, 24-30mph) and heavy snow.
- Power Tools: Power tools can expedite assembly, but use them with caution to avoid over-tightening screws or damaging components.
- Sliding Doors: Operate the smooth-sliding doors carefully to prevent metal scratches during use. Ensure the area around the doors is clear.
- Ventilation: The shed features 4 vents to prevent humidity damage. Do not obstruct these vents.
3. Package Contents & Parts Identification
Before beginning assembly, unpack all components and verify against the parts list provided in the separate detailed assembly guide. All parts are labeled for easy identification. Ensure all parts are present and undamaged. Contact customer service immediately if any parts are missing or damaged.
The shed components typically include:
- Galvanized steel panels (walls, roof)
- Steel frame components (base, uprights, roof supports)
- Sliding door panels and tracks
- Translucent window panel
- Air vents
- Hardware (screws, washers, nuts, bolts)
- Door handles and locking mechanism
Refer to the assembly video for a visual overview of the parts and initial setup:
Video 1: LINKHOO Metal Storage Shed Overview (Note: This is a short overview video. For detailed steps, refer to the full assembly video below.)
4. Setup / Assembly Instructions
Follow these steps carefully. It is highly recommended to have a second person assist with assembly.
- Prepare the Foundation: Ensure your chosen site is level and stable. A concrete slab or a raised wooden base is recommended for optimal performance and longevity.
- Assemble the Base Frame: Connect the base frame components according to the detailed assembly guide. Use the provided hardware and ensure all connections are secure.
- Attach Wall Panels: Begin attaching the wall panels to the base frame, working systematically around the perimeter. Ensure panels are correctly oriented and securely fastened.
- Install Window Panel: Integrate the translucent window panel into the designated wall section. Secure it firmly to prevent leaks and ensure stability.
- Assemble Roof Structure: Construct the roof frame and attach the roof panels. Pay close attention to overlapping sections to ensure water resistance.
- Install Doors: Mount the sliding doors onto their tracks. Ensure they slide smoothly and the locking mechanism functions correctly.
- Final Checks: Double-check all screws and connections for tightness. Ensure doors operate freely and the shed is stable.
For a comprehensive visual guide on assembly, please watch the official installation video:
Video 2: How to Install LINKHOO Storage Shed (Sliding Door Model)

Figure 2: Interior view showing the robust steel frame construction.
5. Operating Instructions
Your LINKHOO storage shed is designed for ease of use and security.
- Sliding Doors: To open, slide the doors along their tracks. Ensure the tracks are free of debris for smooth operation. To close, slide the doors until they meet in the center.
- Locking Mechanism: The shed is equipped with a latch for a padlock (padlock not included) to secure your belongings. Always ensure the doors are fully closed and the latch is engaged before locking.
- Air Vents: The four integrated air vents facilitate air circulation, reducing condensation and humidity inside the shed. Do not block these vents.
- Translucent Window: The translucent window allows natural light into the shed, making it easier to find items without external lighting during the day.

Figure 3: Shed with sliding doors open, showcasing interior space.
6. Maintenance
Regular maintenance will extend the lifespan of your storage shed:
- Cleaning: Periodically clean the exterior of the shed with mild soap and water. Avoid abrasive cleaners or harsh chemicals that could damage the galvanized steel finish.
- Check Fasteners: Annually inspect all screws, bolts, and connections to ensure they remain tight. Tighten any loose fasteners to maintain structural integrity.
- Door Tracks: Keep the sliding door tracks clean and free of dirt, leaves, or other debris to ensure smooth operation. Lubricate tracks if necessary.
- Rust Prevention: Although made from galvanized steel, inspect for any signs of rust, especially in coastal or high-humidity areas. Address any rust spots promptly with appropriate rust-inhibiting paint.
- Snow Load: In areas with heavy snowfall, regularly clear snow from the roof to prevent excessive weight accumulation, which could damage the structure.
7. Troubleshooting
Here are solutions to common issues you might encounter:
- Water Leaks from Roof:
Issue: Water penetration through roof panels.
Solution: Ensure all roof screws are properly tightened and have their rubber grommets (if supplied) in place. Consider using metal roofing screws with rubber grommets for enhanced sealing if leaks persist. Verify that roof panels overlap correctly. - Dented Panels:
Issue: Panels arrived with minor dents.
Solution: While packaging is reinforced, minor dents can occur. If dents do not affect structural integrity or assembly, they can often be gently pushed out. For significant damage, contact customer service for replacement parts. - Difficulty Sliding Doors:
Issue: Doors are stiff or get stuck.
Solution: Check the door tracks for any debris (dirt, leaves, small stones) and clear them. Ensure the shed's base is perfectly level, as an uneven foundation can cause door misalignment. Lubricate the tracks with a silicone-based spray if needed. - Shed Instability:
Issue: The shed feels wobbly or unstable.
Solution: Re-check all frame connections and panel fasteners to ensure they are securely tightened. Verify that the foundation is completely level. Ensure the shed is properly anchored to the ground or a sturdy base as per safety instructions.
8. Specifications
| Attribute | Detail |
|---|---|
| Brand | LINKHOO |
| Model Number | SWF-SS-114-0916 |
| Product Dimensions | 143"D x 121"W x 81"H |
| Material | Galvanized Steel |
| Color | Gray |
| Style | Windows (with translucent panel) |
| Door Style | Sliding Doors |
| Air Vents | 4 |
| Water Resistance Level | Water Resistant |
| Assembly Required | Yes |
| Item Weight | 61 pounds |
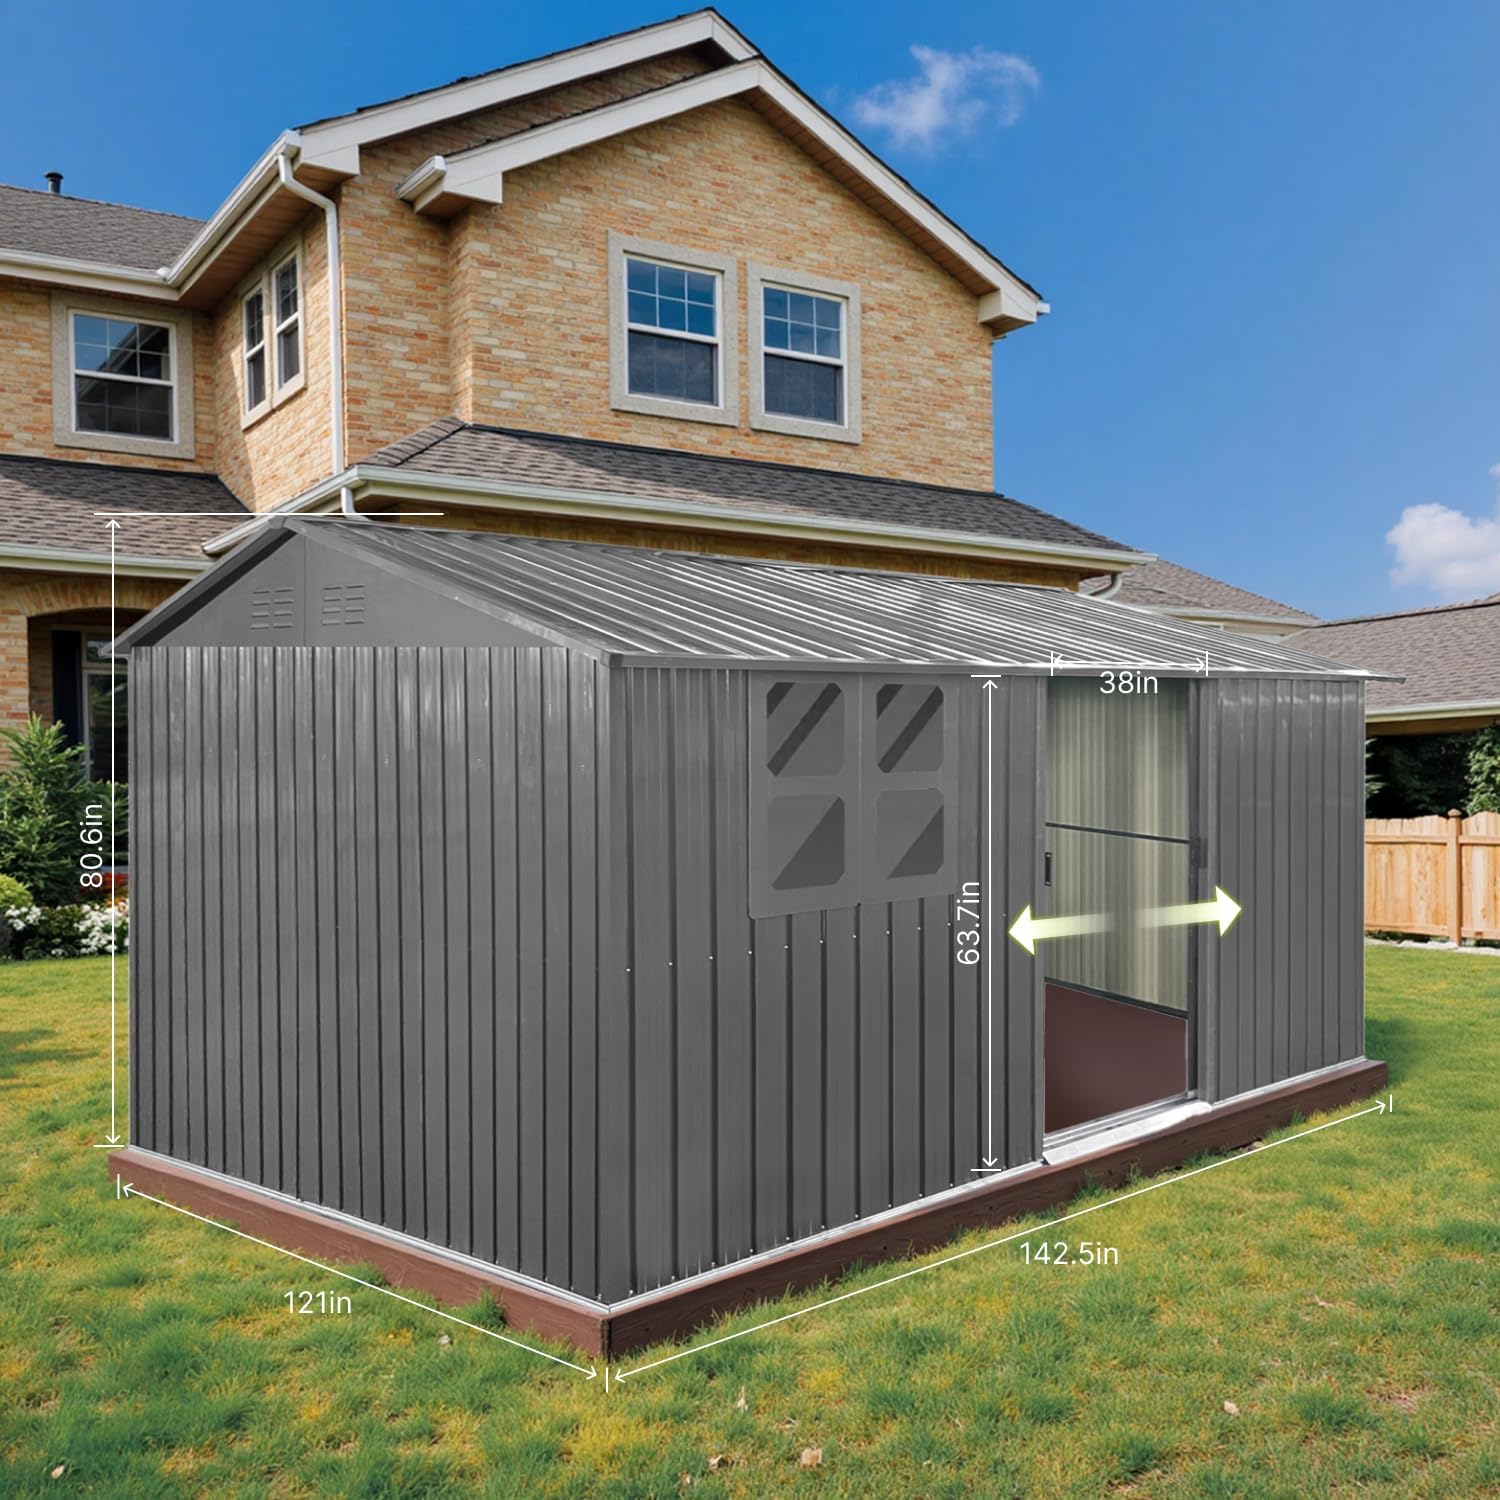
Figure 4: Product Dimensions Overview
9. Warranty and Support
Your LINKHOO storage shed is designed for durability and a 10-year lifespan in various climates. We stand by the quality of our product.
- Missing Parts: In the event of missing parts, free replacements are available. Please contact our customer service team.
- Customer Service: For any questions, concerns, or support needs, our customer service is available 24/7. Refer to your purchase documentation for contact details.