1. Important Safety Instructions
Please read all instructions carefully before using the soldering station. Retain this manual for future reference.
- Always work in a well-ventilated area to avoid inhaling fumes.
- Wear appropriate personal protective equipment, including safety glasses.
- The soldering iron tip reaches very high temperatures. Avoid direct contact with skin or flammable materials.
- Ensure the soldering station is placed on a stable, heat-resistant surface.
- Disconnect the power supply before cleaning or performing maintenance.
- Do not operate the soldering station if the power cord or any part of the unit is damaged.
- This device features an intelligence self-detection function for safe personal operation.
2. Product Overview
The OKANEN Soldering Station Model Sugon-A9-210-I is a versatile tool designed for electronic welding and rework tasks. It features a dual LCD digital display for precise temperature control and supports various soldering iron handles.
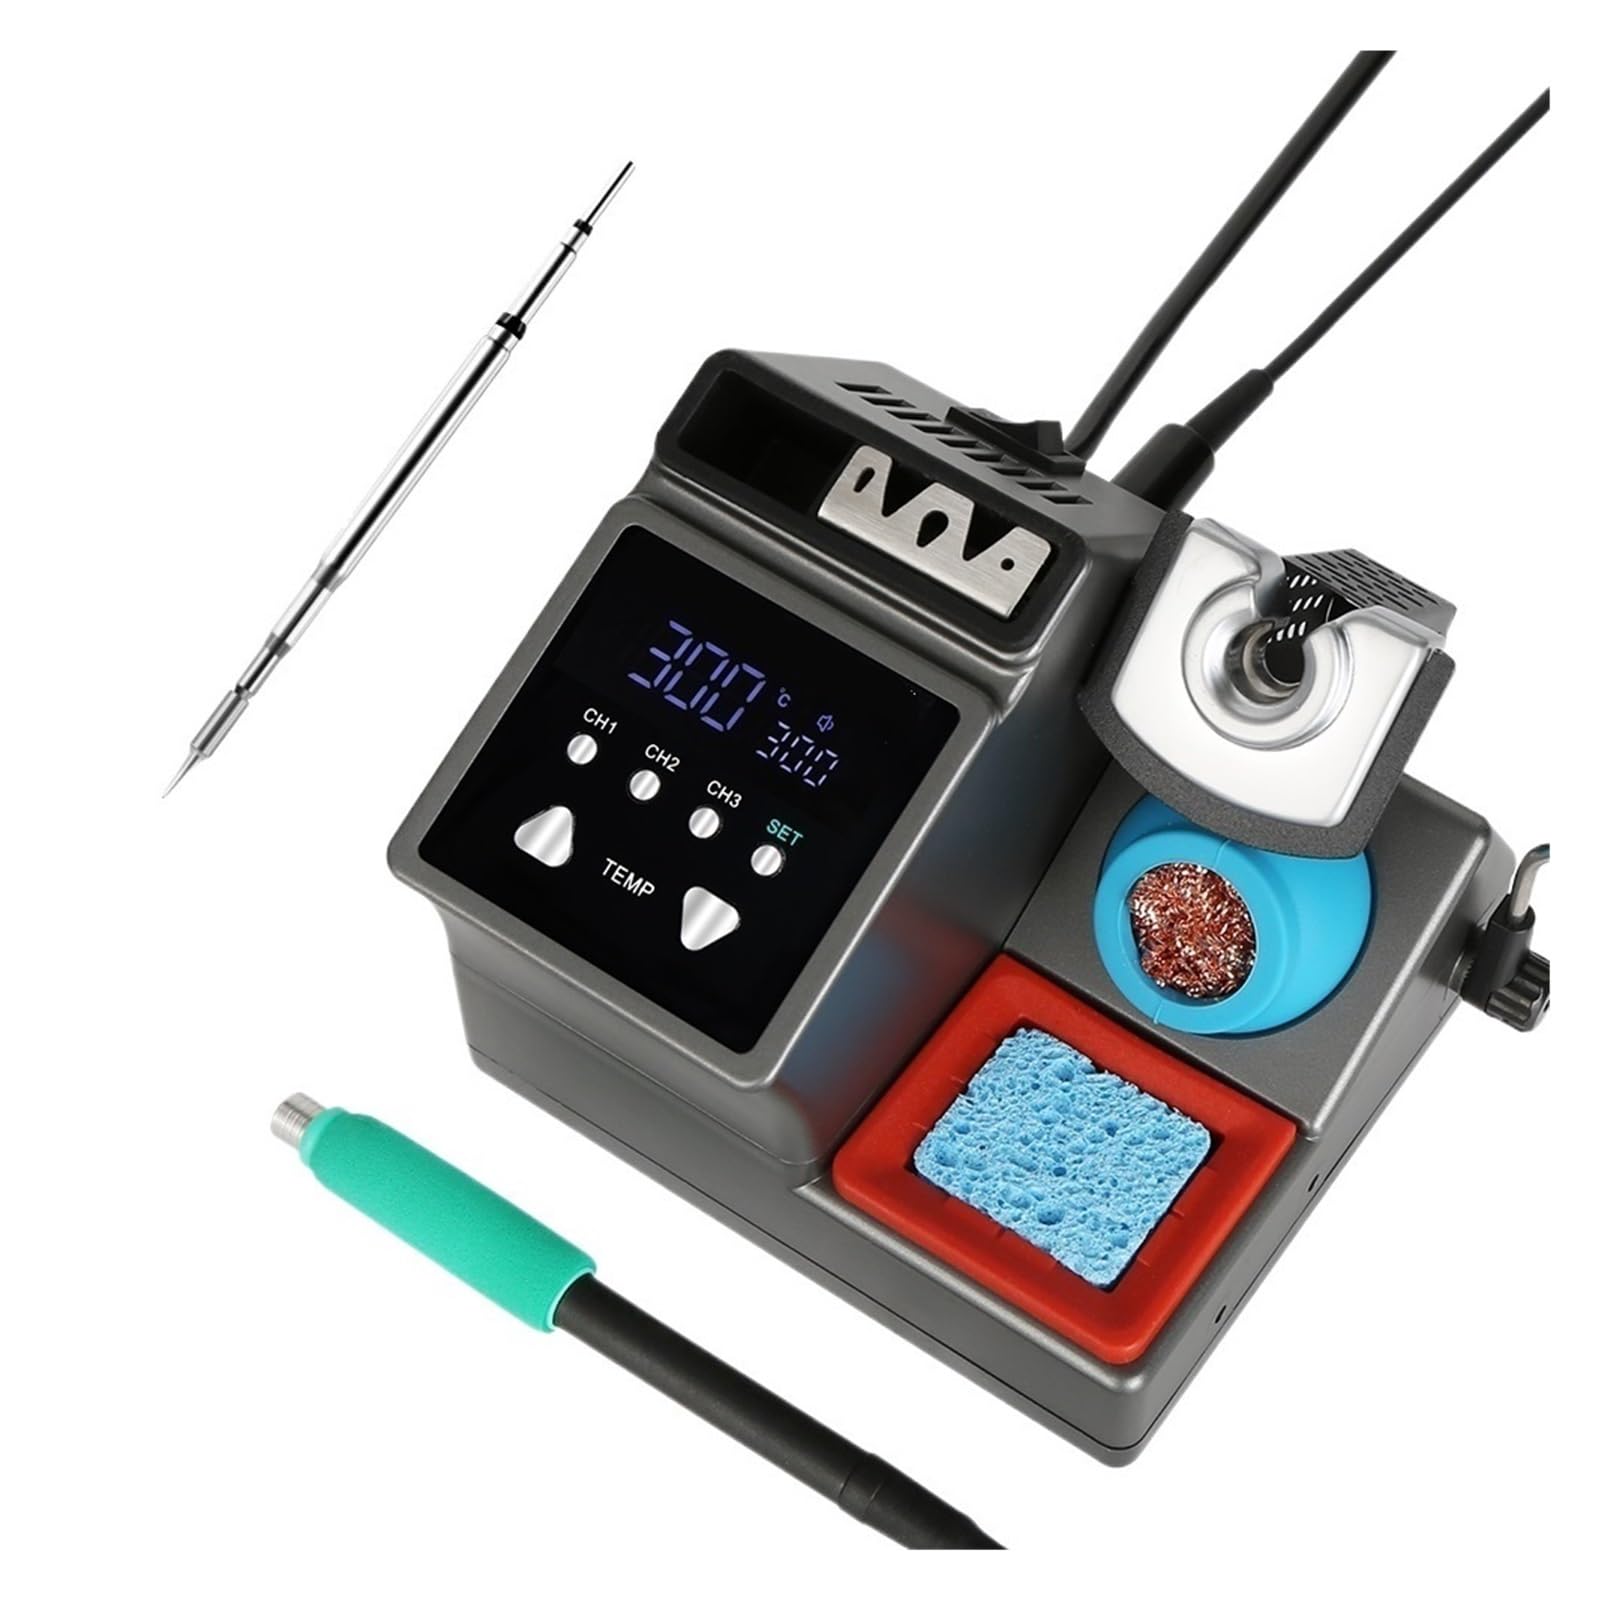
Figure 2.1: Main view of the OKANEN Soldering Station Sugon-A9-210-I, showing the control panel and soldering iron stand.
Key Features:
- Dual LCD digital displays for precision temperature monitoring.
- Low noise operation and space-saving design.
- Intelligence self-detection function for enhanced safety.
- Automatic cooling function to prolong heater life.
- Compatible with original soldering iron tips for 210, 245, and 115 handles.

Figure 2.2: Labeled components of the soldering station, including the line fixing rod, soldering tip storage box, soldering iron tip faster stand, cleaning sponge, and iron cleaning area.
3. Setup
Follow these steps to set up your soldering station:
- Unpack all components and ensure they are free from damage.
- Place the soldering station on a stable, heat-resistant workbench.
- Connect the soldering iron handle to the designated port on the station.
- Insert a suitable soldering tip into the handle.
- Place the cleaning sponge in its tray and dampen it slightly with water.
- Ensure the brass wool for iron cleaning is in its designated holder.
- Connect the power cord to the soldering station and then to a grounded power outlet.
4. Operation
4.1 Power On/Off
Locate the power switch on the unit and turn it to the 'ON' position. The LCD displays will illuminate.
4.2 Temperature Adjustment
The soldering station offers a temperature range of 100°C to 450°C (212°F to 842°F). Use the 'TEMP' buttons on the control panel to increase or decrease the desired temperature. The dual LCD displays will show the set temperature and the actual tip temperature.

Figure 4.1: The soldering station supports 120W high-power, with a temperature adjustment range of 100°C to 450°C (212°F to 842°F). Quick heating allows setting temperature in 3 seconds. Temperature units (°C and °F) can be converted.
4.3 PID Temperature Control
The station utilizes PID (Proportional-Integral-Derivative) temperature control for rapid and stable heating. It can reach 350°C in approximately 2.5 seconds.

Figure 4.2: Visual representation of the PID temperature control, indicating a rapid heat-up time of 2.5 seconds to 350°C, with a full range from 100°C (212°F) to 450°C (842°F).
4.4 Sleep Mode
The soldering station features an adjustable sleep mode to reduce wear on the soldering tip when not in use. When idling, the temperature automatically drops to 150°C. The sleep duration can be set from 1 to 99 minutes. The station quickly heats back to the set operating temperature upon exiting sleep mode.

Figure 4.3: The soldering station's sleep mode function, which idles at 150°C to reduce tip wear when unused for 1-99 minutes, and quickly reheats when activated.
4.5 Handle Compatibility
This soldering station is compatible with T245, T210, and T115 model handles, allowing for flexibility with various soldering tasks.

Figure 4.4: The soldering station supports three models of handles: T115, T210, and T245, offering versatility for different soldering applications.
5. Maintenance
Regular maintenance ensures optimal performance and extends the lifespan of your soldering station.
- Cleaning Sponge: Regularly dampen the cleaning sponge with water and use it to wipe excess solder from the tip. Replace the sponge when it becomes worn or heavily soiled.
- Iron Cleaning (Brass Wool): Use the brass wool to clean the soldering tip. This helps remove oxidation and old solder without significantly lowering the tip's temperature.
- Soldering Tip Storage: Store spare soldering tips in the designated soldering tip storage box to protect them from damage and contamination.
- General Cleaning: Keep the station's exterior clean by wiping it with a soft, dry cloth. Do not use abrasive cleaners or solvents.
6. Troubleshooting
If you encounter issues with your soldering station, refer to the following common problems and solutions:
- No Power: Ensure the power cord is securely connected to both the station and the power outlet. Check the power switch is in the 'ON' position. Verify the power outlet is functional.
- Soldering Iron Not Heating: Check that the soldering iron handle is properly connected to the station. Ensure the temperature setting is above the ambient temperature. If the issue persists, the heating element or tip may need inspection or replacement.
- Inaccurate Temperature Reading: Ensure the soldering tip is fully inserted and making good contact with the heating element. Calibrate the temperature if your model supports it and you have a thermometer.
- Poor Solder Joints: Ensure the soldering tip is clean and properly tinned. Verify the temperature setting is appropriate for the solder and components being used.
For persistent issues not covered here, please contact customer support.
7. Specifications
| Parameter | Value |
|---|---|
| Power | 120W (MAX) |
| Frequency | 50-60Hz |
| Temperature Range | 100°C-450°C / 212°F-842°F |
| Model Number | 243674700 |
| Brand | OKANEN |
8. Warranty and Support
For any questions or concerns regarding your OKANEN Soldering Station, please contact our after-sales service. We are committed to providing support for our products.
Please refer to your purchase documentation for specific warranty terms and conditions.