1. Important Safety Instructions
Read and understand all safety warnings and instructions before operating this welding machine. Failure to follow these instructions may result in electric shock, fire, serious injury, or death.
- Electric Shock Can Kill: Do not touch live electrical parts. Wear dry insulating gloves and protective clothing. Insulate yourself from work and ground.
- Fumes and Gases Can Be Dangerous: Keep your head out of the fumes. Use ventilation or exhaust to remove fumes from the breathing zone.
- Welding Sparks Can Cause Fire or Explosion: Keep flammable materials away from the welding area. Have a fire extinguisher nearby.
- Arc Rays Can Burn Eyes and Skin: Wear a welding helmet with a proper shade filter. Wear protective clothing to protect skin.
- Hot Parts Can Cause Severe Burns: Allow welding equipment to cool before touching.
- Magnetic Fields: Persons with pacemakers should consult their doctor before operating this equipment.
- Ensure the machine is properly grounded.
- Do not operate in damp or wet conditions.
2. Product Overview
The ANDELI MIG-135mini is a versatile 3-in-1 multiprocess welding machine designed for MIG, Lift TIG, and MMA (Stick Arc) welding. It operates on 110V power and is suitable for various applications, including home DIY projects and general maintenance work. Its compact and portable design makes it convenient for different work environments.
2.1 Key Features
- Multiprocess Capability: Supports MIG, Lift TIG, and MMA welding modes.
- User-Friendly Interface: Simple control panel for easy operation and parameter adjustment.
- Integrated Wire Feeder: Ensures smooth wire feeding for consistent MIG welds.
- Efficient Cooling System: Unique air channel design enhances heat dissipation and extends machine longevity.
- Safety Protections: Equipped with automatic protection functions for over-current, over-voltage, and over-heating.
- Portable Design: Lightweight and compact for easy transport.
2.2 Components and Controls
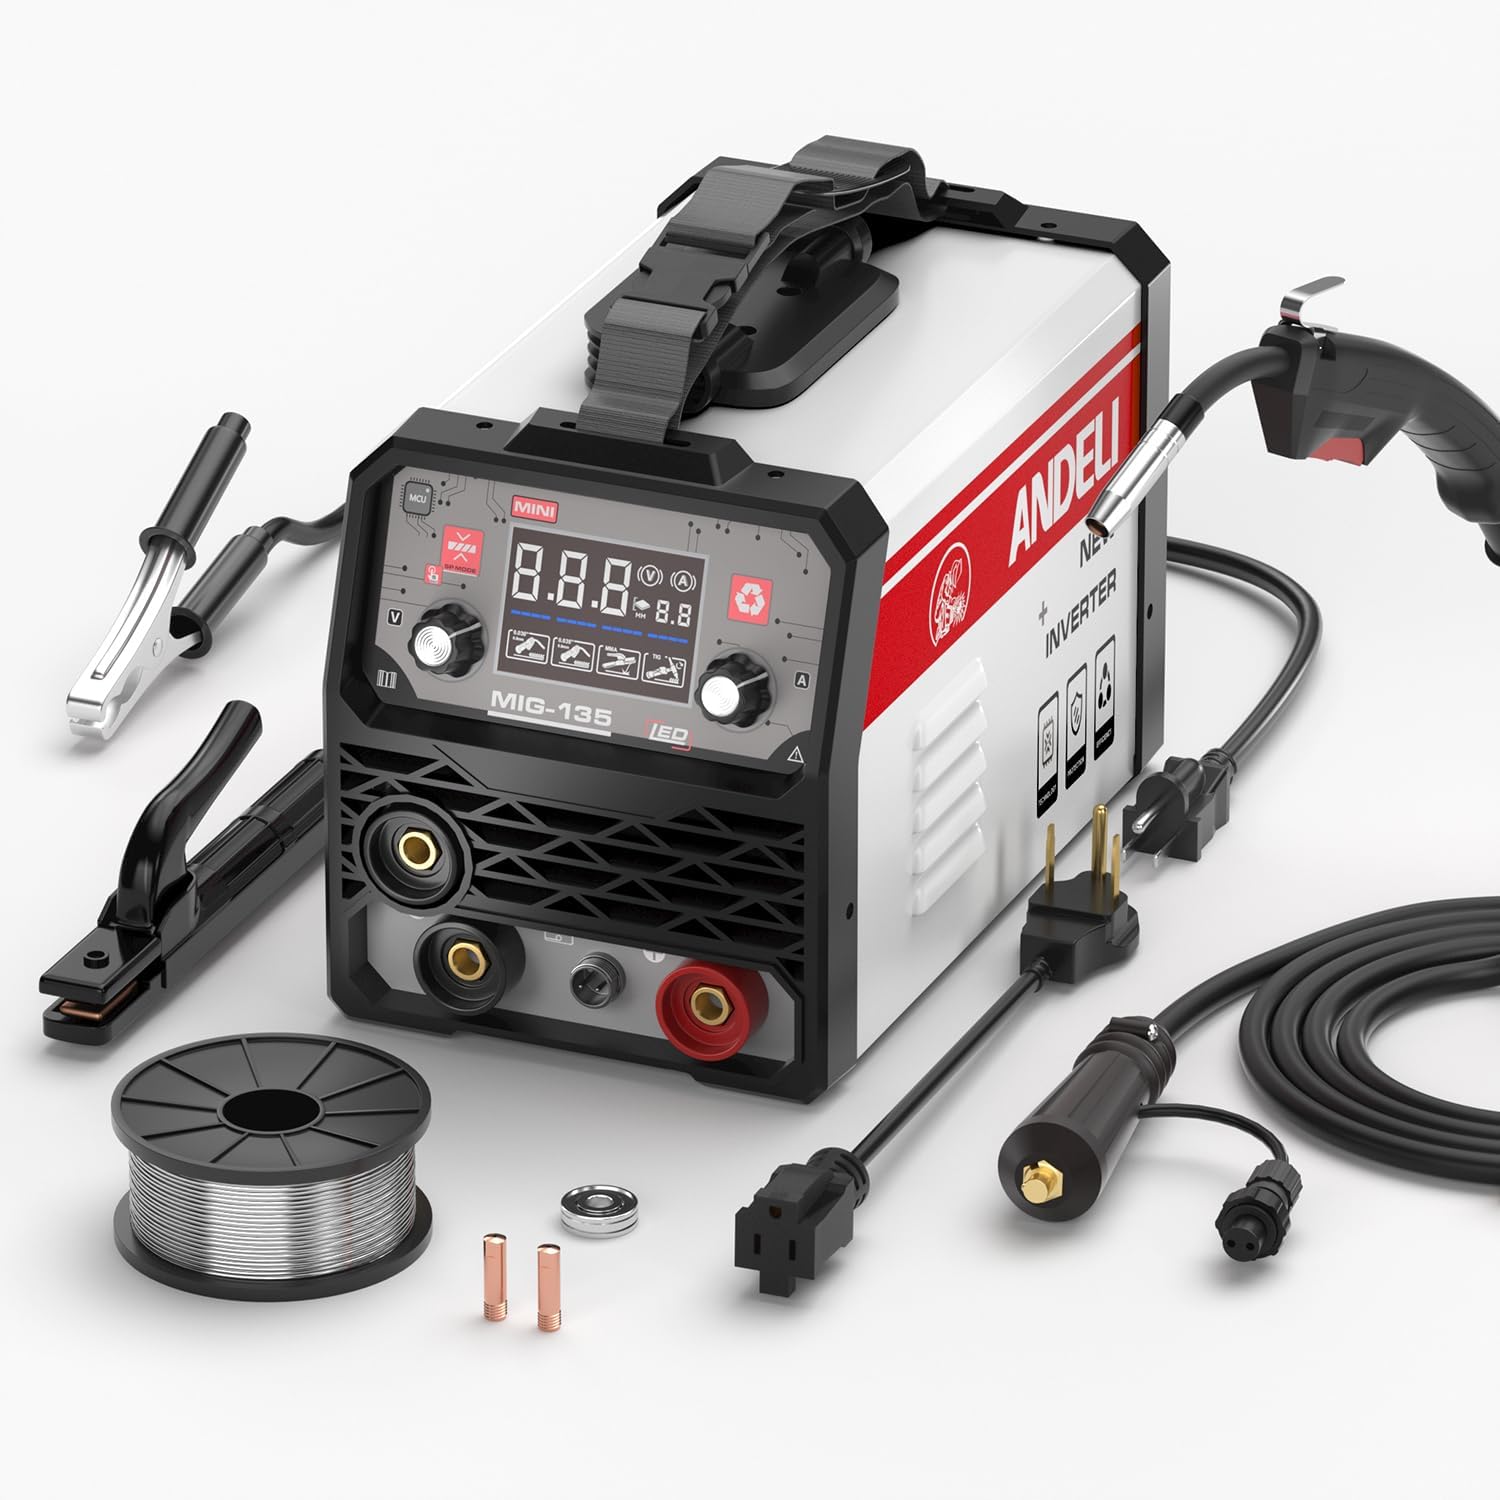
Figure 1: ANDELI MIG-135mini Multiprocess Welder and included accessories. The image displays the main welding unit, MIG torch, ground clamp, electrode holder, flux-cored wire spool, and power cables.
The main unit features a digital display, control knobs for voltage/current and wire speed, mode selection buttons, and connection ports for the MIG torch, ground clamp, and electrode holder.
- Front Panel:
- Digital Display: Shows welding parameters (voltage, current).
- Mode Selection Button: Toggles between MIG, Lift TIG, and MMA.
- Parameter Adjustment Knobs: Adjusts welding current/voltage and wire feed speed.
- Output Terminals: Positive (+) and Negative (-) connections for welding cables.
- Rear Panel:
- Power Input: For connecting the 110V power cord.
- Cooling Fan: For heat dissipation.
- Accessories:
- MIG Torch
- Ground Clamp
- Electrode Holder (for MMA)
- Flux-cored Welding Wire Spool
- Power Cable
3. Setup Instructions
3.1 Power Connection
- Ensure the welder's power switch is in the OFF position.
- Connect the power cable to the welder's power input on the rear panel.
- Plug the power cable into a standard 110V AC power outlet. Ensure the outlet is properly grounded and can supply sufficient current for welding.
3.2 MIG Welding Setup (Flux-Cored)
- Open the wire feeder compartment.
- Place the flux-cored wire spool onto the spindle, ensuring it rotates freely.
- Thread the wire through the guide tube and into the drive roller mechanism.
- Close the drive roller tension arm and adjust the tension. It should be tight enough to feed the wire without slipping, but not so tight as to deform the wire.
- Connect the MIG torch to the appropriate port on the front panel.
- Connect the ground clamp cable to the negative (-) output terminal.
- Ensure the MIG torch nozzle and contact tip are clean and correctly installed.
3.3 MMA (Stick Arc) Welding Setup
- Connect the electrode holder cable to the positive (+) output terminal.
- Connect the ground clamp cable to the negative (-) output terminal.
- Insert the appropriate welding electrode into the electrode holder.
3.4 Lift TIG Welding Setup
- Connect a TIG torch (not included, typically) to the negative (-) output terminal.
- Connect the ground clamp cable to the positive (+) output terminal.
- Ensure a tungsten electrode is properly installed in the TIG torch.
- This model supports Lift TIG, meaning no gas solenoid control from the machine. A TIG torch with a manual gas valve and a separate gas cylinder (Argon) will be required for gas-shielded TIG welding.
4. Operating Instructions
Always wear appropriate personal protective equipment (PPE) including a welding helmet, gloves, and protective clothing before operating the welder.
4.1 General Operation Steps
- Turn on the welder using the power switch.
- Select the desired welding mode (MIG, Lift TIG, or MMA) using the mode selection button on the front panel.
- Adjust the welding parameters (current, voltage, wire speed) according to the material thickness and welding process. Refer to welding charts for recommended settings.
- Securely attach the ground clamp to the workpiece, ensuring good electrical contact.
- Begin welding.
- After welding, turn off the machine and allow it to cool.
4.2 MIG Welding (Flux-Cored)
- Select MIG mode.
- Adjust voltage and wire feed speed. For flux-cored wire, the polarity is typically DCEN (Direct Current Electrode Negative), meaning the MIG torch is connected to the negative terminal and the ground clamp to the positive terminal. (Note: The product image shows the MIG torch connected to the positive terminal, and the ground clamp to the negative. Users should verify the correct polarity for their specific flux-cored wire and machine configuration, as some flux-cored wires use DCEP).
- Hold the MIG torch at a 10-15 degree push angle.
- Press the trigger to start the arc and feed wire. Maintain a consistent travel speed and arc length.
4.3 MMA (Stick Arc) Welding
- Select MMA mode.
- Adjust the welding current based on the electrode type and diameter.
- Strike the arc by lightly touching the electrode to the workpiece and quickly lifting it slightly to establish the arc.
- Maintain a consistent arc length and travel speed.
4.4 Lift TIG Welding
- Select TIG mode.
- Adjust the welding current.
- Open the gas valve on the TIG torch (if applicable) to establish gas flow.
- Gently touch the tungsten electrode to the workpiece to initiate the arc (Lift Arc). Lift the torch slightly to establish the arc.
- Maintain a consistent arc length and feed filler rod manually if required.
- Close the gas valve after welding to conserve gas.
5. Maintenance
Regular maintenance ensures the longevity and optimal performance of your welding machine.
- Cleaning: Regularly clean the machine's exterior with a dry cloth. Use compressed air to blow out dust and debris from the cooling vents. Ensure the machine is unplugged before cleaning.
- Cable Inspection: Periodically inspect all welding cables, power cords, and connections for damage, fraying, or loose connections. Replace damaged components immediately.
- MIG Torch Maintenance: Clean the MIG torch nozzle, contact tip, and diffuser regularly. Replace worn contact tips and nozzles. Ensure the liner is free of kinks and blockages.
- Electrode Holder/Ground Clamp: Keep the jaws of the electrode holder and ground clamp clean to ensure good electrical contact.
- Storage: Store the welder in a clean, dry, and dust-free environment when not in use.
6. Troubleshooting
This section addresses common issues you might encounter during operation.
| Problem | Possible Cause | Solution |
|---|---|---|
| No power to the machine | Power cord unplugged, circuit breaker tripped, machine switch off. | Check power cord connection, reset circuit breaker, turn on machine switch. |
| No arc in MMA/TIG mode | Poor ground connection, incorrect current setting, damp electrode (MMA), contaminated tungsten (TIG). | Ensure good ground contact, adjust current, use dry electrodes, clean/sharpen tungsten. |
| Wire feed issues (MIG) | Wire spool tangled, drive roller tension incorrect, contact tip clogged, liner blocked. | Untangle wire, adjust drive roller tension, replace contact tip, clean/replace liner. |
| Poor weld quality | Incorrect parameters (voltage/current/wire speed), improper technique, dirty workpiece. | Adjust settings, practice technique, clean workpiece thoroughly. |
| Overheat protection activated | Exceeded duty cycle, blocked cooling vents. | Allow machine to cool down, ensure vents are clear. |
7. Specifications
| Specification | Detail |
|---|---|
| Model | MIG-135MINI |
| Input Voltage | 110V AC |
| Welding Processes | MIG (Flux-Cored), Lift TIG, MMA (Stick Arc) |
| Item Weight | 18.85 pounds |
| Package Dimensions | 19.7 x 14.6 x 13.4 inches |
| Manufacturer | XINGYI |
| ASIN | B0FR1BZ1FS |
8. Warranty and Support
This product comes with a manufacturer's warranty. For specific warranty details, claims, or technical support, please refer to the documentation included with your purchase or contact ANDELI customer service directly. Keep your purchase receipt as proof of purchase.
For further assistance, please visit the official ANDELI website or contact their authorized service centers.


