Higeego Higeego H11 Expandable Clothes Rack
Higeego H11 Expandable Clothes Rack User Manual
Model: Higeego H11 Expandable Clothes Rack
1. Introduction
Thank you for choosing the Higeego H11 Expandable Clothes Rack. This heavy-duty garment rack is designed to provide versatile and robust storage for your clothing and accessories. Its expandable and adjustable features allow for customization to fit various spaces and organizational needs, from walk-in closets to laundry rooms. Please read this manual carefully before assembly and use to ensure safe and efficient operation.
2. Safety Information
- Read all instructions: Ensure you understand all assembly steps and safety warnings before proceeding.
- Keep children and pets away: Small parts can be a choking hazard. Keep children and pets away during assembly.
- Use on a level surface: Always assemble and use the rack on a flat, stable surface to prevent tipping.
- Do not overload: The rack has a maximum load capacity of 1000 lbs. Do not exceed this limit to prevent damage or injury.
- Anti-tip device: An anti-tip device is included. It is highly recommended to install this device to secure the rack to a wall, especially if it will hold heavy items or is in an area with children.
- Avoid forceful extension: To prevent damage, avoid forcefully pulling out the hanger rod after it has fully extended (39 inches / 3.2 feet).
- Regular inspection: Periodically check all connections and fasteners to ensure they remain tight and secure.
3. Package Contents
Verify that all components are present before beginning assembly. If any parts are missing or damaged, please contact Higeego customer support.
- Carbon Steel Metal Pipes (various lengths)
- Wire Storage Shelves
- Expandable Hanger Rods
- Adjustable Leveling Feet
- Plastic Clips (for shelf height adjustment)
- Anti-tip Device (wall anchors and straps)
- Assembly Instructions
4. Setup and Assembly
Before assembly, measure your space to determine the optimal configuration (straight or L-shape). Assembly is tool-free, but careful attention to detail is required.
4.1. General Assembly Tips
- Identify parts: Familiarize yourself with all components and their labels (if any).
- Plastic Clips: Ensure the "TOP" arrow on the plastic clips points upwards. These clips snap onto the grooves of the vertical poles. Place two clips on each pole at the desired height for a shelf.
- Shelf Placement: Gently slide the shelves down over the poles until they firmly rest on the installed plastic clips. Ensure all four corners of each shelf are securely seated.
- Pole Connections: When connecting pole sections, ensure they are aligned straight and twisted until snug. Avoid angling them.
- Order of Shelves: Note that certain shelves must be installed in a specific order for structural integrity. Refer to the included diagram.
4.2. Configuration Options
The Higeego H11 offers flexible configurations to suit your space:

Image: Customizable H-shape and L-shape configurations.
This image illustrates how the rack can be configured into either a straight (H-shape) or corner (L-shape) layout, adapting to different room designs and storage needs.
4.2.1. Straight Configuration (H-shape)
This setup maximizes linear hanging and shelving space. The overall width can be adjusted from 92.2 inches (7.8 ft) to 127.6 inches (10.8 ft).

Image: Straight configuration of the Higeego H11 clothes rack.
This image shows the rack set up in a straight line, demonstrating its capacity for hanging garments and storing items on top shelves, suitable for a wide wall space.
4.2.2. Corner Configuration (L-shape)
Ideal for utilizing corner spaces, this configuration allows the rack to turn a corner, providing continuous storage. Each side of the corner can extend from 54 to 71.7 inches.
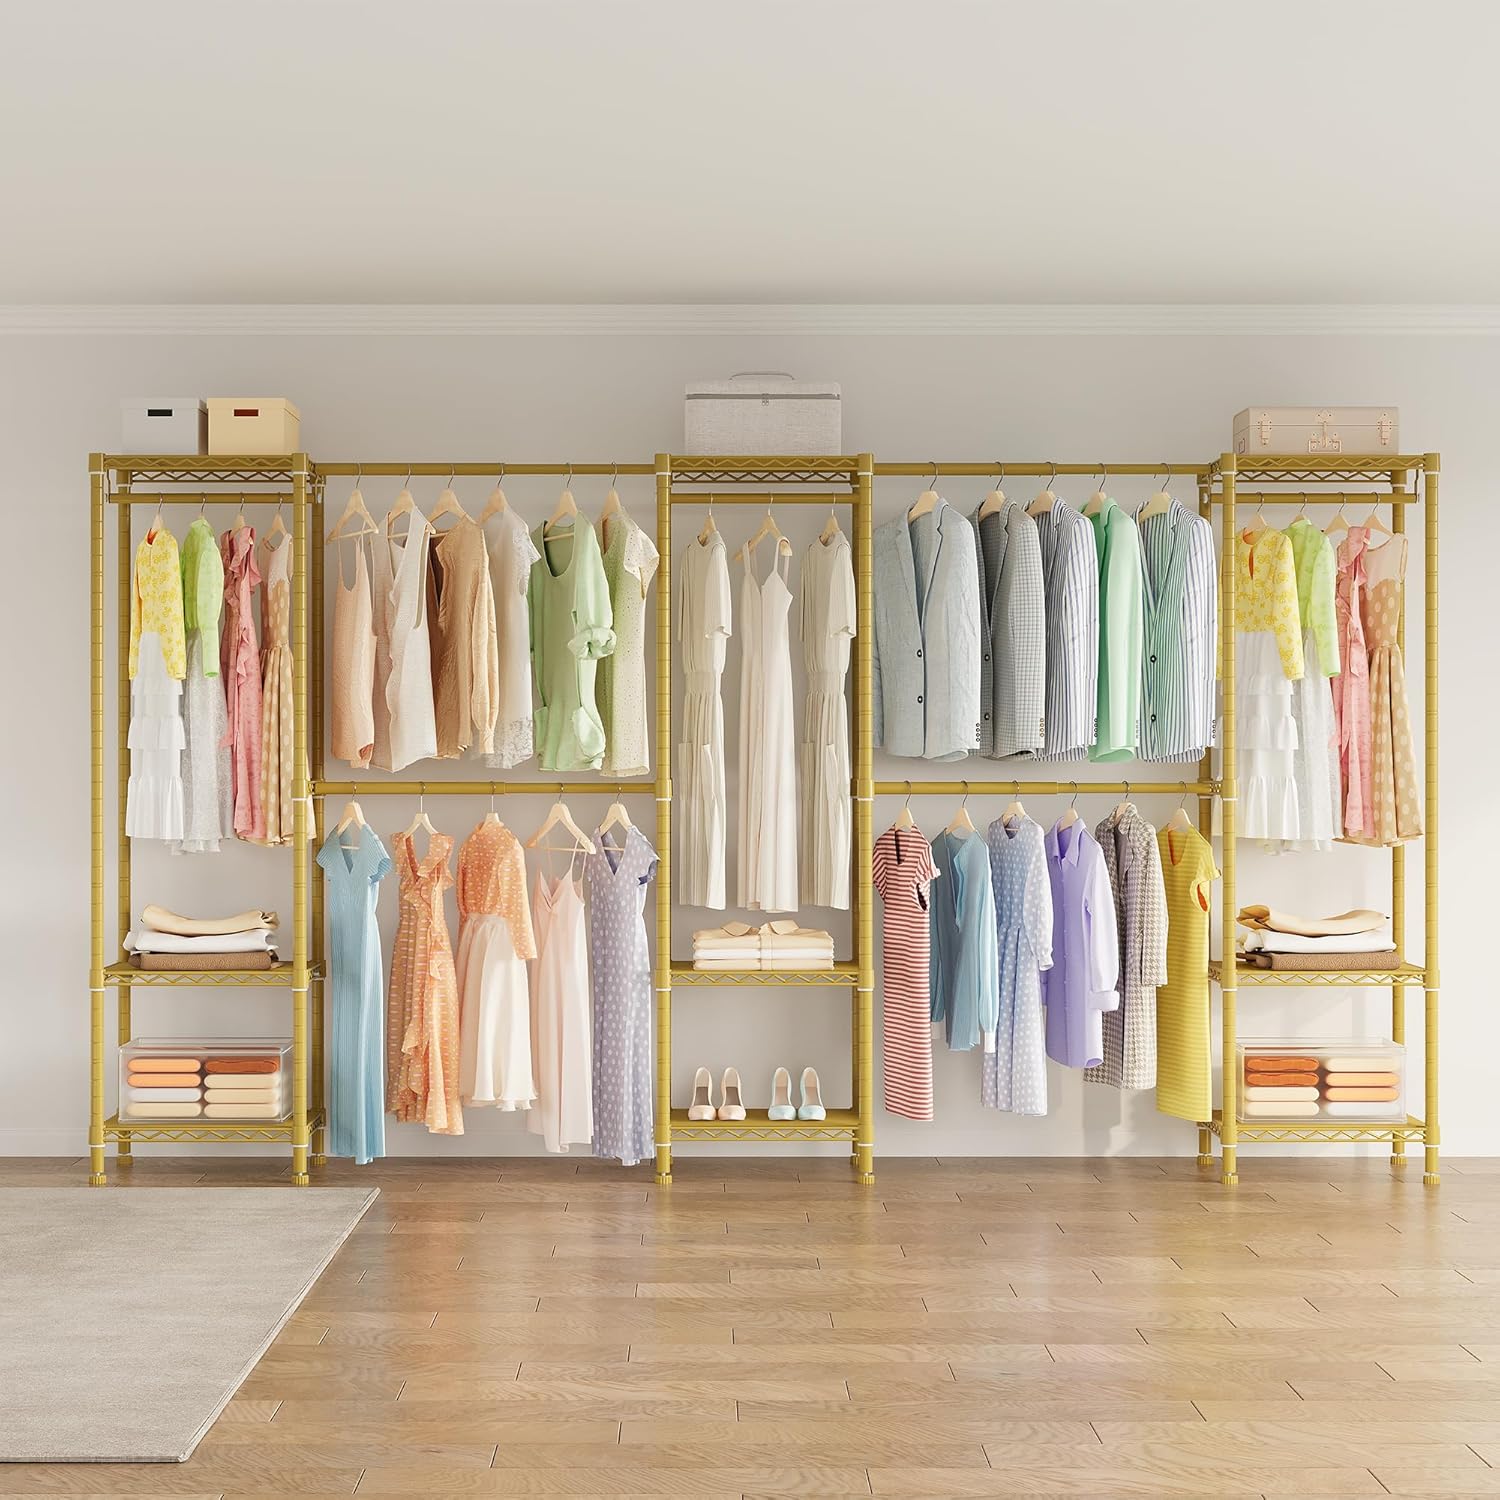
Image: L-shape corner configuration of the Higeego H11 clothes rack.
This image displays the rack configured to fit into a room corner, showcasing its adaptability for different room layouts and efficient use of space.
4.3. Step-by-Step Assembly (Refer to included diagrams for visual aid)
- Prepare the base: Attach the adjustable leveling feet to the bottom of the lowest vertical poles.
- Install first shelves: Determine the desired height for your bottom shelves. Snap the plastic clips onto the grooves of the vertical poles at this height. Slide the first set of wire shelves onto these clips.
- Extend vertical poles: Connect the upper sections of the vertical poles by twisting them securely into the lower sections. Ensure they are straight.
- Add middle shelves and hanger rods: Install plastic clips and slide on middle shelves as desired. Insert the expandable hanger rods into the designated slots on the vertical poles. These rods can be extended by twisting and pulling to your preferred length (up to 3.2 feet).
- Install top shelves: Attach the final set of plastic clips near the top of the poles and place the top wire shelves.
- Secure with anti-tip device: If using, attach the anti-tip straps to the top of the rack and secure them to a wall stud using appropriate hardware.
5. Operating Instructions
5.1. Adjusting Shelves
The height of the wire shelves can be tailored to accommodate different items. To adjust a shelf:
- Remove all items from the shelf.
- Lift the shelf off the plastic clips.
- Remove the plastic clips from the poles.
- Re-attach the plastic clips at the desired new height, ensuring the "TOP" arrow faces upwards and the clips snap securely into the grooves.
- Place the shelf back onto the clips, ensuring it is level and stable.
5.2. Extending Hanger Rods
The four middle hanger rods are extendable to increase hanging space.
- To extend: Gently twist the rod and pull outwards to the desired length.
- To retract: Push the rod inwards.
- Caution: Do not forcefully pull the rods beyond their maximum extension (3.2 feet) to prevent damage.
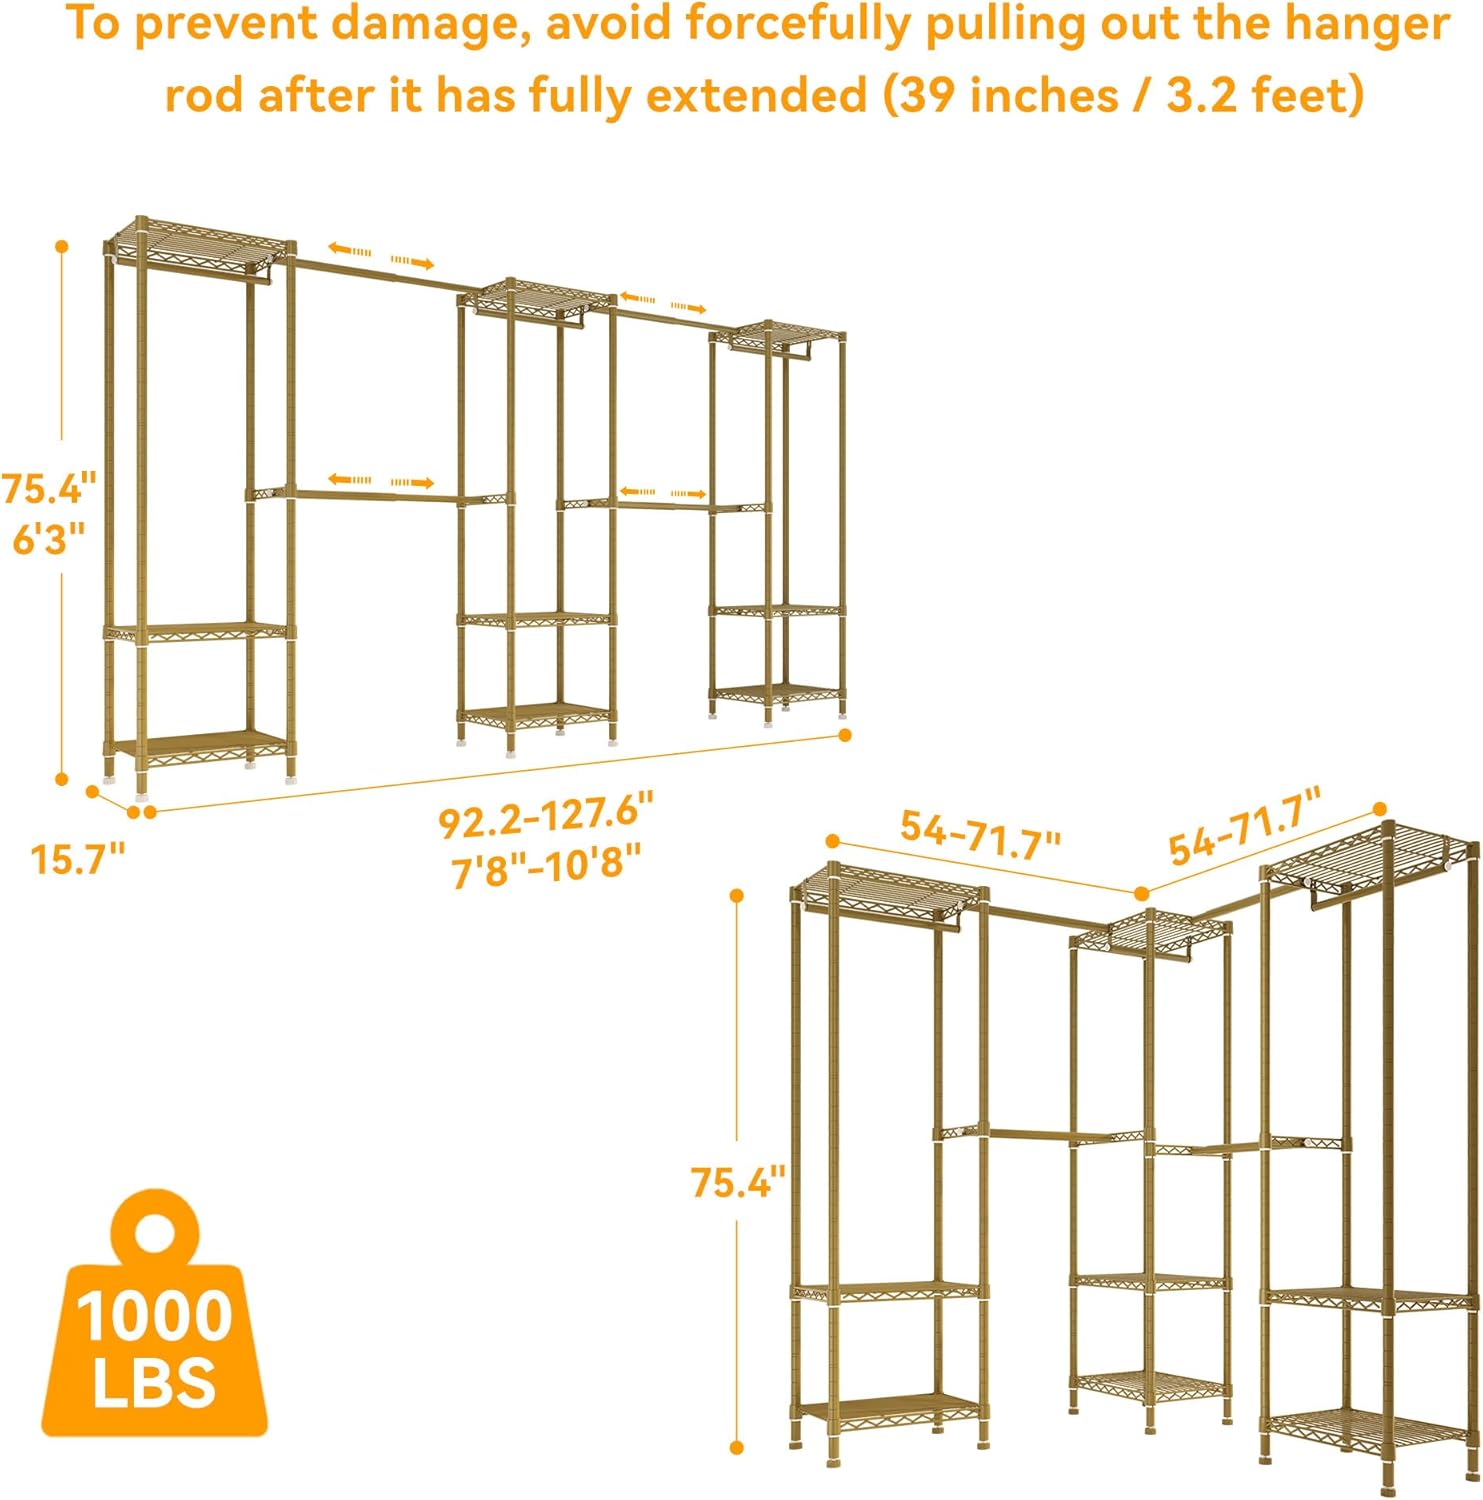
Image: Extendable hanger rods and capacity.
This image provides a visual representation of the rack's dimensions and highlights its impressive 1000 lbs load capacity.
6. Maintenance
- Cleaning: Wipe down the carbon steel frame and wire shelves with a soft, damp cloth. Avoid abrasive cleaners or harsh chemicals that could damage the rust-resistant painted finish.
- Stability Check: Periodically check all connections and the tightness of the leveling feet. Ensure the rack remains stable and level.
- Weight Distribution: Distribute weight evenly across shelves and hanger rods to maintain stability and prevent warping.
7. Troubleshooting
7.1. Rack is Unstable/Wobbly
- Check Leveling Feet: Ensure all adjustable leveling feet are firmly on the ground and adjusted to compensate for uneven surfaces.
- Tighten Connections: Verify that all pole connections and shelf clips are securely fastened.
- Weight Distribution: Redistribute items to ensure weight is evenly distributed and not concentrated on one side.
- Anti-tip Device: Ensure the anti-tip device is correctly installed and securely anchored to the wall.
7.2. Hanger Rods Not Extending/Retracting Smoothly
- Check for Obstructions: Ensure there are no clothes or other items blocking the rod's movement.
- Lubrication: A small amount of silicone-based lubricant can be applied to the sliding mechanism if movement is stiff.
- Avoid Force: Do not force the rods. If they are stuck, check for misalignment or damage.
8. Specifications
| Feature | Detail |
|---|---|
| Brand | Higeego |
| Model Number | Higeego H11 Expandable Clothes Rack |
| Color | Gold |
| Material | Carbon Steel |
| Product Dimensions (Straight) | 15.7"D x (92.2-127.6")W x 75.4"H |
| Product Dimensions (Corner) | 15.7"D x (54-71.7")W x 75.4"H (each side from corner) |
| Load Capacity | Up to 1000 lbs |
| Number of Shelves | 9 |
| Special Features | Easy to Install, Expandable, Portable, With Adjustable Shelves |
| Assembly Required | Yes |

Image: Dimensions and Load Capacity.
This image provides a visual representation of the rack's dimensions and highlights its impressive 1000 lbs load capacity.


Images: Robust Construction Details.
These images highlight the robust carbon steel construction with a rust-resistant finish and the adjustable, sturdy design of the shelves and rods.
9. Warranty and Support
For warranty information, product support, or to inquire about replacement parts, please contact Higeego customer service directly. Refer to the contact information provided with your purchase or visit the official Higeego website.
Ask a question about this manual
Ask about setup, troubleshooting, compatibility, parts, safety, or missing instructions. Manuals+ will review the question and use this page’s manual context to help answer it.