1. Introduction
The Matifaner Physics Optics Experiment Kit is designed for hands-on exploration of fundamental optical principles. This kit supports a wide range of experiments, including light refraction, reflection, convex and concave lens properties, pinhole imaging, and the study of primary colors of light. It is suitable for educational settings, home learning, and laboratory use.
2. Product Components
The kit includes a comprehensive set of components necessary for various optics experiments. Please verify all items are present upon unpacking.

Image: The Matifaner Physics Optics Experiment Kit, showcasing its organized storage case and integrated optical bench.
Kit Contents:
- Integrated Optical Bench (60cm)
- Simulated Eyeball Card
- Multi-hole Plate
- Water Lens with Stand
- Three-line Light Source
- Three-primary-color Light Source
- Lenses: F10cm Convex, F5cm Convex, F-10cm Concave
- F-shaped Light Source
- Shield
- Imaging Screen
- 2 Electronic Candles
- 3 Plane Mirrors
- Periscope
- Water Boxes (Triangular, Semi-circular, Double Concave)
- Vision Lenses (Normal, Myopia Simulation, Myopia Correction, Hyperopia Simulation, Hyperopia Correction)
- White Screen
- Reflection Box
- Gauge
- Syringe
- Instruction Manual
- Storage Box

Image: Key components including the optical bench, various light sources, and lenses.

Image: Additional components such as the water lens, periscope, light baffle, and syringe.

Image: A selection of lenses, water boxes for refraction experiments, and a reflection angle measuring device.
3. Setup
3.1 Unpacking and Inspection
Carefully remove all components from the storage box. Inspect each item for any damage. Refer to the 'Product Components' section to ensure all parts are present.
3.2 Battery Installation
The light sources require 6 AAA batteries (not included). Open the battery compartment on the light sources and insert the batteries, ensuring correct polarity. Close the compartment securely.
3.3 Optical Bench
The 60cm optical bench is integrated and requires no assembly. Simply place it on a stable, flat surface. Components can be mounted onto the bench using their respective bases.

Image: The kit's double-layer storage box, illustrating its compact design and organization.
4. Operating Instructions
This section outlines various experiments you can conduct with the kit. Always ensure a stable setup and proper alignment of components for accurate results.
4.1 Pinhole Imaging Experiment
To demonstrate pinhole imaging, place the F-shaped light source at one end of the optical bench. Position the multi-hole plate (with a single small hole) in front of it, followed by the imaging screen. Observe the inverted image formed on the screen.
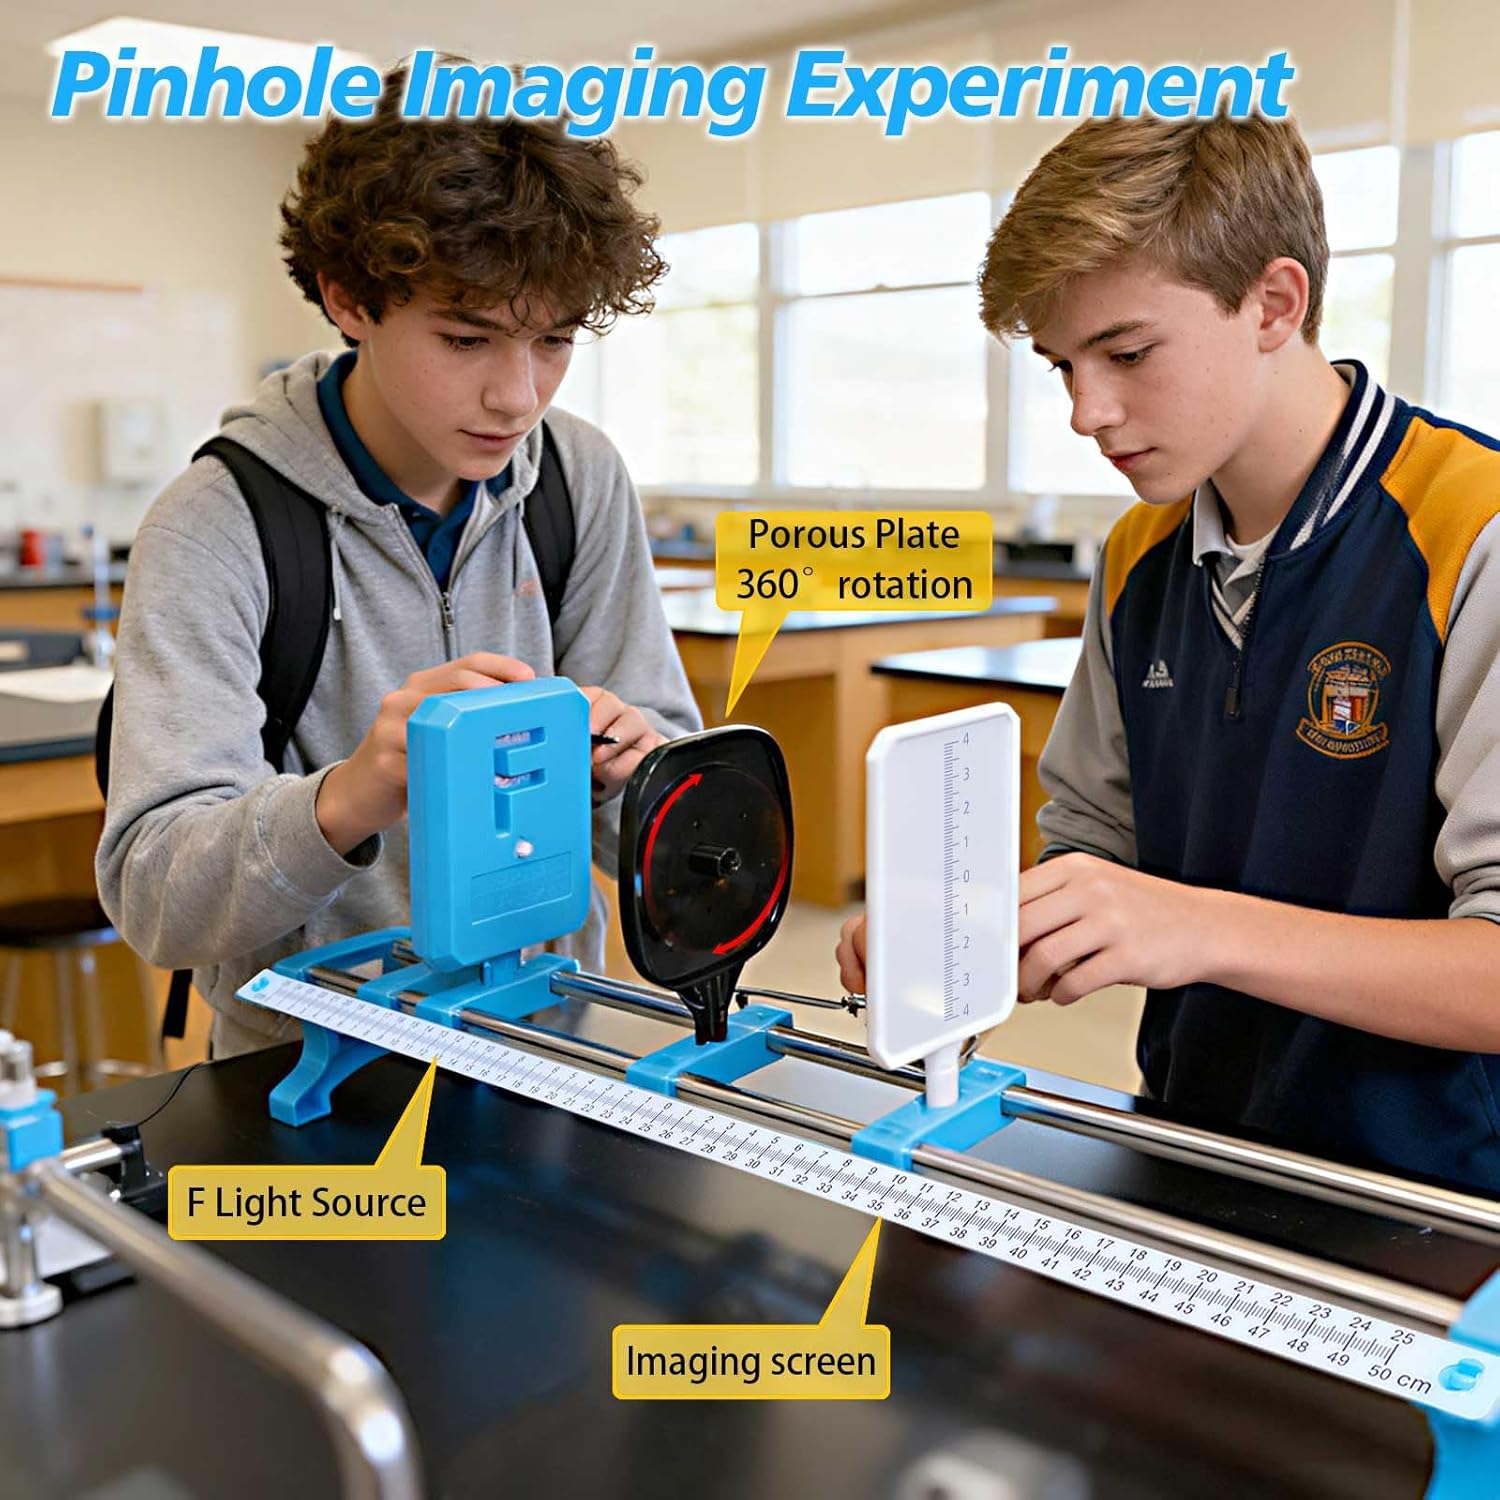
Image: Setup for the Pinhole Imaging Experiment, showing the F light source, porous plate, and imaging screen.
4.2 Light Refraction and Reflection Experiments
Use the three-line light source and various lenses (convex, concave, rectangular, triangular, semicircular) or water boxes to observe how light bends (refracts) when passing through different materials or reflects off surfaces. Place the light source and optical component on a flat surface or the optical bench. Adjust the angle of incidence to see changes in refraction and reflection.

Image: Demonstration of light refraction and reflection using the three-line light source and different optical shapes.

Image: Light rays converging after passing through a convex lens, demonstrating refraction.

Image: Measuring the angle of refraction using a lens and protractor.

Image: Comprehensive setup for observing light refraction and reflection with multiple optical elements.
4.3 Primary Colors of Light Experiment
Use the three-primary-color light source to project red, green, and blue light. Observe how these colors combine to form secondary colors (magenta, cyan, yellow) and white light when overlapped.
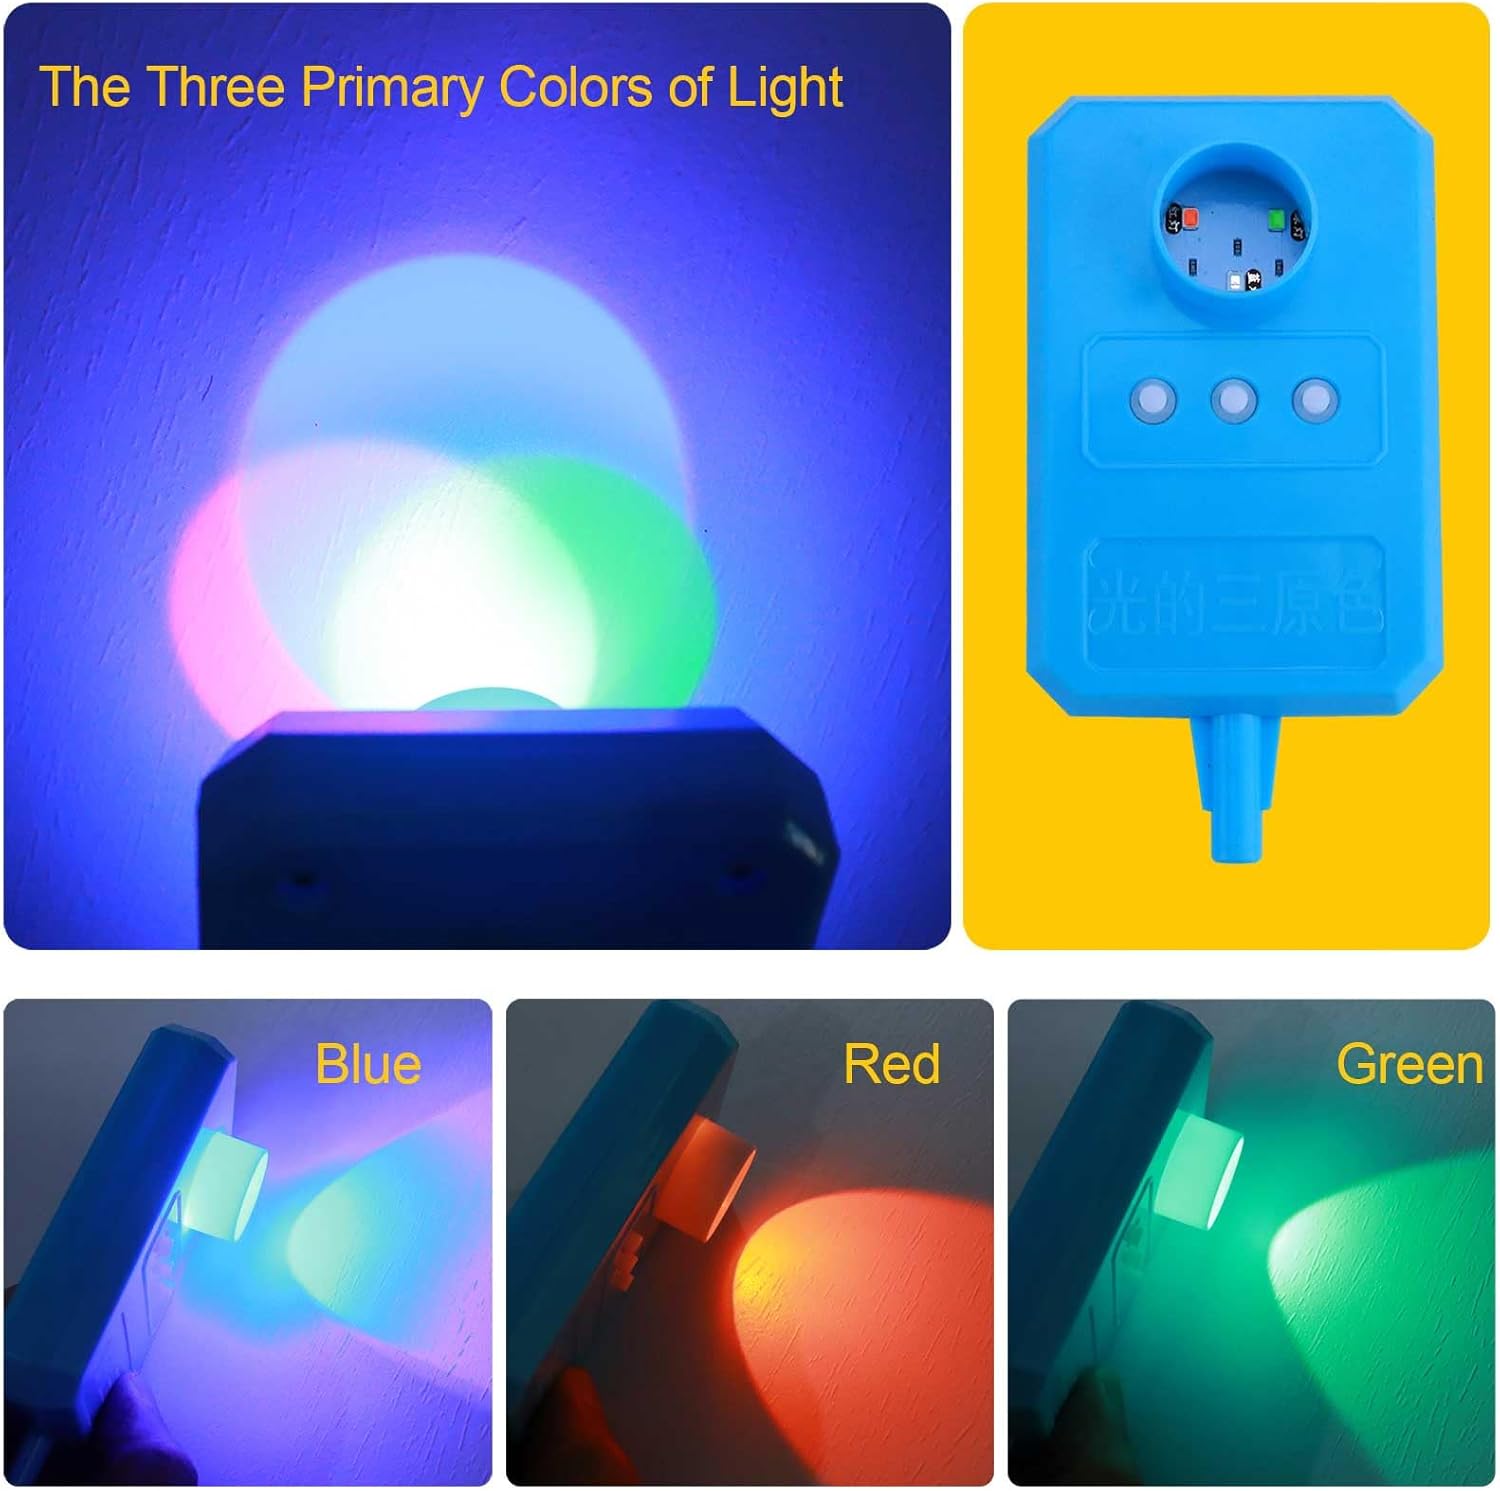
Image: Demonstration of the three primary colors of light and their additive mixing.

Image: Overlapping red, green, and blue light to produce white light.
4.4 Water Lens Experiment
Fill the water lens with water using the provided syringe. Place it on the optical bench with a light source and an imaging screen. Observe how the water lens focuses or diverges light, similar to solid lenses.

Image: The water lens experiment setup, showing the syringe for filling the lens.

Image: Filling the water lens with a syringe as part of the experiment setup.
4.5 Plane Mirror Imaging Experiment
Place an electronic candle in front of a plane mirror. Observe the virtual image formed behind the mirror. Use a second electronic candle to locate the position of the virtual image.

Image: Electronic candles used to demonstrate plane mirror imaging.
4.6 Reflection Angle Measurement
Use the reflection angle measuring device with the three-line light source. Direct a single light ray onto the reflective surface and measure the angle of incidence and the angle of reflection. Observe that these angles are equal.

Image: Measuring the angle of reflection using a light source and a protractor.
4.7 Concave/Convex Mirror Reflection
Utilize the reflection box with concave and convex surfaces. Direct parallel light rays from the three-line light source onto these surfaces to observe how they converge or diverge reflected light.

Image: Light rays reflecting off a concave mirror, demonstrating convergence.
5. Maintenance
- Cleaning: Wipe all plastic and acrylic components with a soft, dry cloth. For stubborn marks, use a slightly damp cloth with mild soap and water, then dry thoroughly. Avoid abrasive cleaners or solvents.
- Storage: Store all components in the provided double-layer storage box when not in use. Ensure all parts are clean and dry before storage to prevent damage.
- Battery Care: Remove batteries from light sources if the kit will not be used for an extended period to prevent leakage.
- Handling: Handle lenses and mirrors carefully to avoid scratches. Acrylic prisms and lenses are designed to be shatterproof, but proper care extends their lifespan.
6. Troubleshooting
- Light Source Not Working:
- Check if batteries are correctly installed and have sufficient charge.
- Ensure the power switch is in the 'ON' position.
- Unclear Images/Results:
- Verify that all components are properly aligned on the optical bench.
- Ensure lenses and mirrors are clean and free of smudges.
- Conduct experiments in a dimly lit room for better visibility of light rays and images.
- Adjust distances between components (light source, lens/mirror, screen) as needed for focusing.
- Missing Components: Refer to the 'Product Components' list. If any parts are missing upon initial inspection, contact customer support immediately.
7. Specifications
| Brand Name | Matifaner |
| Model Number | op-1 |
| Set Name | 37-Piece Optical Experiment Kit |
| Material Type | Plastic (Acrylic prisms/lenses) |
| Item Dimensions (L x W x H) | 23.2 x 6.7 x 3.9 inches (59 x 17 x 10 cm) |
| Assembly Required | Yes (for experiments, optical bench is integrated) |
| Educational Objective | STEM, Physics |
| Manufacturer Minimum Age | 170 months (approx. 14 years) |
8. Safety Information
- Choking Hazard: This kit contains small parts. Not suitable for children under 3 years of age.
- Adult Supervision: Adult supervision is recommended, especially for younger users, to ensure proper handling of components and understanding of experimental procedures.
- Eye Protection: While the light sources are generally low power, avoid direct eye exposure to laser beams.
- Battery Safety: Use only the specified type of batteries. Do not mix old and new batteries or different types of batteries. Dispose of used batteries responsibly.
9. Warranty and Support
Matifaner is committed to providing high-quality educational products. If you encounter any issues with your Physics Optics Experiment Kit, such as equipment faults or questions regarding experiments, please contact our customer support team. We aim to resolve problems within 24 hours to ensure your satisfaction and uninterrupted learning experience.
For support, please refer to the contact information provided with your purchase or visit the official Matifaner website.


