1. Introduction
This manual provides detailed instructions for the assembly, operation, and maintenance of your WELYAS 6x4 FT Resin Outdoor Storage Shed. Please read all instructions carefully before beginning assembly and retain this manual for future reference.

Figure 1: WELYAS 6x4 FT Resin Outdoor Storage Shed.
2. Safety Information
- Two-Person Assembly: Always use at least two people for assembly. Some components can be heavy (up to 150 pounds) and awkward to handle alone.
- Level Surface: Installation requires a solid, level, and hard surface (concrete or wood is recommended) to ensure stability and proper function.
- Weather Conditions: If you live in an area with frequent storms, install the storage shed against a wall for added support. Ensure all parts are securely fastened to withstand wind and other weather elements.
- Component Handling: Be cautious when handling all components to avoid injury. Wear appropriate safety gear, such as gloves, if necessary.
3. Package Contents
Your WELYAS Resin Outdoor Storage Shed comes in two boxes. Please verify all parts are present and undamaged before beginning assembly. A detailed list of components and hardware is provided in the included instruction booklet. Key components include:
- Floor panels
- Wall panels (back, side, front)
- Triangle gable boards
- Roof panels
- Door panels and frame
- Metal frame supports
- Hardware (screws, bolts, nuts, hinges, latch)
- Assembly tools (rubber mallet, spatula)

Figure 2: Overview of shed dimensions and package details, indicating two boxes and tools required.
4. Setup and Assembly
Follow these steps carefully for proper assembly. An assembly video is provided below for visual guidance.
Video 1: Detailed assembly instructions for the WELYAS 6x4 FT Resin Shed with Floor.
4.1. Pre-Assembly Checklist
Before starting, ensure you have a solid and level foundation. Gather all necessary tools and helpers. At least two helpers are recommended. Tools typically include a power screwdriver, hammer/mallet, tape measure, gloves, and exterior sealant/caulk.
4.2. Assembling the Floor
Connect the floor panels (A64-C01, A64-C02, A64-C03) using the provided rubber mallet to ensure a tight fit. Secure them with screws (E02) as indicated in the instructions.
4.3. Assembling the Walls
Assemble the back wall (A64-C02, A64-C12) and side walls (A64-C08, A64-C10, A64-C11) by connecting the panels and securing them with screws (E02). Ensure the grooved side of the panels faces outwards.

Figure 3: Illustration of connecting wall panels during assembly.
4.4. Installing Windows and Gable Boards
Integrate the window components (F35-C31, F35-C32, F35-C33) into the designated side wall panels. Attach the triangle gable boards (A64-C13) to the top sections of the front and back walls, securing any vents (A64-C32) and frames (A64-C33).
4.5. Assembling the Roof
Connect the roof panels (A64-V4-C01, A64-V4-C02) using the provided connectors (A64-V4-A03) and secure with screws (E02). Ensure the panels are aligned correctly to form a waterproof seal.
4.6. Assembling the Door
Assemble the door panels (A64-C04, A64-C05) with the door frame components (A64-A02, A64-A05, A64-A06). Attach hinges (A64-A15) and ensure the door operates smoothly before final tightening of screws (E01, E12).
4.7. Erecting the Walls
Carefully lift and position the assembled back and side walls onto the floor base. Secure them using corner brackets (A64-C19) and screws (E02). Ensure walls are plumb and square.
4.8. Attaching Roof Supports and Panels
Install the roof support beams (A86-V4-A07, A64-V4-A01) and secure them to the top of the walls with screws (E02). Place the assembled roof sections onto the supports, ensuring proper alignment. Secure the roof sections with screws (E02) and the roof ridge cap (A64-C34) with screws (E07).
4.9. Final Assembly and Securing
Attach the remaining roof trim pieces (A64-C17, A64-C18) and corner covers (A64-C29, A64-C31, F35-C30) to complete the roof structure, securing them with screws (E02). Install the door latch (D02) and ensure it functions correctly. Finally, anchor the shed to the ground using the provided anchors (E04) for added stability.
5. Operating Instructions
5.1. Opening and Closing the Door
The shed features a single hinged, lockable door. To open, disengage the latch and pull the door outwards. To close, push the door firmly until it latches. For added security, a padlock (not included) can be used with the integrated lockable mechanism.
5.2. Ventilation and Lighting
The shed includes vents for air circulation and a transparent top panel to provide natural light. The window also allows for additional light and visibility of stored items.

Figure 4: Interior view highlighting the light-transmitting window.
Video 2: Inside view of the WELYAS 6x4 FT Outdoor Storage Resin Shed, demonstrating interior space and light.
6. Maintenance
- Cleaning: Clean the shed periodically with mild soap and water. Avoid abrasive cleaners or harsh chemicals that could damage the resin material.
- Inspection: Regularly inspect all screws, bolts, and connections to ensure they remain tight. Re-tighten as needed.
- Drainage: Ensure the area around the shed is clear of debris to allow for proper water drainage and prevent accumulation around the base.
- Snow Load: While designed to withstand snow, heavy snow accumulation should be cleared from the roof to prevent excessive stress.
7. Troubleshooting
- Water Leakage: If water leaks occur, check all panel connections and roof seams. Apply exterior sealant or caulk to any gaps. Ensure the shed is on a level surface to prevent water pooling.
- Door Misalignment: If the door does not close properly, check the hinges and the shed's overall squareness. Adjust the hinges or re-level the shed foundation if necessary.
- Panel Instability: Ensure all screws are fully tightened. If panels feel loose, re-check the assembly steps and ensure all support brackets are correctly installed.
8. Specifications
| Feature | Specification |
|---|---|
| Brand | WELYAS |
| Model Number | Y8L048 |
| Color | Gray |
| Material | Resin (15MM premium polypropylene) |
| Product Dimensions (Exterior) | 76.8"D x 50.4"W x 78.3"H |
| Base Size | 75.2'' x 48.8'' |
| Roof Size | 76.8'' x 50.4'' |
| Door Size | 65.3'' x 25.1'' |
| Item Weight | 150 Pounds |
| Water Resistance Level | Waterproof |
| Frame Material | Metal |
| Door Style | Single Hinged, Lockable |
| Assembly Required | Yes |
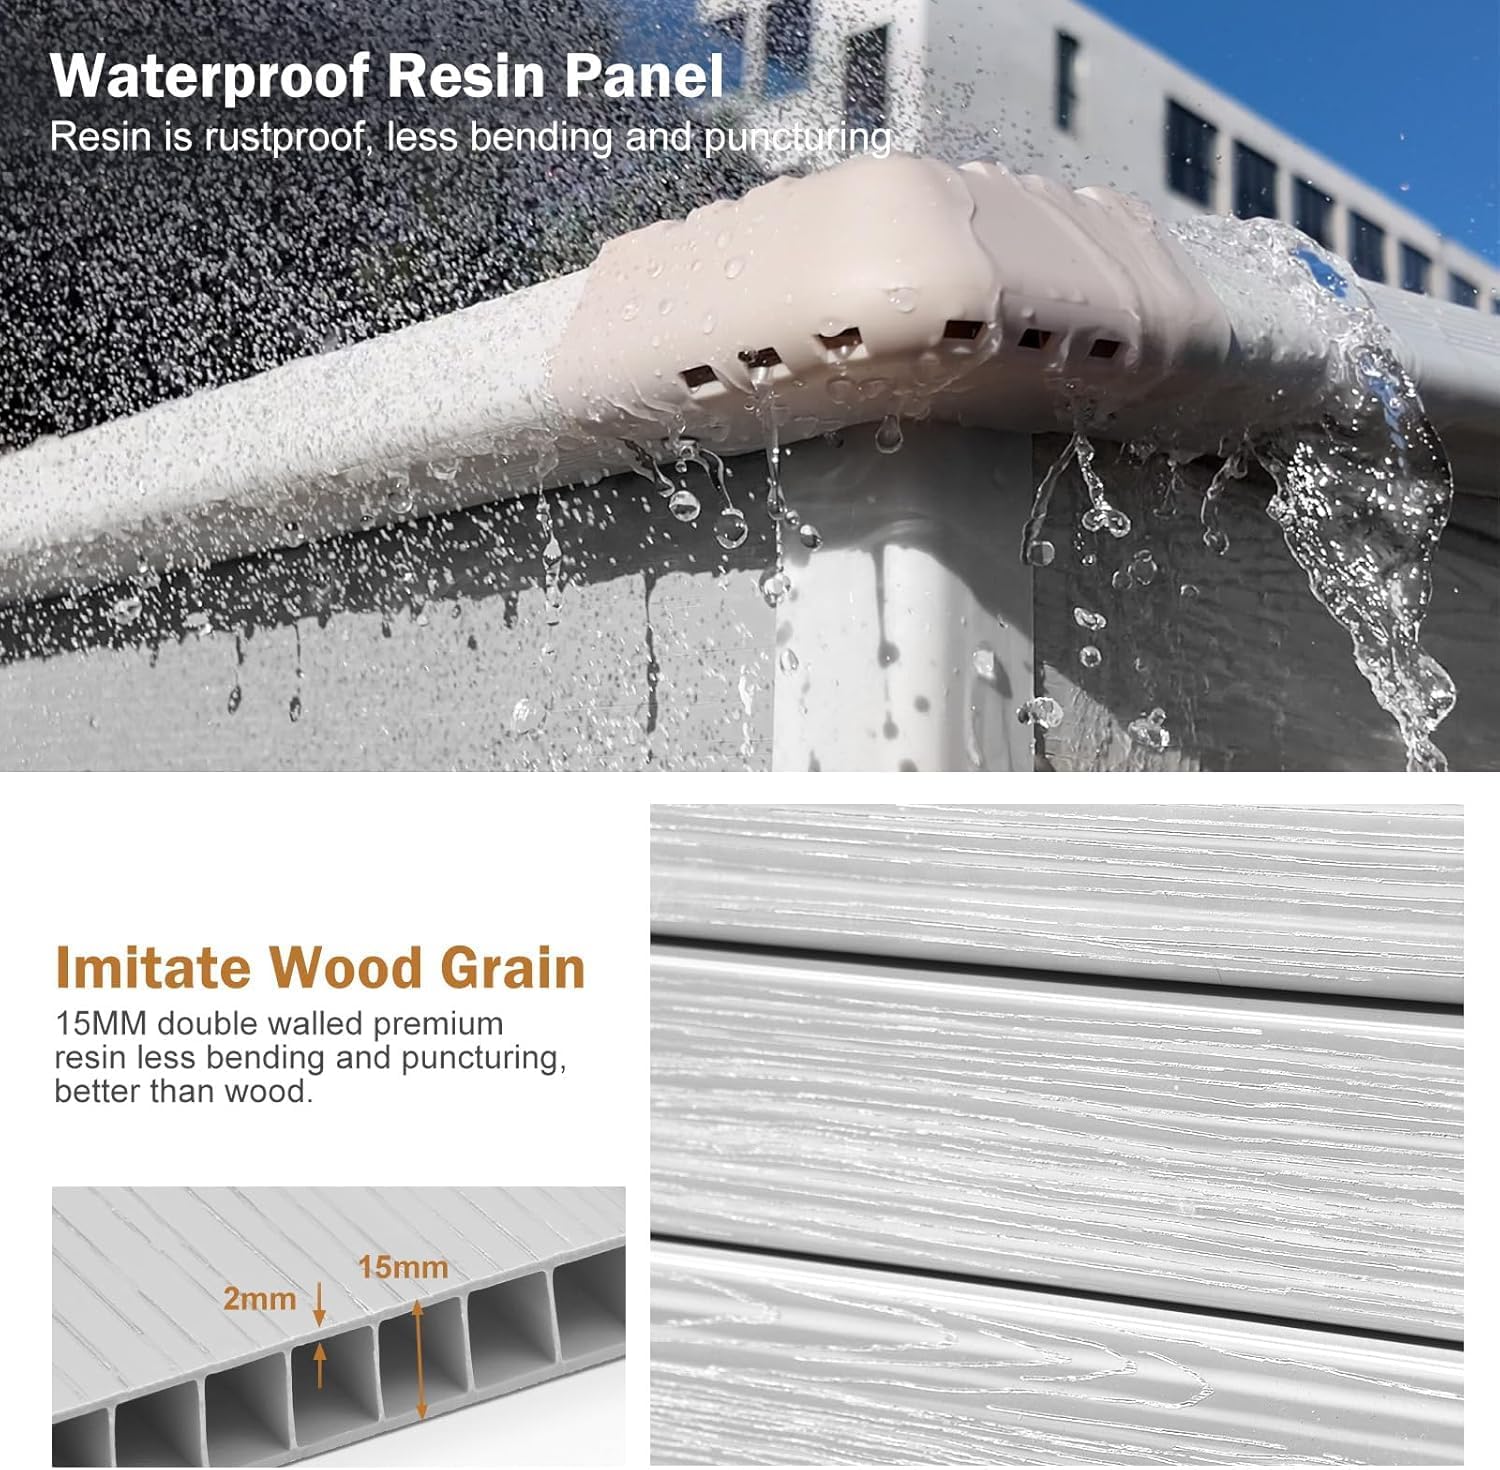
Figure 5: Detail of the waterproof resin panel construction.
Video 3: Durability test of WELYAS Resin Shed Panels.
9. Warranty and Support
For any issues or inquiries regarding your WELYAS Resin Outdoor Storage Shed, please contact the seller through the platform where you made your purchase. The manufacturer is committed to providing a satisfactory solution within 24 hours for any product-related concerns.