HONEYWHALE H2
HONEYWHALE H2 Electric Scooter User Manual
Model: H2
1. Introduction
Thank you for choosing the HONEYWHALE H2 Electric Scooter. This manual provides important information regarding the safe assembly, operation, maintenance, and troubleshooting of your scooter. Please read this manual thoroughly before your first ride to ensure optimal performance and safety. Keep this manual for future reference.

Figure 1: HONEYWHALE H2 Electric Scooter. This image shows the overall design of the HONEYWHALE H2 electric scooter in its upright position.
2. Safety Information
Your safety is paramount. Always adhere to local traffic laws and regulations. Failure to follow these instructions may result in serious injury or property damage.
- Always wear a helmet and appropriate protective gear (knee pads, elbow pads) when riding.
- Do not ride in heavy rain, snow, or icy conditions.
- Ensure the scooter is fully charged and all components are securely fastened before each ride.
- Do not exceed the maximum weight capacity of 150 KG.
- Maintain a safe speed and distance from other vehicles and pedestrians.
- Familiarize yourself with the braking system and practice emergency stops in a safe area.
- Avoid riding on uneven or slippery surfaces.
- Children should only operate the scooter under adult supervision and with proper safety equipment.
3. Package Contents
Please check the package contents carefully. If any items are missing or damaged, contact your retailer.
- 1 x HONEYWHALE H2 Electric Scooter
- 1 x Charger
- 1 x Installation Tool Kit
- 1 x User Manual
4. Setup and Initial Use
4.1 Unfolding the Scooter
- Place the scooter on a flat surface.
- Release the folding mechanism latch, usually located near the base of the handlebar stem.
- Carefully lift the handlebar stem until it locks into the upright position. Ensure the locking mechanism is fully engaged.
- Adjust the handlebar height if applicable and secure it.

Figure 2: Product Dimensions and Load Capacity. This image provides an overview of the scooter's dimensions (126cm height, 126cm length), recommended rider height (160-190cm), scooter weight (25.9 KG), and maximum load capacity (150 KG). It also highlights the 10-inch vacuum tires and illustrates the folding mechanism.
4.2 Initial Charging
Before your first ride, fully charge the scooter's battery.
- Locate the charging port on the scooter.
- Connect the charger to the charging port, then plug the charger into a power outlet.
- The charging indicator on the charger will typically show red during charging and turn green when fully charged.
- Charging time is approximately 11 hours for a full charge. Do not overcharge.

Figure 3: High-Capacity Battery. This image illustrates the high-capacity 54.6V/15Ah lithium-ion battery, providing up to 50 KM of range and requiring approximately 11 hours for a full charge.
5. Operating Instructions
5.1 Power On/Off
Press and hold the power button on the display to turn the scooter on or off.
5.2 Multifunctional Display
The integrated display provides real-time information about your ride.

Figure 4: Multifunctional Touch Display. This image features the scooter's multifunctional touch display, showing battery level, speed indication, cruise mode, speed mode, and headlight status. It also indicates the three speed modes: ECO (25km/h), SPORT (35km/h), and RACE (50km/h).
- Battery Level: Indicates the remaining battery charge.
- Speed Indication: Shows your current speed.
- Speed Mode: Displays the active speed mode (ECO, SPORT, RACE).
- Distance Traveled: Shows the total distance covered.
- Headlight Status: Indicates if the headlight is on or off.
5.3 Speed Modes
The scooter offers three speed modes, selectable via the touch buttons on the display:
- ECO Mode: Maximum speed of 25 KM/H, suitable for energy saving and beginners.
- SPORT Mode: Maximum speed of 35 KM/H, for a balanced ride.
- RACE Mode: Maximum speed of 50 KM/H, for experienced riders on open roads.
5.4 Smart Cruise Mode
Activate cruise mode to maintain a constant speed. To activate, reach your desired speed and hold the accelerator for a few seconds. To deactivate, press the accelerator or brake again. Use this feature only in areas with no traffic or pedestrians.
5.5 Braking System
The H2 scooter is equipped with a dual braking system, combining disc brakes and electronic brakes for enhanced safety.

Figure 5: Suspension and Disc Brake Systems. This image displays the scooter's dual suspension system and disc brakes, emphasizing comfort and safety. The top part shows the front suspension, and the bottom part shows the rear suspension and disc brake.
5.6 Lighting and Signals
The scooter includes a high-brightness headlight, flashing taillight, and left/right turn signals for improved visibility and safety, especially during night rides.
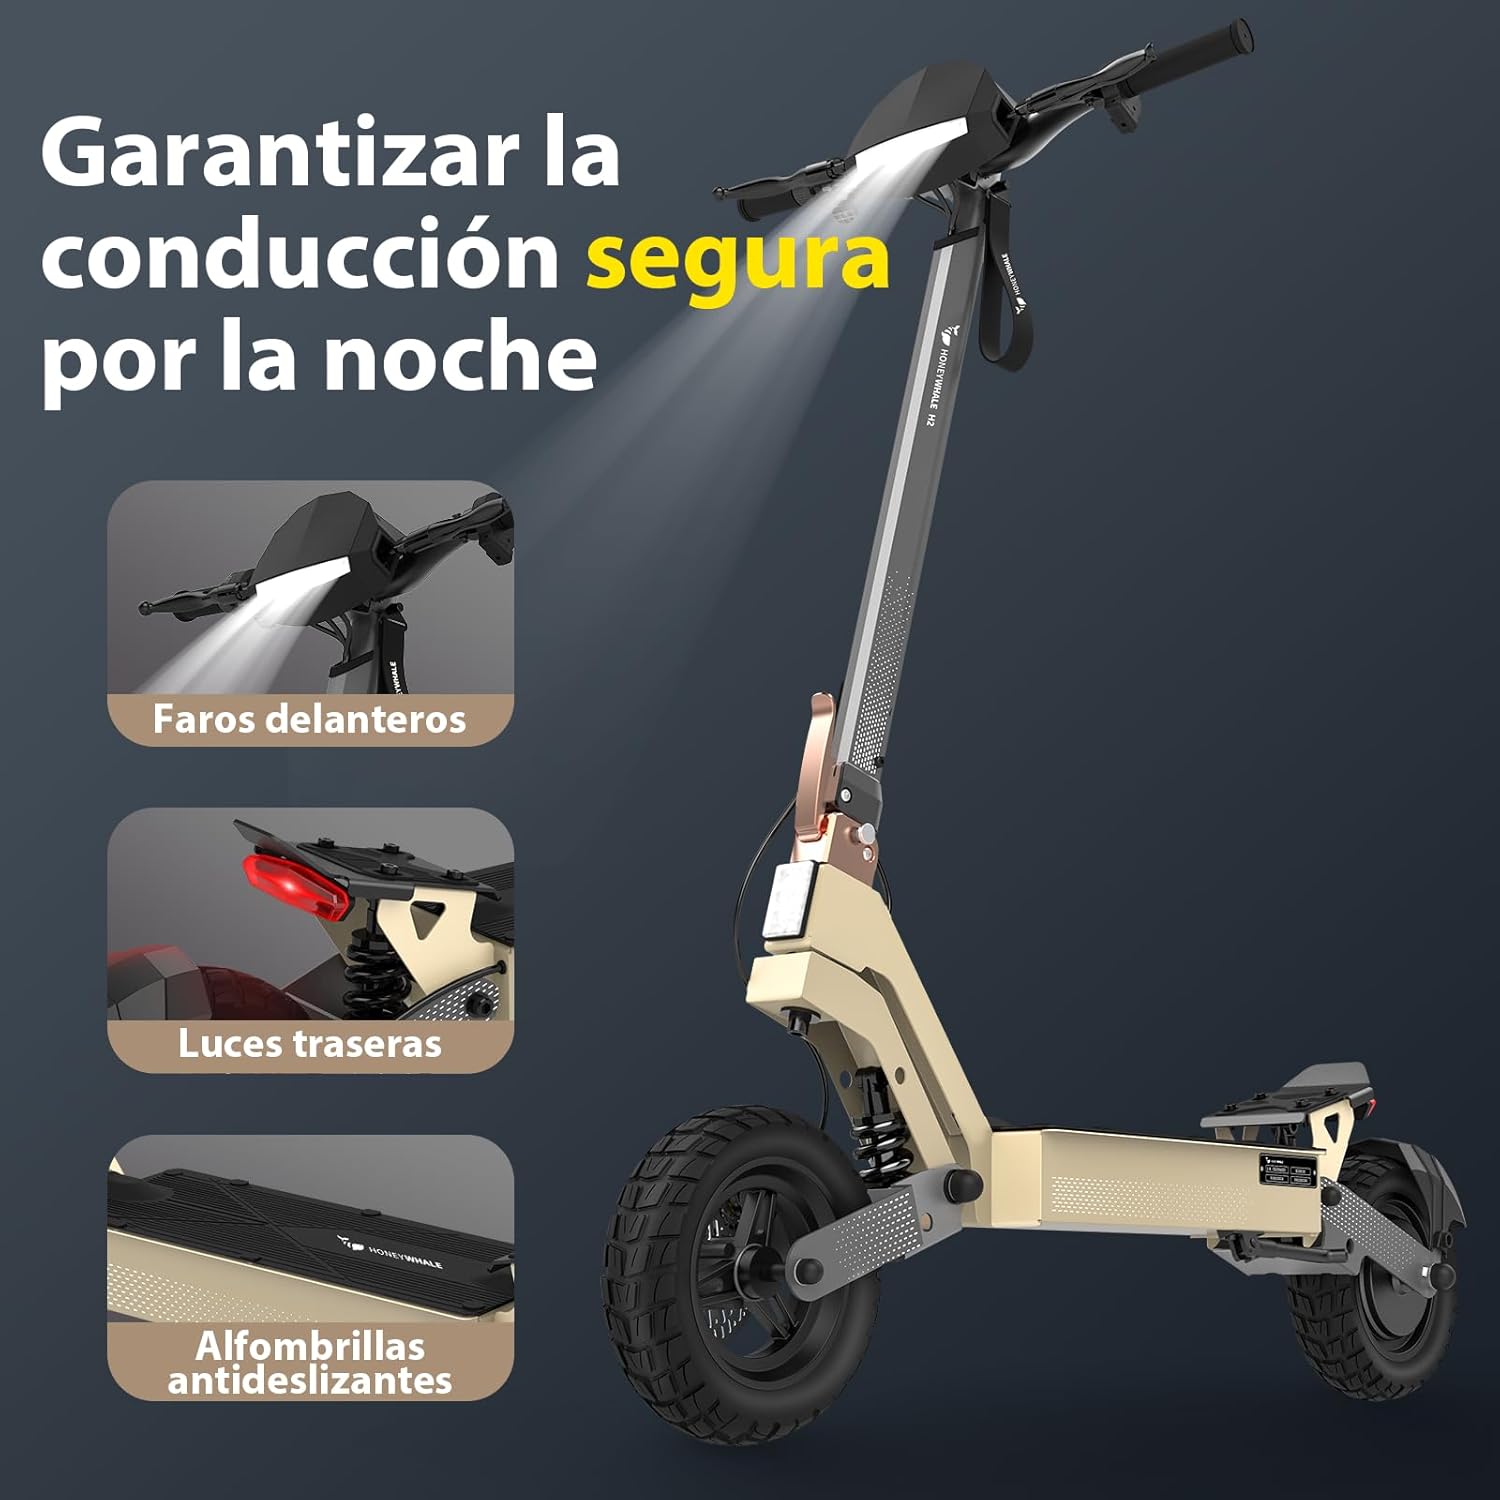
Figure 6: Night Riding Safety Features. This image highlights the safety features for night riding, including the bright front headlights, flashing rear taillights, and anti-slip footpads, ensuring visibility and stability.

Figure 7: Brushless Motor and Power System. This image shows the powerful brushless motor of the HONEYWHALE H2 electric scooter, highlighting its 1200W maximum power, 50 KM/H maximum speed, and 15-degree maximum climbing angle.
6. Maintenance
Regular maintenance ensures the longevity and safe operation of your scooter.
- Battery Care: Charge the battery regularly, even if not in use, to maintain its health. Avoid completely draining the battery. Store the scooter in a cool, dry place.
- Tire Pressure: Check tire pressure periodically. Proper inflation improves ride quality and extends tire life. Refer to the tire sidewall for recommended pressure.
- Brake Inspection: Regularly inspect brake levers, cables, and pads for wear. Adjust or replace components as needed to ensure effective braking.
- General Cleaning: Clean the scooter with a damp cloth. Avoid using high-pressure water jets, which can damage electronic components.
- Fastener Check: Periodically check all screws and fasteners to ensure they are tight.
7. Troubleshooting
This section addresses common issues you might encounter with your HONEYWHALE H2 Electric Scooter.
| Problem | Possible Cause | Solution |
|---|---|---|
| Scooter does not power on | Low battery; Loose connections; Power button malfunction | Charge the battery; Check all cable connections; Contact support if issue persists |
| Reduced range or power | Underinflated tires; Battery degradation; Heavy load; Steep terrain | Inflate tires to recommended pressure; Ensure full charge; Reduce load; Ride on flatter terrain |
| Brakes feel weak | Worn brake pads; Loose brake cable; Air in hydraulic system (if applicable) | Inspect and replace brake pads; Adjust brake cable tension; Seek professional service |
| Unusual noises during operation | Loose components; Debris in wheels; Motor issue | Check all fasteners; Inspect wheels for obstructions; Contact support |
8. Specifications
Key technical specifications for the HONEYWHALE H2 Electric Scooter:
| Feature | Specification |
|---|---|
| Model | H2 |
| Motor Power (Max) | 1200 W |
| Max Speed | 50 KM/H |
| Battery Type | Lithium Ion |
| Battery Capacity | 54.6V/15Ah |
| Max Range | 50 KM (under specific conditions) |
| Charging Time | Approx. 11 hours |
| Max Climbing Angle | 15 degrees |
| Frame Material | Steel and Aluminum |
| Max Load Capacity | 150 KG |
| Wheel Size | 10 Inches (Vacuum Tires) |
| Braking System | Dual Disc + Electronic Brakes |
| Suspension | Dual Front and Rear Spring Shock Absorbers |
| Product Dimensions (L x W x H) | 125.8 x 66 x 126 cm |
| Product Weight | 25 KG |
9. Warranty and Support
The HONEYWHALE H2 Electric Scooter comes with a manufacturer's warranty. For specific warranty terms and conditions, please refer to the warranty card included in your package or contact the seller directly. For technical support, spare parts, or service inquiries, please reach out to Honey Whale official customer service.
Seller: Honey Whale official
Ask a question about this manual
Ask about setup, troubleshooting, compatibility, parts, safety, or missing instructions. Manuals+ will review the question and use this page’s manual context to help answer it.