1. Safety Information
Please read and understand all instructions before beginning assembly and use. Failure to follow these instructions may result in injury or damage to the product.
- Anti-Tip Device: This dresser is equipped with an anti-tip device. It is crucial to install this device to prevent the dresser from tipping over, especially in households with children. Follow the installation instructions carefully.
- Weight Limits: Do not exceed the recommended weight limits for the tabletop (130 lbs) and individual drawers (30 lbs). Overloading can cause structural damage or tipping.
- Assembly: Assemble the dresser on a soft, clean surface (e.g., the packaging carton or a rug) to prevent scratches or damage to the product and your floor.
- Tools: Use appropriate tools as specified in the assembly instructions. Do not overtighten screws, as this may damage the material.
- Children: Keep children and pets away from the assembly area. Small parts can be a choking hazard.
- Stability: Ensure the dresser is placed on a level surface. Adjust glides if necessary to prevent wobbling.
2. Package Contents
Verify that all parts and hardware are present before beginning assembly. If any parts are missing or damaged, please contact customer support.
Parts List:
- Side Panels (2)
- Top Panel (1)
- Bottom Panel (1)
- Back Panels (multiple)
- Drawer Fronts (5)
- Drawer Sides & Backs (multiple)
- Drawer Bottoms (5)
- Curved Side Supports (2)
- Drawer Slides (10 pairs)
Hardware List:
- Screws (various sizes)
- Wooden Dowels
- Cam Locks and Pins
- Anti-Tip Kit (bracket, screws, strap)
- Plastic Glides/Feet
3. Assembly Instructions
Estimated assembly time: 45 minutes. It is recommended to have two people for assembly.
Tools Required:
- Phillips Head Screwdriver (not included)
- Hammer (optional, for dowels)
General Assembly Tips:
- Use the packaging carton as a working surface to prevent product damage.
- Do not fully tighten screws until instructed, or until all parts are aligned.
- Refer to the included diagram for part identification.
Step-by-Step Guide:
- Prepare Side Panels: Attach the specified screws and wooden dowels to the pre-drilled holes on side panels #2 and #3. Ensure they are securely in place.
- Install Drawer Slides to Side Panels: Align the drawer slides (part E) with the pre-drilled holes on side panels #2 and #3. Secure them using the provided screws. Ensure the slides are oriented correctly for smooth operation.
- Attach Curved Side Supports: Secure the curved side supports (parts #4 and #5) to the main side panels using the designated screws.
- Assemble Top and Bottom Panels: Attach the top panel (#1) and bottom panel (#6) to the curved side supports using dowels and screws. Ensure a snug fit.
- Install Back Supports: Secure the back support panels to the rear of the dresser frame.
- Install Internal Vertical Panels: Insert the internal vertical panels (#20) into their respective slots, ensuring they align with the drawer slides.
- Secure Remaining Side Panels: Attach the remaining side panel (#3) to complete the main frame structure, securing it with screws and dowels.
- Install Top Frame: Attach the top frame to the upper section of the dresser.
- Install Anti-Tip Device: Attach the anti-tip brackets (parts M and N) to the top rear of the dresser using screws. Secure the strap to a wall stud according to the instructions provided in the anti-tip kit.
- Attach Feet/Glides: Install the plastic glides (part O) to the bottom of the dresser.
- Assemble Drawers:
- Attach the drawer sides (#9, #10) to the drawer front (#8, #14, or #15) using dowels and screws.
- Slide the drawer bottom (#12) into the grooves.
- Attach the drawer back (#11) to complete the drawer box.
- Install the drawer slides (part E) to the sides of each drawer box. Ensure the mobile plastic parts are dragged outward before installation.
- Repeat for all 5 drawers.
- Insert Drawers: Carefully slide each assembled drawer into its designated slot in the dresser frame.
Visual Assembly Aids:

Figure 3.1: Overall product dimensions including height, width, and depth, along with individual drawer dimensions and weight capacity for the tabletop and drawers.
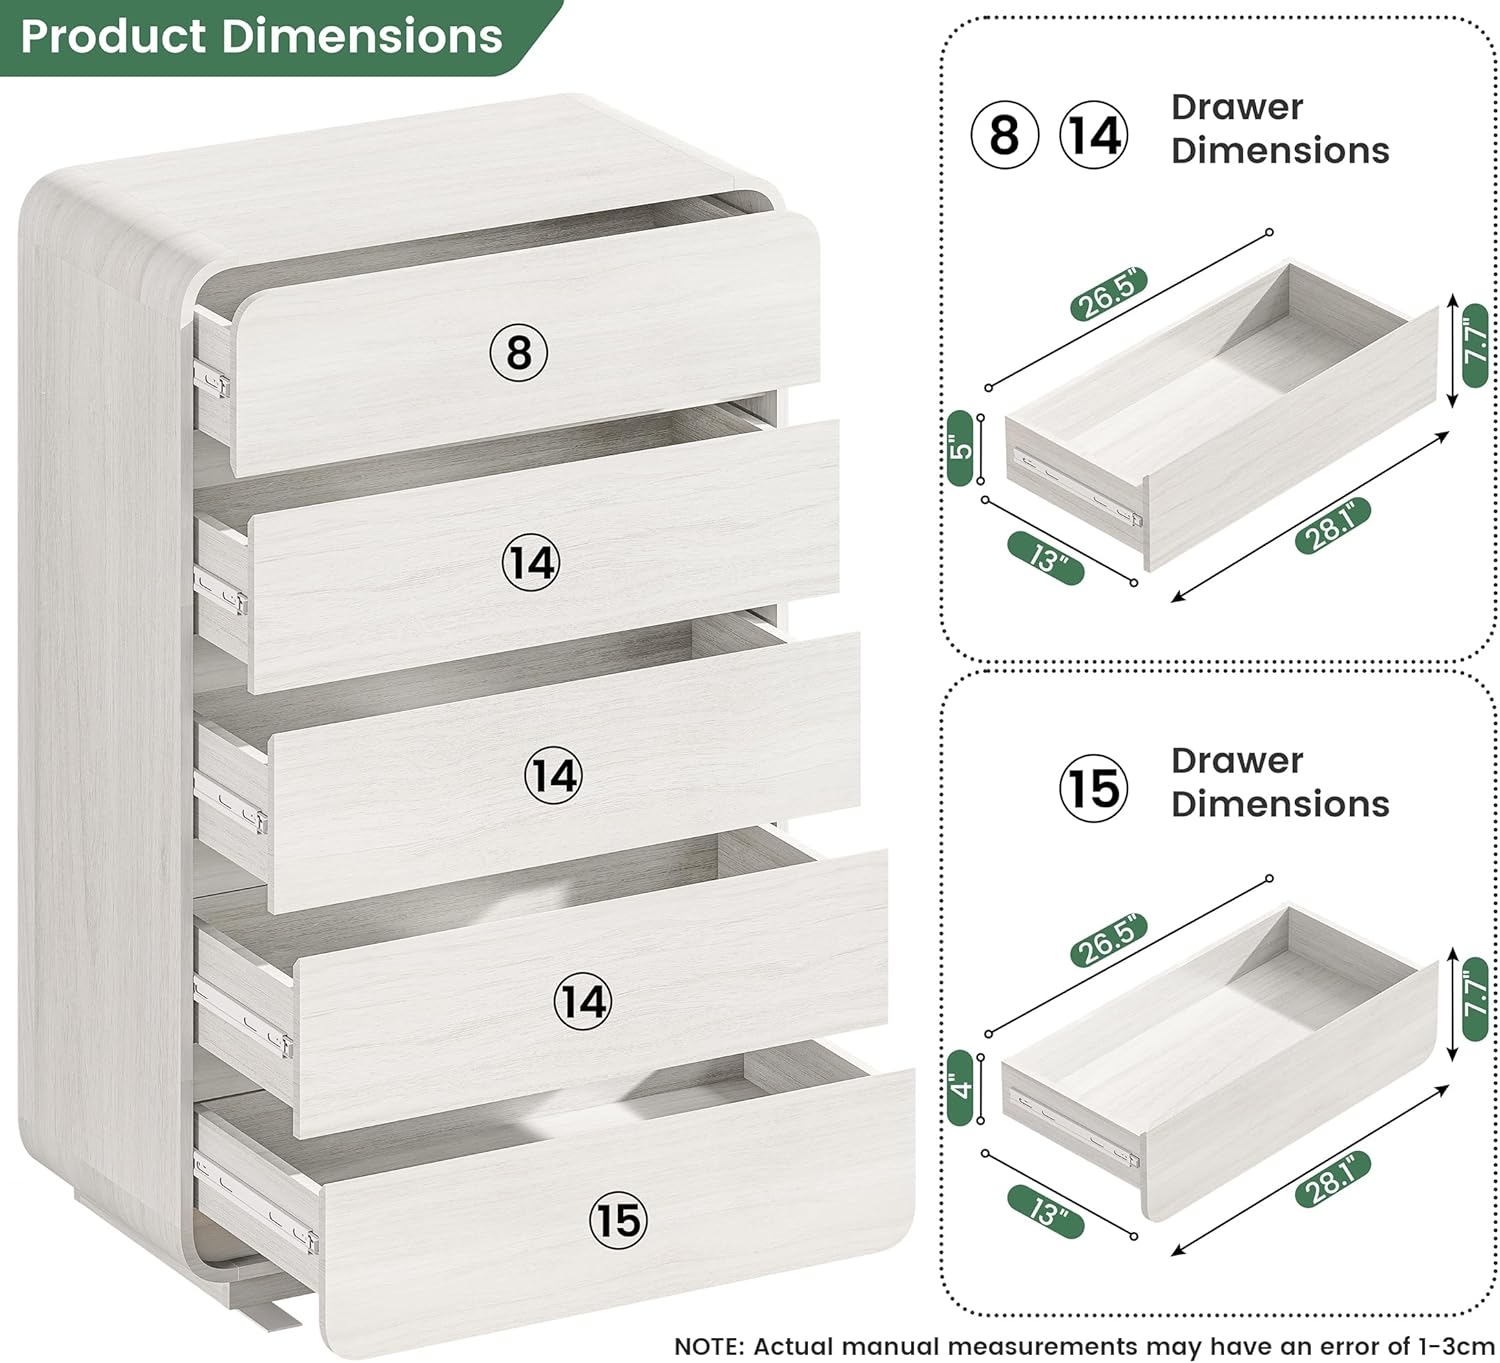
Figure 3.2: Specific dimensions for the upper and lower drawers, showing width, depth, and height.

Figure 3.3: Close-up of the 29.5-inch wide tabletop, highlighting its wood texture and ease of cleaning.

Figure 3.4: Details of the unique curved design, smooth slide rails for effortless operation, and the 45-degree angled drawer fronts for comfortable opening.
Installation Video: Curved 5 Drawer Dresser
This video provides a comprehensive visual guide for assembling the Standifurno 5-Drawer Curved Dresser, covering all major steps from unboxing to final drawer installation.
Instructional Video: Rail Installation Method
This video demonstrates the correct method for installing the drawer rails, including how to properly extend the mobile plastic parts before attachment.
4. Care & Maintenance
Proper care will extend the life and appearance of your dresser.
- Cleaning: Wipe surfaces with a soft, damp cloth. Avoid harsh chemicals or abrasive cleaners, as they may damage the finish.
- Spills: Promptly wipe up any spills to prevent staining or water damage.
- Sunlight: Avoid prolonged exposure to direct sunlight to prevent fading or discoloration.
- Heat: Do not place hot items directly on the surface. Use coasters or protective pads.
- Hardware: Periodically check and tighten all hardware to ensure stability. Do not overtighten.
5. Troubleshooting
| Problem | Possible Cause | Solution |
|---|---|---|
| Dresser is wobbly | Uneven floor; loose hardware | Adjust glides on the bottom of the dresser. Check and tighten all assembly screws. |
| Drawers do not slide smoothly | Improperly installed drawer slides; debris in slides; overtightened screws | Ensure drawer slides are correctly aligned and securely fastened. Clean any debris from the tracks. Loosen screws slightly if they are too tight. Refer to the 'Rail Installation Method' video. |
| Drawers are difficult to open/close | Drawer box not assembled squarely; overloaded drawer | Recheck drawer assembly to ensure all corners are square. Reduce the weight in the drawer. |
| Anti-tip device not secure | Improper installation; not anchored to a wall stud | Ensure the anti-tip strap is securely fastened to both the dresser and a wall stud. Consult a professional if unsure about wall anchoring. |
6. Specifications
- Brand: Standifurno
- Model Name: H01-DR-5-5-WH-1PC
- Product Dimensions: 15.4"D x 29.5"W x 46.3"H
- Number of Drawers: 5
- Material: Engineered Wood
- Finish Type: Wood Sticker
- Color: White
- Item Weight: 99.78 Pounds
- Mounting Type: Freestanding
- Style Name: Modern
- Room Type: Bedroom, Living Room, Nursery, Office
- Assembly Required: Yes
7. Warranty & Support
For any questions, missing parts, or assistance with assembly, please contact Standifurno customer support. Refer to your purchase documentation for specific warranty details.
You can visit the official Standifurno store for more information: Standifurno Store on Amazon