AUTOKATO ME-8XP 110V
AUTOKATO ME-8XP 110V Mid-Rise Scissor Lift User Manual
Model: ME-8XP 110V | Brand: AUTOKATO
1. Introduction
This manual provides essential instructions for the safe and effective installation, operation, and maintenance of the AUTOKATO ME-8XP 110V Mid-Rise Scissor Lift. Please read this manual thoroughly before operating the equipment to ensure proper usage and to prevent injury or damage.
The AUTOKATO ME-8XP is a robust mid-rise scissor lift designed for automotive service, offering a lifting capacity of 7700 lbs (3492 kg). It features a pneumatic release system, a 24V safe control system, and a height limit switch for enhanced safety and operational efficiency.
2. Safety Information
WARNING: Failure to follow these safety instructions may result in serious injury or death.
- Read and understand all instructions and warnings in this manual before operating the lift.
- Ensure the lift is installed on a level, solid concrete surface capable of supporting the lift's weight and maximum load.
- Only trained and authorized personnel should operate this equipment.
- Always wear appropriate personal protective equipment (PPE), including safety glasses and steel-toed boots.
- Never exceed the maximum lifting capacity of 7700 lbs (3492 kg).
- Ensure the vehicle is properly centered and secured on the lift platforms before raising. Use the provided rubber blocks.
- Always engage the safety locks before working under a raised vehicle.
- Keep hands, feet, and clothing clear of moving parts during operation.
- Do not modify the lift in any way. Use only genuine replacement parts.
- Disconnect power before performing any maintenance or repairs.
- Ensure adequate lighting in the work area.
- The lift should be directly connected to a dedicated power source rather than relying on a standard wall socket to prevent electrical overload.
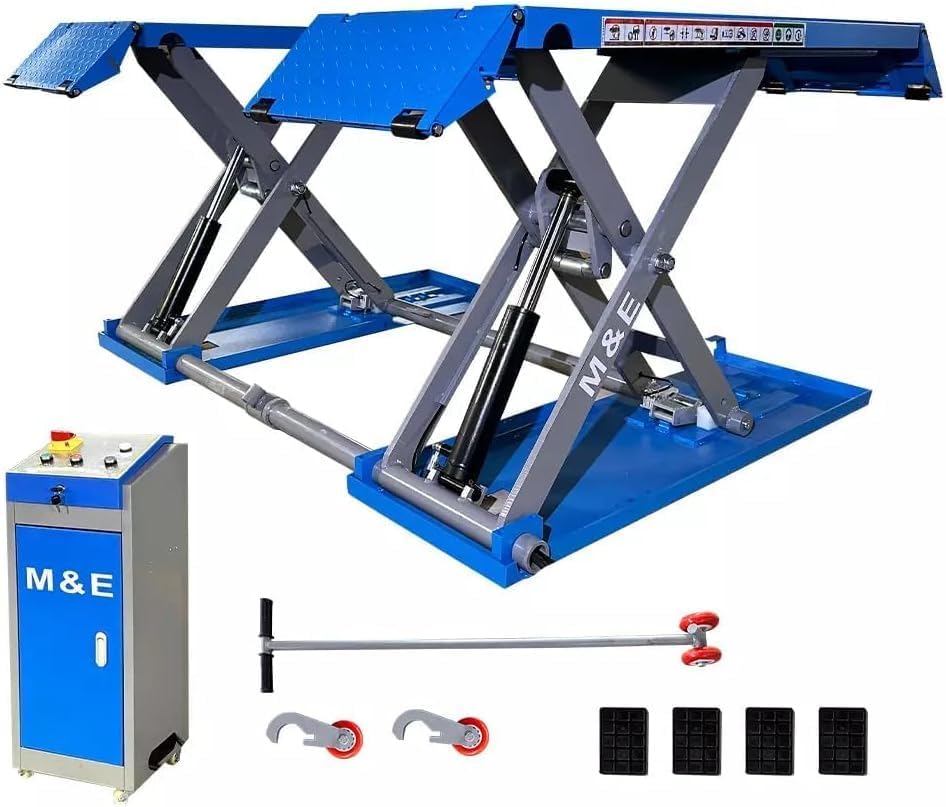
3. Product Overview and Components
The AUTOKATO ME-8XP Mid-Rise Scissor Lift is designed for efficient vehicle lifting in a garage or workshop environment. Its compact design allows for easy placement and mobility.
Key Features:
- Maximum Lifting Height: 38 inches (965 mm)
- Minimum Height: 4.3 inches (110 mm)
- Lifting Capacity: 7700 lbs (3492 kg)
- Pneumatic Safety Release System
- 24V Safe Control System
- Height Limit Switch
- Drive-up Ramps with Lock Design for Platform Extension
- Mobile Kit Included for Easy Movement
- Self-Lubricated Bushings and Bearings
- Top-level Hydraulic System with Aluminum Motor and Cooling Fan
Main Components:


4. Specifications
| Specification | Value |
|---|---|
| Lifting Capacity | 7700 lbs (3492 kg) |
| Max. Lifting Height | 38 inches (965 mm) |
| Min. Height | 4.3 inches (110 mm) |
| Platform Length | 56.25 inches (1430 mm) |
| Overall Length | 80 inches (2036 mm) |
| Platform Width | 19.5 inches (500 mm) |
| Overall Width | 73.25 inches (1860 mm) |
| Motor | 110VAC / 60HZ / 1PH |
| Net Weight | 600 kg |
| Safety Certification | CE Approved and Certified (115% dynamic, 150% static loading capacity tested) |

5. Setup and Installation
5.1 Site Preparation
- Ensure the installation area is a level concrete floor, free from cracks or damage, capable of supporting the lift and a 7700 lb vehicle.
- Provide adequate clearance around the lift for safe operation and vehicle access.
5.2 Electrical Connection
- The lift requires a 110VAC/60HZ/1PH power supply.
- Important: The lift must be directly connected to a dedicated power source. Do not use extension cords or plug into a standard wall socket, as this can lead to overheating or electrical hazards. Consult a qualified electrician for proper wiring.

5.3 Assembly and Placement
- Unpack all components and verify against the packing list.
- Position the main lift assembly in the desired location.
- Connect the hydraulic lines and pneumatic lines as per the detailed assembly instructions provided with the product packaging.
- Connect the control unit to the main lift assembly.
- If using the mobile kit, attach the wheels and handle as instructed to facilitate movement within the garage.
6. Operating Instructions
6.1 Preparing the Vehicle
- Drive the vehicle onto the lift platforms, ensuring it is centered and balanced.
- Position the rubber blocks under the vehicle's designated lifting points.
- For longer vehicles, utilize the drive-up ramps as platform extensions by locking them into place.
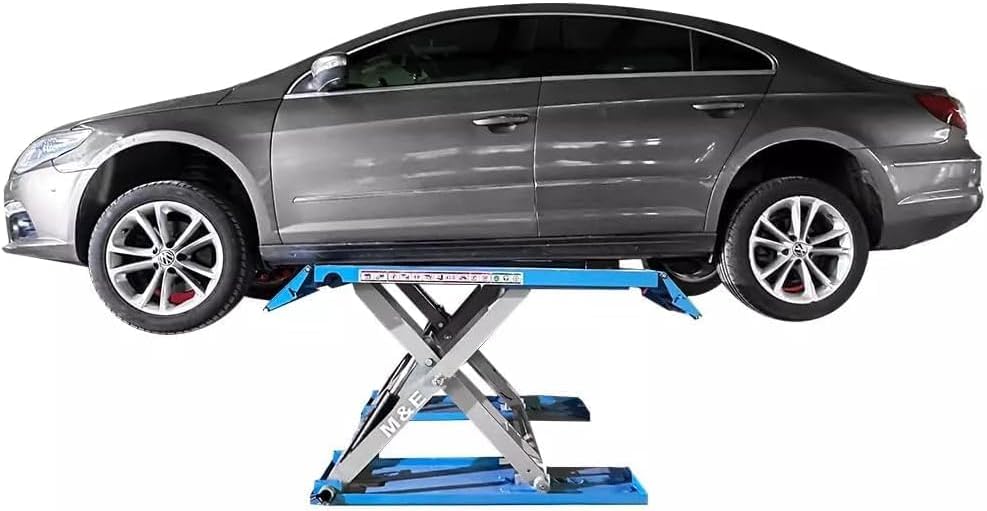

6.2 Lifting the Vehicle
- Ensure all personnel are clear of the lift and vehicle.
- Using the control unit, press the "UP" button to raise the lift.
- Observe the lift as it rises, ensuring smooth operation and proper vehicle stability.
- The height limit switch will automatically stop the lift at its maximum height (38 inches).
- Once the desired working height is reached, lower the lift slightly until the safety locks engage. This is crucial for safe operation.

6.3 Lowering the Vehicle
- Ensure the area beneath the lift is clear of obstructions and personnel.
- Slightly raise the lift to disengage the safety locks.
- Activate the pneumatic safety release.
- Press the "DOWN" button on the control unit to lower the lift slowly and steadily.
- Once the lift is fully lowered, carefully drive the vehicle off the platforms.
7. Maintenance
Regular maintenance is essential to ensure the longevity and safe operation of your AUTOKATO ME-8XP Scissor Lift.
- Daily Checks: Inspect all hydraulic hoses, electrical cables, and pneumatic lines for signs of wear, damage, or leaks. Check for any loose fasteners.
- Lubrication: The lift features self-lubricated bushings and bearings. However, periodically inspect these points and apply additional lubrication if necessary, following the manufacturer's recommendations.
- Hydraulic System: Monitor the hydraulic fluid level and top up with recommended hydraulic oil if needed. The aluminum motor with a fan is designed to prevent overheating during extended use, but ensure the fan is clear of debris.
- Safety Locks: Regularly inspect the safety lock mechanisms for proper function and wear.
- Cleaning: Keep the lift clean and free of dirt, grease, and debris.
- Annual Inspection: A qualified technician should perform an annual inspection of the lift to ensure all components are in good working order and meet safety standards.
8. Troubleshooting
This section provides basic troubleshooting steps for common issues. For more complex problems, contact AUTOKATO customer support or a qualified service technician.
- Lift Does Not Raise:
- Check power supply connection and ensure the circuit breaker is not tripped.
- Verify that the control unit is properly connected and receiving power.
- Check hydraulic fluid level.
- Ensure no safety mechanisms are inadvertently engaged.
- Lift Does Not Lower:
- Ensure the safety locks are disengaged (lift slightly first, then activate pneumatic release).
- Check pneumatic air supply for the release mechanism.
- Verify the "DOWN" button on the control unit is functioning.
- Unusual Noises During Operation:
- Stop operation immediately.
- Inspect for loose components, obstructions, or signs of wear on moving parts.
- Check lubrication points.
9. Contact and Support
For technical assistance, parts, or warranty inquiries, please contact AUTOKATO customer support. Refer to your purchase documentation for specific contact details or visit the official AUTOKATO website.
Manufacturer: KATOOL
Brand: AUTOKATO
UPC: 698700882172
Ask a question about this manual
Ask about setup, troubleshooting, compatibility, parts, safety, or missing instructions. Manuals+ will review the question and use this page’s manual context to help answer it.