Stellar Mounts B0FQRMCZD3
Stellar Mounts Ultra Slim Fixed TV Wall Mount User Manual
Model: B0FQRMCZD3
Introduction
This manual provides comprehensive instructions for the safe and proper installation and use of your Stellar Mounts Ultra Slim Fixed TV Wall Mount. Please read this manual thoroughly before installation and retain it for future reference. This mount is designed to securely hold flat or curved televisions ranging from 43 to 100 inches, with a maximum weight capacity of 165 lbs (75 kg).
Important Safety Information
- Weight Capacity: Do not exceed the maximum weight capacity of 165 lbs (75 kg). Exceeding this limit may result in serious injury or property damage.
- Wall Structure: Ensure the mounting surface can safely support the combined weight of the mount and the television. Consult a qualified professional if unsure about your wall's structural integrity.
- Tools: Use appropriate tools for installation. Always wear safety glasses.
- Children: Keep children away from the installation area.
- Damaged Parts: Do not install if any parts are damaged or missing. Contact Stellar Mounts for replacement parts.
- Professional Installation: If you have any doubts about installing this product, seek assistance from a professional installer.
Package Contents
Verify that all components are present and undamaged before beginning installation.
- Wall Plate Assembly
- TV Brackets (2x)
- Mounting Hardware Kit (screws, anchors, washers, spacers)
- Built-in Bubble Level
- Instruction Manual

Image: Overview of the Stellar Mounts Ultra Slim Fixed TV Wall Mount, showing the wall plate, TV brackets, and packaging.
Product Specifications
| Brand: | Stellar Mounts |
| Model: | B0FQRMCZD3 |
| Mounting Type: | Wall Mount (Fixed) |
| Material: | High-quality 1.5mm cold-rolled steel |
| Color: | Black |
| TV Size Compatibility: | 43" - 100" (flat or curved) |
| Weight Capacity: | 165 lbs (75 kg) |
| VESA Compatibility: | Min: 50x50mm, Max: 910x602mm (e.g., 400x400, 600x400, 800x400, 900x600) |
| Profile from Wall: | 1.18" (30 mm) |
| Wall Plate Dimensions: | 37.01 x 6.3 x 1.57 inches (approximate package dimensions, actual wall plate will be similar) |
| Item Weight: | 6.25 pounds |

Image: Diagram illustrating the versatile VESA compatibility and supported TV sizes (43"-102", Max Load 165 lbs) for the mount.
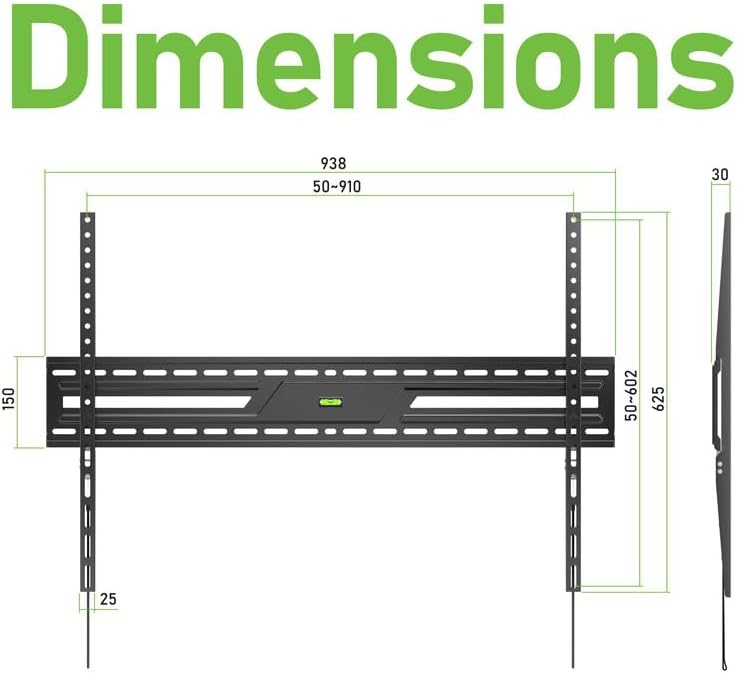
Image: Technical drawing showing the precise dimensions of the wall plate and TV brackets, including VESA ranges (50-910mm horizontal, 50-602mm vertical) and the 30mm slim profile.
Installation Guide
Tools Required (Not Included):
- Pencil
- Stud Finder (for wood stud installation)
- Drill
- Drill Bits (appropriate size for lag bolts/anchors)
- Socket Wrench or Adjustable Wrench
- Phillips Head Screwdriver
Step 1: Prepare Your TV
- Carefully place your TV face-down on a soft, clean surface to prevent screen damage.
- Identify the VESA mounting holes on the back of your TV.
- Select the appropriate screws, washers, and spacers from the hardware kit that fit your TV's VESA holes. Ensure screws are not too long, which could damage internal components.
- Attach the two TV brackets to the back of your TV using the selected hardware. Ensure the brackets are oriented correctly (hooks facing downwards) and are securely tightened.
Step 2: Determine Wall Mounting Location
- Determine the desired height for your TV. The center of the TV should ideally be at eye level when seated.
- For Wood Stud Walls: Use a stud finder to locate the edges and center of two adjacent wood studs. Mark the center of the studs. The wall plate is designed to accommodate stud spacing of 406 mm, 450 mm, or 600 mm.
- For Concrete/Brick Walls: No studs are required. Ensure the wall is solid concrete or brick.
Step 3: Attach Wall Plate to Wall
- Hold the wall plate against the wall at your desired height and align it with the marked stud centers (for wood studs) or desired drilling points (for concrete/brick).
- Use the built-in bubble level on the wall plate to ensure it is perfectly horizontal. Mark the drilling locations through the holes on the wall plate with a pencil.
- Set the wall plate aside. Drill pilot holes at the marked locations.
- For Wood Studs: Drill pilot holes (e.g., 7/32" or 5.5mm) to the appropriate depth.
- For Concrete/Brick: Drill pilot holes (e.g., 3/8" or 10mm) to the appropriate depth. Insert the concrete anchors flush with the wall surface.
- Position the wall plate over the pilot holes. Secure the wall plate to the wall using the lag bolts and washers provided. Tighten firmly but do not overtighten.
Step 4: Mount TV to Wall Plate
- With assistance, carefully lift the TV (with brackets attached) and hook the TV brackets onto the top edge of the wall plate.
- Gently lower the TV until the brackets are fully seated on the wall plate. Ensure both brackets are securely engaged.
- Pull the quick-release straps located at the bottom of the TV brackets to access the locking mechanism. Engage the locking screws to secure the TV to the wall plate. This prevents accidental dislodgement.

Image: A television mounted on the Stellar Mounts wall mount in a modern living room setting, demonstrating the sleek, low-profile design.
Operation
The Stellar Mounts Ultra Slim Fixed TV Wall Mount is designed for a static, low-profile installation. Once installed, your TV will remain in a fixed position, 1.18 inches (30 mm) from the wall.
Accessing Cables:
To access cables behind the TV, gently pull the quick-release straps located at the bottom of the TV brackets. This will disengage the locking mechanism, allowing you to lift the TV slightly off the wall plate. Always have assistance when removing the TV from the wall mount to prevent damage or injury. Re-engage the locking mechanism after adjusting cables.
Maintenance
- Cleaning: Wipe the mount with a soft, dry cloth. Avoid abrasive cleaners or solvents.
- Periodic Checks: Periodically check all screws and bolts to ensure they remain securely tightened. Over time, vibrations or environmental changes can cause fasteners to loosen.
- Damage Inspection: Inspect the mount for any signs of wear, corrosion, or damage. If any damage is observed, discontinue use and contact Stellar Mounts for assistance.
Troubleshooting
- Problem: TV is not level after installation.
- Solution: The built-in bubble level on the wall plate should ensure level installation. If the TV appears unlevel, carefully remove the TV from the wall plate (with assistance), re-check the wall plate's level, and adjust if necessary by slightly loosening and re-tightening the lag bolts. Ensure the wall plate is perfectly level before re-mounting the TV.
- Problem: Difficulty attaching TV brackets to the TV.
- Solution: Ensure you are using the correct size and length of VESA screws for your specific TV model. Refer to your TV's manual for VESA screw specifications. Use the provided spacers if the screws are too long or if the TV back is uneven.
- Problem: TV feels unstable on the mount.
- Solution: Immediately remove the TV. Re-check all installation steps. Ensure the wall plate is securely fastened to the wall, and the TV brackets are properly hooked onto the wall plate and locked with the quick-release straps. Verify that the wall structure is adequate for the combined weight of the TV and mount. Do not use the mount if it feels unstable.
Warranty and Customer Support
Stellar Mounts products are manufactured with quality and durability in mind. For specific warranty information, please refer to the product packaging or contact Stellar Mounts customer support directly.
If you encounter any issues or have questions regarding the installation or operation of your Stellar Mounts TV Wall Mount, please contact our customer support team for assistance. Contact information can typically be found on our official website or product packaging.