1. Introduction
Thank you for choosing the KEENSTAR 20Bar Espresso Machine. This manual provides essential information for the safe operation, maintenance, and troubleshooting of your new espresso machine. Please read it thoroughly before first use and keep it for future reference.
2. Important Safety Instructions
- Read all instructions before using the appliance.
- Do not touch hot surfaces. Use handles or knobs.
- To protect against fire, electric shock, and injury to persons, do not immerse cord, plugs, or appliance in water or other liquid.
- Close supervision is necessary when any appliance is used by or near children.
- Unplug from outlet when not in use and before cleaning. Allow to cool before putting on or taking off parts, and before cleaning the appliance.
- Do not operate any appliance with a damaged cord or plug or after the appliance malfunctions, or has been damaged in any manner.
- The use of accessory attachments not recommended by the appliance manufacturer may result in fire, electric shock, or injury to persons.
- Do not use outdoors.
- Do not let cord hang over edge of table or counter, or touch hot surfaces.
- Do not place on or near a hot gas or electric burner, or in a heated oven.
- Always attach plug to appliance first, then plug cord into the wall outlet. To disconnect, turn any control to "off", then remove plug from wall outlet.
- Do not use appliance for other than intended use.
- Exercise extreme caution when disposing of hot steam.
- This appliance is for household use only.
3. Package Contents
Please check the package contents upon unboxing to ensure all items are present and undamaged.
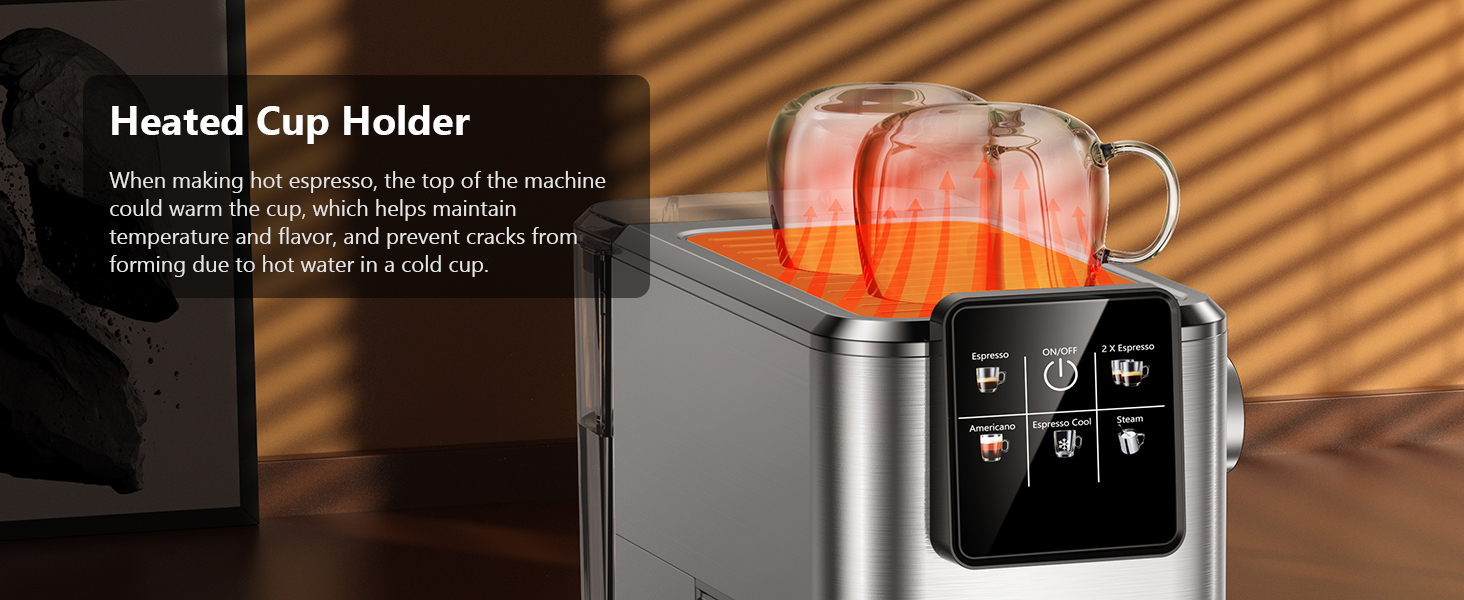
Image: All components included in the KEENSTAR 20Bar Espresso Machine package. This includes the main unit, portafilter with handle, single and double shot filters, coffee spoon with tamper, and a removable drip tray. The water tank and steam nozzle are also visible.
- KEENSTAR 20Bar Espresso Machine Main Unit
- Portafilter Handle
- 1-Shot Filter Basket
- 2-Shot Filter Basket
- Coffee Spoon with Tamper
- Removable Drip Tray
- User Manual
4. Product Overview
Familiarize yourself with the various parts of your espresso machine.

Image: Front view of the KEENSTAR 20Bar Espresso Machine, showcasing its sleek stainless steel design and key operational areas.
- Water Tank: Detachable, 1.1 Liter capacity. Located at the back of the machine.
- Control Panel: Intuitive touch screen for selecting brew options (Espresso, Americano, Espresso Cool, Steam, ON/OFF, 2X Espresso).
- Portafilter: Holds ground coffee for brewing.
- Steam Wand: For frothing milk for lattes and cappuccinos. Features a 360-degree rotation.
- Drip Tray: Removable for easy cleaning.
- Heated Cup Holder: Located on top of the machine to warm cups, maintaining coffee temperature.
5. Setup
5.1 Initial Use and Priming
Before first use, or if the machine has not been used for a long time, it is essential to prime the system to ensure proper operation and remove any air from the pipes.
- Fill the water tank with fresh water and place it back into the machine. Ensure the tank cover is properly closed.
- Plug the machine into a power outlet. The ON/OFF button on the touch screen will illuminate.
- Press the ON/OFF button to turn on the machine. The indicator lights will blink as the machine preheats.
- Once the indicator lights are steady, the machine is ready.
- Place an empty cup under the steam wand.
- Turn the steam knob to the "ON" position. Water will run out from the steam wand like a line. Let it run for about 10-15 seconds to purge air.
- Turn the steam knob to the "OFF" position.
- Press the ON/OFF button to turn off the machine. The machine is now primed and ready for use.

Image: Visual steps for priming the espresso machine before its first use or after a period of inactivity. This process drains air from the internal pipes.
5.2 Water Tank Filling
The water tank has a maximum capacity of 1200ml. Do not exceed the maximum fill line to prevent overflow.
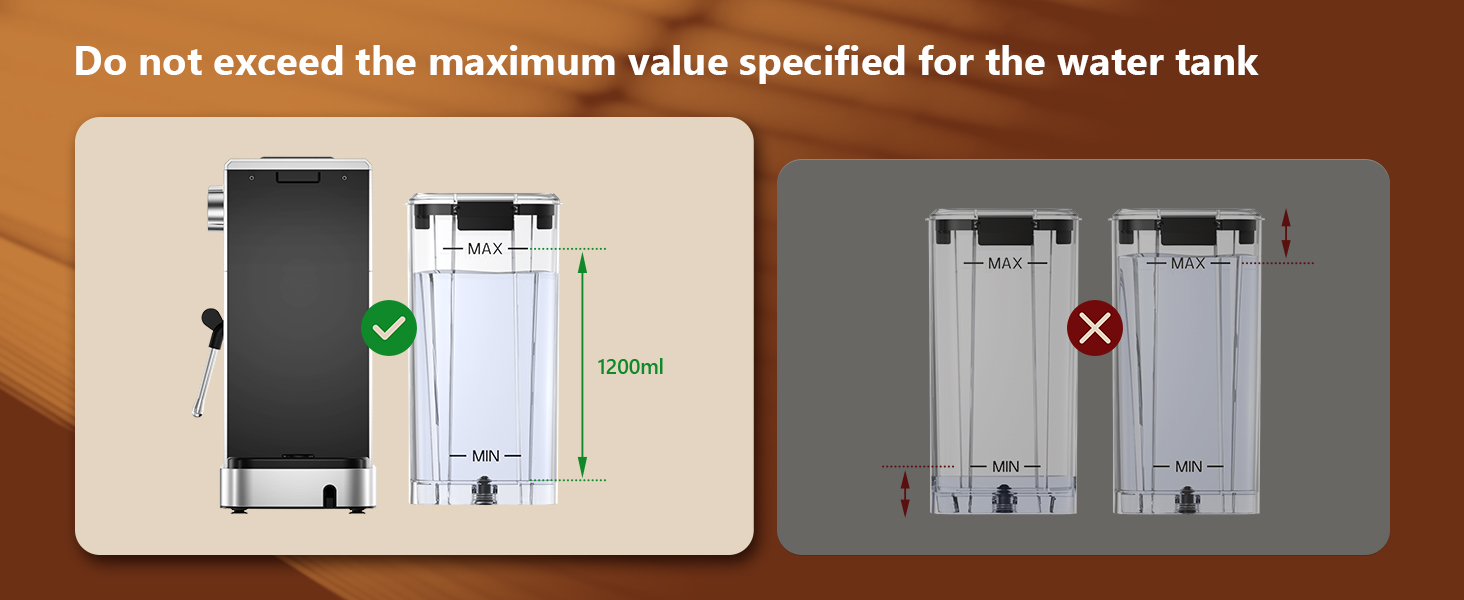
Image: Guidance on filling the water tank, indicating the 1200ml maximum fill level to avoid overfilling.
6. Operating Instructions
6.1 Brewing Espresso
The machine features a 20-bar pressure system and pre-soak technology for rich espresso extraction.
- Ensure the steam knob is set to the "OFF" position before brewing coffee.
- Fill the water tank with fresh water and press the ON/OFF button to power on. Wait for the indicator to become steady, signifying preheating is complete.
- Select the appropriate filter basket (1-shot or 2-shot) and place it into the portafilter.
- Add ground coffee to the filter basket. Use medium ground coffee (greater than 0.5mm) for optimal results.
- Tamp the ground coffee firmly and evenly using the coffee tamper.
- Attach the portafilter to the machine, ensuring it is fully locked into place.
- Place your cup(s) on the drip tray beneath the portafilter.
- Select "Espresso" for a single shot or "2 X Espresso" for a double shot on the touch screen. The machine will begin brewing.
- Once brewing is complete, the machine will stop automatically.

Image: Step-by-step visual instructions for brewing espresso, from preparing the machine to the final extraction.
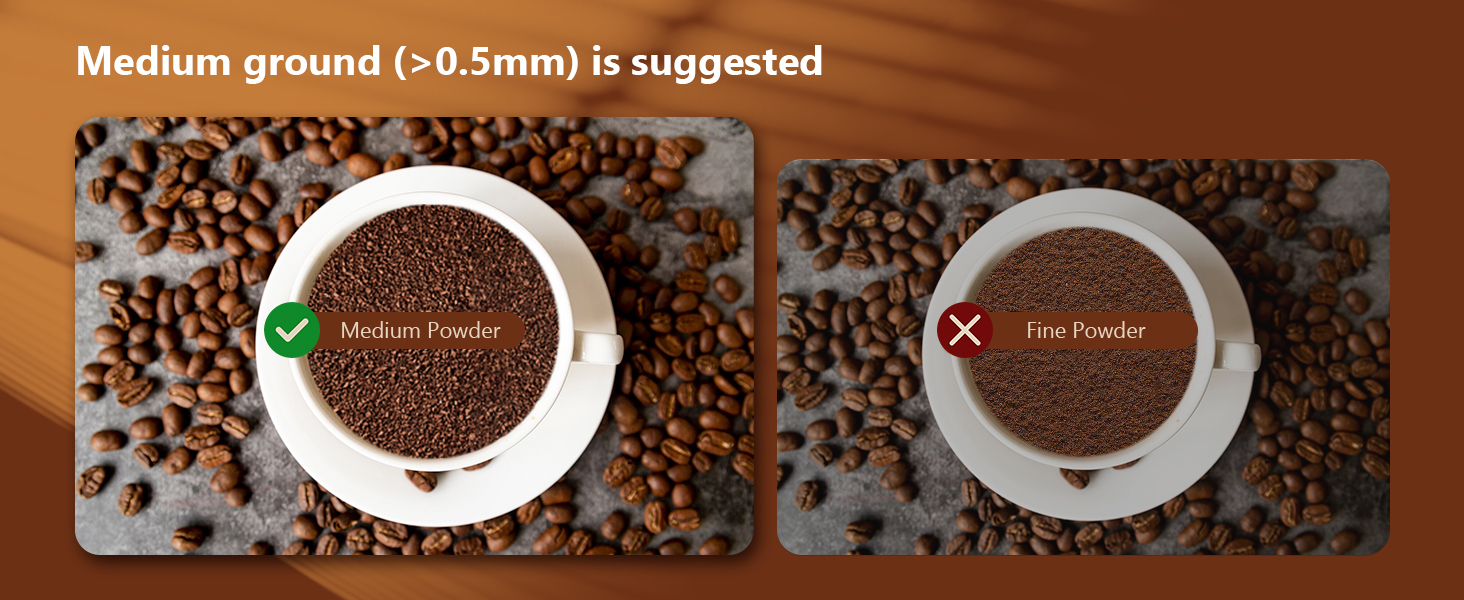
Image: Illustration demonstrating the correct way to lock the portafilter before brewing to prevent leaks and ensure proper extraction.

Image: Recommended coffee grind size (medium, >0.5mm) for optimal espresso extraction, contrasting it with fine ground coffee.
6.2 Making Cold Brew Espresso
This machine offers a rapid cold brew function, producing smooth cold brew in as little as 10 minutes.
- Ensure the water tank is filled with iced water for the cold brew function.
- Prepare the portafilter with ground coffee as described in Section 6.1.
- Attach the portafilter to the machine and place a cup underneath.
- Select "Espresso Cool" on the touch screen. The machine will begin the cold brew process.
- Enjoy your rapid cold brew espresso.

Image: The espresso machine preparing cold brew, emphasizing the requirement for iced water in the tank.
6.3 Frothing Milk
The powerful steam wand allows you to create creamy microfoam for lattes and cappuccinos.
- Fill the water tank with fresh water and press the ON/OFF button to power on.
- Press the "Steam" button on the touch screen to preheat the steam function. The indicator will blink during preheating and become steady when ready.
- After preheating, turn the steam knob to the "ON" position to release any remaining water in the pipe before frothing.
- Insert the steam nozzle approximately 1 inch into the surface of your milk.
- Gradually turn the steam knob to increase steam until the desired foam consistency is achieved.
- Once finished, turn the steam knob to the "OFF" position and clean the steam wand immediately.
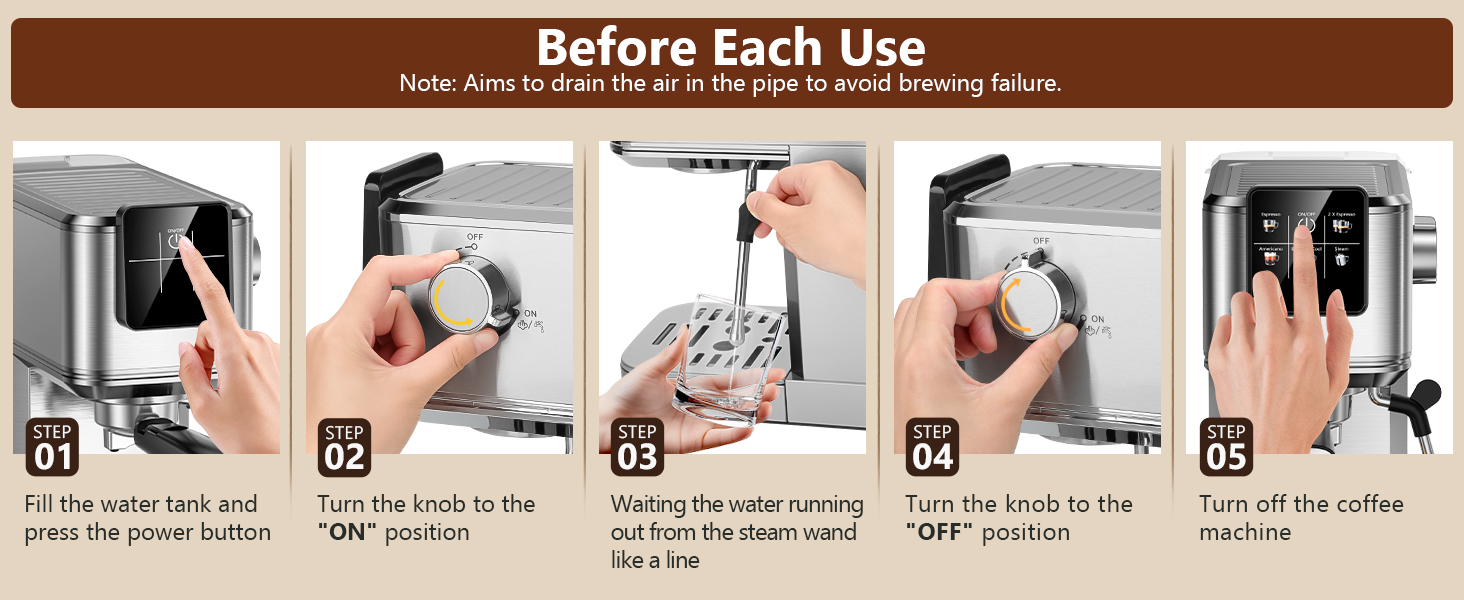
Image: Visual instructions for frothing milk, detailing the steps from preheating to creating microfoam.
7. Maintenance and Cleaning
Regular cleaning ensures the longevity and optimal performance of your espresso machine.
- General Cleaning: Wipe the exterior of the machine with a damp cloth. Do not use abrasive cleaners or scourers.
- Drip Tray: The removable drip tray should be emptied and cleaned regularly.
- Portafilter and Filter Baskets: After each use, remove the portafilter and discard used coffee grounds. Rinse the portafilter and filter basket under running water.
- Steam Wand: Immediately after frothing milk, wipe the steam wand with a damp cloth to prevent milk residue from drying. Purge steam briefly to clear any internal blockages.
- Water Tank: Clean the water tank periodically with mild detergent and rinse thoroughly.
- Descaling: Depending on water hardness, descale the machine every 2-3 months. Follow the instructions provided with a suitable descaling solution.

Image: Important cleaning instruction: All accessories must be washed by hand and are not dishwasher safe.
8. Troubleshooting
Refer to this section for common issues and their solutions.
| Problem | Possible Cause | Solution |
|---|---|---|
| No coffee dispenses / Slow flow |
|
|
| Water leaks from portafilter edge |
|
|
| Steam wand not producing steam |
|
|
| Coffee is not hot enough |
|
|
9. Specifications
- Brand: KEENSTAR
- Model Name: JH-C5210
- Pressure System: 20 Bar
- Power: 1350W
- Water Tank Capacity: 1.1 Liters (37oz)
- Product Dimensions: 11.8"D x 12.6"W x 5.5"H
- Item Weight: 4.6 Pounds
- Material: Stainless Steel
- Special Feature: Programmable, Touch Screen, Milk Frother, Hot & Rapid Cold Brew
- Coffee Input Type: Ground Coffee
- Filter Type: Reusable
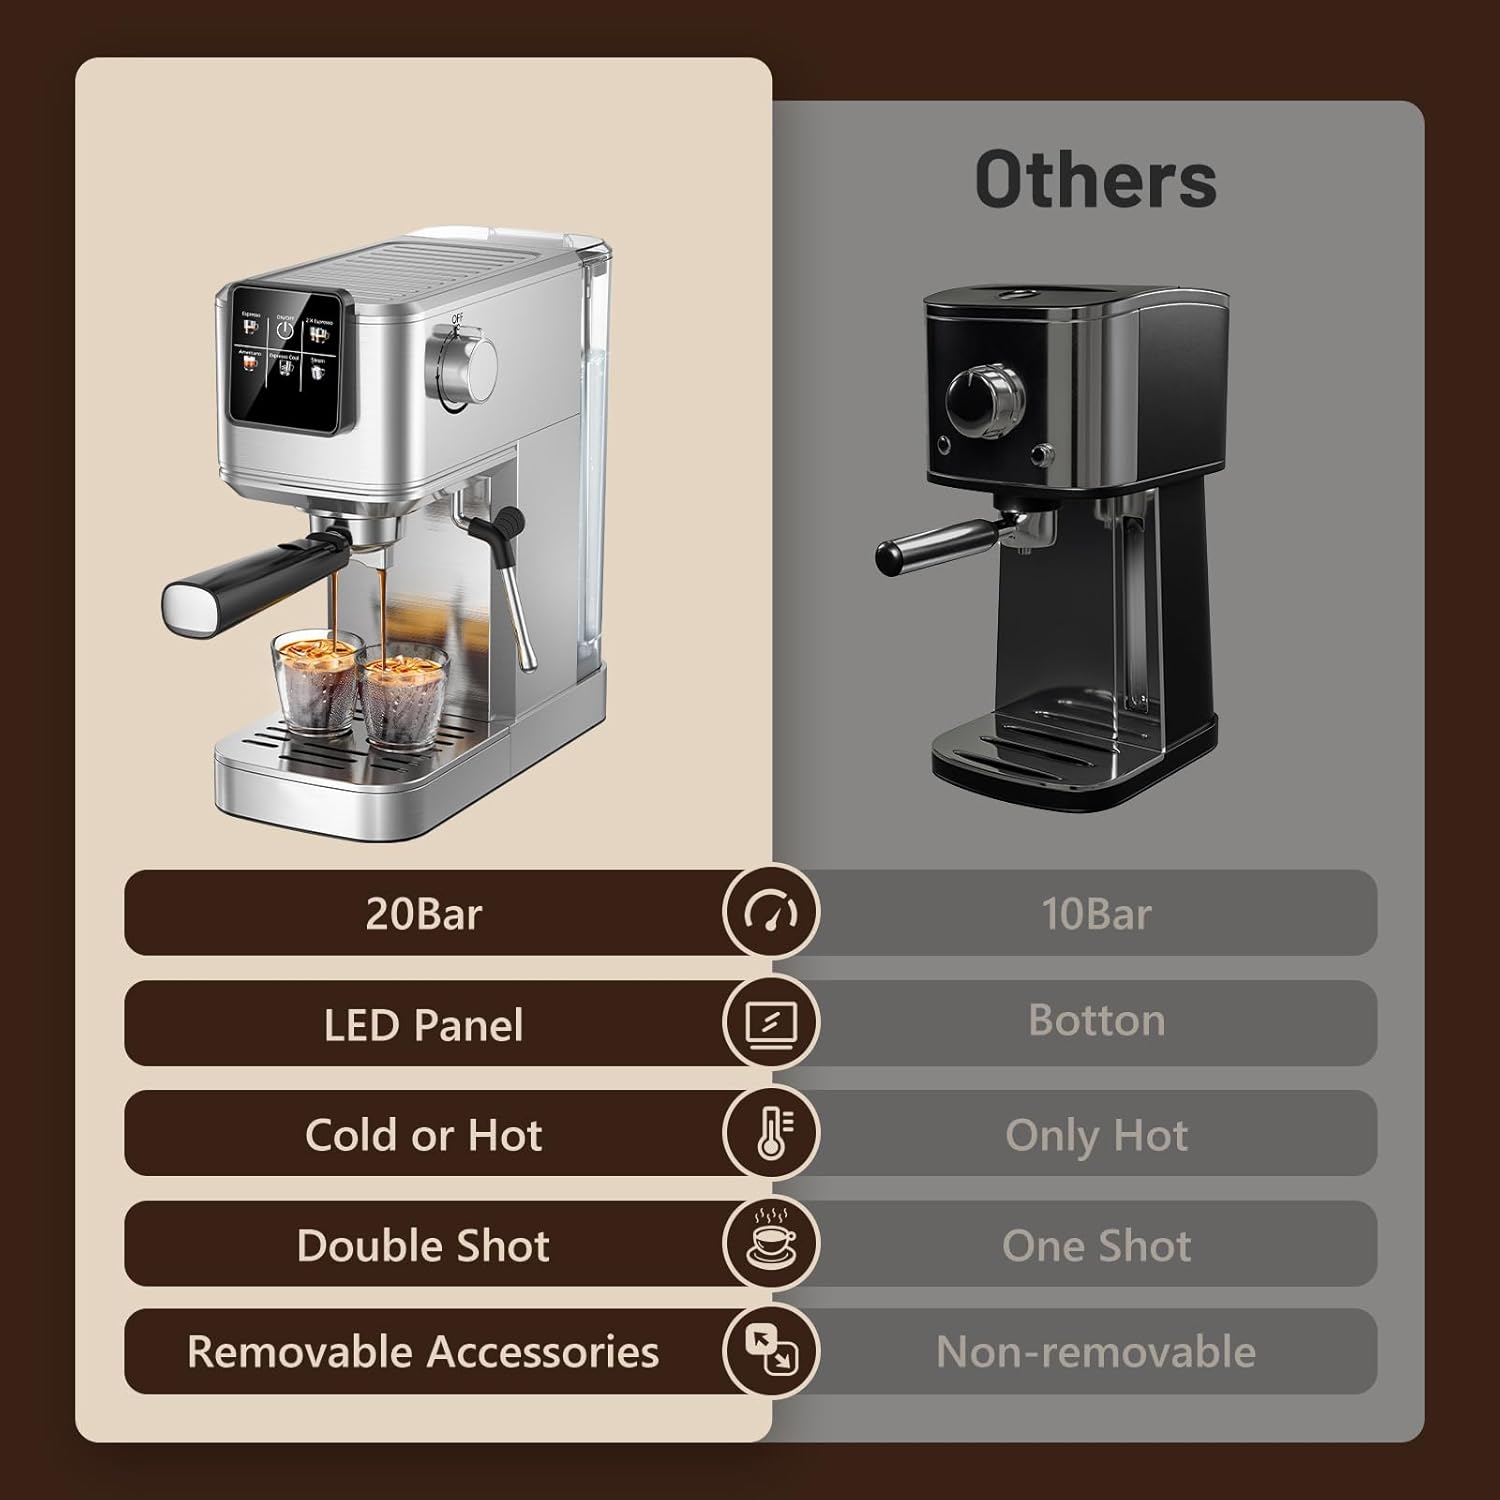
Image: Feature comparison of the KEENSTAR machine, emphasizing its 20Bar pressure, LED panel, and versatility for hot and cold beverages.

Image: Dimensions of the KEENSTAR espresso machine, indicating its compact size.
10. Warranty and Support
For warranty information or technical support, please refer to the contact details provided on the product packaging or visit the official KEENSTAR website. Keep your proof of purchase for any warranty claims.