Introduction
Thank you for purchasing the Olayks Portable Induction Cooktop and Electric Meat Grinder. This manual provides important information regarding the safe operation, setup, maintenance, and troubleshooting of your new appliances. Please read this manual thoroughly before use and retain it for future reference.
Important Safety Information
Always follow basic safety precautions when using electrical appliances to reduce the risk of fire, electric shock, and injury. This section applies to both the Induction Cooktop and the Meat Grinder.
- Read all instructions before operating the appliance.
- Do not immerse the appliance, cord, or plug in water or other liquids.
- Close supervision is necessary when any appliance is used by or near children.
- Unplug from outlet when not in use, before putting on or taking off parts, and before cleaning.
- Avoid contact with moving parts.
- Do not operate any appliance with a damaged cord or plug, or after the appliance malfunctions or has been damaged in any manner.
- The use of attachments not recommended or sold by the manufacturer may cause fire, electric shock, or injury.
- Do not use outdoors.
- Do not let cord hang over edge of table or counter or touch hot surfaces.
- Do not place on or near a hot gas or electric burner, or in a heated oven.
Olayks Portable Induction Cooktop
Product Overview
The Olayks Portable Induction Cooktop offers efficient and precise cooking with multiple power and temperature settings. It includes a grill pan and rack for versatile meal preparation.

Figure 1: Multifunction Induction Cooktop Components. Shows the Induction Cooktop base, Iron Pot, Iron Pan, Steaming Frame, and Lid stacked together.
Key Features:
- Versatile Cooking Modes: 8 power levels (150W–1500W) and 6 temperature settings (122℉–410℉).
- Digital Timer: Up to 3 hours for precise cooking control.
- Efficient Heating: Pure copper coils convert 90% of electromagnetic energy into heat.
- User-Friendly Controls: LED screen and knob for flexible temperature and power adjustments.
Setup
- Place the induction cooktop on a stable, flat, and heat-resistant surface. Ensure adequate ventilation around the unit.
- Plug the power cord into a standard electrical outlet.
- Ensure the cookware you intend to use is compatible with induction cooking.
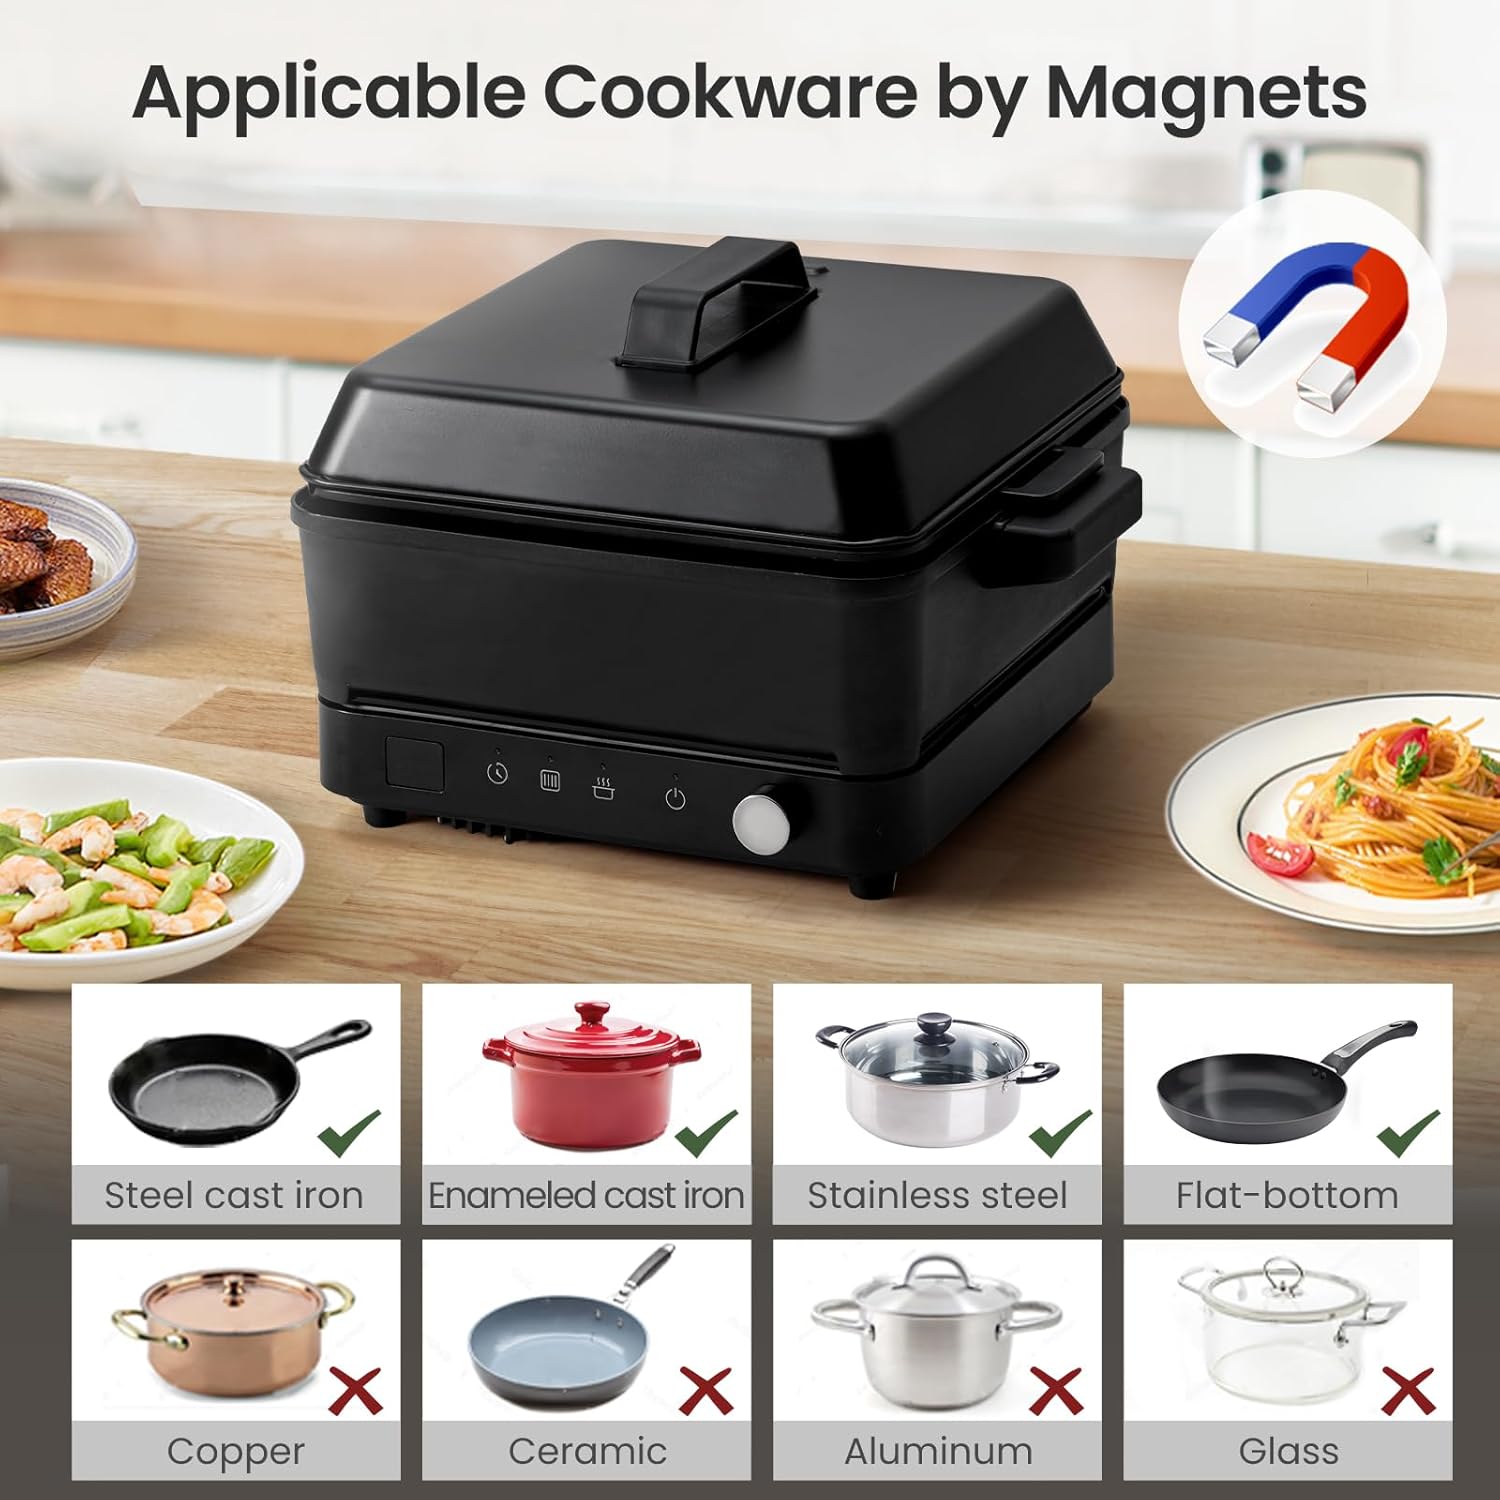
Figure 2: Applicable Cookware. Shows examples of compatible (steel cast iron, enameled cast iron, stainless steel, flat-bottom) and incompatible (copper, ceramic, aluminum, glass) cookware, indicated by a magnet test.
Cookware Compatibility: Induction cooktops require cookware made of ferromagnetic materials. Use a magnet to test your cookware; if it sticks to the bottom, it is compatible. Compatible materials include steel cast iron, enameled cast iron, stainless steel, and flat-bottomed magnetic pots. Incompatible materials include copper, ceramic, aluminum, and glass.
Operating Instructions
- Place compatible cookware centrally on the cooktop surface.
- Press the ON/OFF button to power on the unit. The LED display will illuminate.
- Use the knob or touch controls to select your desired power level (150W-1500W) or temperature setting (122℉-410℉).
- To set a timer, press the timer button and adjust the duration using the knob. The timer can be set for up to 3 hours.
- Monitor your cooking. The cooktop will automatically shut off if no cookware is detected or after the timer expires.
- After cooking, press the ON/OFF button to turn off the unit and unplug it from the outlet.

Figure 3: Digital Sensor Touch and Knob Control. Illustrates the control panel with ON/OFF, Roasting, Heating, and 99 Minutes Timer functions.

Figure 4: 6 Levels Temperature Control. Depicts temperature settings C1 through C6, corresponding to different cooking methods like melting butter, warming milk, boiling pasta, grilling meat, stir-frying, and boiling water.
Maintenance and Cleaning
- Always unplug the cooktop and allow it to cool completely before cleaning.
- Wipe the ceramic glass surface with a damp cloth and mild detergent. For stubborn stains, use a non-abrasive cleaner specifically designed for induction cooktops.
- Do not use abrasive pads, harsh chemicals, or steel wool, as these can scratch the surface.
- Clean the grill pan and rack with warm, soapy water. These components may be dishwasher safe, refer to their specific care instructions.
- Ensure all parts are dry before storing or next use.
Troubleshooting (Induction Cooktop)
| Problem | Possible Cause | Solution |
|---|---|---|
| Cooktop does not turn on. | Not plugged in; power outage; faulty outlet. | Check power cord connection; check circuit breaker; try a different outlet. |
| No heating or error code displayed. | Incompatible cookware; cookware not centered; no cookware present. | Use induction-compatible cookware; center cookware on the heating zone; place cookware on the cooktop. |
| Cooktop shuts off during operation. | Overheating; timer expired; power fluctuation. | Allow unit to cool; check timer settings; ensure stable power supply. |
Specifications (Induction Cooktop)
- Power: 150W - 1500W
- Temperature Range: 122℉ - 410℉ (50℃ - 210℃)
- Timer: Up to 3 hours
- Heating Efficiency: Approximately 90%
Olayks Electric Meat Grinder / Food Processor
Product Overview
The Olayks Electric Meat Grinder is a versatile food processor designed for quick and efficient chopping and grinding of various ingredients, from meat to vegetables.

Figure 5: 350W Food Processor. Highlights 350W power, glass container, 2.2L capacity, 4 blades, 2 adjustable speeds, and easy cleaning.
Key Features:
- Powerful Motor: 350W pure copper motor for efficient grinding.
- Sharp Blades: Dual-layer 4-blade system for even cutting and mixing.
- Capacity: 2.2L stainless steel bowl.
- Speed Settings: Two adjustable speeds for different food types.
- Safety Features: Blades stop rotating immediately when leaving the motor; overheat protection system.

Figure 6: Improved 360° Cutting. Shows the 4 stainless steel blades designed for even cutting and mixing.
Setup and Assembly
- Place the non-slip stand ring on a stable, flat surface.
- Place the processing bowl onto the non-slip stand ring.
- Carefully remove the blade guard from the blade assembly.
- Insert the blade assembly onto the spindle pin inside the bowl. Ensure it is securely seated.
- Add your desired ingredients into the bowl. Do not overfill.
- Place the lid onto the bowl and ensure it is properly aligned and securely closed.
- Install the Power Pod (motor unit) onto the lid, ensuring it locks into place.
- Plug the power cord into a standard electrical outlet.

Figure 7: Use Steps. Illustrates placing the bowl, inserting blades, adding ingredients, and covering with the power pod for chopping.
Operating Instructions
- With the unit assembled and plugged in, press down on the Power Pod to activate the motor.
- The meat grinder offers two speeds. Press the left button for softer foods (e.g., chili, onions, vegetables) and the right button for harder foods (e.g., meat, carrots, nuts).
- Use short pulses for coarse chopping or hold down for finer results. Do not operate continuously for more than 30 seconds to prevent overheating. Allow a short break between pulses.
- Once desired consistency is achieved, release the button and unplug the unit.
- Carefully remove the Power Pod, then the lid, and finally the blade assembly before emptying the bowl.

Figure 8: Two Speeds for Chopping. Illustrates using the left button for soft foods (chili, onions, vegetables) and the right button for hard foods (meat, carrots, nuts).
Maintenance and Cleaning
- Always unplug the meat grinder before cleaning.
- The Power Pod (motor unit) should only be wiped clean with a damp cloth. Do not immerse it in water.
- The processing bowl, lid, and blade assembly can be washed with warm, soapy water. Rinse thoroughly and dry immediately.
- Handle the blades with extreme care as they are very sharp.
- Ensure all parts are completely dry before reassembling or storing.
Troubleshooting (Meat Grinder)
| Problem | Possible Cause | Solution |
|---|---|---|
| Motor does not start. | Not plugged in; lid or Power Pod not properly assembled; overheat protection activated. | Check power connection; ensure lid and Power Pod are securely locked; allow unit to cool down. |
| Blades are not rotating or are slow. | Too much food in the bowl; food pieces are too large; blades are jammed. | Reduce food quantity; cut food into smaller pieces; disassemble and clear any obstructions. |
| Unusual noise or smell. | Overloading; motor strain; foreign object. | Stop operation immediately, unplug, and inspect. Reduce load. If problem persists, contact support. |
Specifications (Meat Grinder)
- Power: 350W
- Capacity: 2.2 Liters
- Blades: 4 Stainless Steel Blades (dual-layer)
- Speeds: 2 adjustable speeds
Warranty and Support
Olayks products are manufactured to high-quality standards. For warranty information, technical support, or service inquiries, please refer to the warranty card included with your purchase or contact Olayks customer service through the retailer where the product was purchased. Please have your model number (B0FQN5KLWP) and purchase date available.