
Product Overview
The homary Japanese Style Queen Floor Bed Frame (Model JJ90B477N0) is a low-profile platform bed designed to accommodate a standard Queen mattress (60" W x 80" L) without the need for a box spring. It features a wood-finished metal frame and carbon steel slats for mattress support. The design is inspired by traditional Japanese tatami style, offering a minimalist aesthetic.

Image: Fully assembled homary Japanese Style Queen Floor Bed Frame with a mattress, showcasing its low-profile design in a bedroom setting.
Safety Information
Please read and understand all safety warnings before assembly and use. Failure to follow these instructions may result in injury or damage to the product.
- Exercise caution around sharp edges during assembly to prevent cuts.
- Be aware of the bed's low height to prevent tripping hazards, especially in dimly lit areas.
- Due to the product's weight (approximately 99.2 lbs), exercise care when moving or assembling. It is recommended to have two people for assembly and relocation.
- Ensure all fasteners are securely tightened before use and periodically check for tightness.
- Do not exceed the recommended weight capacity of the bed frame.
Package Contents
Verify that all components are present before beginning assembly. If any parts are missing or damaged, please contact customer support.
Parts List:
- Side Rails (A)
- End Rails (B)
- Center Support Legs (C)
- Center Support Beam (D)
- Corner Brackets (E)
- Slats (F) - 42 pieces
Hardware List:
- AA: Bolts with washers (x4)
- BB: Bolts with washers (x8)
- CC: Threaded rods (x4)
- DD: Corner plates (x4)
- EE: Washers (x8)
- FF: Nuts (x4)
- GG: Wooden dowels (x8)
- HH: Screws (x42)
- Tools: Allen wrench, Wrench
Assembly Instructions
Follow these steps carefully for proper assembly. It is recommended to assemble the bed frame with two people.
- Step 1: Attach Center Support Legs to Center Support Beam.
Place the Center Support Beam (D) on a flat surface. Attach the four Corner Brackets (E) to the beam using bolts (BB) and washers (EE). Ensure they are securely fastened.

Image: Close-up of the wood-finished metal frame, showing a corner detail.
- Step 2: Install Threaded Rods into End Rails.
Insert the four threaded rods (CC) into the pre-drilled holes on the End Rails (B). Hand-tighten them until snug.
- Step 3: Insert Wooden Dowels.
Insert the eight wooden dowels (GG) into the corresponding holes on the End Rails (B).
- Step 4: Connect Side Rails and End Rails.
Connect the Side Rails (A) to the End Rails (B) by aligning the wooden dowels and threaded rods. Gently push the pieces together to form the rectangular frame.

Image: The bed frame fully assembled, showing the wooden frame structure before slats are installed.
- Step 5: Secure Frame Corners.
Attach the four Corner Plates (DD) to the inside corners of the frame. Secure them using bolts (AA) and washers (EE). Use the provided wrench to tighten the nuts (FF) onto the threaded rods from Step 2, ensuring a firm connection.
- Step 6: Place and Secure Slats.
Carefully place the Slats (F) onto the assembled frame. Ensure they are evenly spaced and rest properly on the support ledges. Use the screws (HH) to secure each slat to the frame.

Image: Detailed view of the carbon steel slats providing mattress support within the bed frame.
Once all steps are completed, ensure the frame is stable and all fasteners are tight. The bed frame is now ready for your mattress.
Usage and Operation
This bed frame is designed for use with a Queen-sized mattress (60" W x 80" L). No box spring is required as the carbon steel slats provide adequate support for various mattress types, including futon, memory foam, and hybrid mattresses.
- Mattress Placement: Carefully place your Queen mattress directly onto the assembled slats.
- Low Profile Design: The 6.3-inch low-profile design offers a grounded sleeping experience. Consider your preferred mattress height for optimal comfort.
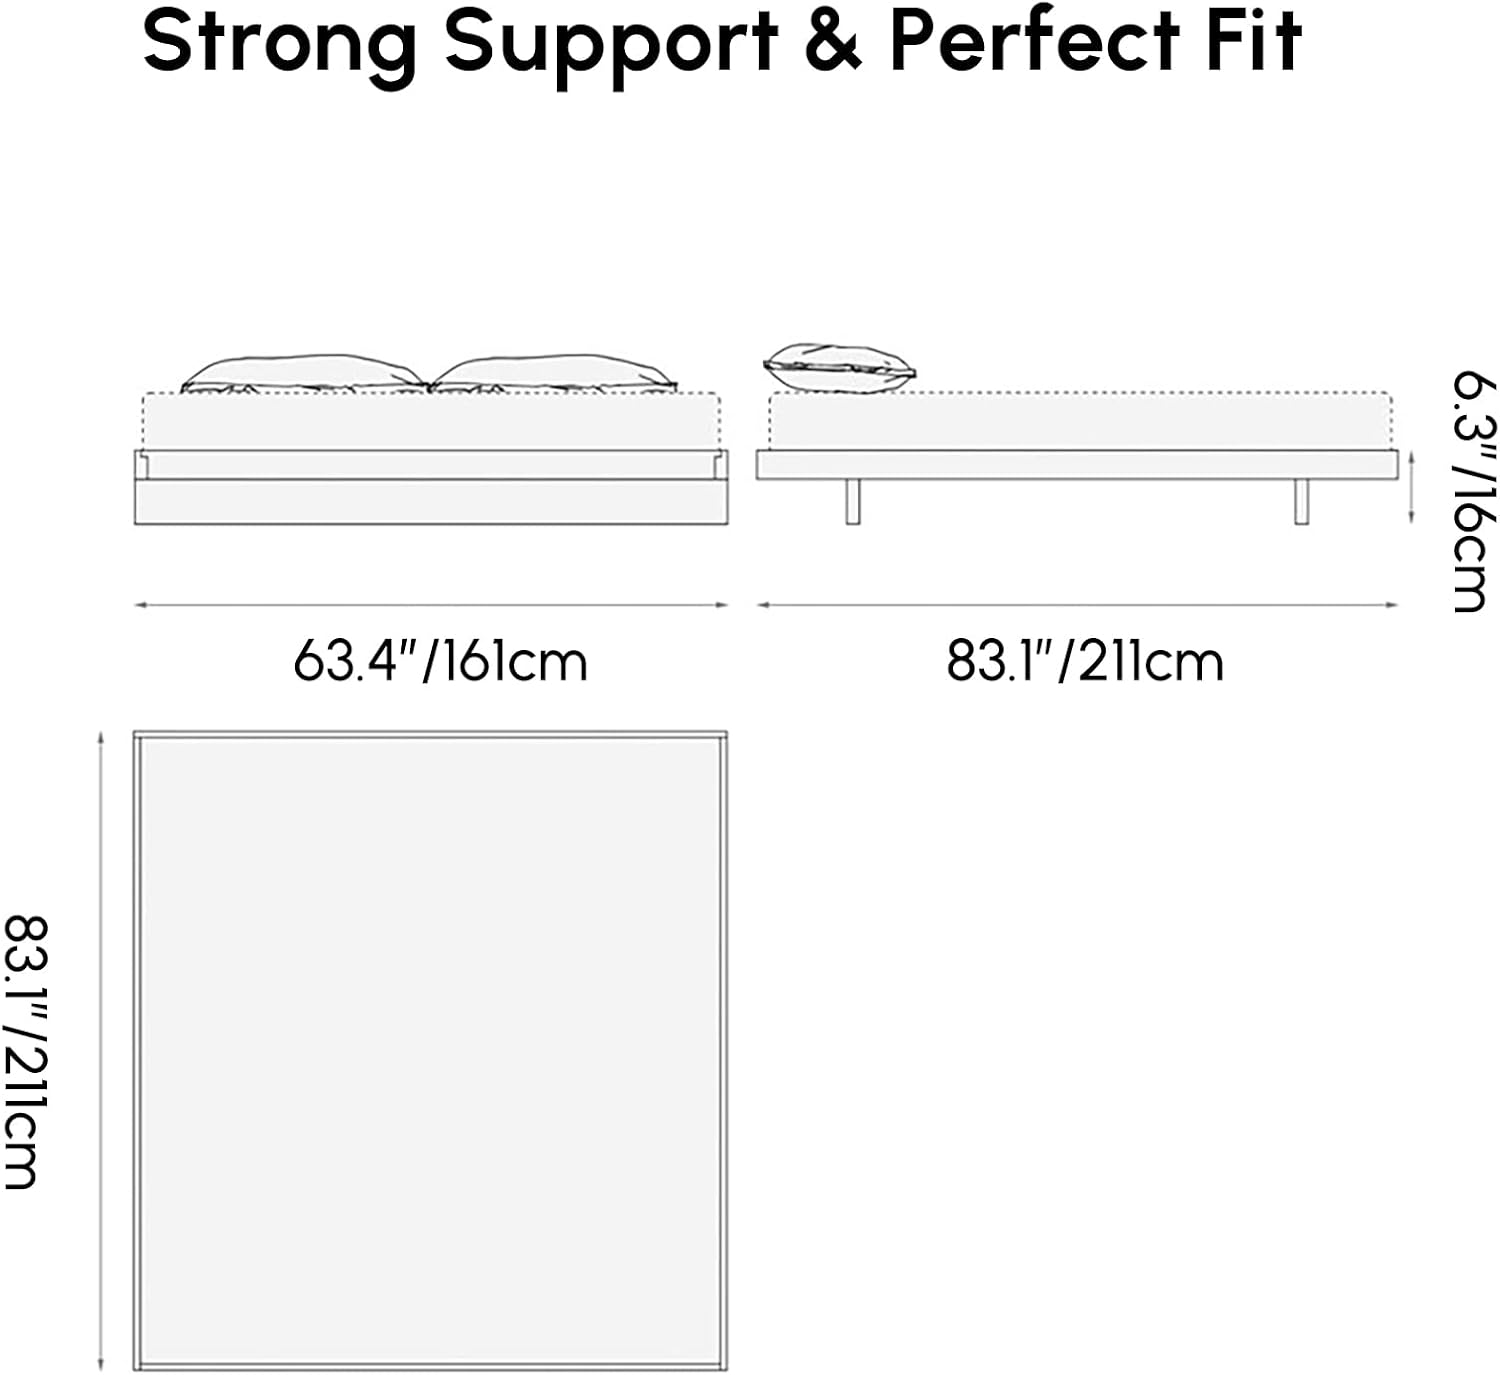
Image: Technical drawing illustrating the dimensions of the Queen floor bed frame, including length, width, and height.

Image: A person sitting on the low-profile bed frame, illustrating its height relative to the floor.
Maintenance
Regular maintenance will help prolong the life and appearance of your bed frame.
- Cleaning: Wipe the wood-finished metal frame with a soft, damp cloth. Avoid harsh chemicals or abrasive cleaners that could damage the finish.
- Fastener Check: Periodically check all bolts and screws to ensure they remain tight. Re-tighten if necessary to maintain stability.
- Avoid Excessive Moisture: Protect the bed frame from prolonged exposure to moisture or direct sunlight to prevent warping or fading.
Troubleshooting
If you encounter issues with your bed frame, refer to the following common solutions:
- Squeaking Noises: Squeaking often indicates loose connections. Re-tighten all bolts and screws on the frame and slats. Ensure the bed frame is on a level surface.
- Instability/Wobbling: Check that all frame components are correctly aligned and securely fastened. Verify that the floor is even.
- Slats Shifting: Ensure all screws securing the slats are fully tightened. If slats continue to shift, verify they are correctly positioned within the frame's support ledges.
Specifications
| Brand | homary |
| Model Number | JJ90B477N0 |
| Size | Queen |
| Material | Metal; Carbon Steel |
| Product Dimensions (L x W x H) | 83.1"L x 63.4"W x 6.3"H |
| Compatible Mattress Size | 60"W x 80"L (Queen) |
| Style | Japandi |
| Color | Walnut |
| Item Weight | 99.2 Pounds |
| Assembly Required | Yes |

Image: The Homary Japanese Style Bed Frame integrated into a minimalist bedroom, highlighting its aesthetic appeal.
Warranty and Support
For warranty information, missing parts, or any questions regarding your homary Japanese Style Queen Floor Bed Frame, please contact homary customer support.
Customer Care Center: Available for questions.
Service Time: Replies typically within 24 hours.
Email: service@homary.com
When contacting support, please provide your order number for faster assistance.

Image: Homary customer service contact details, including email and response time.


