TRV MS32
TRV Digital Night Vision Scope MS32 Instruction Manual
Model: MS32
1. Introduction
This manual provides detailed instructions for the proper use, setup, and maintenance of your TRV Digital Night Vision Scope MS32. Please read this manual thoroughly before operating the device to ensure optimal performance and safety.
2. Safety Information
- Do not look directly at strong light sources through the device, as this may cause permanent eye damage.
- Keep the device away from extreme temperatures and direct sunlight.
- Ensure the device is securely mounted to prevent accidental drops or damage.
- Do not attempt to disassemble or modify the device, as this will void the warranty and may cause damage.
- Use only specified batteries and charging accessories.
3. Package Contents
Verify that all items are present in your package:
- TRV Digital Night Vision Scope MS32
- Infrared Flashlight
- Rechargeable Battery
- Battery Charger
- USB Charging Cable
- Charger Plug
- Flashlight Holder
- Lens Cleaning Cloth
- User Manual
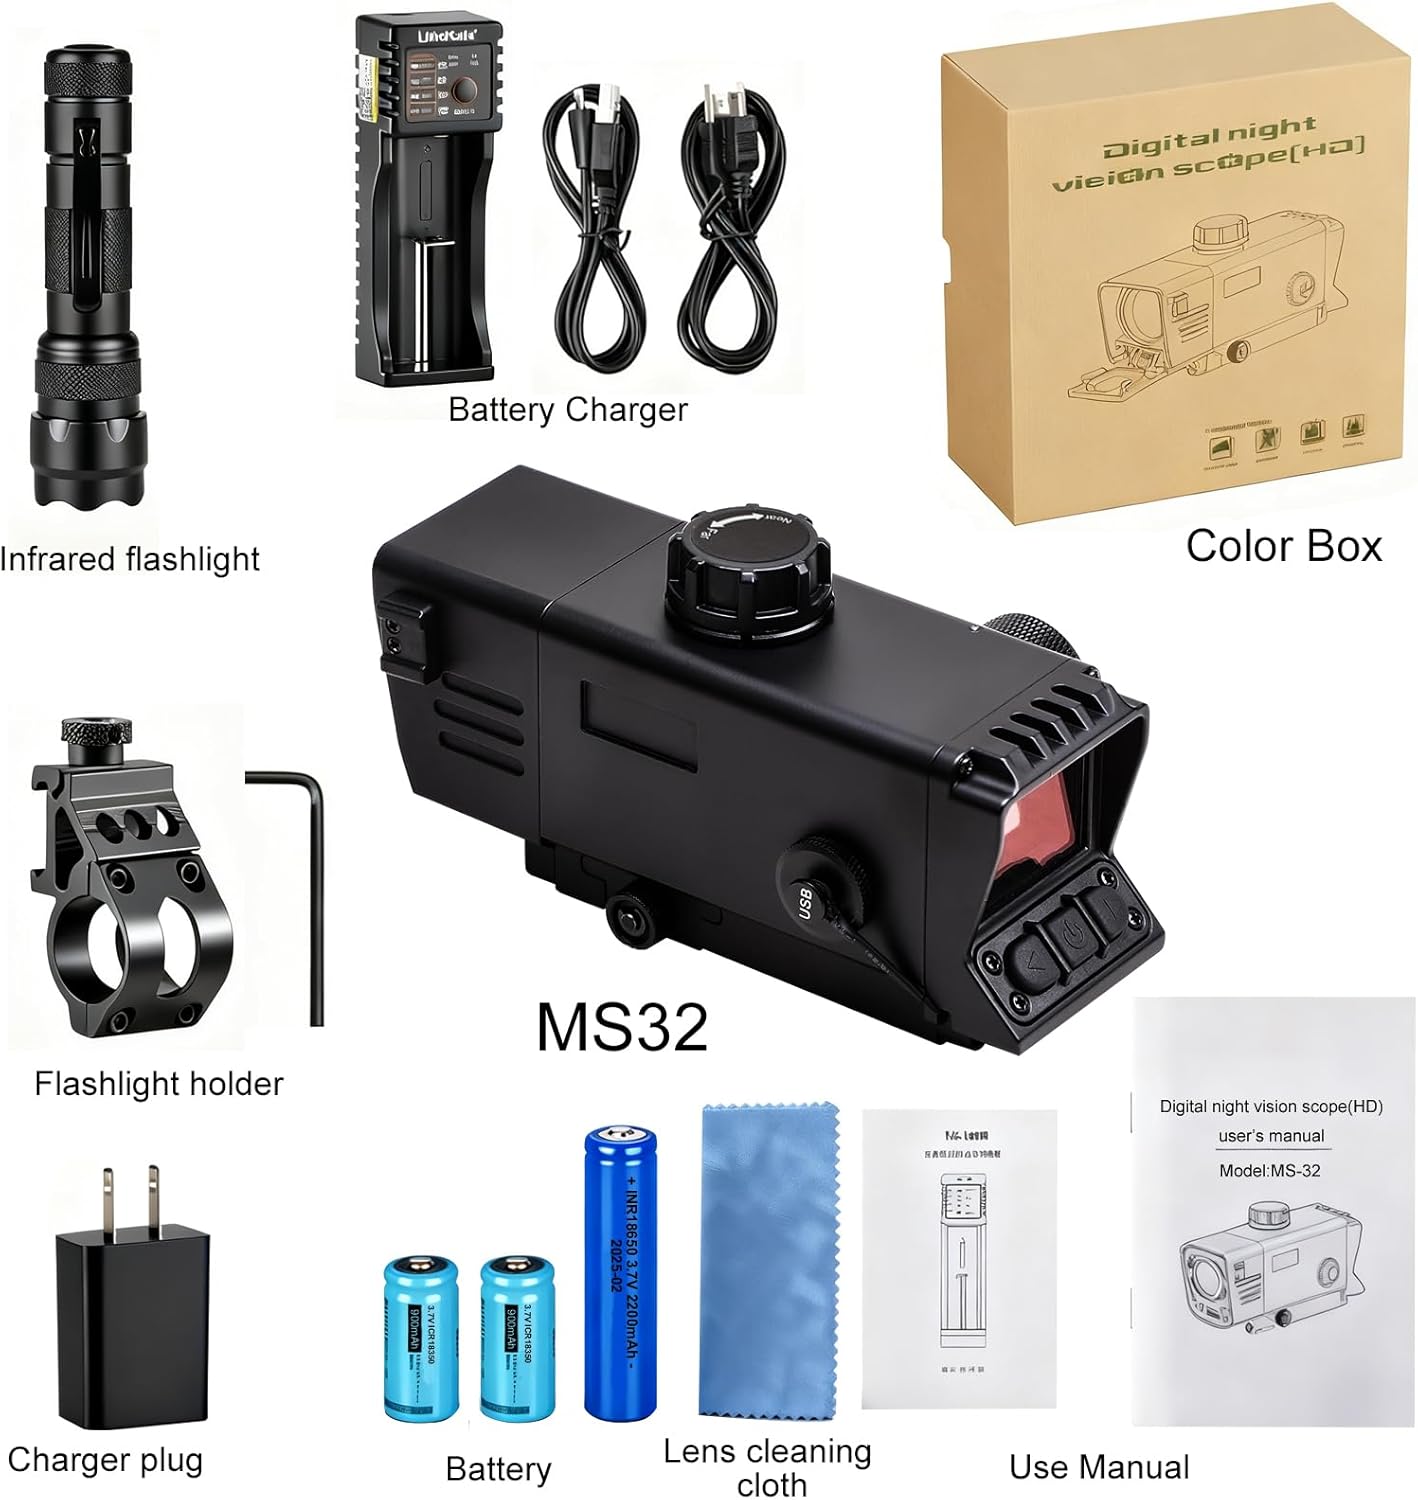
This image displays the TRV MS32 night vision scope along with its accessories: an infrared flashlight, rechargeable battery, battery charger, USB charging cable, charger plug, flashlight holder, lens cleaning cloth, and the user manual.
4. Component Identification
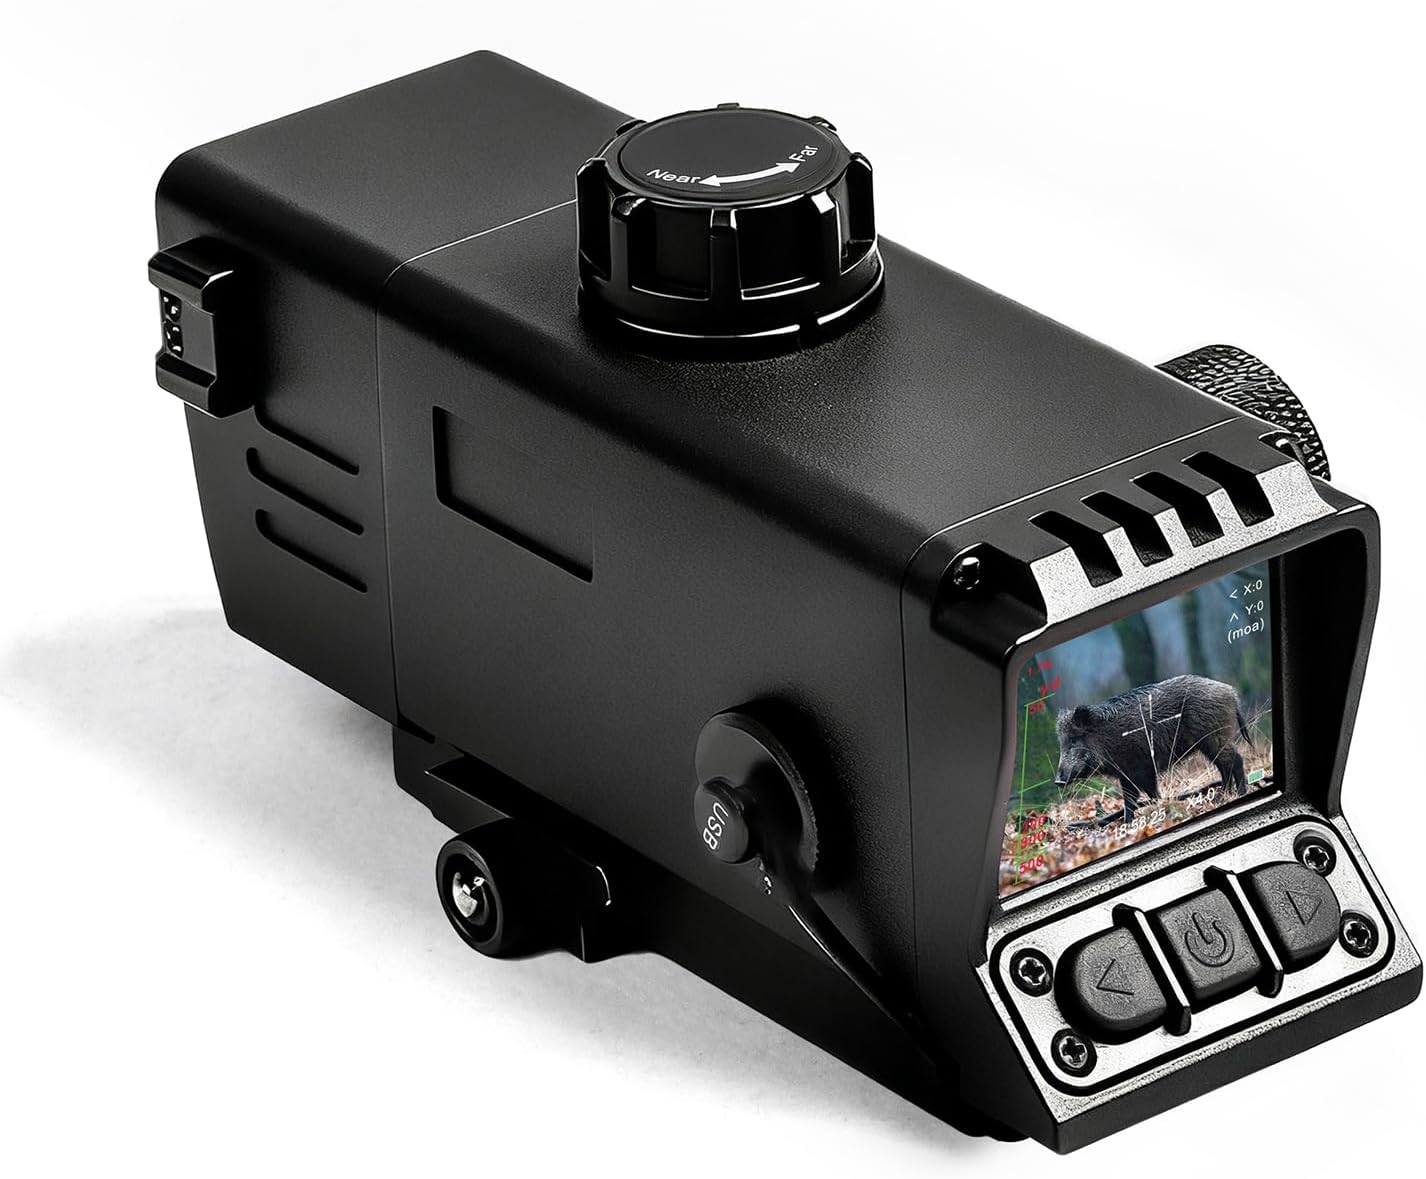
This image shows the main body of the TRV MS32 night vision scope, highlighting its compact design and primary optical components.
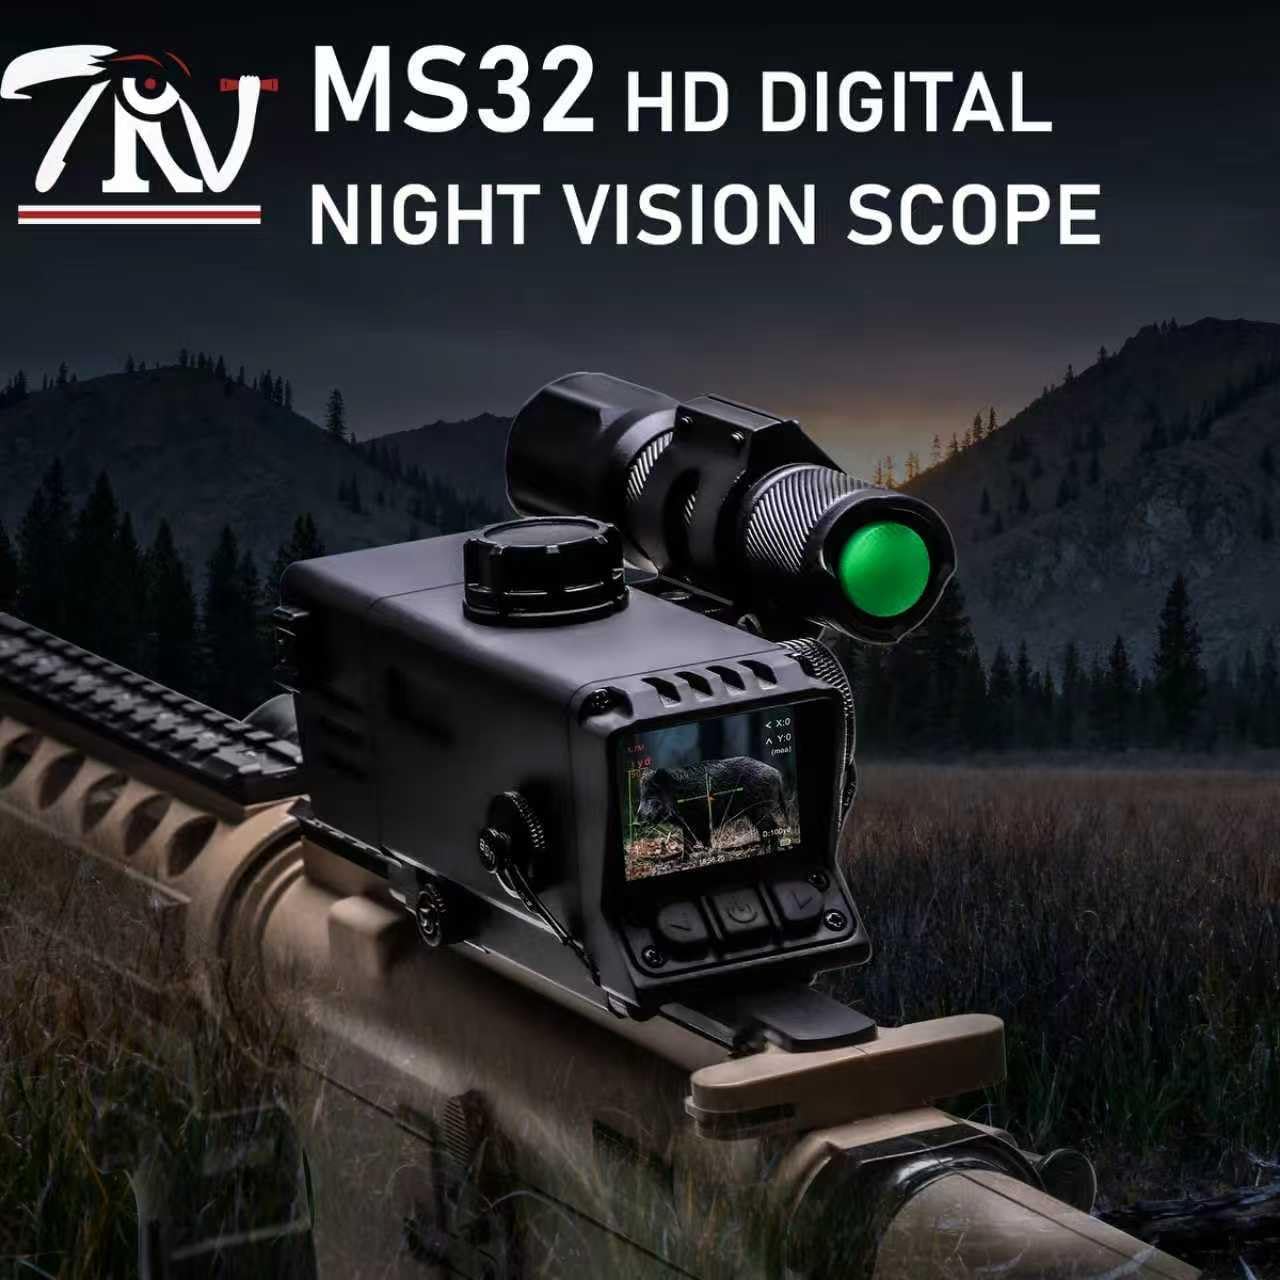
This image illustrates the TRV MS32 night vision scope attached to a rifle, with the external infrared flashlight mounted alongside, demonstrating its operational configuration.

This image provides a view of the scope's internal display, featuring the Ballistic Drop Compensation (BDC) reticle and various on-screen data points for aiming.

This image focuses on the side of the TRV MS32, showing the access point for the rechargeable battery and the USB port for charging and data transfer.
5. Setup
5.1 Battery and MicroSD Card Installation
- Unscrew the battery cap located on the side of the scope.
- Insert the provided rechargeable battery with the correct polarity.
- Carefully insert the MicroSD card into its designated slot, ensuring the correct orientation, until it clicks into place.
- Replace and tighten the battery cap.
5.2 Mounting to Picatinny Rail
- Align the scope's integrated Picatinny mount with your rifle's Picatinny rail.
- Secure the mount using the provided screws and tools, ensuring a tight and stable fit.
- Attach the infrared flashlight to the designated rail section if additional illumination is required.

This image shows the TRV MS32 night vision scope with its Picatinny rail interface, illustrating how it can be securely attached to a compatible firearm.
6. Operating Instructions
6.1 Power On/Off
- To power on, press and hold the power button (usually marked with a ⚡ symbol) until the display illuminates.
- To power off, press and hold the power button again until the display shuts down.
6.2 Adjusting Eyepiece/Diopter
- Rotate the eyepiece adjustment ring until the display image is sharp and clear for your vision.
6.3 Activating and Changing Reticle
- Press and hold the 'Down' button to activate the reticle.
- Press the 'OK' button to cycle through different reticle styles and colors.
- Once your desired reticle is displayed, press 'OK' again to lock it.

This image illustrates the five different reticle styles available on the TRV MS32, which can be customized in various colors to suit user preference and environmental conditions.
6.4 Adjusting IR Illuminator
- Press the 'Left' button to cycle through the three IR illumination modes (IR1, IR2, IR3) or to turn the IR illuminator off.
- The IR illuminator's beam can also be adjusted by rotating the front ring of the IR flashlight.
6.5 Zoom Function
- Use the 'Up' and 'Down' arrow buttons to digitally zoom in or out (2X-7X).
6.6 Focus Adjustment
- Rotate the central focusing ring on the scope to achieve a clear image of your target.
6.7 Video Recording and Photo Capture
- To start video recording, press and hold the 'Up' button. A timer will appear on the display indicating recording is active.
- To stop recording, press and hold the 'Up' button again.
- To take a photo, tap the 'Right' arrow button.
6.8 Reviewing Media
- To enter the playback menu, press and hold the 'Menu/Play' button.
- Use the arrow buttons to navigate through your recorded videos and photos.
- To exit the playback menu, press and hold the 'Menu/Play' button again.
6.9 Color Modes
- The scope features four image modes: Color, Black & White, Sepia, and Fluorescent Green. These modes adapt to varying light and environmental conditions.

This image displays the four different viewing modes available on the TRV MS32, allowing users to select the best visual representation for various lighting conditions.
6.10 BDC Reticle and Rangefinder
- The built-in electronic rangefinder can estimate distances for 1.7m targets.
- The BDC (Ballistic Drop Compensation) mode assists in accurate aiming at distances from 100 to 500 yards.
7. Maintenance
7.1 Cleaning
- Use the provided lens cleaning cloth to gently wipe optical surfaces. Avoid abrasive materials.
- For the device body, use a soft, damp cloth. Do not use harsh chemicals.
7.2 Storage
- Store the device in a cool, dry place away from direct sunlight.
- Remove the battery if storing for extended periods to prevent leakage.
8. Troubleshooting
| Problem | Possible Cause | Solution |
|---|---|---|
| Device does not power on | Low or dead battery; Incorrect battery insertion | Charge or replace battery; Ensure correct polarity |
| Image is blurry | Improper focus adjustment; Eyepiece not adjusted | Adjust the focusing ring; Adjust the eyepiece diopter |
| IR illuminator not working | IR mode off; Low battery for IR | Cycle through IR modes; Charge battery |
| Cannot record video/photos | MicroSD card full or missing; MicroSD card error | Insert/replace MicroSD card; Format MicroSD card |
9. Specifications
- Brand: TRV
- Model Name: MS32
- Night Vision: Yes
- Mounting Type: Picatinny Mount
- Compatible Devices: Rifle, Crossbow
- Material: Alloy Steel, Aluminum
- Sport: Hunting
- Style: Compact
- Color: Black
- Reticle Type: BDC
- Item Package Dimensions L x W x H: 6.69 x 6.69 x 2.96 inches
- Package Weight: 2.24 Pounds
- Included Components: MS32 night vision scope, infrared flashlight
10. Warranty and Support
10.1 Warranty Information
The TRV Digital Night Vision Scope MS32 comes with a 2-Year Manufacturer Warranty. This warranty covers defects in materials and workmanship under normal use. Please retain your proof of purchase for warranty claims.
10.2 Protection Plans
Extended protection plans are available for purchase:
- 2-Year Protection Plan: $24.99
- 3-Year Protection Plan: $33.99
- Complete Protect: One plan covers all eligible past and future purchases for $16.99/month.
10.3 Customer Support
For technical assistance, warranty claims, or any other inquiries, please contact TRV customer support through the official TRV website or your retailer.