Introduction
Thank you for choosing the Elikliv 4K Digital Microscope TL301. This device is designed for detailed observation and analysis across various applications, including PCB soldering, coin inspection, and biological slide examination. It features a magnetic quick-swap triple lens system and a 7-inch IPS display for clear, magnified viewing. This manual provides essential information for the proper setup, operation, and maintenance of your microscope.
Product Features
- Triple Magnetic Lenses: Includes Wide-Angle (W), Long-Distance (L), and Micro (M) lenses for diverse applications such as PCB soldering, error coin magnification, and slide inspection.
- Magnetic Quick-Swap System: Lenses can be attached or removed effortlessly without tools, ensuring a stable and efficient workflow.
- 7-inch IPS Screen: Provides a clear and bright display for comfortable viewing.
- 4K Resolution: Delivers high-definition imaging for detailed observation.
- External Display Output: Supports HDMI and USB output for real-time viewing on larger screens.

Image: The Elikliv 4K Digital Microscope TL301 with its three interchangeable magnetic lenses (L, W, M) and the main display unit. The display shows a magnified image of a coin, illustrating its application for detailed inspection.

Image: A detailed view of the microscope's lens attachment mechanism, highlighting the magnetic quick-swap system. Icons below illustrate the key features: magnetic attachment, three lens options, quick swapping, and N52 magnet strength.
Setup Instructions
- Unpack Components: Carefully remove all items from the packaging, including the microscope unit, stand, 7-inch IPS screen, three magnetic lenses (L, W, M), power adapter, and any included cables.
- Assemble the Stand: Attach the microscope unit to the adjustable stand. Ensure all screws are tightened securely to prevent wobbling.
- Mount the Screen: Secure the 7-inch IPS screen to the designated mounting point on the microscope unit or stand.
- Connect Power: Plug the power adapter into the microscope unit and then into a standard electrical outlet.
- Attach a Lens: Select the appropriate magnetic lens (L, W, or M) for your initial observation and snap it onto the microscope's lens barrel. The magnetic system will secure it in place.
Operating Instructions
Basic Operation
- Power On/Off: Press and hold the power button on the screen unit to turn the microscope on or off.
- Adjust Focus: Use the focus knob on the microscope stand to bring your specimen into clear view. Adjust the distance between the lens and the specimen as needed.
- Adjust Illumination: The microscope is equipped with adjustable LED lights. Use the controls to optimize lighting for your specimen.
- Menu Navigation: Use the 'MENU', 'OK', and arrow buttons on the screen to navigate through settings, adjust resolution, exposure, and other parameters.
Image and Video Capture
To capture images or record videos, ensure a compatible memory card (not included) is inserted into the designated slot. Use the appropriate buttons on the screen unit to initiate photo capture or video recording.
Display Features

Image: A detailed view of the microscope's 7-inch IPS display, showcasing its clarity and size. Text overlays emphasize the 3K display resolution, 38MP image clarity, IPS panel brightness, and the larger screen size for enhanced viewing.
The 7-inch IPS screen provides a clear and vibrant view of your magnified specimens. The 3K display ensures high detail, making it suitable for intricate work.
External Display Connection
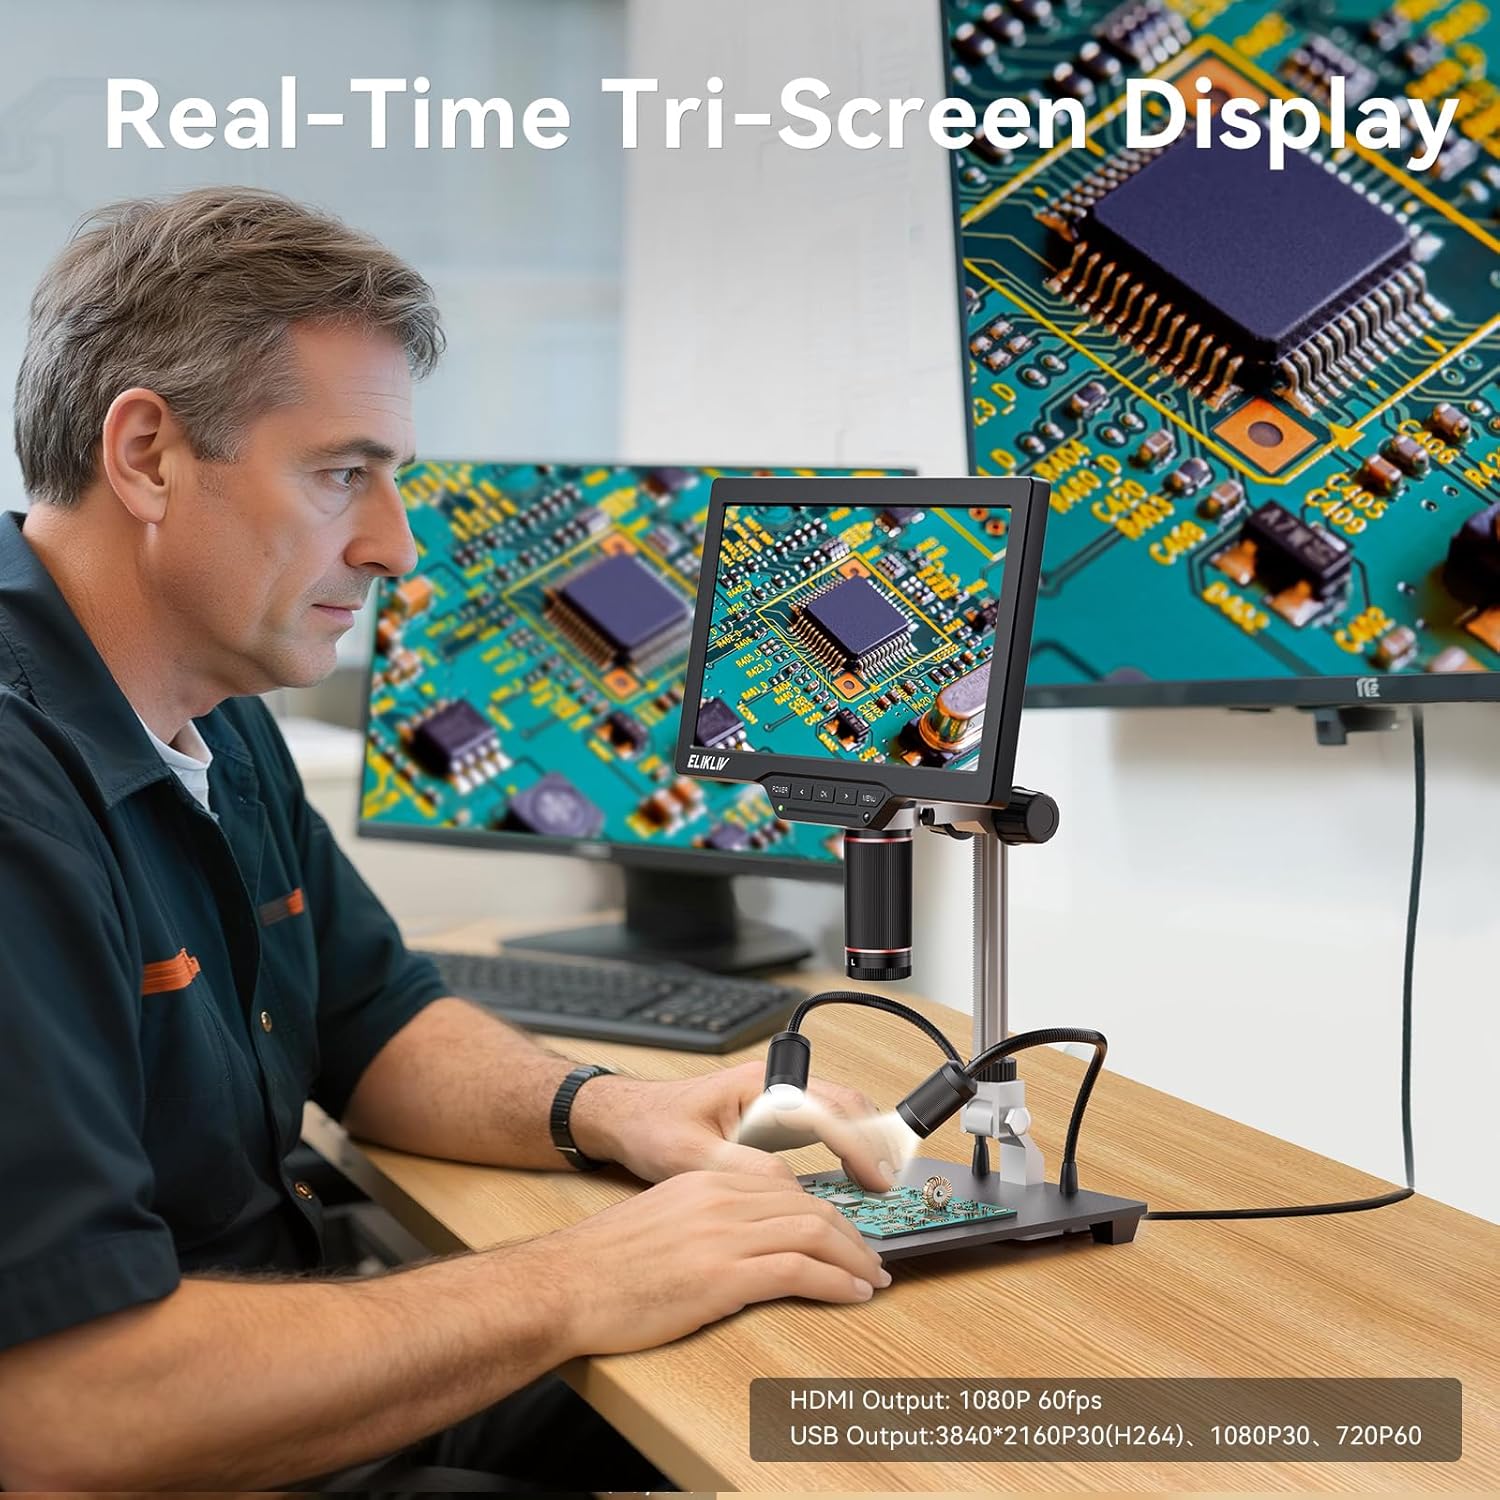
Image: A user operating the Elikliv digital microscope, with the magnified view simultaneously shown on the microscope's built-in screen and two larger external monitors. This demonstrates the real-time tri-screen display capability via HDMI and USB outputs.
Connect the microscope to an external monitor or computer using the HDMI or USB output ports for a larger viewing experience or for data transfer. The device supports real-time tri-screen display, allowing simultaneous viewing on the microscope screen and external displays.
Lens Usage Guide
The Elikliv TL301 comes with three specialized magnetic lenses, each designed for specific observation needs. The magnetic quick-swap system allows for easy and rapid lens changes.
1. Long-Distance Lens (L)
The 'L' lens is designed to provide an expanded working distance while maintaining high magnification. This is particularly useful for tasks requiring space for tools or hands.
- Applications: Micro soldering, PCB inspection, watch repair, jewelry appraisal, and other precision tasks where working space is critical.

Image: A user engaged in micro soldering on a circuit board, utilizing the Elikliv digital microscope with the Long-Distance Lens (L). This setup provides sufficient working distance for tools and hands, enhancing precision during delicate tasks.
2. Wide-Angle Lens (W)
The 'W' lens offers a broader field of view, allowing you to capture an entire object, such as a coin or gemstone, within a single frame.
- Applications: Full view coin inspection, stamp collection examination, gemstone appraisal, and viewing other larger specimens where a comprehensive overview is needed.

Image: A user inspecting a coin using the Elikliv digital microscope equipped with the Wide-Angle Lens (W). The microscope's screen clearly displays the entire coin, demonstrating the lens's capability for full-object viewing.
3. Micro Lens (M)
The 'M' lens provides ultra-high magnification, revealing intricate micro-details of specimens that are otherwise invisible to the naked eye.
- Applications: Biological slide examination, insect observation, plant cell study, material science, and other scientific research requiring extreme magnification.

Image: An adult and child are shown observing a magnified plant cell structure on the Elikliv digital microscope's screen. The Micro Lens (M) is in use, allowing for the detailed examination of microscopic specimens.
Maintenance
- Cleaning Lenses: Use a soft, lint-free cloth specifically designed for optical lenses to gently wipe the lens surfaces. Avoid using abrasive materials or harsh chemicals.
- Cleaning Screen: Use a soft, dry cloth to clean the screen. For stubborn smudges, a screen-cleaning solution applied to the cloth (not directly to the screen) can be used.
- General Cleaning: Keep the microscope body and stand free of dust and debris using a soft brush or cloth.
- Storage: When not in use, store the microscope in a clean, dry environment, away from direct sunlight and extreme temperatures. Consider covering it to prevent dust accumulation.
Troubleshooting
| Problem | Possible Cause | Solution |
|---|---|---|
| Microscope does not power on. | No power, loose connection, faulty adapter. | Check power cable connection. Ensure adapter is plugged into a working outlet. Try a different power source if available. |
| Image is blurry or out of focus. | Incorrect focus adjustment, wrong working distance, dirty lens. | Adjust the focus knob. Ensure the specimen is at the correct working distance for the attached lens. Clean the lens surface. |
| No image on external display. | Incorrect cable connection, wrong input source selected on external display. | Verify HDMI/USB cable connections. Select the correct input source (e.g., HDMI 1) on your monitor/TV. |
| Cannot capture images/videos. | No memory card, full memory card, card error. | Insert a compatible memory card. Check if the memory card is full and delete unnecessary files or use a new card. Format the memory card if necessary (this will erase all data). |
| Screen is too dark/bright. | Brightness settings incorrect, insufficient LED illumination. | Adjust the brightness settings via the microscope's menu. Increase the intensity of the LED lights. |
Specifications
- Model: TL301
- Display: 7-inch IPS Screen
- Lenses: Magnetic Triple Lens System (Long-Distance, Wide-Angle, Micro)
- Output: HDMI, USB
- ASIN: B0FQJBCC1W
- First Available: July 26, 2025
Warranty and Support
For warranty information and technical support, please refer to the documentation included with your purchase or visit the official Elikliv website. If you encounter any issues not covered in this manual, please contact Elikliv customer service for assistance.