1. Important Safety Instructions
Please read all instructions carefully before installing or operating this appliance. Retain this manual for future reference.
- Ensure the power supply voltage matches the rating label on the radiator.
- Do not cover the radiator. Covering the radiator can lead to overheating and fire hazards.
- Keep flammable materials (curtains, furniture, paper, etc.) at a safe distance from the radiator.
- Do not operate the radiator with a damaged power cord or plug. Contact qualified personnel for repairs.
- This appliance is rated IP24, meaning it is protected against splashing water. It is suitable for installation in bathrooms, but must not be directly exposed to water jets or submerged.
- Ensure proper grounding of the electrical installation.
- This appliance can be used by children aged 8 years and above and persons with reduced physical, sensory or mental capabilities or lack of experience and knowledge if they have been given supervision or instruction concerning use of the appliance in a safe way and understand the hazards involved. Children shall not play with the appliance. Cleaning and user maintenance shall not be made by children without supervision.
- Always disconnect the radiator from the main power supply before cleaning or performing any maintenance.
2. Product Overview
The WARM TECH Ceramic Inertia Radiator 1000W is designed to provide efficient and comfortable heating for your home. Its ceramic stone core accumulates heat and diffuses it gently and consistently, ensuring warmth even after the unit is switched off. Equipped with an LCD thermostat, it offers easy programming and precise temperature control.

Image: Front view of the WARM TECH Ceramic Inertia Radiator 1000W, showcasing its sleek black design and integrated digital display.
Key Features:
- Power: 1000 Watts for effective heating.
- Heating Element: Ceramic stone for gentle, consistent, and silent heat diffusion.
- Thermostat: Integrated LCD digital thermostat for precise temperature control.
- Operating Modes: 5 distinct modes including Confort, ECO, and Frost Protection.
- Pilot Wire: Compatible with 6-order pilot wire systems for advanced programming.
- Protection Rating: IP24 (splash-proof), suitable for various indoor environments.
- Installation: Designed for wall mounting.
- Dimensions: Approximately 55 cm (width) x 45 cm (height) x 12 cm (depth).
3. Installation and Setup
3.1 Unpacking
Carefully remove the radiator from its packaging. Inspect the unit for any signs of damage during transit. Keep all packaging materials until you are satisfied with the product.
3.2 Mounting the Radiator
The radiator is designed for wall mounting. Choose a suitable location on a solid wall, ensuring it is away from direct water sources, flammable materials, and areas where it might be easily damaged. Maintain adequate clearance around the radiator for optimal heat distribution.
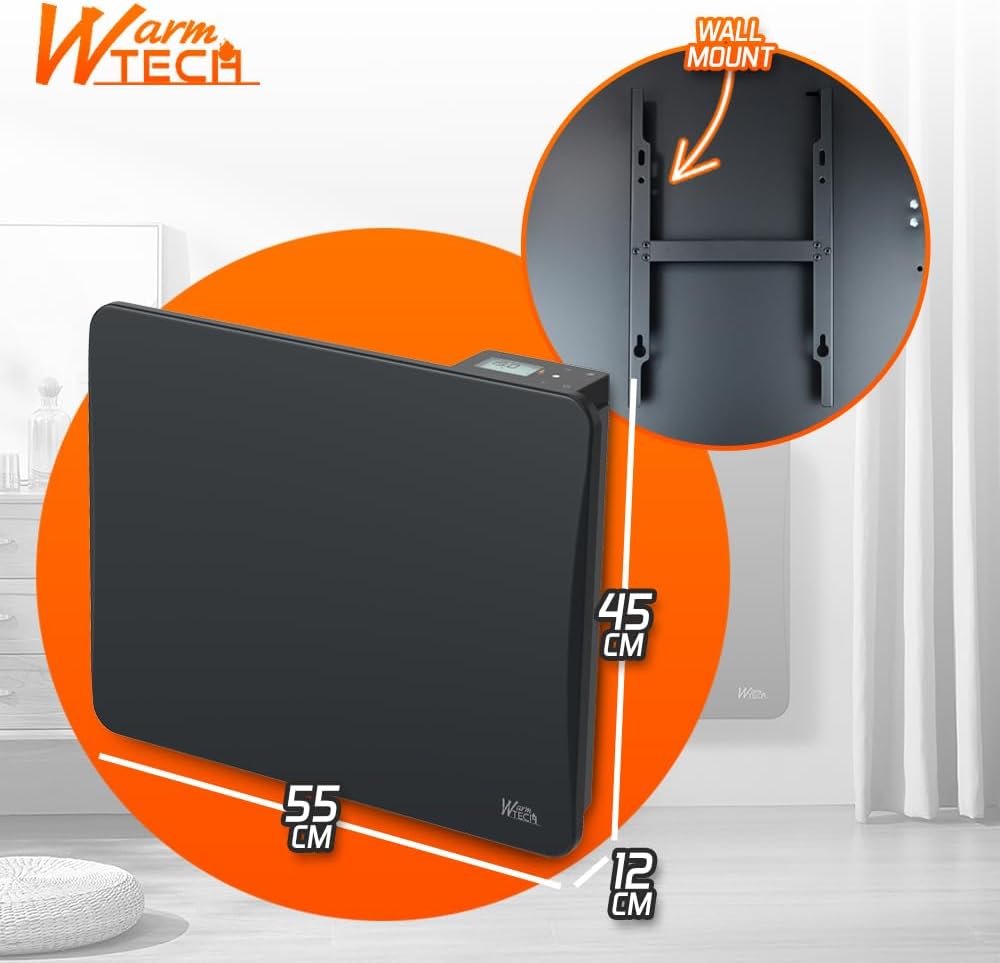
Image: Illustration showing the radiator's dimensions (55cm width, 45cm height, 12cm depth) and the wall mounting bracket for installation.
- Mark the drilling points on the wall using the provided wall fixings as a template.
- Drill holes and insert appropriate wall plugs.
- Secure the wall mounting bracket to the wall.
- Carefully hang the radiator onto the bracket, ensuring it is securely seated.
3.3 Electrical Connection
WARNING: Electrical installation should only be performed by a qualified electrician in accordance with local regulations. Ensure the main power supply is switched off before making any connections.

Image: Diagram illustrating the internal ceramic stone system, IP24 protection, and the electrical connection points for Phase, Neutral, and the 6-order Pilot Wire.
- Connect the Phase (Live) wire to the designated terminal.
- Connect the Neutral wire to the designated terminal.
- Connect the Earth wire to the designated terminal.
- If using a pilot wire system, connect the 6-order Pilot Wire to its dedicated terminal. This allows for centralized control and programming.
- Ensure all connections are secure and properly insulated.
4. Operating Instructions
4.1 Control Panel Overview
The radiator features an intuitive control panel with an LCD display and several buttons for easy operation.

Image: Close-up of the radiator's control panel, highlighting the LCD display and control buttons for thermostat adjustment and mode selection.
- LCD Display: Shows current temperature, selected mode, and other operational information.
- '+' / '-' Buttons: Used to adjust the desired temperature setting.
- MODE Button: Cycles through the available operating modes.
- Power Button: Turns the radiator ON/OFF.
4.2 Initial Setup and Temperature Adjustment
- After connecting to power, press the Power button to turn on the radiator.
- The LCD display will show the current room temperature or a default setting.
- Use the '+' and '-' buttons to set your desired comfort temperature. The display will show the set temperature.
4.3 Operating Modes
Press the 'MODE' button repeatedly to cycle through the following heating modes:
- Confort: The radiator maintains the exact temperature you have set. This is the primary heating mode for active use.
- Confort -1°: The radiator maintains a temperature 1°C below your set comfort temperature. Useful for slight energy savings without significant comfort loss.
- Confort -2°: The radiator maintains a temperature 2°C below your set comfort temperature. Offers greater energy savings compared to Confort -1°.
- ECO: This energy-saving mode typically maintains a temperature approximately 3.5°C below your set comfort temperature. Ideal for periods of absence or when less heat is required.
- Hors Gel (Frost Protection): This mode maintains a minimum temperature (e.g., 7°C) to prevent pipes from freezing in unoccupied rooms or during long absences.
4.4 Programming (Pilot Wire)
The 6-order pilot wire functionality allows for advanced programming and centralized control of your radiator. If your home is equipped with a compatible central programmer or home automation system, you can integrate the radiator for scheduled heating cycles and remote control.
- Ensure the pilot wire is correctly connected as per Section 3.3.
- Refer to the instruction manual of your central programmer or home automation system for specific details on how to program and control the radiator via the pilot wire.
- The radiator will respond to the commands sent through the pilot wire, overriding its local thermostat settings when programmed.
5. Maintenance
5.1 Cleaning
Regular cleaning helps maintain the radiator's appearance and efficiency.
- Always disconnect the radiator from the power supply before cleaning.
- Wipe the exterior surfaces with a soft, damp cloth.
- Do not use abrasive cleaners, solvents, or chemical agents, as these can damage the finish.
- Ensure no water enters the internal components of the radiator.
- Allow the radiator to dry completely before reconnecting it to power.
5.2 Storage
If the radiator will not be used for an extended period:
- Ensure the unit is clean and completely dry.
- Store it in a cool, dry place, protected from dust and moisture.
- It is recommended to store it in its original packaging to prevent damage.
6. Troubleshooting
If you encounter issues with your WARM TECH Ceramic Inertia Radiator, please refer to the following common problems and solutions:
| Problem | Possible Cause | Solution |
|---|---|---|
| Radiator does not heat. | No power supply. Thermostat set too low. Radiator is in Frost Protection mode. | Check power connection and circuit breaker. Increase the set temperature. Change to Confort or ECO mode. |
| Inconsistent heating. | Obstructions around the radiator. Incorrect mode selected. | Ensure clear space around the radiator. Verify the selected operating mode. |
| LCD display is blank. | No power supply. | Check power connection and circuit breaker. |
If the problem persists after attempting these solutions, please contact customer support for assistance.
7. Specifications
| Feature | Specification |
|---|---|
| Brand | WARM TECH |
| Model | Ceramic Inertia Radiator 1000W |
| Power | 1000 Watts |
| Dimensions (W x H x D) | 55 cm x 45 cm x 12 cm |
| Weight | 7.3 Kilograms |
| Heating Element | Ceramic Stone |
| Protection Rating | IP24 (Splash-proof) |
| Special Features | LCD Digital Display, 6-Order Pilot Wire |
| Color | Black |
| Mounting Type | Wall Mount |
| Recommended Use | Indoor, Home |
8. Warranty and Support
This WARM TECH Ceramic Inertia Radiator 1000W is manufactured to high-quality standards. For information regarding the warranty period and terms, please refer to the warranty card included with your product or visit the official WARM TECH website.
For technical support, troubleshooting assistance, or inquiries about spare parts, please contact WARM TECH customer service. Please have your product model and purchase date available when contacting support.
Contact information for WARM TECH can typically be found on the product packaging, the official brand website, or your purchase receipt.