1. Introduction
The Radioddity X1 Walkie Talkies are designed for reliable two-way communication in various environments. Featuring an IP67 waterproof and dustproof rating, durable construction, and advanced noise reduction, these FRS radios are suitable for outdoor adventures, professional use, and emergency situations. They offer a long communication range and include essential features like NOAA weather alerts and voice-activated transmission (VOX).

Image: The Radioddity X1 Walkie Talkie, showcasing its robust design.
2. What's in the Box
Upon opening your Radioddity X1 package, you should find the following items:
- 2 x Radioddity X1 Walkie Talkies
- 2 x Rechargeable Batteries
- 1 x 2-in-1 USB-C Charging Cable
- 2 x Belt Clips
- 2 x Hand Straps
- 1 x Adapters
- 1 x User Manual (this document)

Image: All components included in the Radioddity X1 package, including two radios, batteries, charging cable, belt clips, hand straps, and adapters.
3. Setup
3.1. Battery Installation
- Ensure the walkie talkie is powered off.
- Locate the battery compartment on the back of the unit.
- Align the battery with the contacts and gently push it into the compartment until it clicks into place.
3.2. Charging the Battery
The Radioddity X1 features a 2500mAh rechargeable lithium battery. For optimal performance, fully charge the battery before first use.
- Connect the provided USB-C charging cable to the charging port on the walkie talkie.
- Connect the other end of the USB-C cable to the adapter, and then plug the adapter into a standard power outlet. Alternatively, you can connect the USB-C cable to a compatible USB power source (e.g., computer, power bank).
- The battery indicator on the display will show charging status. A full charge typically takes several hours.
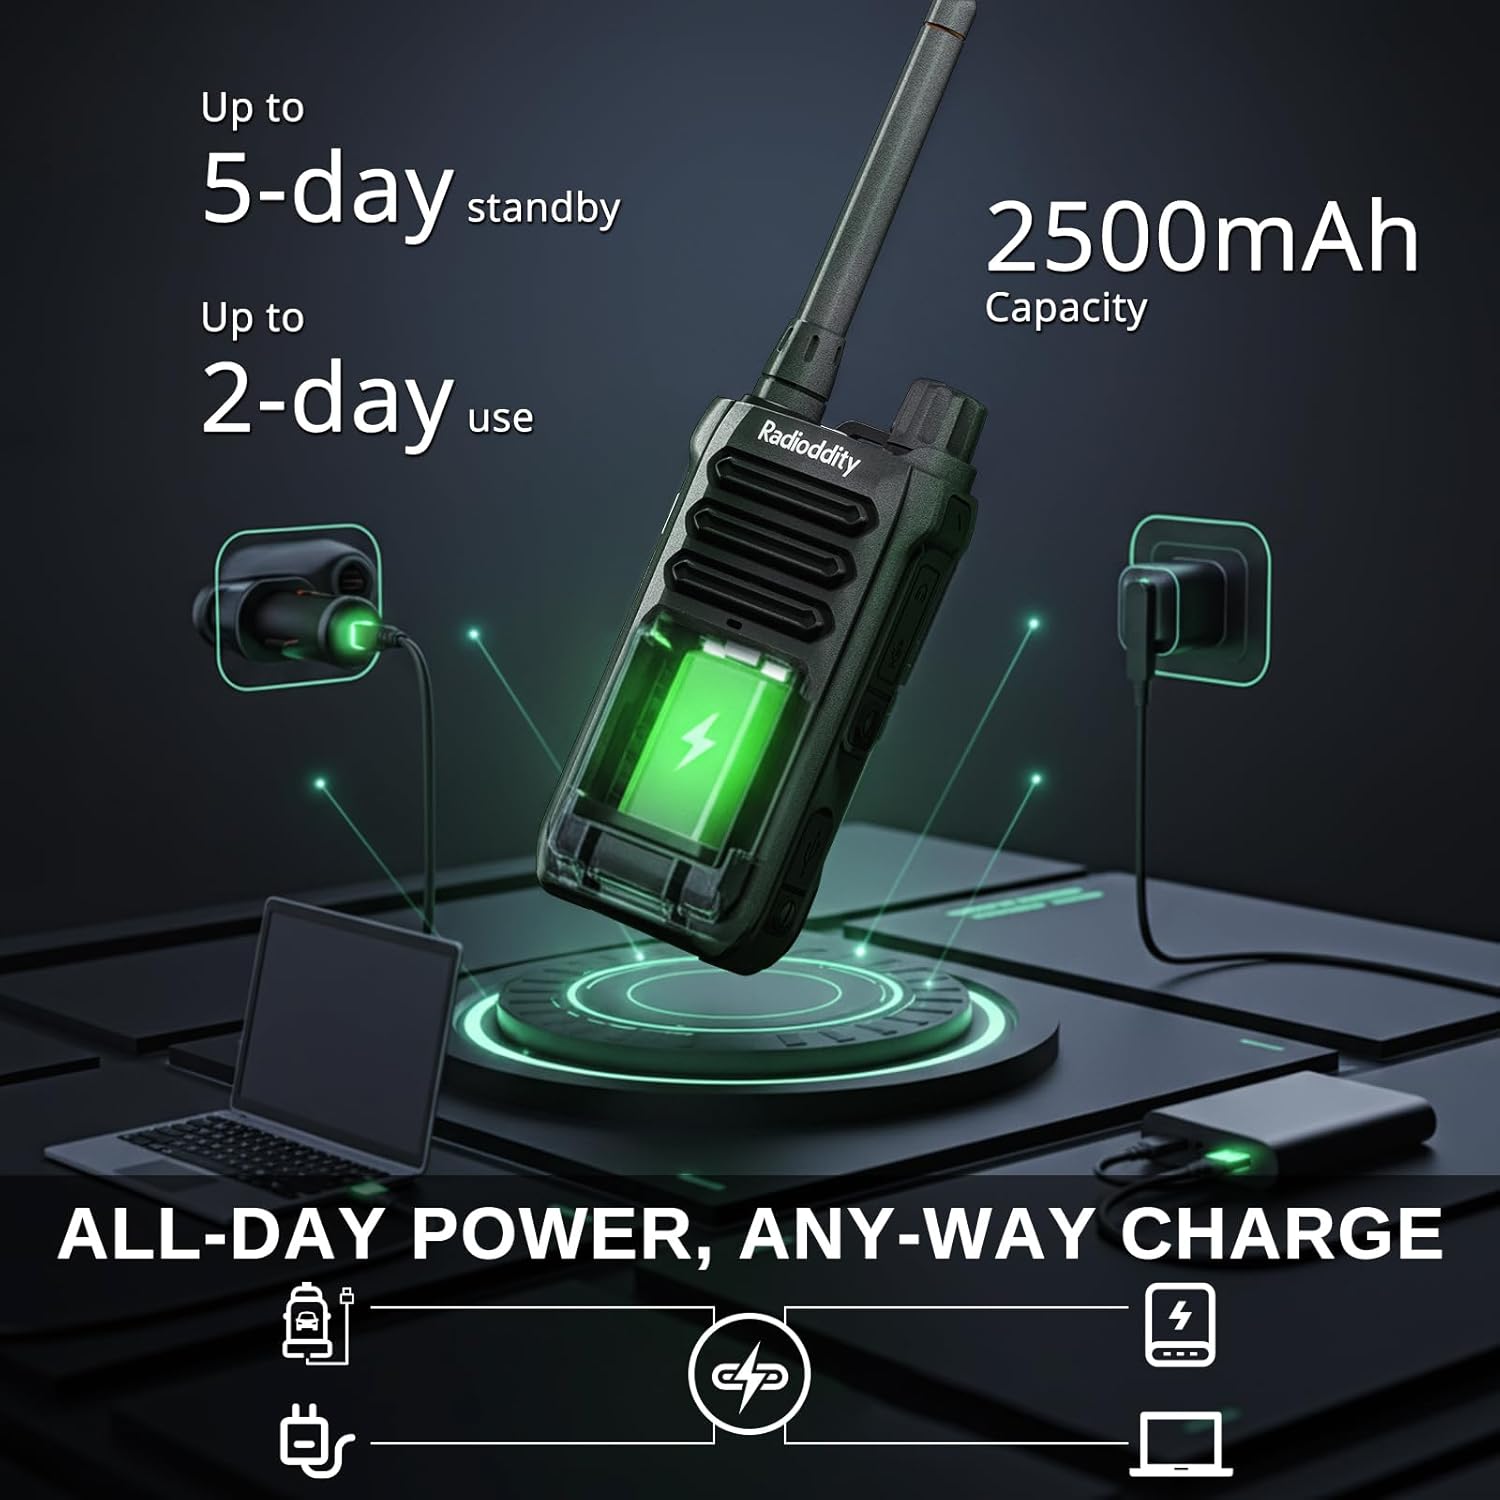
Image: The Radioddity X1 Walkie Talkie connected to a USB-C charger, illustrating the charging process.
3.3. Attaching Accessories
- Belt Clip: Secure the belt clip to the designated slot on the back of the walkie talkie.
- Hand Strap: Thread the hand strap through the loop on the top or side of the walkie talkie for added security.
3.4. Powering On/Off
To power on or off the device, rotate the power/volume knob located on the top of the unit clockwise to turn on, and counter-clockwise until it clicks to turn off.
4. Operating Instructions
4.1. Channel Selection
The Radioddity X1 comes pre-programmed with 22 FRS channels. To select a channel:
- Press the MENU button to enter the menu.
- Use the Up/Down arrow buttons to navigate to the channel setting.
- Press OK to confirm, then use the Up/Down arrow buttons to select your desired channel (1-22).
- Press OK again to save the selection and MENU to exit.
4.2. Privacy Codes (CTCSS/DCS)
The radio supports 155 privacy codes (CTCSS/DCS) to filter out unwanted conversations on a channel. While not providing true privacy, these codes ensure you only hear transmissions from radios set to the same channel and code.
- Press the MENU button.
- Navigate to the CTCSS or DCS setting using the Up/Down arrow buttons.
- Press OK, then select your desired code.
- Press OK to save and MENU to exit. Ensure all radios in your group use the same channel and privacy code.
4.3. Push-to-Talk (PTT)
To transmit, press and hold the large PTT button on the side of the radio. Speak clearly into the microphone. Release the PTT button to listen.
4.4. VOX Function (Voice Operated Transmission)
The VOX function allows for hands-free operation. When activated, the radio transmits automatically when it detects your voice.
- Press the MENU button.
- Navigate to the VOX setting.
- Press OK, then select an appropriate sensitivity level (higher numbers for lower sensitivity).
- Press OK to save and MENU to exit.

Image: Icon representing the Voice Operated Transmission (VOX) function.
4.5. NOAA Weather Alerts
Stay informed with 10 built-in NOAA weather channels providing real-time alerts.
- Press the MENU button.
- Navigate to the NOAA setting.
- Press OK, then select the desired NOAA channel or activate weather alerts.
- Press OK to save and MENU to exit.

Image: Icon representing the NOAA Scan & Alert feature.
4.6. Recording Playback
The Radioddity X1 features a unique recording playback function for up to 20 messages.
- To record, press and hold the dedicated RECORD button (if available, or refer to specific menu options).
- To play back recorded messages, press the REPLAY button.

Image: The Radioddity X1 display showing the recording and replay functions, highlighting its audio safety net capability.

Image: Icon representing the Recording function.
4.7. Noise Reduction
The dual-way noise reduction feature ensures clear communication even in noisy environments.

Image: The Radioddity X1 in a construction setting, illustrating its noise reduction capabilities for clear communication.
5. Maintenance
5.1. IP67 Waterproof and Dustproof Care
The Radioddity X1 is rated IP67, meaning it is dustproof and can withstand submersion in up to 1 meter of water for 30 minutes. To maintain its integrity:
- Ensure all port covers (e.g., charging port, accessory port) are securely closed before exposure to water or dust.
- After exposure to water, wipe the radio dry with a clean cloth. Do not charge the radio if the charging port is wet.
- Avoid prolonged submersion beyond the specified depth and time.

Image: The Radioddity X1 Walkie Talkie submerged in clear water, demonstrating its IP67 waterproof capability.

Image: The Radioddity X1 Walkie Talkie partially covered in sand, highlighting its dustproof design.
5.2. Battery Care
The 2500mAh battery provides up to 48 hours of average use. To prolong battery life:
- Avoid fully discharging the battery regularly.
- Store the radio in a cool, dry place when not in use.
- Use only the provided charging cable and adapter.
5.3. Cleaning
Wipe the radio with a soft, damp cloth. Do not use harsh chemicals or abrasive cleaners.
6. Troubleshooting
| Problem | Possible Cause | Solution |
|---|---|---|
| No power | Battery is low or not installed correctly. | Charge the battery or re-install it. |
| Cannot transmit or receive | Incorrect channel or privacy code. Out of range. | Verify channel and privacy code settings. Move closer to the other radio. |
| Poor audio quality | Weak signal, interference, or volume too low. | Adjust volume. Move to an area with less obstruction. Check for interference sources. |
| Short communication range | Obstructions (buildings, terrain), low power channel. | Move to an open area. Use channels 1-7 or 15-22 for higher power output. |
7. Specifications
| Feature | Detail |
|---|---|
| Brand | Radioddity |
| Model Number | X1 |
| Color | Black |
| Number of Channels | 22 (FRS) |
| Frequency Range | FRS |
| Talking Range Maximum | 5 Miles (open areas), 2 Miles (urban settings) |
| Water Resistance Level | IP67 Waterproof |
| Special Features | Dust Proof, Emergency Alarm (SOS), Long Range, Shockproof, Voice Operated Transmission (VOX), Noise Reduction, NOAA Weather Alerts, Recording Playback |
| Battery Capacity | 2500mAh Lithium |
| Battery Average Life | 48 Hours |
| Charging | USB-C |
| Product Dimensions (D x W x H) | 1.1" x 2.4" x 7.1" |
| FCC ID | 2AN62-X1 |

Image: Visual representation of the Radioddity X1's communication range, showing up to 5 miles in open areas and 2 miles in urban settings.

Image: The Radioddity X1 Walkie Talkie on the ground at a construction site, illustrating its durability and shockproof design after 1,000+ drop tests.
8. Warranty & Support
8.1. Warranty Information
The Radioddity X1 Walkie Talkies come with an 18-month warranty from the date of purchase. This warranty covers manufacturing defects and ensures your product is free from material and workmanship flaws under normal use. Please retain your proof of purchase for warranty claims.
8.2. Customer Support
For technical assistance, troubleshooting, or warranty inquiries, please visit the official Radioddity website or contact their customer support team. You can find contact information and additional resources on their website: www.radioddity.com.
9. Product Videos
Radioddity X1 | Built for Harsh Conditions
Video: This official Radioddity video demonstrates the X1's robust features, including its IP67 dustproof and waterproof capabilities, drop resistance, car-crush resistance, long-range communication, and noise-cancelling audio, highlighting its suitability for challenging environments.


