1. Introduction
Thank you for choosing the Generic Y9 Mini HD 1080P Body Camera. This compact and versatile device is designed for various recording needs, offering high-definition video and photo capture with features like night vision, loop recording, and motion detection. This manual provides essential information for setting up, operating, and maintaining your camera to ensure optimal performance.
2. Product Overview
2.1 Key Features
- HD 1080P Video Recording: Capture clear, high-definition footage.
- One-Click Recording & Photo Capture: Easy access to essential functions.
- IR Night Vision: Record clear footage in low-light conditions.
- 180° Rotating Lens: Adjust the camera angle for flexible recording.
- Loop Recording: Automatically overwrites old files when storage is full.
- Motion Detection: Automatically starts recording when movement is detected.
- 1.3-inch Color Screen: For easy navigation and playback.
- Supports up to 128GB TF Card: Expandable storage for extended recording.
- Long Battery Life: Up to 5 hours of continuous recording.
2.2 Camera Components

Image Description: This image displays the front and side views of the Y9 Mini Body Camera. The front view shows the lens, a 1.3-inch color screen, and control buttons. Icons around the camera highlight key features: Night Vision, Video Playback, Loop Recording, and One-Button Recording. The side view shows additional control buttons and a clip for mounting.

Image Description: This image showcases the Y9 Mini Body Camera with a cyclist on its screen, surrounded by icons representing its features. These include 4 million pixels, 1080 HD resolution, one-click photography and recording, 180-degree lens rotation, audio and video synchronization, autosave function, support for 128GB expansion, and continuous recording capability.
3. Setup
3.1 Initial Charging
Before first use, fully charge the camera for 1-2 hours. Connect the camera to a USB power source using the provided charging cable. The charging indicator light will show the charging status and turn off or change color when fully charged.
3.2 Inserting a TF Card
The camera supports a TF (microSD) card up to 128GB (not included). Locate the TF card slot on the side of the camera. Gently insert the TF card with the gold contacts facing down until it clicks into place. Ensure the camera is powered off before inserting or removing the TF card.
3.3 Powering On/Off
- Power On: Press and hold the Power button for a few seconds until the screen lights up.
- Power Off: Press and hold the Power button for a few seconds until the screen turns off.
3.4 Time Synchronization
To ensure accurate timestamps on your recordings, synchronize the system time. Refer to the on-screen menu options for time and date settings. Connect the camera to a computer via USB, and a time synchronization file may be generated automatically or can be manually updated.
4. Operating Instructions
4.1 Video Recording
From standby mode, press the dedicated Record button once to start video recording. The recording indicator will flash. Press the Record button again to stop recording and save the file.
4.2 Taking Photos
From standby mode, press the dedicated Photo button once to take a still picture. The screen may flash briefly to indicate a photo has been captured.
4.3 Night Vision Activation
The camera features infrared (IR) night vision for recording in low-light conditions. Depending on the model, night vision may activate automatically in dark environments or can be manually toggled via the menu settings.
4.4 Loop Recording
When the TF card is full, the loop recording feature automatically overwrites the oldest video files to make space for new recordings. This ensures continuous recording without manual intervention. This feature is typically enabled by default.

Image Description: This image demonstrates two key functions of the Y9 Mini Body Camera. The top section illustrates 'Motion Detection,' showing a burglar in a house triggering the camera to automatically start recording. The bottom section explains 'Default loop recording,' depicting a filmstrip where older video segments are automatically overwritten by new ones once the storage card is full, optimizing memory usage.
4.5 Motion Detection
When enabled, the camera will automatically start recording when it detects movement within its field of view. This feature is useful for surveillance and conserving battery life and storage space. Activate or deactivate motion detection through the camera's menu settings.
4.6 180° Rotating Lens
The camera's lens can be manually rotated 180 degrees, allowing you to adjust the recording angle without repositioning the entire device. This is particularly useful for capturing footage from different perspectives while the camera is mounted.
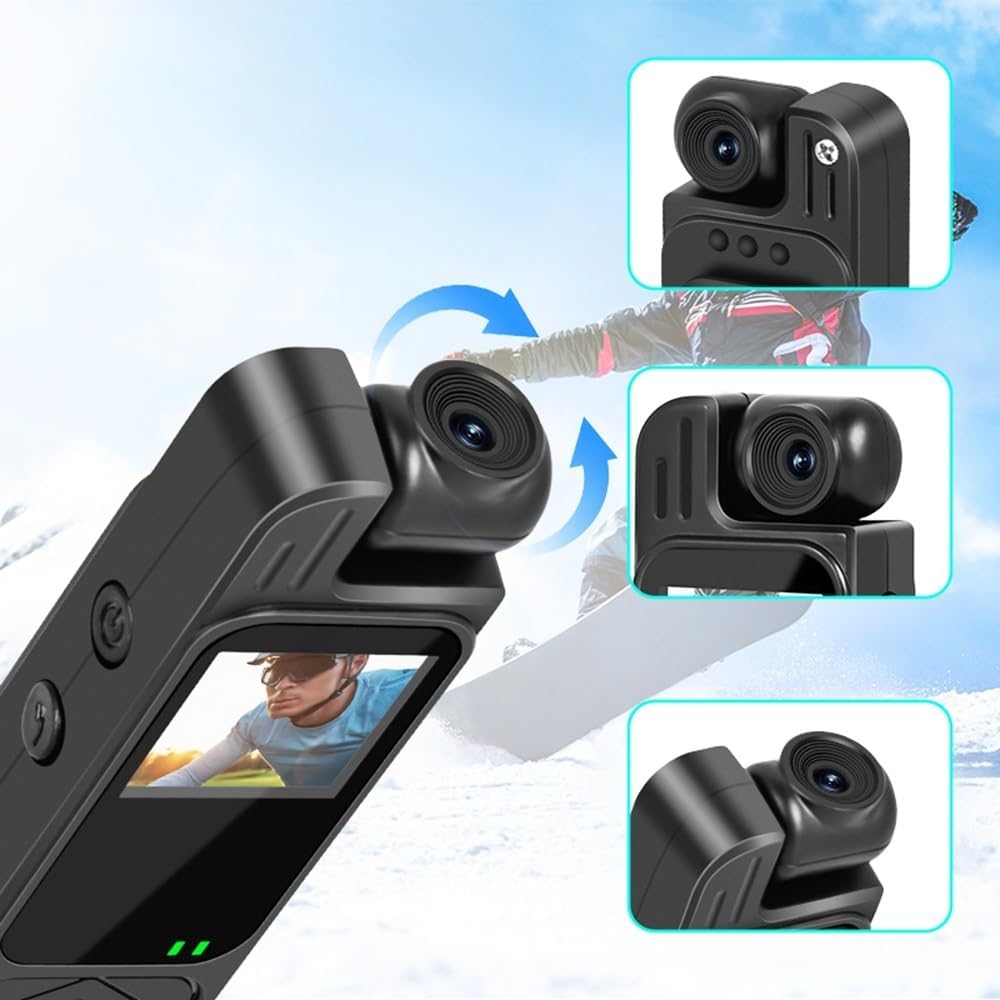
Image Description: This image highlights the 180-degree rotating lens feature of the Y9 Mini Body Camera. The main illustration shows the camera with its lens rotating, indicated by blue arrows. Insets provide close-up views of the lens positioned at different angles, demonstrating its flexibility for various recording perspectives.
4.7 Video Playback
You can review recorded videos and photos directly on the camera's 1.3-inch color screen. Navigate to the playback menu using the control buttons. Alternatively, connect the camera to a computer via USB to access and transfer files.

Image Description: This image provides a visual comparison of video quality between 720P and 1080P resolutions as displayed on the Y9 Mini Body Camera's screen. The left side shows a scene recorded in 720P, appearing slightly less sharp, while the right side shows the same scene in 1080P, demonstrating significantly clearer and more detailed footage.
5. Maintenance
5.1 Cleaning
Use a soft, dry cloth to clean the camera body. For the lens, use a specialized lens cleaning cloth and solution to avoid scratches. Do not use harsh chemicals or abrasive materials.
5.2 Storage
Store the camera in a cool, dry place away from direct sunlight, extreme temperatures, and high humidity. When storing for extended periods, ensure the battery is partially charged (around 50%) to prolong its lifespan.
5.3 Battery Care
To maintain battery health, avoid fully discharging the battery frequently. Recharge the camera regularly, even if not in use, to prevent deep discharge.
6. Troubleshooting
- Camera not turning on: Ensure the battery is charged. Connect to a power source and try again.
- Cannot record: Check if a TF card is inserted correctly and if it has sufficient free space. Format the TF card if necessary (this will erase all data).
- Poor video quality: Ensure the lens is clean. Check that you are recording in 1080P resolution via the settings.
- Camera freezing: Press and hold the Power button for an extended period (e.g., 10-15 seconds) to force a restart.
- Computer not recognizing camera: Try a different USB port or cable. Ensure the camera is powered on when connected.
7. Specifications
- Model Name: LS (Y9 Mini)
- Video Resolution: 1080P HD
- Lens Rotation: 180 degrees
- Display: 1.3-inch Color Screen
- Storage: Supports up to 128GB TF card (not included)
- Battery Capacity: 1200mAh
- Recording Time: Up to 5 hours (continuous)
- Features: IR Night Vision, Loop Recording, Motion Detection, One-Click Recording/Photo
- Material: ABS
- Item Weight: Approximately 40g (camera only)
- Package Dimensions: 3.15 x 3.15 x 3.15 inches
8. Warranty and Support
Warranty information and specific support contact details are not provided in the product description. Please refer to the retailer or manufacturer's website for details regarding warranty coverage and customer support options.


