1. Introduction
This manual provides detailed instructions for the installation, programming, operation, and maintenance of your CARMATOR Wireless Keyless Entry Garage Door Opener Keypad. This device offers convenient access to your garage without the need for a remote or key, featuring a backlit keypad for visibility in low light conditions and advanced security features.
2. Compatibility
The CARMATOR Garage Door Opener Keypad is designed for broad compatibility with various garage door opener brands, including LiftMaster, Sears, Craftsman, and Chamberlain. To ensure compatibility, it is essential to identify the 'PART NO' or 'PART NUMBER' of your existing garage door opener.
To locate your garage door opener's 'PART NO', look for a sticker on the overhead unit. This sticker is often on the exterior, but some units may require lifting the light cover to access it.

Image 2.1: Illustration of where to find the 'PART NO' on various residential garage door opener models.
Refer to the compatibility chart below to cross-reference your opener's part number with the supported models. The keypad is compatible with a wide range of part numbers, including 41DJ002, 41D7675, 1D8169, 050DCTWFLK, HBW7675, HBW7356, and many others.
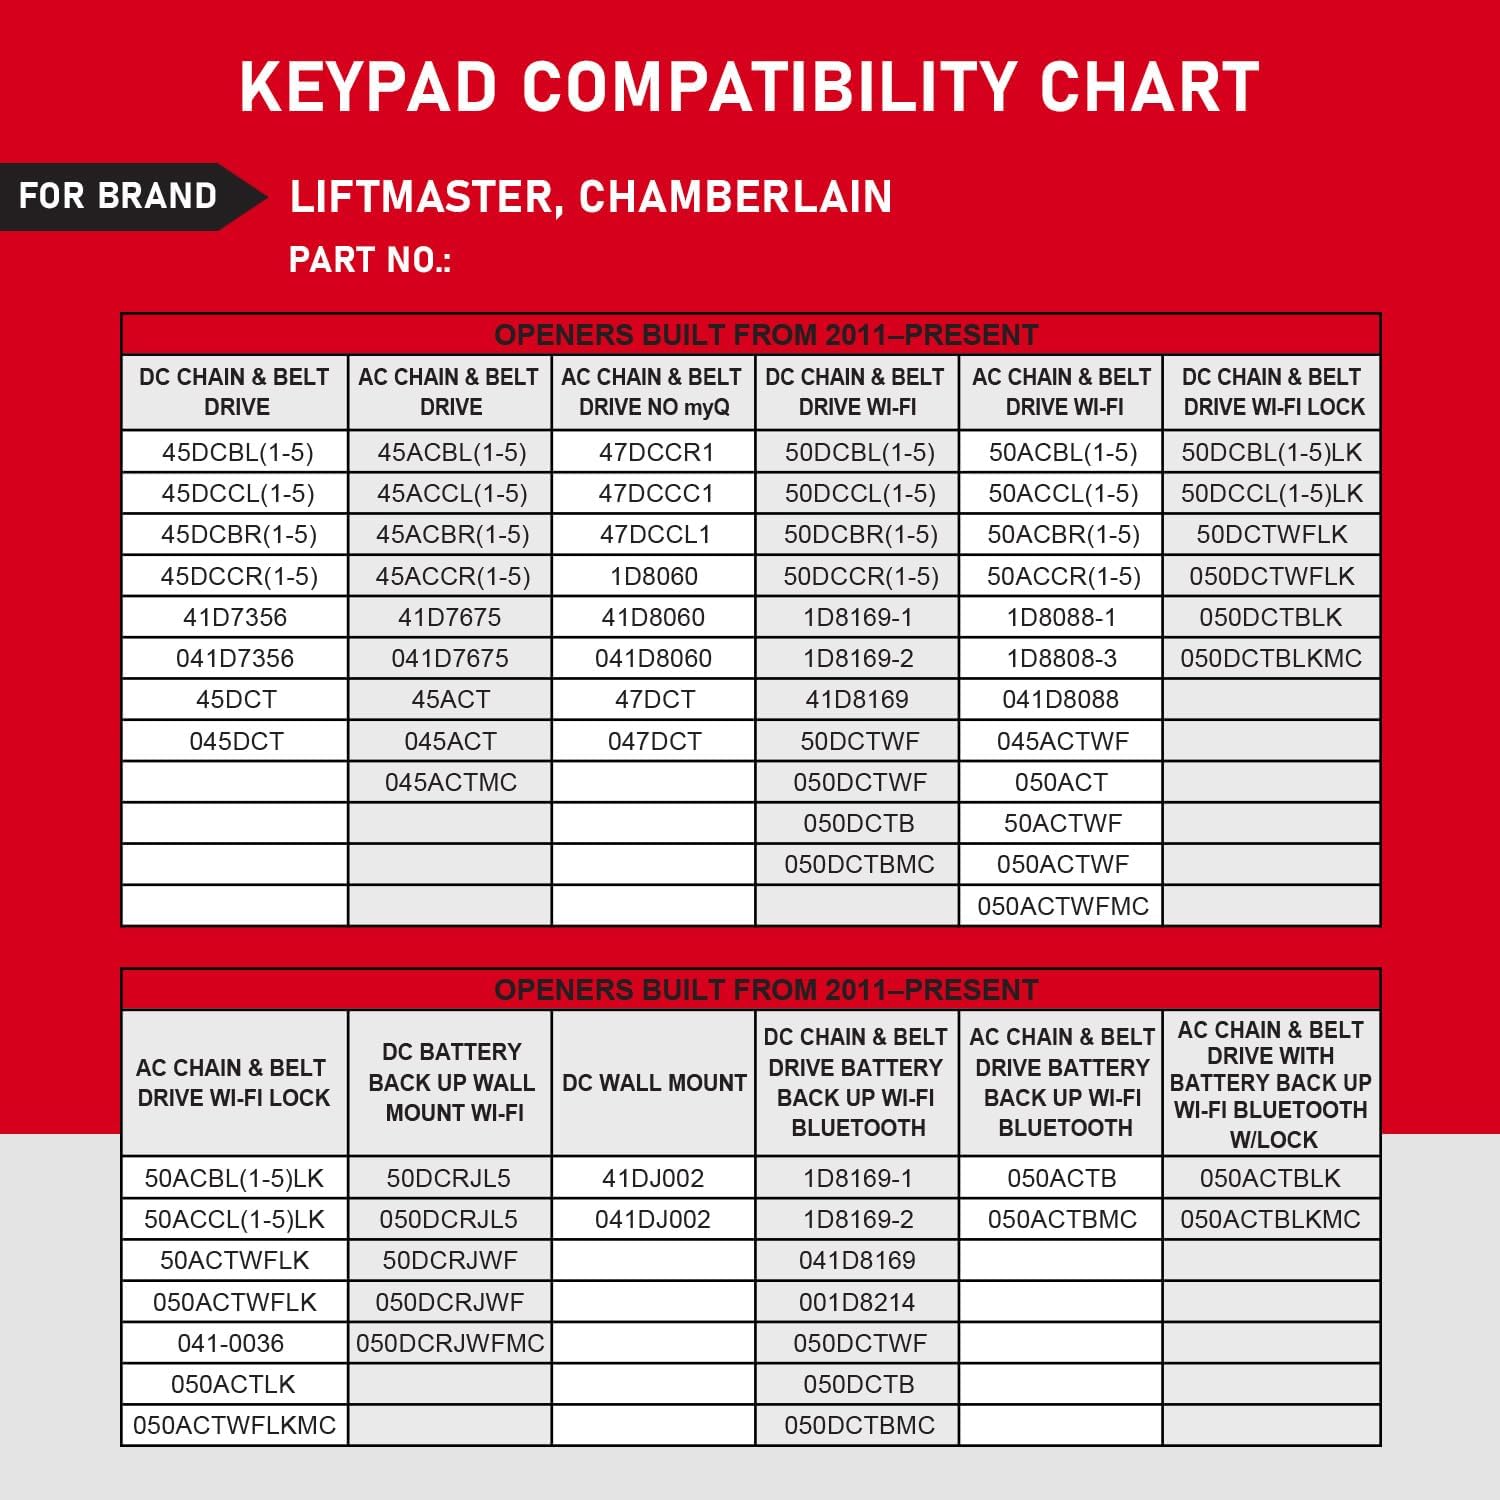
Image 2.2: Detailed compatibility chart for LiftMaster and Chamberlain garage door openers, listing various part numbers for different drive types and features.
3. Box Contents
Upon opening the package, verify that all the following items are included:
- CARMATOR Wireless Keyless Entry Keypad
- Mounting Screws (3x)
- 9V Battery (pre-installed in keypad)
- User Manual (this document)

Image 3.1: Contents of the product package, including the keypad, user manual, 9V battery, and mounting screws.
4. Setup & Installation
4.1. Battery Installation/Replacement
The keypad comes with a 9V alkaline battery pre-installed. To replace the battery, open the battery compartment cover located at the bottom of the keypad. Remove the old battery and insert a new 9V alkaline battery, ensuring correct polarity. Close the cover securely.
4.2. Mounting the Keypad
Choose a convenient location outside your garage, typically near the garage door, at a height accessible to all users. Ensure the location is protected from direct heavy rain if possible, although the keypad features a weatherproof cover.
- Open the keypad's flip-up cover.
- Mark the positions for the mounting screws using the keypad's screw holes as a template.
- Drill pilot holes if necessary.
- Secure the keypad to the wall using the provided mounting screws.
4.3. Wireless Programming
The keypad offers wireless programming. Specific programming steps will vary slightly depending on your garage door opener model. Generally, the process involves:
- Locating the 'Learn' button on your garage door opener motor unit.
- Pressing and releasing the 'Learn' button.
- Within 30 seconds, entering your desired 4-digit PIN on the CARMATOR keypad and pressing the 'ENTER' button.
- The garage door opener light should flash or click, indicating successful programming.
Refer to your garage door opener's specific manual for detailed programming instructions if the general steps do not work.
5. Operating Instructions
5.1. Standard Operation
To open or close your garage door:
- Open the keypad cover.
- Enter your programmed 4-digit PIN.
- Press the 'ENTER' button.
The garage door will activate. The backlit keyboard ensures visibility in dark conditions.
5.2. One-Touch Closing Feature
For quick closing, the keypad features a one-touch close function. After entering your PIN, you can close the garage door by simply pressing the 'ENTER' button again within 15 seconds, without re-entering the PIN.
5.3. Temporary Passwords
You can set temporary PINs for visitors, service personnel, or deliveries. This allows access without compromising your primary entry code. Consult the programming section of your garage door opener manual or the keypad's advanced programming guide for steps on setting temporary codes.

Image 5.1: Keypad features including one-button close, temporary password functionality, and general keyless entry access.
6. Features and Advantages
The CARMATOR Keypad is designed with several features to enhance convenience, durability, and security:
- Weatherproof Cover: A robust flip-up cover protects the keypad from moisture and environmental elements, ensuring long-lasting performance.
- Durable Construction: Made from alloy ABS plastic, the shell is anti-drop and anti-ultraviolet, providing enhanced durability.
- Silicone Buttons: The buttons are made of silicone, offering good elasticity and a comfortable tactile response.
- High-Capacity Battery: Equipped with a high-capacity 6F22 9V battery for extended service life.
- Backlit Keypad: Numbers are illuminated, making it easy to operate the keypad in the dark.
- Multi-Door Control: Capable of operating up to 3 garage door openers.
- Enhanced Security: Features Security 2.0+ Rolling Code technology for strongest encryption, preventing unauthorized access.

Image 6.1: Visual representation of the keypad's advantages, including its weatherproof cover, durable ABS plastic shell, silicone buttons, and long-lasting battery.

Image 6.2: Illustration of the keypad's security features, highlighting Security 2.0+ Rolling Code technology for enhanced protection.
7. Maintenance
The CARMATOR Keypad requires minimal maintenance. Regularly check the battery life and replace the 9V battery when the keypad's backlight dims or operation becomes inconsistent. Keep the keypad clean by wiping it with a soft, damp cloth. Avoid using harsh chemicals or abrasive cleaners.
8. Troubleshooting
- Keypad not responding: Check the battery. Replace if necessary. Ensure the keypad is within range of the garage door opener.
- Garage door not opening/closing: Verify that the PIN is entered correctly. Re-attempt the programming steps (Section 4.3) to ensure the keypad is properly linked to your garage door opener. Check for any obstructions in the garage door's path.
- Intermittent operation: This could indicate a low battery or interference. Try replacing the battery.
If issues persist after following these steps, please contact customer support.
9. Specifications
| Brand | CARMATOR |
| Model Number | Keypad |
| Item Weight | 5.4 ounces (153 grams) |
| Product Dimensions | 6.3 x 2.5 x 1.1 inches (16 x 6.35 x 2.8 cm) |
| Battery Type | 1 x 9V Alkaline (included) |
| Color | Yellow (keypad housing color may vary by variant) |
| Compatibility | LiftMaster, Sears, Craftsman, Chamberlain (various models, refer to compatibility chart) |
10. Warranty & Support
CARMATOR provides online technical support within 24 hours. If you encounter any issues or have questions regarding your keypad, please contact seller support through your purchase platform for assistance.