1. Introduction
This manual provides detailed instructions for the installation, operation, and maintenance of your ORICO MiniLink M47P USB4 Docking Station. Please read this manual thoroughly before using the product to ensure proper functionality and to maximize its potential with your Mac mini M4 or M4 Pro.
2. Package Contents
Carefully unpack the box and ensure all items listed below are present and in good condition. If any items are missing or damaged, please contact ORICO customer support.

Image: Contents of the ORICO MiniLink M47P retail package.
- 1 x ORICO MiniLink M47P Docking Station
- 1 x Packaging Box
- 1 x User Manual
- 1 x Screwdriver
- 1 x 40Gbps USB-C to USB-C 0.15M Cable
- 1 x 40Gbps USB-C to USB-C 1M Cable
- 1 x 12V3A Power Adapter
- 1 x SSD Heatsink, Thermal Silicone Pad
3. Product Overview
3.1 Port Layout
The ORICO MiniLink M47P features a comprehensive set of ports designed for seamless integration with your Mac mini. Below is a diagram illustrating the front and back port configurations.

Image: Diagram showing the front and back ports of the ORICO MiniLink M47P.
Front Ports:
- SD 4.0 Card Reader: For high-speed data transfer from SD cards.
- TF 4.0 Card Reader: For high-speed data transfer from microSD cards.
- 2 x USB 3.2 (10Gbps) Type-A Ports: For connecting USB peripherals at high speeds.
- Power Button: To power on/off the docking station.
Back Ports:
- DC 12V Power IN: Connect the provided 12V3A power adapter here.
- 1 x USB 3.2 (10Gbps) Type-A Port: Additional high-speed USB port for peripherals.
- 40Gbps PC IN (USB4): Connect to your Mac mini using the provided USB4 cable for full functionality.
3.2 Key Features
High-Speed Data Transfer
The MiniLink M47P supports 40Gbps USB4 connectivity to your Mac mini, enabling rapid data exchange. It also features three USB 3.2 Gen 2 Type-A ports, each providing up to 10Gbps transfer speeds for external drives and other peripherals.

Image: Chart comparing data transfer speeds of various USB interfaces, highlighting 40Gbps USB4.
Dual NVMe M.2 SSD Storage Expansion
Expand your storage with dual PCIe 4.0 M.2 slots, supporting up to 8TB total capacity (4TB per slot). These slots deliver sequential read/write speeds of up to 3000MB/s (x2 lanes) and 1600MB/s (x1 lane), ideal for large files and demanding applications. Only NVMe PCIe M.2 SSDs are compatible.

Image: Illustration of the dual NVMe M.2 SSD slots and compatible M.2 key types (M Key, B&M Key) and size (2280).
Integrated SD/TF 4.0 Card Readers
The built-in SD 4.0 and TF 4.0 card readers offer transfer speeds of up to 314 MB/s, allowing for quick import of photos and videos from your memory cards.

Image: A Mac mini setup showing the ORICO MiniLink M47P with an SD card inserted, demonstrating simultaneous read capabilities.
Efficient Cooling System
Designed with a cooling fan, metal casing, and 360° air holes, the docking station maximizes heat dissipation to maintain optimal performance and quiet operation even under heavy workloads.
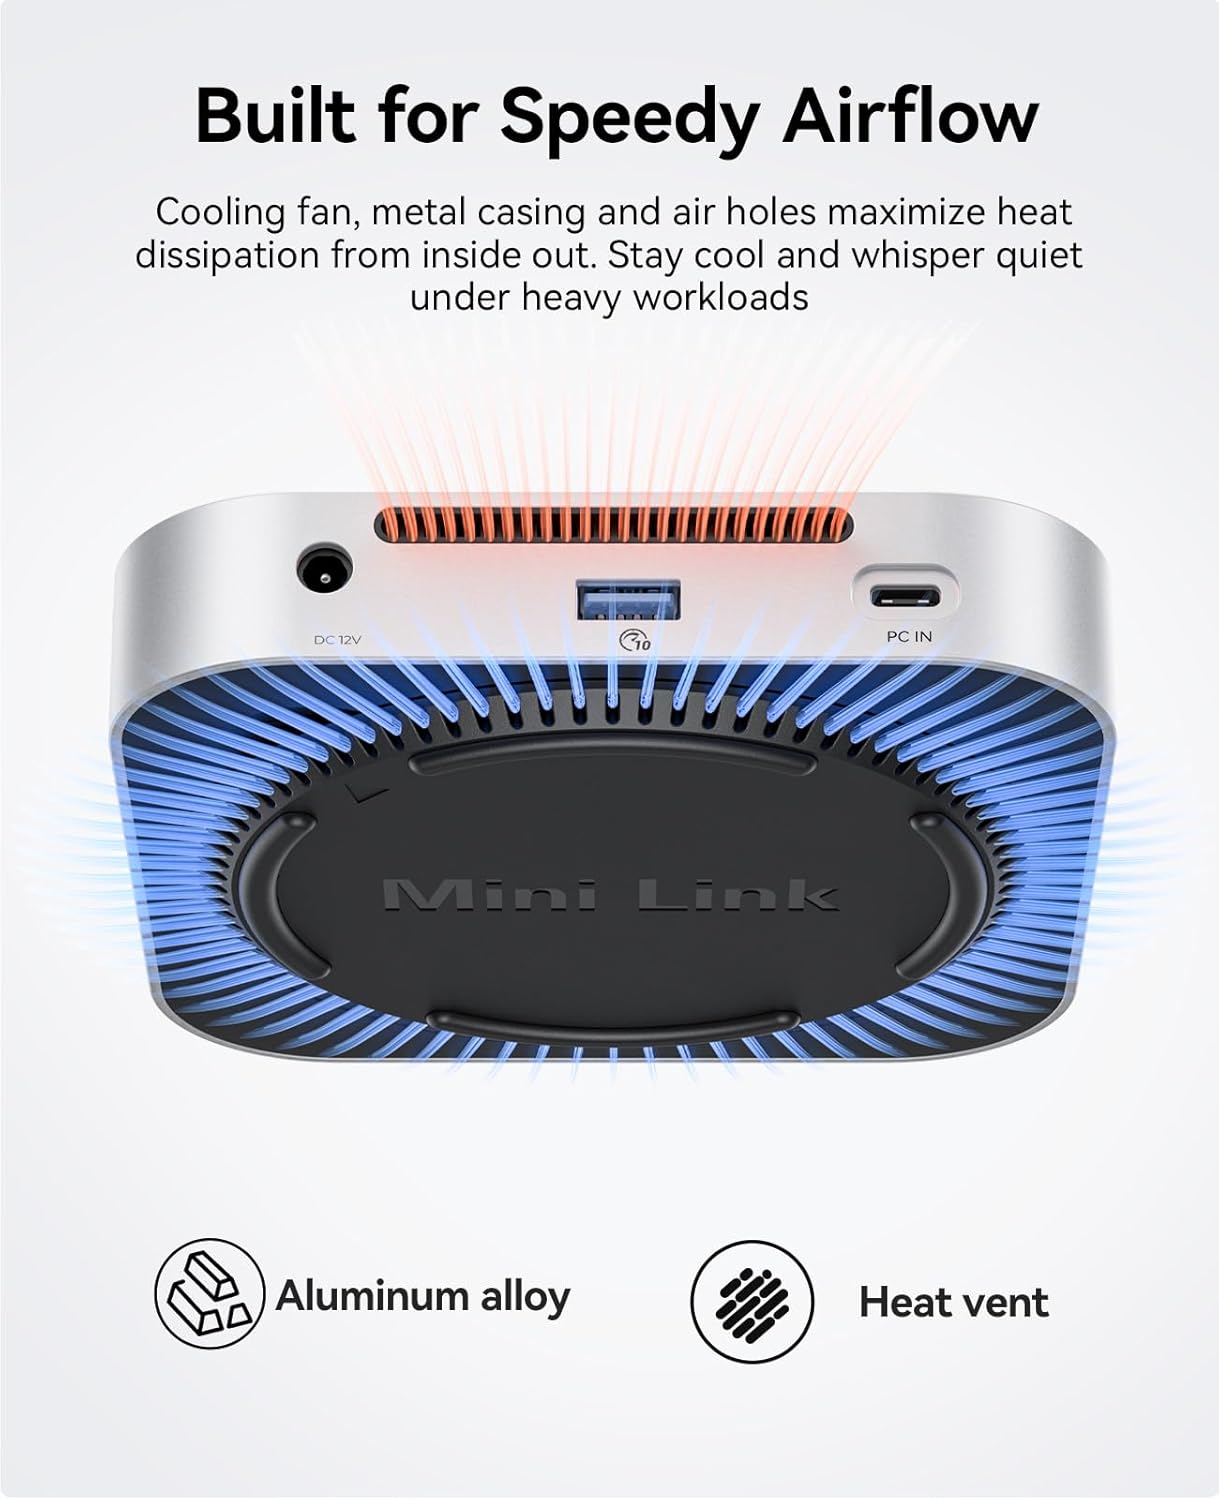
Image: Diagram illustrating the internal cooling fan and heat vents of the ORICO MiniLink M47P.
Seamless Design Integration
Constructed from anodized aluminum, the MiniLink M47P features a contoured design that complements the aesthetic of your Mac mini, creating a unified and organized workspace.

Image: Views of the ORICO MiniLink M47P highlighting its sleek design and 360° air holes.
4. Setup Guide
4.1 Connecting the Docking Station
- Place the ORICO MiniLink M47P on a stable surface next to or beneath your Mac mini.
- Connect the provided 12V3A power adapter to the "DC 12V Power IN" port on the back of the docking station, then plug the adapter into a power outlet.
- Using one of the provided USB4 cables (15cm or 30cm), connect the "40Gbps PC IN" port on the back of the docking station to a Thunderbolt 3/4/5 or USB4 port on your Mac mini.
- Press the power button on the front of the docking station to turn it on. The indicator light will illuminate.
4.2 Installing NVMe M.2 SSDs
The MiniLink M47P supports two NVMe PCIe M.2 SSDs (2280 size, M Key or B&M Key). Follow these steps to install your SSDs:
- Ensure the docking station is powered off and disconnected from your Mac mini.
- Locate the bottom cover of the docking station. Gently twist or slide it to remove it, exposing the M.2 SSD slots.
- Insert your NVMe M.2 SSD into an available slot at a 30-degree angle, ensuring the notch on the SSD aligns with the key in the slot.
- Gently push down the SSD and secure it with the provided screw using the included screwdriver.
- Apply the thermal silicone pad and heatsink (if desired) onto the installed SSD for improved heat dissipation.
- Replace the bottom cover, ensuring it is securely fastened.
- Reconnect the docking station to your Mac mini and power it on. The newly installed SSDs should appear in your Mac's Disk Utility for formatting and use.
5. Operating Instructions
5.1 Using USB Ports
Connect your USB peripherals such as external hard drives, keyboards, mice, or USB flash drives to any of the three USB 3.2 Gen 2 Type-A ports. These ports support data transfer speeds up to 10Gbps and are backward compatible with USB 2.0 devices.
5.2 Using SD/TF Card Readers
Insert your SD or microSD (TF) card into the corresponding slot on the front of the docking station. The card will be recognized by your Mac mini, allowing you to access its contents. Ensure the card is inserted correctly to avoid damage. Always eject the card safely from your operating system before removal.
5.3 Power Button Functionality
The power button on the front of the docking station controls the power to the unit. Press it once to turn the device on or off. When powered on, the indicator light will be active.
6. Maintenance
- Keep the docking station clean by wiping it with a soft, dry cloth. Avoid using liquid cleaners or solvents.
- Ensure proper ventilation around the device. Do not block the air vents.
- Avoid exposing the device to extreme temperatures, humidity, or direct sunlight.
- Handle the device with care to prevent physical damage.
7. Troubleshooting
7.1 Device Not Recognized by Mac mini
- Ensure the power adapter is securely connected and the docking station is powered on.
- Verify that the USB4 cable is firmly connected to both the docking station's "40Gbps PC IN" port and a Thunderbolt/USB4 port on your Mac mini.
- Try using a different USB4 cable or a different port on your Mac mini.
- Restart your Mac mini.
7.2 SSD Not Appearing in Finder/Disk Utility
- Confirm that the SSD is correctly installed in the M.2 slot and securely fastened.
- Ensure the SSD is an NVMe PCIe M.2 type and not a SATA M.2 SSD, as only NVMe is supported.
- Check Disk Utility to see if the SSD is detected but unformatted. If so, format it for use with macOS.
- Try installing the SSD in the other M.2 slot to rule out a slot-specific issue.
7.3 Slow Data Transfer Speeds
- Ensure your Mac mini is connected to the docking station via a Thunderbolt 3/4/5 or USB4 port to achieve 40Gbps speeds.
- Verify that the connected peripherals (e.g., external SSDs, USB drives) support the expected speeds (e.g., 10Gbps for USB 3.2 Gen 2).
- Performance can be affected by the quality of cables and the specifications of the connected devices.
7.4 Docking Station Feels Loose or Unstable
- Ensure the docking station is placed on a flat, stable surface.
- Verify that the bottom cover is securely attached after any SSD installation.
8. Product Specifications
| Brand | ORICO |
| Model | MiniLink M47P |
| Color | Silver |
| Hardware Interface | USB4 (40Gbps), USB 3.2 Gen 2 (10Gbps), SD 4.0, TF 4.0, NVMe M.2 PCIe 4.0 |
| Compatible Devices | Mac mini, Mac mini M4, Mac mini M4 Pro |
| Operating System | macOS (Minimum Required: Mac OS 12 Monterey) |
| Data Transfer Rate | 40 Gigabits Per Second (USB4), 10 Gigabits Per Second (USB-A), up to 3000MB/s (NVMe PCIe 4.0 x2), up to 1600MB/s (NVMe PCIe 4.0 x1), up to 314MB/s (SD/TF 4.0) |
| Total USB Ports | 5 (3 x USB-A, 1 x USB-C for host, 1 x USB-C for power) |
| Number of Ports | 7-in-1 (2x M.2 SSD slots, 3x USB-A, 1x SD, 1x TF) |
| Enclosure Material | Aluminum |
| Special Features | Fast Charging, Indicator Light, LED Indication, Lightweight, Plug and Play, Portable, Powered, Slim |
9. Warranty and Support
9.1 Warranty Information
The ORICO MiniLink M47P USB4 Docking Station comes with a 2-YEAR manufacturer's warranty. This warranty covers defects in materials and workmanship under normal use. It does not cover damage caused by misuse, accident, unauthorized modification, or external causes.
Please retain your proof of purchase for warranty claims. For detailed warranty terms and conditions, refer to the official ORICO website or contact customer support.
9.2 Customer Support
If you encounter any issues or have questions regarding your ORICO MiniLink M47P, please contact ORICO customer support through their official website or the retailer where you purchased the product. Provide your product model number (M47P) and a detailed description of the issue for efficient assistance.
For the latest drivers, firmware updates, and FAQs, please visit the official ORICO support page.


