1. Introduction
This manual provides detailed instructions for the assembly, operation, and maintenance of your HOOBRO Farmhouse Record Stand, model WB40UDRS01. This versatile furniture piece is designed to store vinyl records, accommodate a turntable, and offer convenient charging capabilities with integrated LED lighting.

Image: The HOOBRO Farmhouse Record Stand in a living room setting, showcasing its design and functionality.
2. Safety Information
Please read and understand all safety instructions before assembly and use. Failure to follow these instructions may result in injury or damage to the product.
- Weight Capacity: Do not exceed the recommended weight capacity for each shelf. The top surface is designed for a turntable and small accessories.
- Stability: Ensure the stand is placed on a flat, stable surface to prevent tipping.
- Electrical Safety: The integrated charging station and LED lights require a power source. Ensure all electrical connections are secure and avoid exposing the unit to moisture. Do not overload the power outlets.
- Assembly: Assemble the unit strictly according to the provided instructions. Do not use power tools unless specified, as this may overtighten screws and damage the material.
- Children and Pets: Keep small parts and packaging materials away from children and pets during assembly.
3. Package Contents
Verify that all components are present before beginning assembly. If any parts are missing or damaged, contact customer support.
- 1 x Record Player Stand (unassembled components)
- 1 x Accessory Kit (hardware, tools)
- 1 x Charging Station
- 1 x LED Light Strip
- 1 x Instructions Manual
4. Setup and Assembly
Assembly of the HOOBRO Farmhouse Record Stand is designed to be straightforward. Follow the included step-by-step instructions carefully.
- Unpack Components: Carefully remove all parts from the packaging. Lay them out on a clean, soft surface to prevent scratches.
- Identify Parts: Refer to the parts list in the separate instruction manual to identify each component and hardware piece. All parts are labeled for easy identification.
- Follow Instructions: Assemble the stand by following the detailed diagrams and steps provided in the dedicated assembly manual. Ensure all screws and fasteners are tightened securely.
- Install Charging Station: Integrate the charging station into the designated slot on the side panel. Ensure it is flush and secure.
- Attach LED Light Strip: Adhere the LED light strip to the underside of the top shelf or within the display area as indicated in the assembly manual. Connect it to the power source.
- Cable Management: Utilize the integrated cable hole on the back panel for tidy cord management, especially for the charging station and LED lights.

Image: Dimensional diagram of the record stand, useful for planning placement and understanding component sizes.

Image: Detail of the arc-shaped base, highlighting its design for stability.
5. Operating Instructions
5.1. Charging Station
The record stand features a side-panel power strip to keep your devices connected and powered.
- AC Outlets: Two 125V/12A AC outlets are available for standard electronic devices.
- USB Ports: One 5V/2A USB port and one 5V/2A Type-C port are provided for charging smartphones, tablets, and other USB-powered devices.
- Power Cord: The integrated 4.9-foot power cord connects the charging station to a wall outlet.
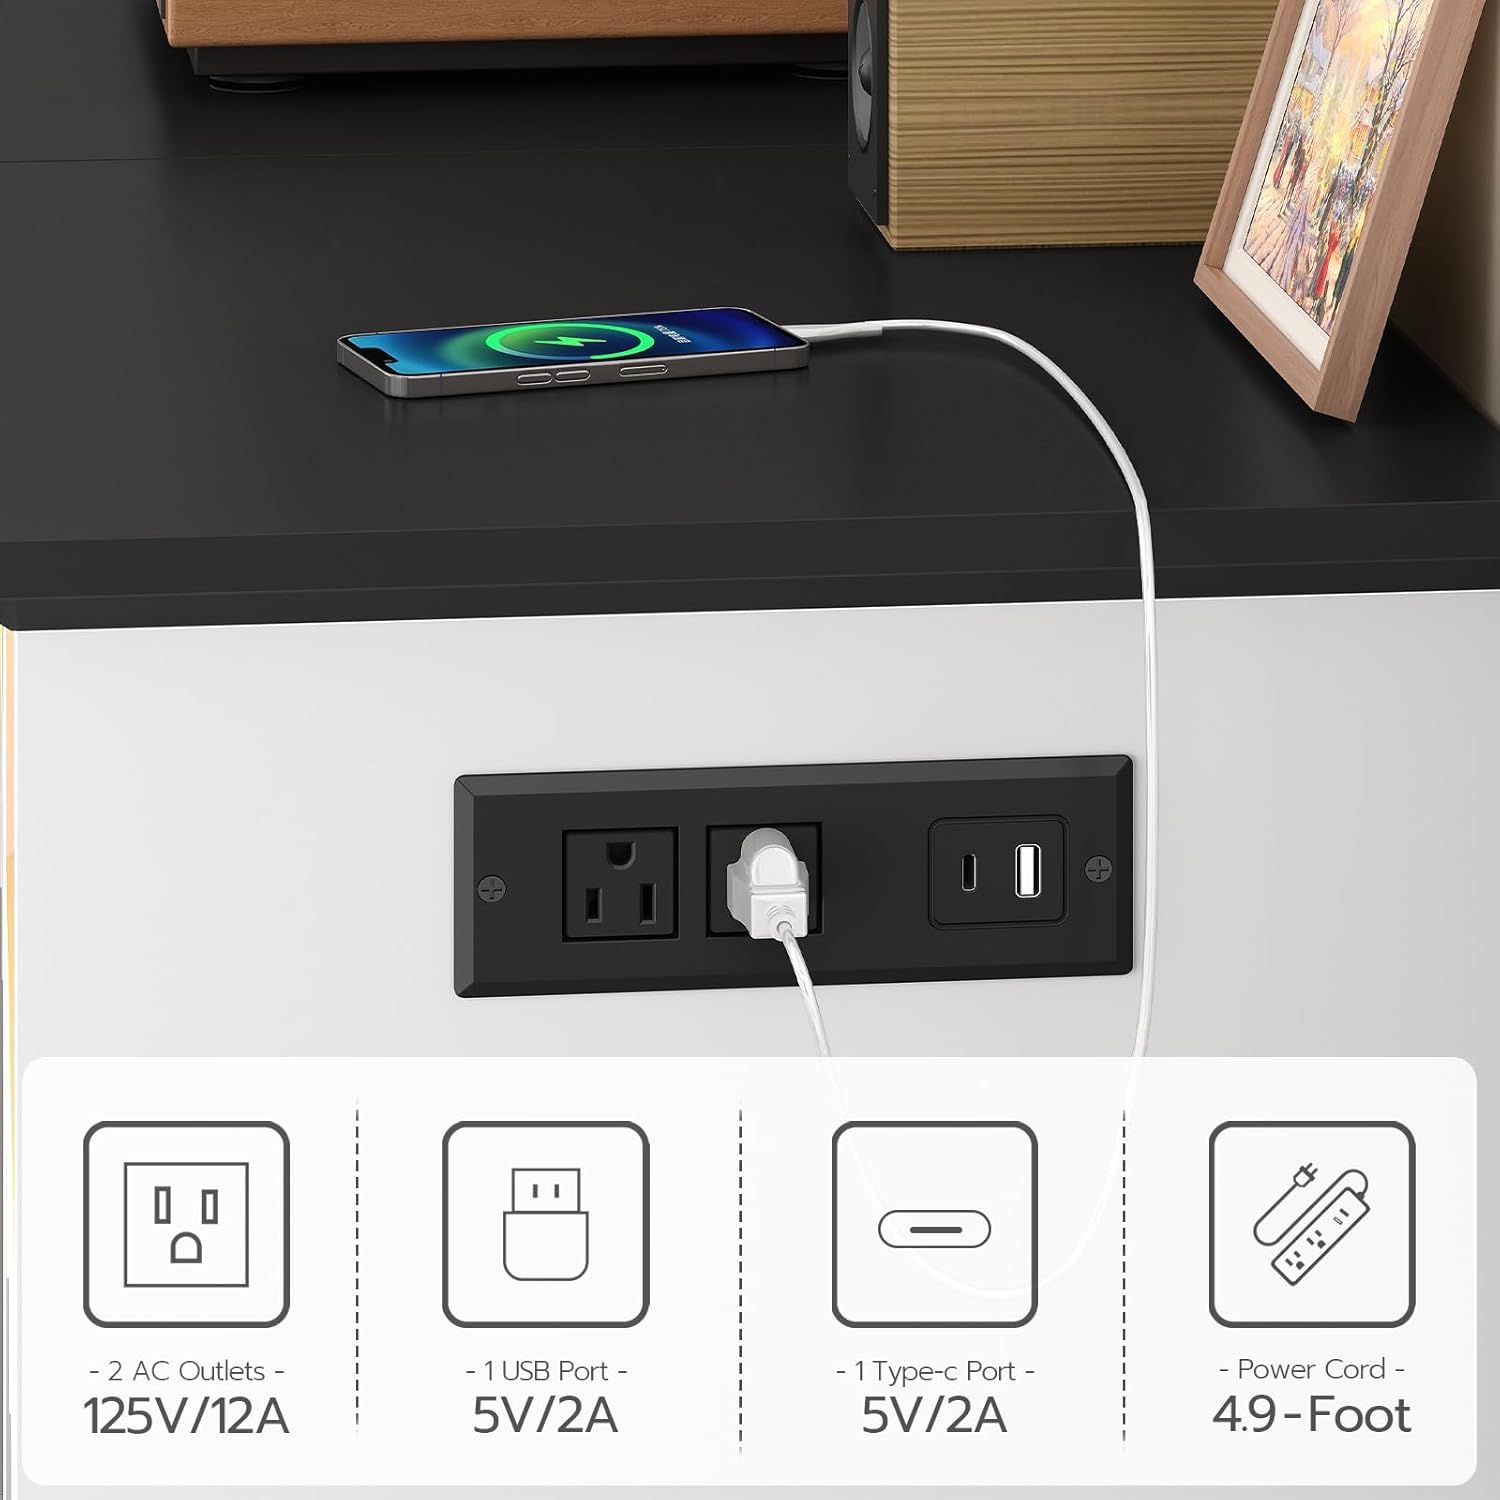
Image: Detailed view of the charging station, showing the types of outlets and ports available.

Image: The integrated cable hole for organized wire management, with a phone charging on the top surface.
5.2. LED Lights
The LED light strip adds ambiance to your space and illuminates the display area.
- Control: Use the provided remote control to operate the LED lights.
- Colors: Choose from 16 vivid colors to match your mood or decor.
- Dynamic Modes: Select from 4 dynamic modes for various lighting effects.
- Brightness: Adjust the light intensity with 6 brightness levels.

Image: The record stand with its LED lights set to a warm yellow, accompanied by the remote control for customization.
5.3. Record Storage
The lower section of the stand is designed for organized vinyl record storage.
- Capacity: The stand can hold up to 230 albums.
- Dividers: The base features dividers that organize records into four sections, keeping your collection neat and accessible.

Image: The compact record holder section, demonstrating how albums are organized into four distinct sections.
5.4. Video Overview
Video: An official HOOBRO video providing an overview of the Record Stand with Charging Station and LED Lights, demonstrating its features and functionality.
6. Maintenance
Proper care will ensure the longevity and appearance of your record stand.
- Cleaning: The smooth finish of the stand is simple to wipe clean. Use a soft, damp cloth for general cleaning. Avoid abrasive cleaners or harsh chemicals that may damage the surface.
- Dusting: Regularly dust the surfaces, especially around the charging station and LED lights, to prevent dust buildup.
- Electrical Components: Ensure the charging station and LED lights remain dry. Do not attempt to clean them with liquids while plugged in.
- Fasteners: Periodically check all screws and fasteners to ensure they remain tight. Retighten if necessary to maintain structural integrity.
7. Troubleshooting
If you encounter issues with your record stand, refer to the following common troubleshooting steps:
- LED Lights Not Working:
- Check if the LED light strip is properly connected to its power source.
- Ensure the remote control has working batteries and is pointed directly at the receiver.
- Verify that the main power cord for the stand is securely plugged into a wall outlet.
- Charging Station Not Powering Devices:
- Confirm the main power cord is plugged into a functional wall outlet.
- Check if the device you are trying to charge is properly connected to the USB or AC outlet.
- Test the charging station with a different device or cable to rule out device-specific issues.
- Ensure the total power draw of connected devices does not exceed the charging station's capacity.
- Stand Feels Unstable:
- Verify that the stand is placed on a level surface.
- Check all assembly screws and tighten any that are loose.
- Ensure the weight distribution on the shelves is balanced.
If these steps do not resolve the issue, please contact customer support.
8. Specifications
| Feature | Detail |
|---|---|
| Model Number | WB40UDRS01 |
| Material | Engineered Wood |
| Color | White and Black |
| Product Dimensions (D x W x H) | 15.7" x 18.9" x 29.9" (40cm x 48cm x 76.5cm) |
| Shelf Type | Tiered Shelf |
| Number of Shelves | 3 |
| Record Storage Capacity | Up to 230 Albums |
| Charging Station | 2 x AC Outlets (125V/12A), 1 x USB Port (5V/2A), 1 x Type-C Port (5V/2A) |
| Power Cord Length | 4.9 feet |
| LED Lights | 16 Colors, 4 Dynamic Modes, 6 Brightness Levels |
| Room Type | Bedroom, Dorm, Living Room, Small Space, Study Room |
| Mounting Type | Tabletop |
| Assembly Required | Yes |
9. Warranty Information
For specific warranty details regarding your HOOBRO Farmhouse Record Stand WB40UDRS01, please refer to the warranty card included with your product or contact the manufacturer directly. Warranty terms typically cover manufacturing defects and material flaws under normal use.
10. Customer Support
If you have any questions, require assistance with assembly, or need to report a missing/damaged part, please contact HOOBRO US customer support through the retailer where the product was purchased or via the official HOOBRO website. Please have your model number (WB40UDRS01) and purchase information ready when contacting support.