1. Important Safety Information
Read all instructions before operating the drone. Failure to follow instructions may result in injury or property damage.
- Age Recommendation: This drone is intended for users aged 14 and older. It is not a toy for children.
- Flight Environment: Operate the drone in open, clear areas, away from people, animals, buildings, and power lines. Avoid flying in strong winds or adverse weather conditions.
- Battery Safety: Use only the provided batteries and charging cables. Do not overcharge or puncture batteries. Dispose of batteries properly.
- Propeller Safety: Keep hands, face, and loose clothing away from rotating propellers. Always power off the drone before handling propellers.
- Line of Sight: Always maintain visual line of sight with the drone during flight.
- Respect Privacy: Be mindful of privacy laws when using the camera features.
2. Package Contents
Verify that all items are present in the package:
- E99 Pro Foldable Drone
- Remote Control
- Rechargeable Drone Batteries (Quantity: 2)
- USB Charging Cable
- Spare Propellers
- Screwdriver
- Carrying Case
- User Manual (this document)

Image: Contents of the E99 Pro Foldable Drone package, including the drone, remote, and carrying case.
3. Component Identification
3.1 Drone Components

Image: The E99 Pro drone in its unfolded state, showing the main body, propellers, and front camera.
- Front Camera: Main 4K HD camera for aerial photography and video.
- Bottom Camera: Secondary 4K HD camera for alternative perspectives and optical flow positioning.
- Propellers: Four rotating blades for flight.
- Motor Arms: Foldable arms holding the motors and propellers.
- Battery Compartment: Located on the underside of the drone.
- Power Button: To turn the drone on/off.
3.2 Remote Control Components

Image: Detailed diagram of the remote control with labels for each button and joystick function.
- Throttle Lever (Left Joystick): Controls altitude (up/down) and rotation (left/right).
- Steering Rod (Right Joystick): Controls forward/backward and left/right movement.
- One Key Up/Landing Button: Initiates automatic takeoff or landing.
- Headless Mode / Return Home (Long Press): Activates headless mode or initiates return to home.
- One Key Correction: For fine-tuning flight stability.
- 3D Roll: Activates 360-degree flip function.
- Left Fly Fine Tuning: Adjusts left/right drift.
- Right Fly Fine Tuning: Adjusts left/right drift.
- Forward Fine-tuning: Adjusts forward/backward drift.
- Backward Fine-tuning: Adjusts forward/backward drift.
- Power Switch: Turns the remote control on/off.
- Phone Holder: Extends to hold a smartphone for FPV viewing.
4. Setup
4.1 Drone Battery Installation and Charging
- Insert the fully charged drone battery into the battery compartment on the drone's underside. Ensure it clicks securely into place.
- To charge, connect the drone battery to the USB charging cable, then plug the USB cable into a 5V/1A USB adapter (not included). The charging indicator will show charging status.
- Charging time is approximately 60-80 minutes per battery.
4.2 Remote Control Battery Installation
- Open the battery cover on the back of the remote control.
- Insert 3 AA batteries (not included) according to the polarity markings.
- Close the battery cover securely.
4.3 Unfolding the Drone
- Gently unfold the front motor arms first, then the rear motor arms, until they are fully extended and locked into position.
- Ensure all arms are securely locked before flight.
4.4 App Download and Connection (FPV)
- Scan the QR code in the manual (or search your app store) for the recommended FPV application.
- Install the application on your smartphone.
- Turn on the drone and the remote control.
- On your smartphone, connect to the drone's Wi-Fi network (usually named 'WIFI-XXXXXX').
- Open the FPV application to view the live camera feed and access additional controls.
5. Operating Instructions
5.1 Power On/Off and Pairing
- Press and hold the power button on the drone until the indicator lights turn on.
- Press the power switch on the remote control. The remote will beep.
- Push the left joystick (throttle) fully up, then fully down. The remote will beep, and the drone lights will become solid, indicating successful pairing.
5.2 Gyroscope Calibration
- After pairing, place the drone on a flat, level surface.
- Push both joysticks down and to the bottom-left corner simultaneously for 2-3 seconds. The drone lights will flash rapidly and then become solid, indicating successful calibration.
5.3 Takeoff and Landing
- One-Key Takeoff: Press the 'One Key Up/Landing' button once. The drone will automatically ascend to a stable hovering height.
- Manual Takeoff: Push both joysticks down and to the bottom-right corner to unlock the motors. Then, slowly push the left joystick (throttle) up to ascend.
- One-Key Landing: Press the 'One Key Up/Landing' button once. The drone will automatically descend and land.
- Manual Landing: Slowly pull the left joystick (throttle) down until the drone lands. Once landed, pull both joysticks down and to the bottom-right corner to stop the motors.
5.4 Basic Flight Controls
- Altitude: Push the left joystick up to ascend, pull down to descend.
- Rotation: Push the left joystick left to rotate counter-clockwise, push right to rotate clockwise.
- Forward/Backward: Push the right joystick up to fly forward, pull down to fly backward.
- Left/Right Sideways Flight: Push the right joystick left to fly left, push right to fly right.
5.5 Advanced Flight Features
- Speed Modes: Press the speed button on the remote to cycle through 3 different speed settings (low, medium, high).
- Headless Mode: Press the 'Headless Mode' button. In this mode, the drone's orientation is relative to the pilot, regardless of the drone's front direction. Press again to exit.
- 360° Flips: Fly the drone to a height of at least 3 meters. Press the '3D Roll' button, then push the right joystick in any direction to perform a flip.
- Wind Resistance: The drone is designed with upgraded motors for stable flight in light wind conditions. Avoid flying in strong winds.

Image: The E99 Pro drone demonstrating its wind-resistant capabilities during flight.
5.6 Camera Operation

Image: Diagram illustrating the E99 Pro's dual camera system, showing the main lens, 90-degree adjustment, and 120-degree wide angle view.
- Photo: While connected to the FPV app, tap the photo icon to capture still images.
- Video: While connected to the FPV app, tap the video icon to start recording. Tap again to stop.
- FPV Live Video: The FPV app provides a real-time view from the drone's camera to your smartphone.
- Camera Switching: Use the app to switch between the front and bottom 4K HD cameras.
6. Maintenance
- Cleaning: Use a soft, dry cloth to clean the drone and remote control. Do not use water or solvents.
- Propeller Replacement: If a propeller is damaged, use the provided screwdriver to remove the screw, replace the propeller with a spare, and re-secure the screw. Ensure correct propeller (A or B) is installed on the corresponding motor arm.
- Battery Care: Store batteries in a cool, dry place. Do not store fully charged or fully depleted for extended periods. Charge them to about 50% for long-term storage.
- Storage: Fold the drone arms and store the drone and remote in the carrying case when not in use to protect them from damage.
7. Troubleshooting
| Problem | Possible Cause | Solution |
|---|---|---|
| Drone does not respond to remote. | Not paired; low battery; interference. | Re-pair drone and remote; charge batteries; move to an area with less interference. |
| Drone flies erratically or drifts. | Not calibrated; damaged propeller; uneven surface for takeoff. | Perform gyroscope calibration; replace damaged propellers; take off from a flat surface. |
| FPV app shows no image or disconnects. | Wi-Fi not connected; app error; weak signal. | Ensure phone is connected to drone's Wi-Fi; restart app and drone; fly closer to the drone. |
| Drone does not take off. | Motors not unlocked; low battery. | Unlock motors (joysticks down-right); charge drone battery. |
8. Specifications
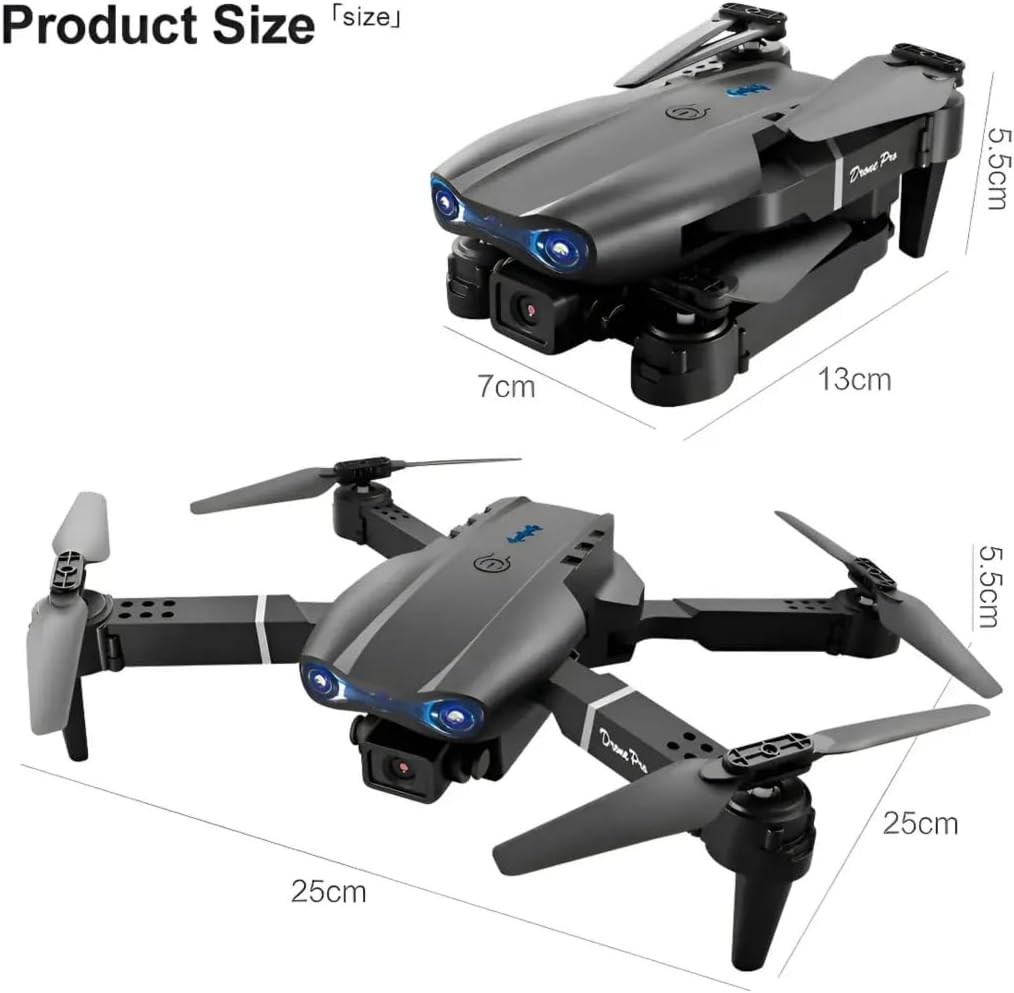
Image: Dimensions of the E99 Pro drone in both folded and unfolded states.
| Feature | Detail |
|---|---|
| Model Name | E99 |
| Brand | Generic |
| Video Capture Resolution | 4K |
| Effective Still Resolution | 8 MP |
| Connectivity Technology | Bluetooth, Wi-Fi |
| Skill Level | All |
| Item Weight | 340 Grams (12 ounces) |
| Drone Battery Capacity | 1800 Milliamp Hours (per battery) |
| Control Type | Remote Control |
| Material | Plastic |
| Product Dimensions (Unfolded) | 9.84"L x 9.84"W x 2.17"H (25cm x 25cm x 5.5cm) |
| Remote Control Batteries | 3 AA batteries (not included) |
9. Warranty and Support
For warranty information or technical support, please refer to the contact details provided by your retailer or the manufacturer's official website.
Keep your purchase receipt as proof of purchase for any warranty claims.