1. Introduction
Thank you for purchasing the PARTPHONER Floor Lamp with Table. This versatile unit combines a functional floor lamp with a multi-tiered side table, designed to enhance your living space with both illumination and storage. This manual provides essential information for safe assembly, operation, and maintenance of your new product. Please read all instructions carefully before use.
2. Safety Instructions
- Ensure all components are securely fastened before use to prevent tipping.
- Do not exceed the maximum weight capacity of 50 lb per shelf.
- This product is intended for indoor use only. Do not expose to moisture or extreme temperatures.
- Always unplug the lamp from the power outlet before cleaning or replacing the bulb.
- Use only the specified bulb type (E26, 9W LED) to avoid electrical hazards or damage to the lamp.
- Keep the power cord away from heat sources, sharp edges, and moving parts.
- Do not attempt to modify or repair the lamp yourself. Contact qualified personnel for service.
3. Package Contents
Verify that all parts are present before beginning assembly. If any parts are missing or damaged, please contact customer support.
- Lamp Head with Shade
- Lamp Pole Sections
- Table Shelves (3 pieces)
- Table Support Poles
- Hardware Pack (screws, Allen wrench)
- 9W 3CCT LED Bulb
- Instruction Manual

Description: This image displays all the individual components of the PARTPHONER Floor Lamp with Table laid out, including the three wooden shelves, the metal support poles, the lamp pole, the lamp head with its linen shade, the included LED bulb, and a small bag of assembly hardware.
4. Setup and Assembly
Assembly of the PARTPHONER Floor Lamp with Table is designed to be quick and straightforward, typically taking less than 10 minutes. No additional tools are required beyond the included Allen wrench.
- Unpack Components: Carefully remove all parts from the packaging and lay them out on a clean, flat surface. Refer to the 'Package Contents' section to ensure all items are present.
- Assemble Table Base: Attach the table support poles to the bottom shelf using the provided screws and Allen wrench. Then, attach the middle and top shelves in sequence, ensuring all connections are secure.
- Assemble Lamp Pole: Connect the lamp pole sections together by twisting them clockwise until snug.
- Attach Lamp to Table: Insert the base of the assembled lamp pole into the designated opening on the top table shelf. Secure it firmly.
- Install Bulb: Screw the included 9W 3CCT LED bulb into the lamp socket.
- Attach Lamp Shade: Secure the lamp shade to the lamp head according to the instructions provided with the shade.
- Position and Connect: Place the assembled lamp and table in your desired location. Plug the power cord into a standard 120V AC outlet.
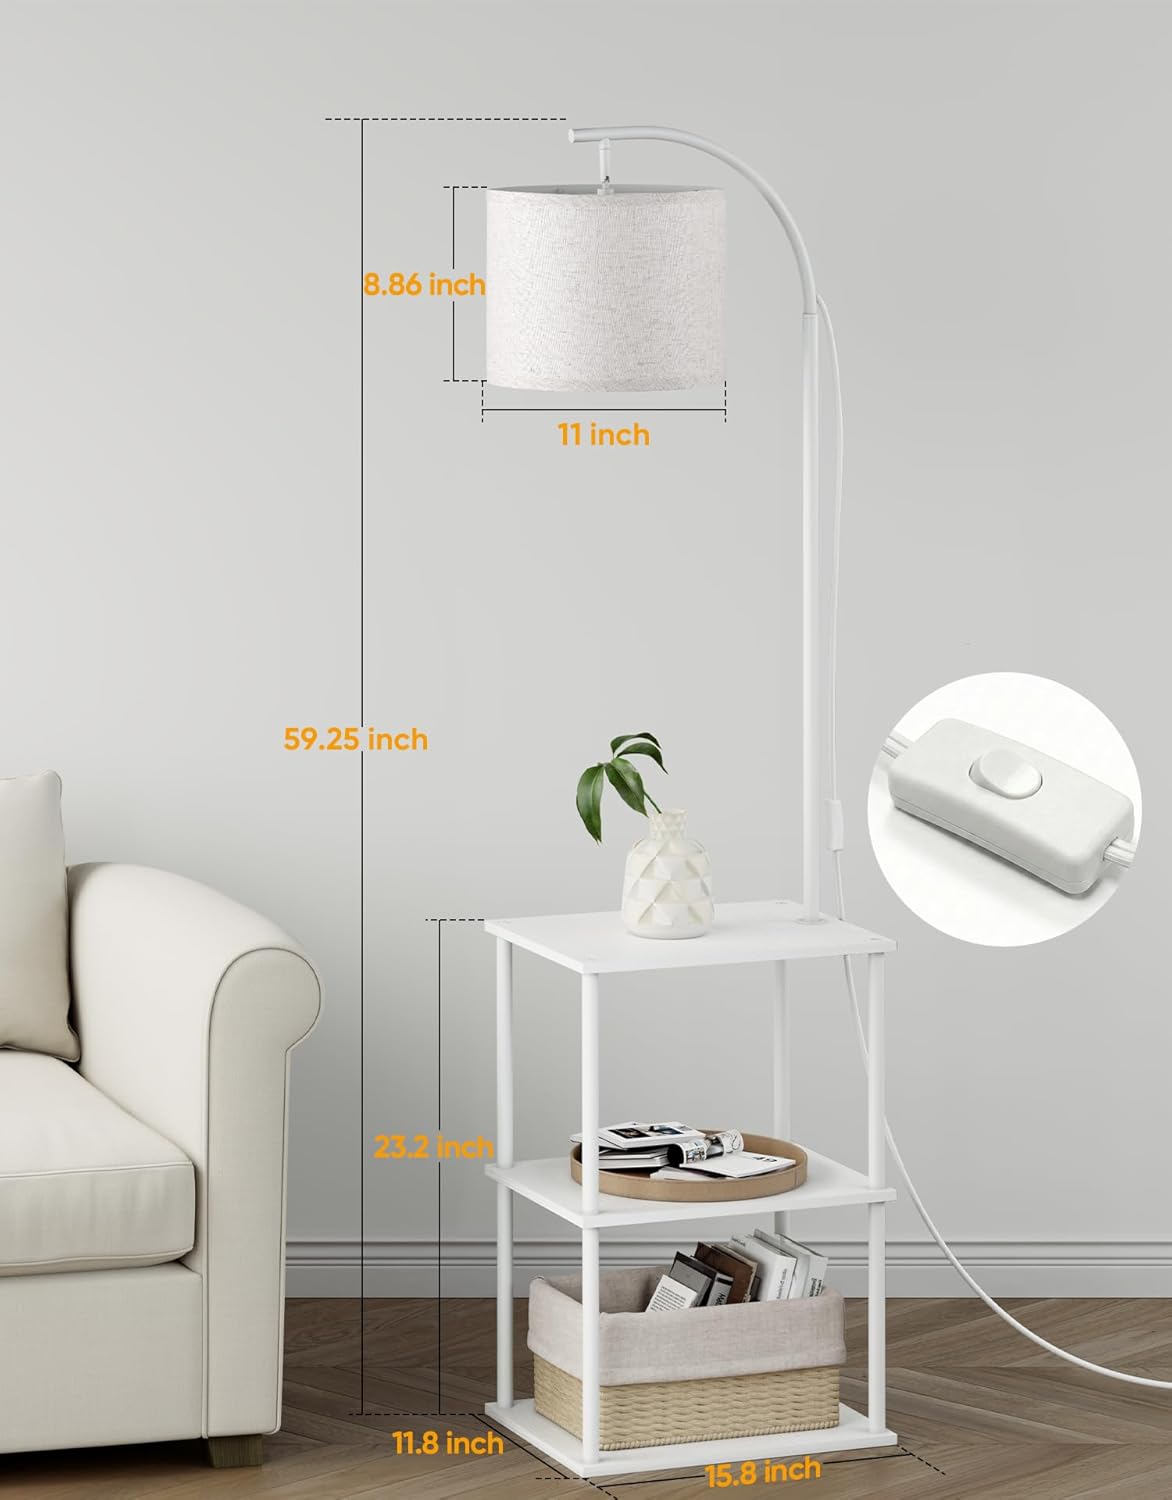
Description: This image provides a visual representation of the lamp's dimensions, including its overall height of 59.25 inches, the width and depth of the shelves (11.8 inches by 15.8 inches), and the lamp shade's height (8.86 inches) and diameter (11 inches). This helps users understand the product's footprint.
5. Operating Instructions
5.1 Power On/Off and Color Temperature Adjustment
The lamp features a convenient rocker switch located on the power cord for easy operation. The included 3CCT LED bulb allows you to select from three different color temperatures:
- Warm White (2700K): Provides a cozy and inviting ambiance.
- Neutral White (4000K): Offers a balanced and natural light, suitable for general tasks.
- Cool White (5000K): Delivers bright, crisp light ideal for focused work or reading.
To cycle through the color temperatures, simply toggle the rocker switch off and on. Each toggle will switch to the next available color temperature.

Description: This image visually demonstrates the three distinct color temperatures available from the included LED bulb: Warm 2700K (yellowish light), Neutral 4000K (balanced white light), and Cold 5000K (bluish-white light). A close-up of the rocker switch is also shown.
5.2 Adjustable Lamp Head
The lamp head features a 180-degree swivel mechanism, allowing you to direct the light precisely where needed. This is particularly useful for reading, working, or highlighting specific areas.

Description: This image illustrates the flexibility of the lamp head, showing it can be rotated up to 180 degrees to direct light. Multiple smaller images show the lamp shade tilted at various angles, from straight down to angled outwards.
6. Maintenance
6.1 Cleaning
- Always unplug the lamp before cleaning.
- Wipe the metal and wood surfaces with a soft, dry cloth. For stubborn marks, a slightly damp cloth can be used, followed by immediate drying.
- Dust the fabric lamp shade gently with a soft brush or lint roller. Do not use liquid cleaners on the shade.
- Avoid using abrasive cleaners, solvents, or harsh chemicals, as these can damage the finish.
6.2 Bulb Replacement
- Ensure the lamp is unplugged and the bulb has cooled completely before attempting to replace it.
- Carefully unscrew the old bulb from the socket.
- Screw in a new E26 base, 9W LED bulb. Using a bulb with different wattage or type may damage the lamp or pose a fire hazard.
7. Troubleshooting
| Problem | Possible Cause | Solution |
|---|---|---|
| Lamp does not turn on. | 1. Power cord not plugged in. 2. Bulb is loose or faulty. 3. Power outlet is not working. | 1. Ensure the power cord is securely plugged into a working outlet. 2. Tighten or replace the bulb. 3. Test the outlet with another device. |
| Bulb does not change color temperature. | 1. Bulb is not a 3CCT type. 2. Rapid toggling of switch. | 1. Ensure you are using the provided 3CCT LED bulb or a compatible replacement. 2. Toggle the rocker switch off and on with a brief pause in between to allow the bulb to register the change. |
| Lamp is unstable or wobbles. | 1. Screws are loose. 2. Uneven surface. | 1. Check and tighten all assembly screws. 2. Place the lamp on a flat, level surface. |
8. Specifications
| Feature | Detail |
|---|---|
| Model Number | STR-FL-0219-white |
| Product Dimensions | 15.8"D x 11.8"W x 59.25"H |
| Item Weight | 9 Pounds |
| Material Type | Metal, Wood |
| Finish Type | Veneered |
| Shade Material | Linen |
| Shade Color | Beige |
| Bulb Base | E26 |
| Light Source Type | LED |
| Wattage | 9 watts |
| Voltage | 120 Volts |
| Switch Type | Rocker |
| Additional Features | 3 Color Temperature (2700K/4000K/5000K) |
| Indoor/Outdoor Usage | Indoor |
9. Warranty and Support
9.1 Manufacturer Warranty
This PARTPHONER product is covered by a 1-year manufacturer's warranty from the date of purchase. This warranty covers defects in materials and workmanship under normal use. It does not cover damage resulting from misuse, accidents, unauthorized modifications, or normal wear and tear.
9.2 Customer Support
For warranty claims, technical assistance, or any questions regarding your PARTPHONER Floor Lamp with Table, please contact our customer support team. Refer to your purchase documentation or the PARTPHONER official website for the most current contact information.