OuterMust PH01
OuterMust 110,000 BTU Pellet Patio Heater Instruction Manual
Model: PH01
1. Introduction
Thank you for choosing the OuterMust 110,000 BTU Pellet Patio Heater. This manual provides essential information for the safe and efficient operation, maintenance, and troubleshooting of your new outdoor heating appliance. Please read this manual thoroughly before assembly, installation, or operation, and retain it for future reference.
This patio heater is designed to provide powerful and efficient warmth for outdoor spaces, utilizing both wood and pellets as fuel.

Figure 1.1: OuterMust 110,000 BTU Pellet Patio Heater. This image shows the complete assembled heater from the front, highlighting its black and stainless steel finish, the tall chimney, and the tempered glass viewing window.
2. Important Safety Information
WARNING: Failure to follow these instructions could result in fire, explosion, property damage, personal injury, or death.
- Outdoor Use Only: This heater is designed for outdoor use only. Do not operate indoors or in enclosed spaces.
- Clearance to Combustibles: Maintain a minimum clearance of 3 feet (0.9 meters) from the top and sides of the heater to any combustible materials (e.g., walls, furniture, trees, dry leaves).
- Fuel Type: Use only dry wood pellets or seasoned firewood as fuel. Do not use gasoline, kerosene, lighter fluid, or other highly flammable liquids.
- Ventilation: Ensure adequate ventilation around the heater during operation.
- Wind Conditions: Do not operate the heater in strong or gusty wind conditions, as this may affect combustion efficiency and safety.
- Hot Surfaces: The heater surfaces become extremely hot during operation. Avoid direct contact. Use protective gloves when handling components during or after use.
- Children and Pets: Keep children and pets away from the heater at all times.
- Moving the Heater: Allow the heater to cool completely before attempting to move it. Use the integrated swivel casters for mobility.
- Ash Removal: Only remove ash when the heater is completely cool.
- Supervision: Never leave a burning heater unattended.
- Level Surface: Always operate the heater on a firm, level, non-combustible surface.
3. Product Components
Familiarize yourself with the main components of your OuterMust Pellet Patio Heater:
- Main Heater Body: The primary structure housing the combustion chamber.
- Chimney/Flue Pipe: Directs exhaust gases safely upwards.
- Tempered Glass Window: Allows observation of the flame and enhances heat radiation.
- Pellet Hopper: Top-loading compartment for storing pellets, designed for self-feeding.
- Fuel Regulator: A sliding control rod to adjust the pellet feed quantity.
- Combustion Chamber: Where fuel is burned.
- Pull-out Ash Drawer: Located at the bottom for easy ash collection and removal.
- Swivel Casters: Four wheels for effortless mobility, two with locking mechanisms.
- Airflow Control: System for adjusting the intensity of the fire.

Figure 3.1: View of the heater with the front door open, showing the internal burning basket and ash collection area. This illustrates the robust construction and accessibility for cleaning.
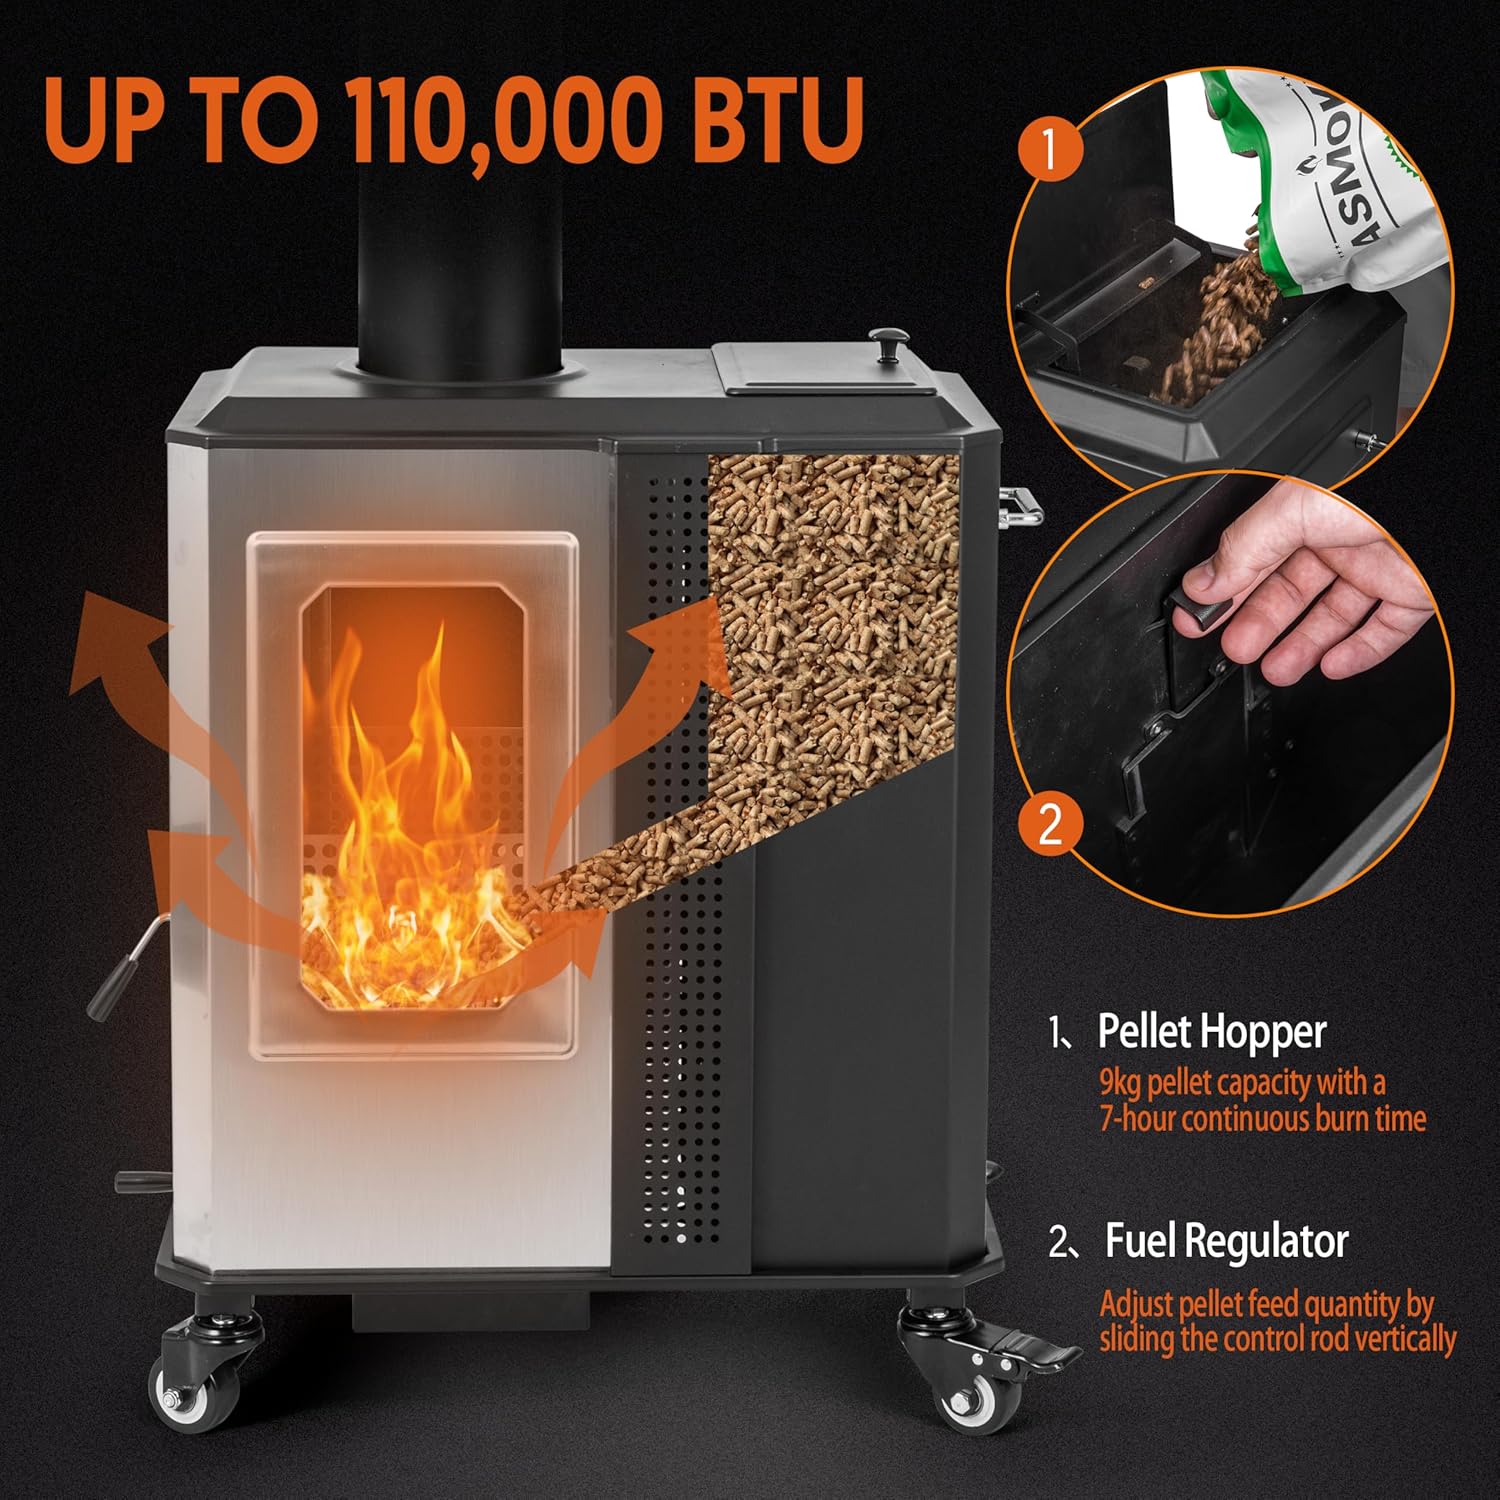
Figure 3.2: Detailed diagram showing the pellet hopper (1) and the fuel regulator (2). The pellet hopper has a 9kg capacity for continuous burn, and the fuel regulator allows adjustment of pellet feed by sliding the control rod vertically.
4. Setup and Initial Placement
4.1 Unpacking and Assembly
Carefully remove all components from the packaging. Inspect for any damage during transit. Refer to the assembly diagram (if provided separately) for detailed steps. Typically, assembly involves attaching the chimney section to the main heater body and ensuring all connections are secure.
4.2 Placement
- Choose a firm, level, non-combustible surface for the heater.
- Ensure the heater is placed outdoors in an open area, away from windows, doors, and air intakes.
- Maintain the minimum clearances to combustible materials as specified in the Safety Information section (Section 2).
- Lock the two casters to secure the heater in place once positioned.
5. Operating Instructions
5.1 Fueling the Heater
The OuterMust Pellet Patio Heater is designed to burn both wood pellets and seasoned firewood. For optimal performance and cleaner burning, dry wood pellets are recommended.
- Open the lid of the pellet hopper located on top of the heater.
- Carefully pour dry wood pellets into the hopper. The hopper has a capacity of approximately 9kg, providing up to 7 hours of continuous burn time.
- Alternatively, small pieces of seasoned firewood can be placed directly into the combustion chamber through the front door.
- Close the hopper lid securely after fueling.

Figure 5.1: Image demonstrating the process of filling the pellet hopper with wood pellets. The hopper is located on the top of the heater, accessible via a hinged lid.
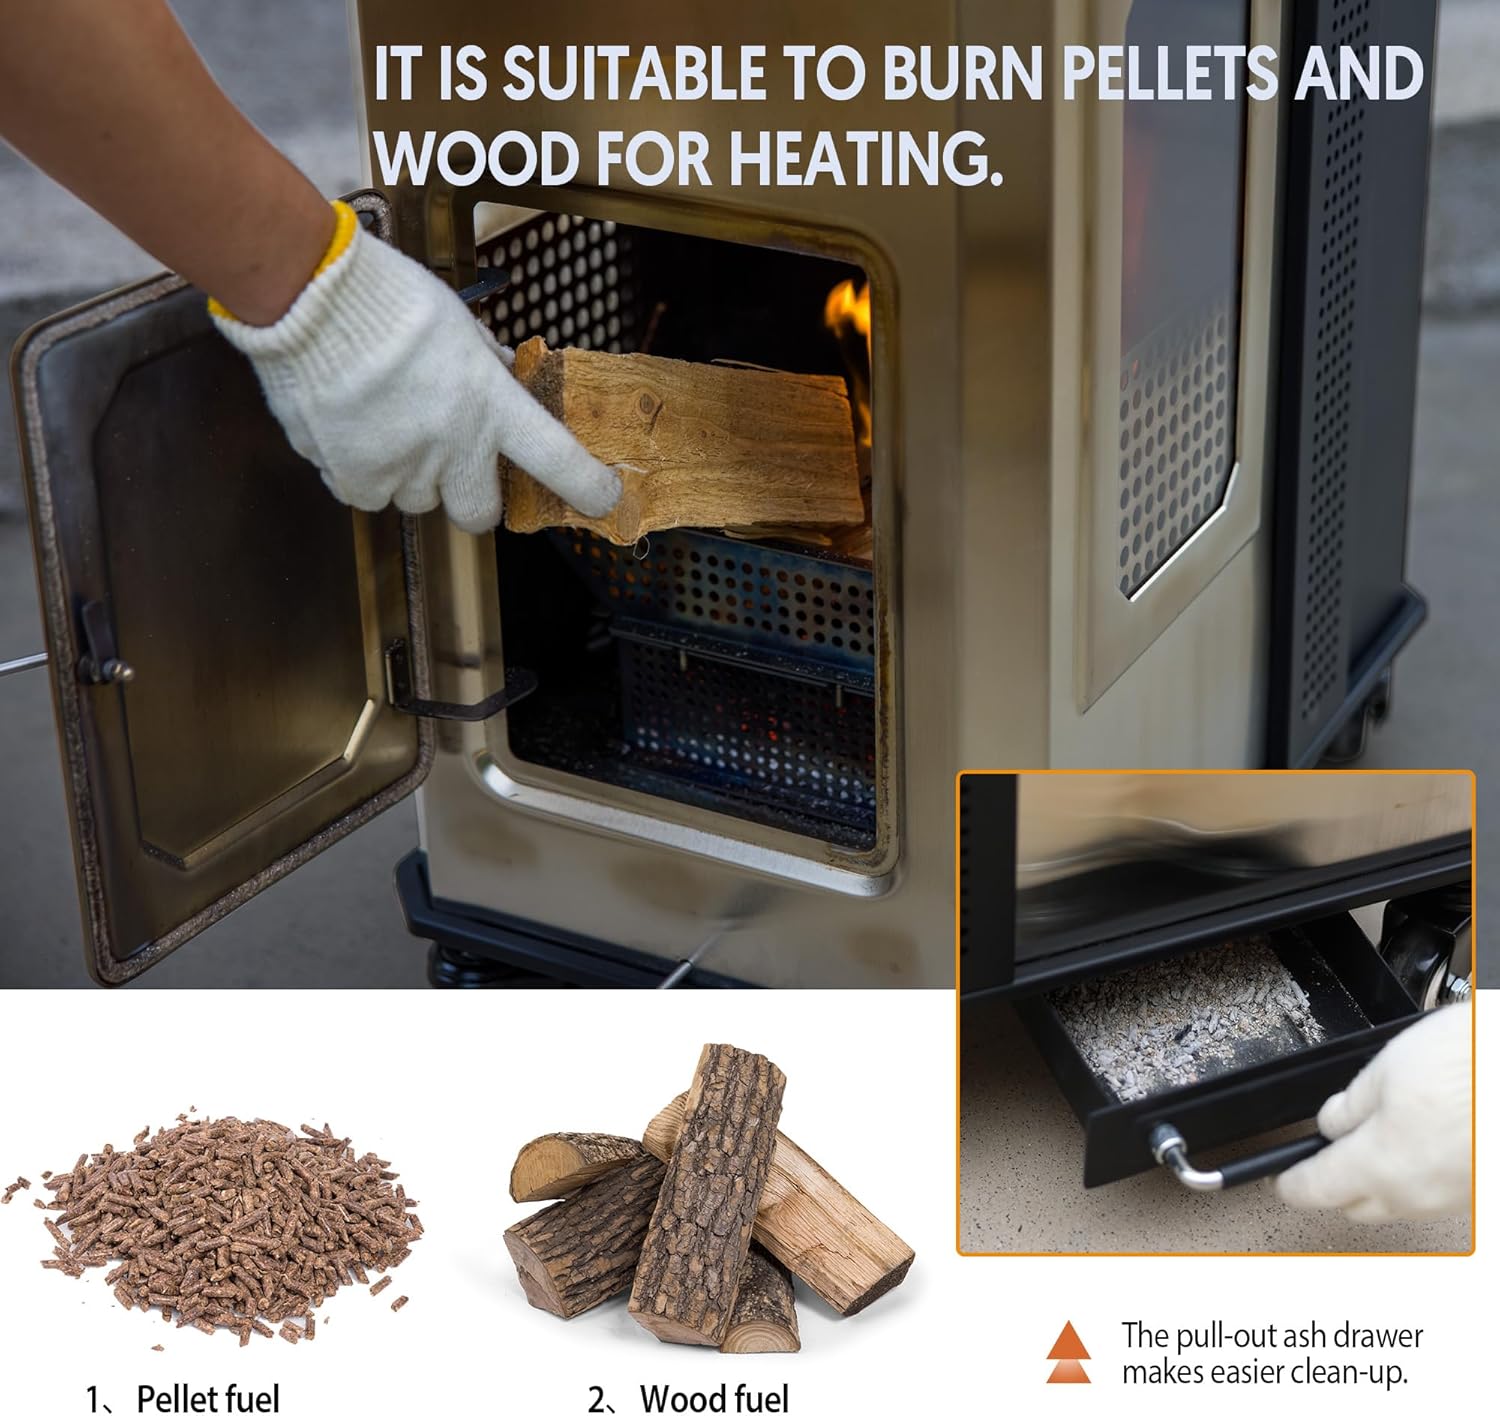
Figure 5.2: This image shows the versatility of the heater, capable of burning both pellet fuel (1) and wood fuel (2). It also highlights the convenient pull-out ash drawer for easy cleanup.
5.2 Ignition
- Ensure the combustion chamber is clear of excessive ash.
- Place a small amount of kindling (e.g., paper, small wood chips) and a fire starter (e.g., natural firelighter) into the combustion chamber.
- Light the fire starter.
- Once the kindling is burning, slowly add a small amount of pellets or wood.
- Close the front door securely.
5.3 Adjusting Heat Output
- Fuel Regulator: For pellet burning, adjust the fuel regulator (sliding control rod) to control the rate at which pellets feed into the combustion chamber. Sliding it up increases feed, sliding it down decreases feed.
- Airflow Control: The precisely adjustable airflow system allows you to control the intensity of the fire. Refer to the specific lever or dial on your unit for adjustment. More airflow generally leads to a hotter, more vigorous flame.
5.4 Shutting Down
To shut down the heater, simply stop adding fuel. The fire will gradually die down. Do not use water to extinguish the fire, as this can damage the unit. Allow the heater to cool completely before moving or performing maintenance.
6. Maintenance
Regular maintenance ensures the longevity and safe operation of your patio heater. Always ensure the heater is completely cool before performing any maintenance.
6.1 Ash Removal
- The integrated pull-out ash drawer makes ash cleanup effortless.
- Once the heater is cool, pull out the ash drawer from the bottom of the unit.
- Dispose of ash in a metal container with a tight-fitting lid, away from combustible materials.
- Ensure the ash drawer is fully reinserted before operating the heater.
6.2 Cleaning the Tempered Glass Window
Use a soft cloth and a non-abrasive glass cleaner specifically designed for wood stove glass. Avoid harsh chemicals or abrasive pads that could scratch the glass.
6.3 Chimney Inspection and Cleaning
Monthly checking of the chimney tightness is recommended to ensure there is no particle build-up or deformation. If significant creosote or soot build-up is observed, the chimney should be cleaned by a qualified professional.
6.4 General Cleaning and Storage
Wipe down the exterior surfaces with a damp cloth. For long-term storage, especially during off-season, clean the heater thoroughly, ensure it is dry, and store it in a covered, dry location to protect it from the elements.
7. Troubleshooting
This section addresses common issues you might encounter with your pellet patio heater.
| Problem | Possible Cause | Solution |
|---|---|---|
| Heater not igniting or difficult to light. |
|
|
| Low heat output. |
|
|
| Excessive smoke. |
|
|
| Difficulty moving the heater. |
|
|
8. Product Specifications
The following are the technical specifications for the OuterMust Pellet Patio Heater (Model PH01):
| Brand | OuterMust |
| Model Number | PH01 |
| ASIN | B0FPX771HX |
| UPC | 784300303510 |
| Color | Black |
| Form Factor | Tower |
| Indoor/Outdoor Usage | Outdoor |
| Product Dimensions (D x W x H) | 24.4"D x 17.5"W x 80.3"H |
| Mounting Type | Floor Mount |
| Heat Output | 110,000 BTU per Hour |
| Fuel Type | Wood, Pellets |
| Item Weight | 122.5 pounds |
| Special Features | Detachable Filter, SUS 304 Stainless Steel, Tempered Glass Shield material: SPCC Cold-Rolled Carbon Steel |
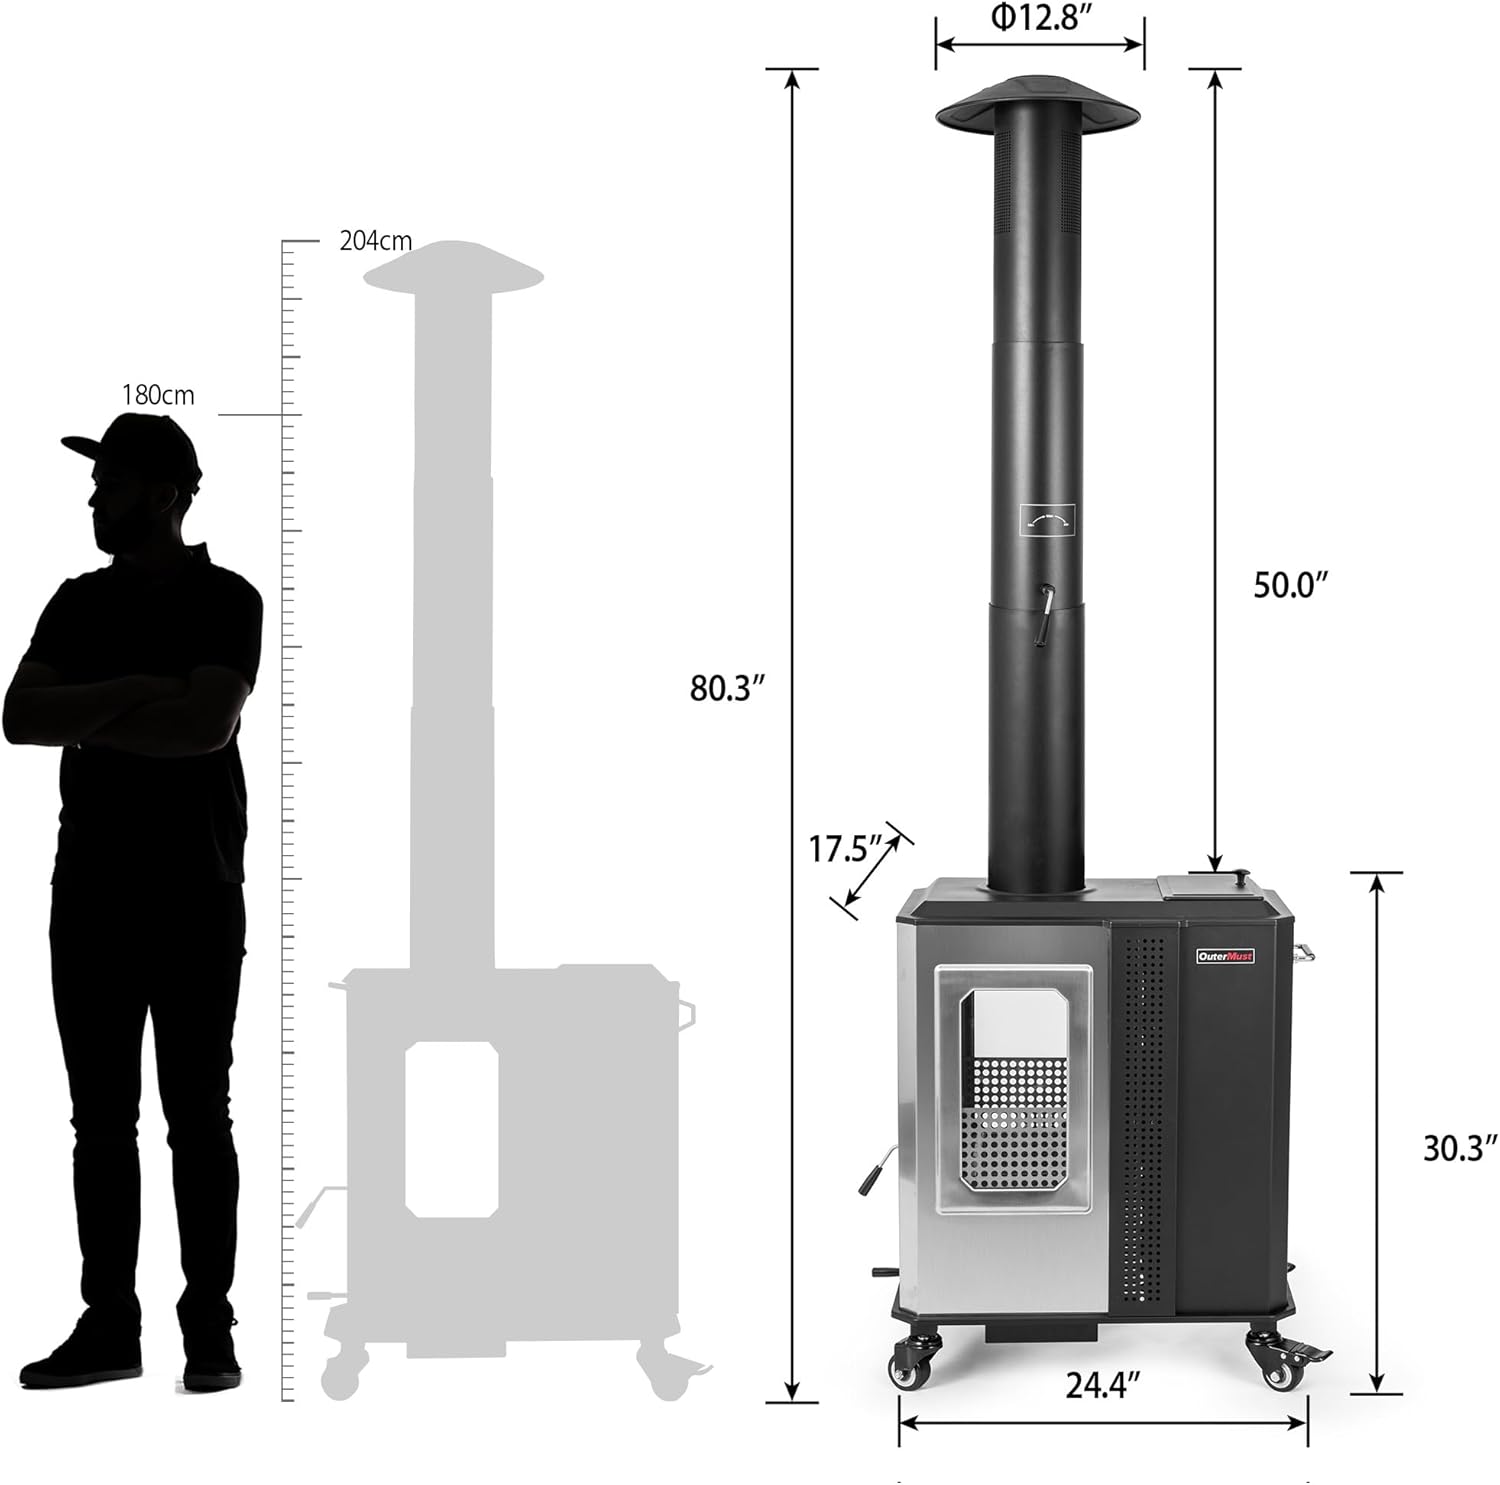
Figure 8.1: Dimensional drawing of the OuterMust Pellet Patio Heater, showing its height (80.3 inches), width (17.5 inches), and depth (24.4 inches), along with chimney dimensions.
9. Warranty and Customer Support
For information regarding warranty coverage, please refer to the warranty card included with your product or visit the official OuterMust website.
If you have any questions, require technical assistance, or need to report an issue, please contact OuterMust customer support.
- Online Support: Visit the OuterMust official website for FAQs and support resources.
- Contact Information: Refer to your product packaging or the OuterMust website for the most current contact details (phone, email).
Ask a question about this manual
Ask about setup, troubleshooting, compatibility, parts, safety, or missing instructions. Manuals+ will review the question and use this page’s manual context to help answer it.