1. Introduction
Thank you for choosing the PARTPHONER Floor Lamp with Integrated Table. This versatile unit combines a functional floor lamp with a multi-tiered side table, designed to enhance your living space with both illumination and storage. It features a 3CCT LED bulb for adjustable lighting and a 180-degree swivel lamp head for directional light. This manual provides essential information for safe assembly, operation, and maintenance of your new product.

Figure 1: PARTPHONER Floor Lamp with Integrated Table in a living room.
2. Safety Instructions
- Read all instructions before assembly and use.
- Unplug the lamp from the power outlet before cleaning or replacing the bulb.
- Do not expose the lamp to water or excessive moisture.
- Ensure the lamp is placed on a stable, level surface to prevent tipping.
- Do not exceed the maximum weight capacity of 50 lb per shelf.
- Keep children and pets away from the lamp during operation and assembly.
- Use only the specified bulb type (E26 base, 9W LED bulb included).
3. What's in the Box
Verify that all components are present before beginning assembly:
- Floor Lamp Pole (Arc and Straight Sections)
- Linen Fabric Shade
- Table Shelves (3 pieces)
- Metal Support Poles for Shelves
- 9W 3CCT LED Bulb (E26 base)
- Assembly Hardware (screws, Allen wrench)
- Instruction Manual

Figure 2: All components for the PARTPHONER Floor Lamp with Table.
4. Assembly Instructions
Assembly is designed to be quick and straightforward, typically taking around 10 minutes. No additional tools are required beyond what is provided.
- Prepare the Base: Place the bottom shelf on a clean, flat surface. Attach the four short metal support poles to the corners of the bottom shelf using the provided screws and Allen wrench.
- Add Middle Shelf: Carefully place the middle shelf onto the top of the four short metal support poles. Secure it with screws.
- Attach Top Shelf: Place the top shelf onto the top of the next set of four short metal support poles. Secure it with screws.
- Assemble Lamp Pole: Connect the straight sections of the lamp pole, ensuring the electrical cord runs through the center.
- Attach Lamp Pole to Table: Insert the bottom end of the assembled lamp pole into the designated hole on the top shelf of the table. Secure it firmly.
- Install Lamp Head: Attach the curved section of the lamp pole, which holds the bulb socket, to the top of the straight lamp pole.
- Install Bulb and Shade: Screw the included 9W 3CCT LED bulb into the lamp socket. Then, attach the linen fabric shade to the lamp head.
- Cable Management: Use the provided cable clips to secure the power cord along the lamp pole for a neat appearance.

Figure 3: Assembled table shelves with items, demonstrating storage capacity.
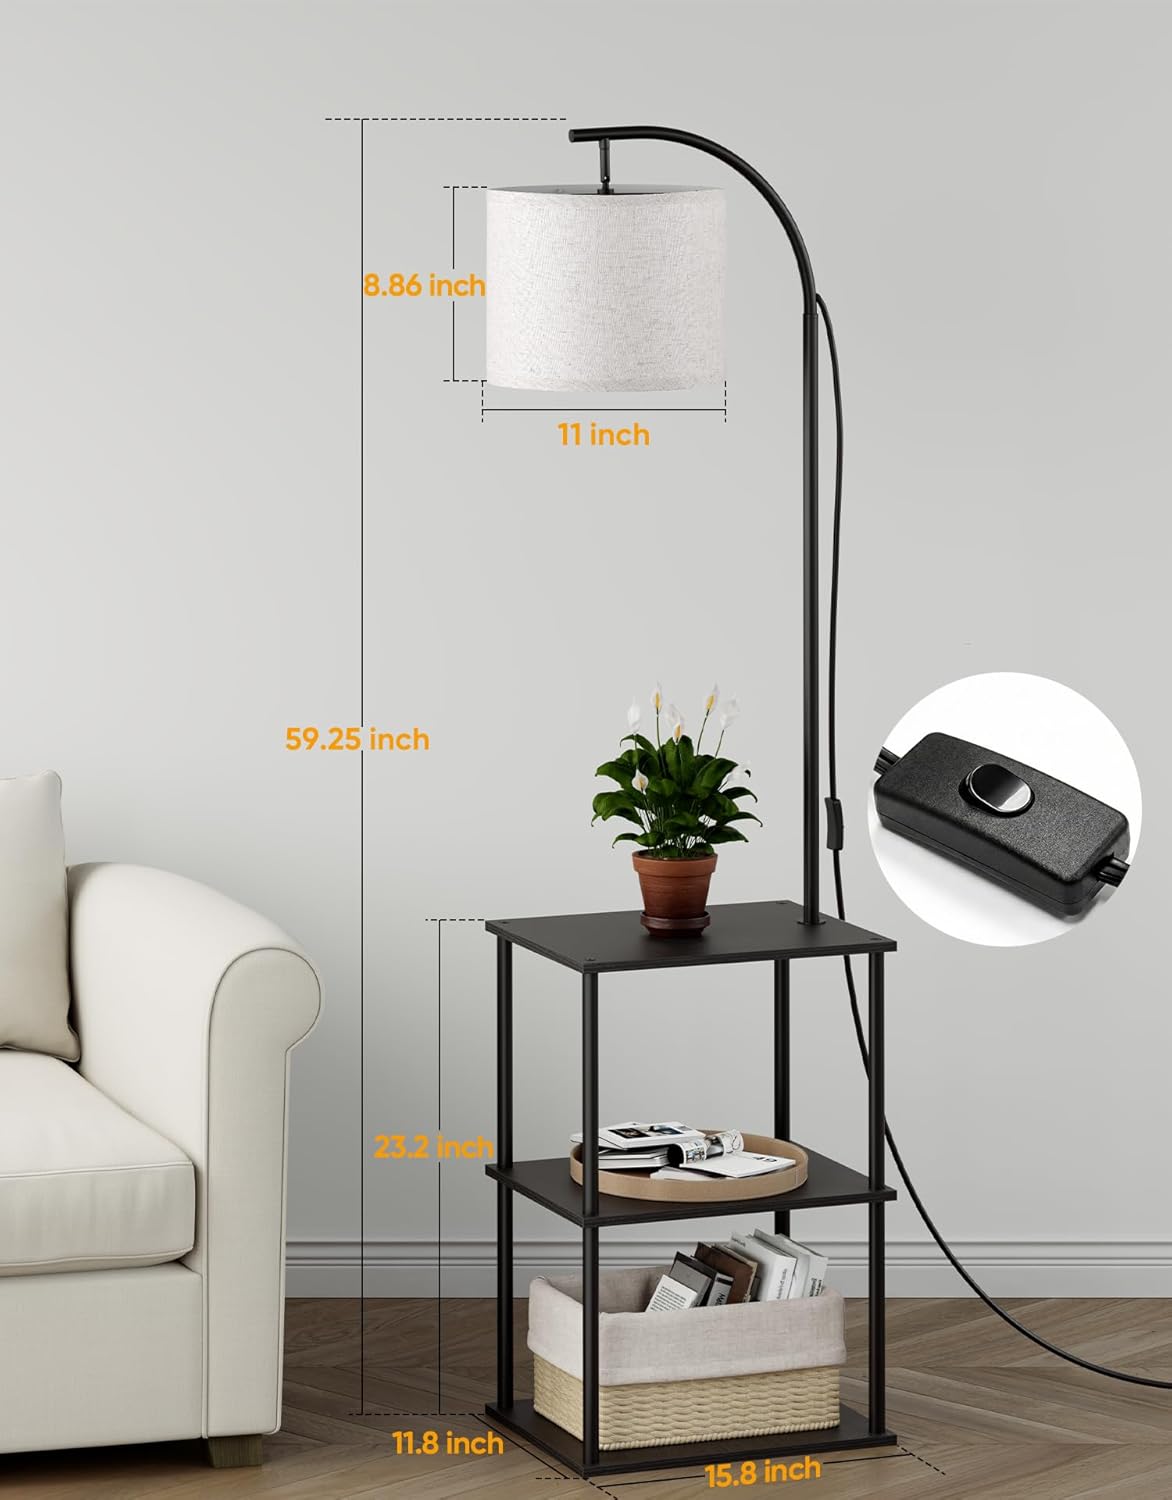
Figure 4: Product dimensions for placement reference.
5. Operating Instructions
5.1 Power On/Off and Color Temperature Adjustment
The lamp is equipped with a rocker switch on the power cord for easy operation. The included 9W LED bulb offers three color temperature settings:
- Warm White (2700K): For a cozy and relaxing ambiance.
- Neutral White (4000K): For general illumination and everyday tasks.
- Cool White (5000K): For bright, focused lighting ideal for reading or working.
To cycle through the color temperatures, simply toggle the rocker switch off and on. Each toggle will switch to the next color temperature.

Figure 5: Demonstrating the three color temperature options of the LED bulb.
5.2 Adjustable Lamp Head
The lamp head features a 180-degree swivel and 360-degree rotation capability. This allows you to direct the light precisely where needed, minimizing glare and shadows for tasks like reading or working, or to create accent lighting.
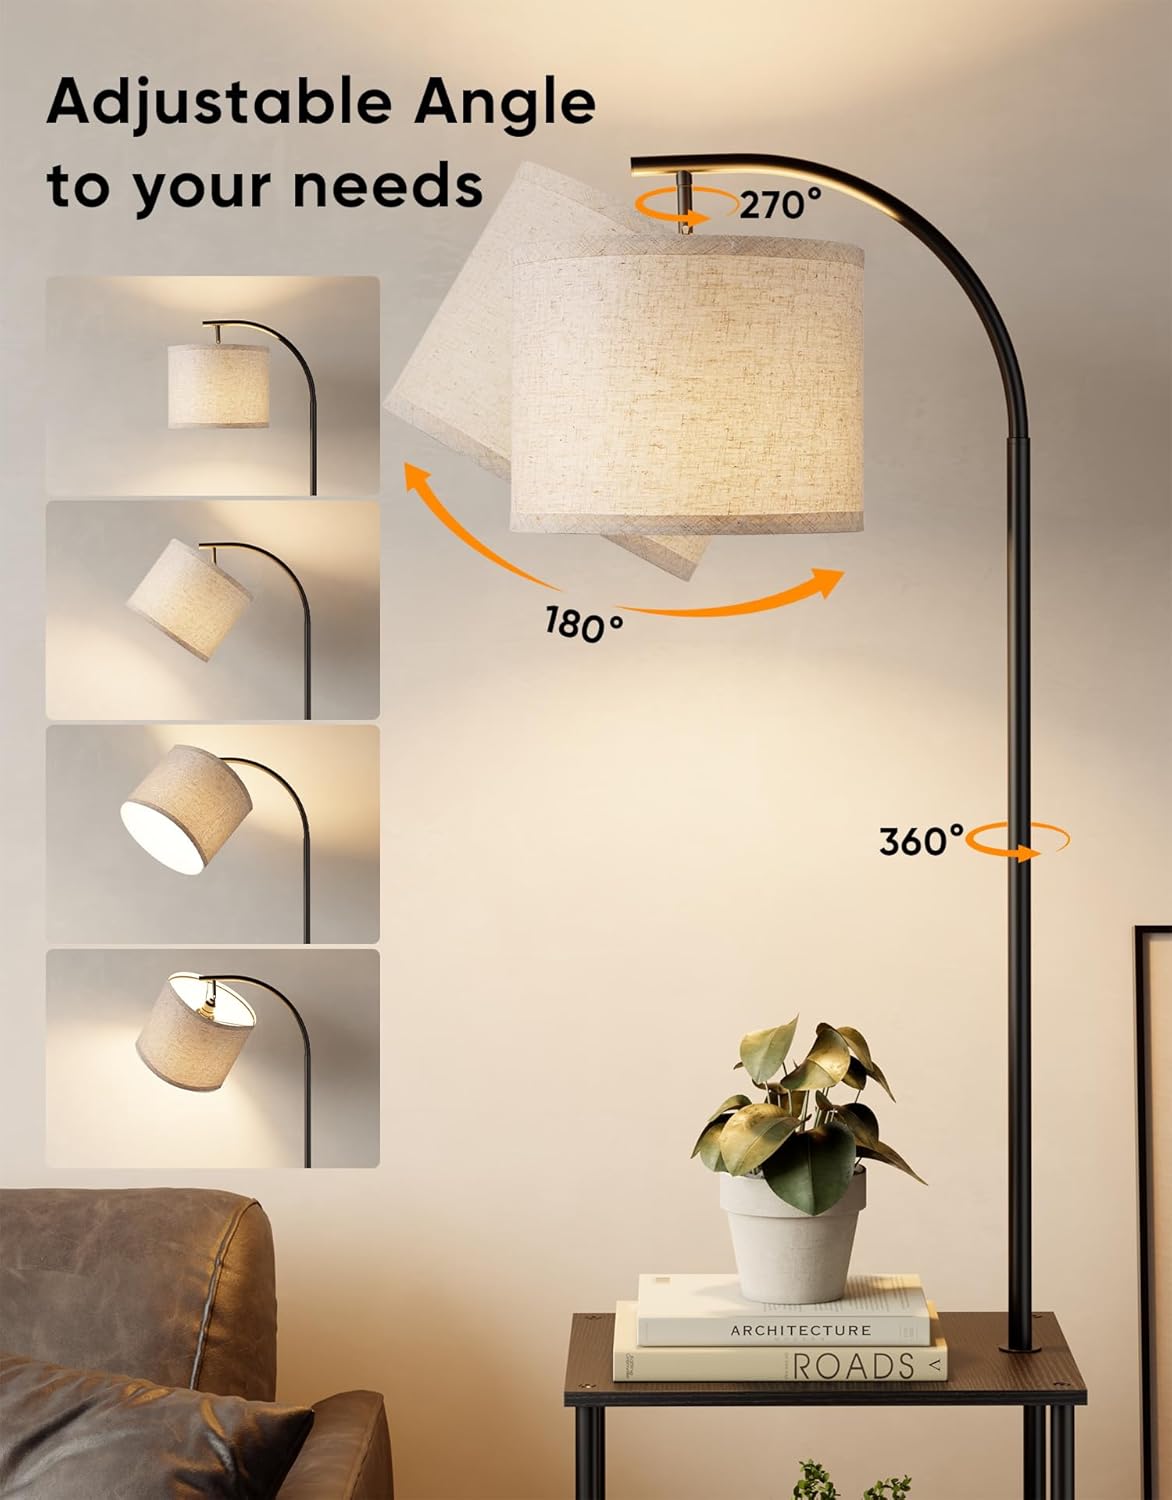
Figure 6: Adjustable lamp head for directional lighting.
6. Maintenance
6.1 Cleaning
To clean the lamp and table, ensure it is unplugged from the power outlet. Use a soft, dry cloth to wipe down the metal frame and wooden shelves. For the fabric shade, a lint roller or a soft brush can be used to remove dust. Avoid using abrasive cleaners or solvents, as these may damage the finish.
6.2 Bulb Replacement
Before replacing the bulb, ensure the lamp is unplugged and the bulb has cooled down. Unscrew the old bulb and replace it with a new E26 base LED bulb, not exceeding 9 watts.
7. Troubleshooting
- Lamp Not Turning On:
- Check if the power cord is securely plugged into a working outlet.
- Ensure the bulb is screwed in tightly and is not burnt out.
- Verify the rocker switch is in the 'On' position.
- Table Feels Unstable:
- Check all screws and connections to ensure they are tightened properly.
- Ensure the lamp is placed on a flat, even surface.
- Light Flickers:
- Ensure the bulb is screwed in tightly.
- Try a different bulb to rule out a faulty bulb.
8. Specifications
| Model Number | STR-FL-0219-black |
| Brand Name | PARTPHONER |
| Product Dimensions | 15.8"D x 11.8"W x 59.24"H |
| Item Weight | 9 Pounds |
| Material Type | Metal, Wood |
| Finish Type | Veneered |
| Shade Material | Linen |
| Shade Color | Beige |
| Light Source Type | LED |
| Wattage | 9 watts |
| Voltage | 120 Volts |
| Bulb Base | E26 |
| Switch Type | Rocker |
| Mounting Type | Freestanding |
| Indoor Outdoor Usage | Indoor |
| Additional Features | 3 Color Temperature |
9. Warranty and Support
9.1 Manufacturer's Warranty
This PARTPHONER product comes with a 1-year manufacturer's warranty from the date of purchase. This warranty covers defects in materials and workmanship under normal use. It does not cover damage resulting from misuse, accidents, unauthorized modifications, or normal wear and tear.
9.2 Customer Support
For any questions, concerns, or warranty claims, please contact PARTPHONER customer support through the retailer's platform or visit the official PARTPHONER website for contact information.