Introduction
This manual provides essential instructions for the safe and efficient operation and maintenance of your KAOLALI Electric Fuel Transfer Pump. Please read this manual thoroughly before first use and retain it for future reference. This pump is designed for transferring gasoline, diesel, and oil, offering dual power options for convenience.
Safety Information
WARNING: Flammable Liquids. Use extreme caution when handling fuels.
- Always operate the pump in a well-ventilated area.
- Keep away from open flames, sparks, and other ignition sources.
- Do not smoke while operating the pump or handling fuel.
- Wear appropriate personal protective equipment, such as gloves and eye protection.
- Ensure all connections are secure before operating to prevent leaks.
- Do not use for potable water or corrosive liquids. This pump is designed for gasoline, diesel, and oil only.
- Keep out of reach of children.
Package Contents
Verify that all items listed below are included in your package:
- 1 x Fuel Transfer Pump
- 1 x Hose (1.3m long)
- 4 x Adapters for fuel cans
Setup
1. Power Supply Options
Your KAOLALI fuel transfer pump offers two power options:
- USB-C Connection: Connect the pump using a standard USB-C cable (not included) to a compatible 12V power source.
- AA Batteries: Insert 4 AA batteries (not included) into the battery compartment. In an emergency, the pump can operate with 2 AA batteries, though with reduced performance. Ensure the battery compartment is securely closed during operation.

Figure 1: Power supply options. The pump can be powered via USB-C or by inserting 4 AA batteries into the designated compartment. For emergency use, 2 AA batteries are sufficient.
2. Attaching the Pump Head and Adapters
The pump head is designed with a 28mm diameter to fit most European standard fuel cans. Four adapters are included to ensure compatibility with various barrel sizes.
- Select the appropriate adapter that securely fits your fuel can's opening.
- Attach the pump head to the selected adapter, ensuring a tight seal.
- Insert the pump assembly into the fuel can.

Figure 2: Pump head and included adapters. The pump head is 28mm, and the four adapters ensure compatibility with various fuel can openings.
Operating Instructions
- Prepare for Transfer: Place the fuel can on a stable, level surface. Ensure the receiving tank (e.g., vehicle fuel tank) is positioned lower than the fuel can for optimal flow.
- Insert Pump: Insert the pump's intake hose into the fuel can and the discharge nozzle into the receiving tank's opening. Ensure the nozzle is securely placed and will not fall out during transfer.
- Start Pumping: Press the ON button on the pump. The pump will begin transferring fuel at a rate of up to 12 liters per minute.
- Auto-Stop Sensor: The integrated auto-stop sensor will automatically interrupt the fuel flow when the receiving tank is full, preventing overfilling and spills.
- Stop Pumping: To manually stop the pump, press the OFF button.
- Remove Pump: Once transfer is complete and the pump has stopped, carefully remove the discharge nozzle from the receiving tank, allowing any residual fuel to drain back into the can or a suitable container. Then, remove the pump assembly from the fuel can.

Figure 3: Fuel transfer in progress. The pump efficiently transfers fuel from a container to a vehicle.

Figure 4: Auto-stop sensor in action. The sensor automatically stops the flow when the tank is full, preventing spills.
Maintenance
Proper maintenance ensures the longevity and reliable performance of your fuel transfer pump.
- Cleaning After Use: After each use, especially when transferring different types of fuel, rinse the pump's intake and discharge hoses with a small amount of the fuel just transferred or a compatible cleaning agent. Wipe the exterior of the pump clean with a damp cloth.
- Battery Care: If using AA batteries, remove them if the pump will not be used for an extended period to prevent leakage and corrosion.
- Storage: Store the pump in a clean, dry place, away from direct sunlight and extreme temperatures. Ensure the hoses are free of kinks.

Figure 5: Post-use maintenance steps. Ensure the battery compartment is closed, turn off the pump, and clean it properly before storage.
Troubleshooting
| Problem | Possible Cause | Solution |
|---|---|---|
| Pump does not turn on. | No power supply; batteries are dead or incorrectly inserted; USB-C cable not connected. | Check battery orientation and charge; replace batteries; ensure USB-C cable is securely connected to a power source. |
| Slow flow rate or no flow. | Low battery power; clogged intake filter; kinked hose; receiving tank is higher than fuel source. | Replace batteries or use USB-C power; clean intake filter; straighten hose; ensure fuel source is higher than receiving tank. |
| Fuel leakage. | Loose connections; damaged hose or seals. | Tighten all connections, especially adapters. Inspect hoses and seals for damage and replace if necessary. |
| Auto-stop sensor activates prematurely. | Sensor is wet or obstructed; foam in fuel. | Ensure sensor is clean and dry. Allow foam to settle before resuming. |
Specifications
| Feature | Detail |
|---|---|
| Brand | KAOLALI |
| Model | USB-C Umfüllpumpe |
| Power Source | USB-C (12V) / 4x AA Batteries (2x AA minimum for emergency) |
| Flow Rate | Up to 12 Liters per minute |
| Hose Length | 1.3 meters |
| Pump Head Diameter | 28 mm |
| Compatible Liquids | Gasoline, Diesel, Oil (Non-potable water only) |
| Material | Plastic, Stainless Steel |
| Product Weight | 860 g |
| Package Dimensions | 33.79 x 18.7 x 10.1 cm |
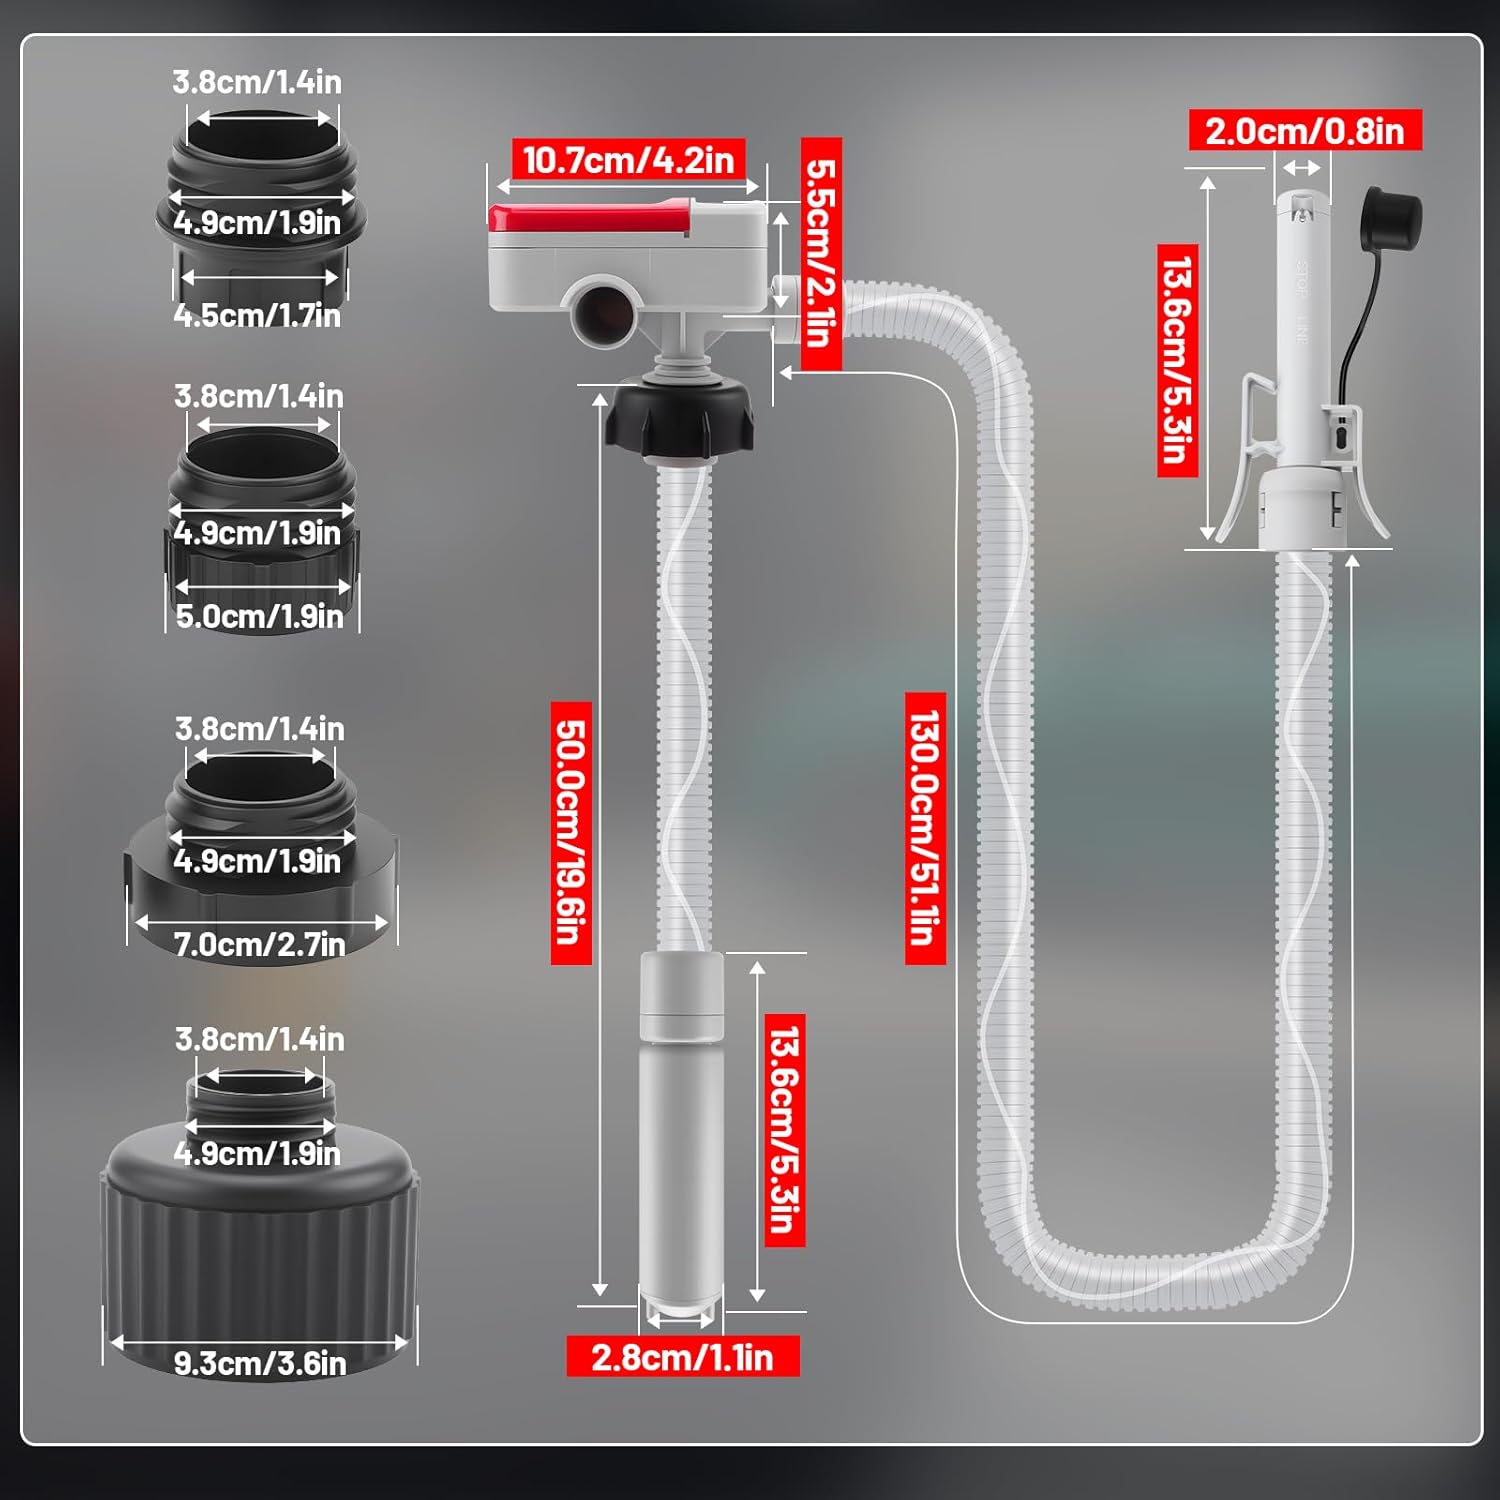
Figure 6: Detailed dimensions of the pump and its components.
Warranty and Support
For warranty information or technical support, please contact KAOLALI customer service through the retailer where the product was purchased. Please have your model number (USB-C Umfüllpumpe) and purchase date available.