Introduction
Thank you for choosing the Keenstar Electric Milk Frother. This appliance is designed to create perfect milk foam for your favorite beverages, including lattes, cappuccinos, and macchiatos. It offers multiple functions for both warm and cold milk preparations. Please read this manual carefully before use to ensure safe and optimal operation.
Important Safety Information
- Read all instructions before using the appliance.
- Do not immerse the base or cord in water or other liquids.
- Ensure the power supply voltage matches the rating label on the appliance.
- Always unplug the frother when not in use and before cleaning.
- Do not operate the appliance with a damaged cord or plug.
- Keep out of reach of children.
- Use only on a flat, stable, heat-resistant surface.
- Do not touch hot surfaces. Use handles or knobs.
- This appliance is for household use only.
Package Contents
Upon unpacking, please ensure all items are present and in good condition:
- Keenstar Electric Milk Frother unit (stainless steel jug with handle)
- Power base with cord
- Transparent lid
- Frothing whisk (pre-installed)
- Instruction Manual

Image: Unboxing the Keenstar Electric Milk Frother, showing the frother unit, power base, and manual.
Product Overview
Familiarize yourself with the components of your Keenstar Electric Milk Frother:
- Stainless Steel Jug: The main container for milk, featuring a non-stick interior.
- Handle: Ergonomically designed for comfortable pouring.
- Power Button: Located on the front, used to select frothing modes.
- Transparent Lid: Allows you to monitor the frothing process.
- Frothing Whisk: Detachable whisk for creating foam.
- Heating Whisk: Used for heating milk without frothing.
- Power Base: Detachable base that supplies power to the frother.
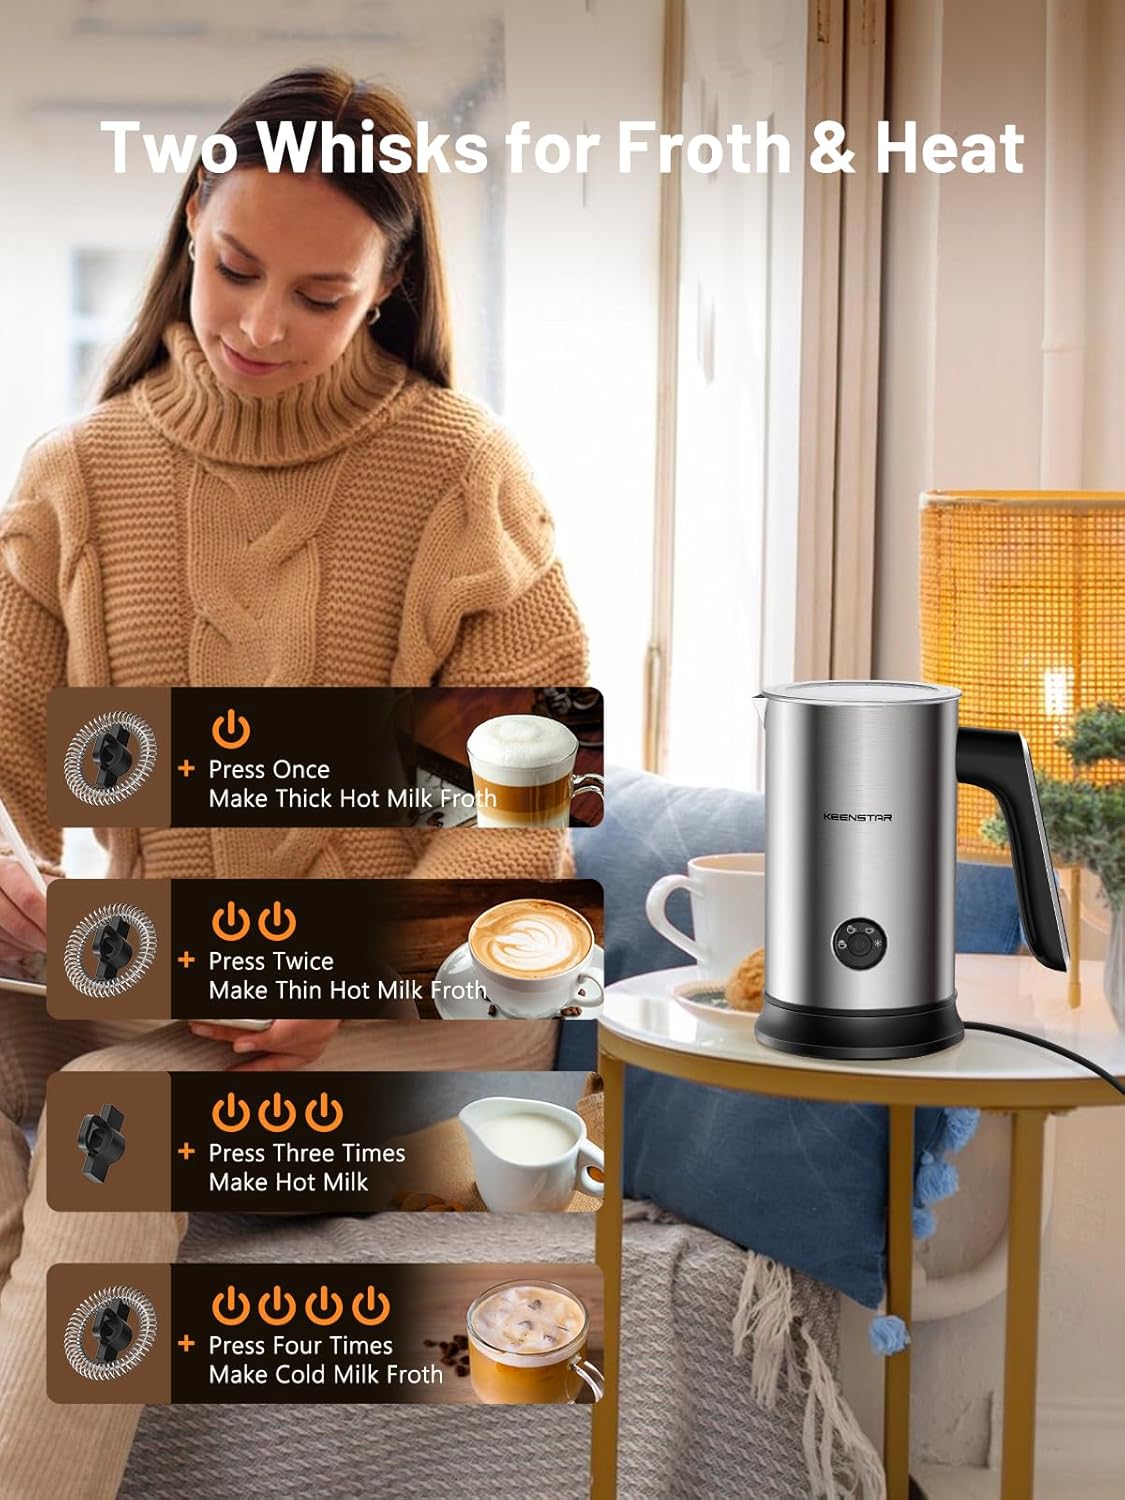
Image: A detailed view of the Keenstar Electric Milk Frother, highlighting its stainless steel body, handle, power button, and lid.
Setup
- Unpack: Carefully remove all packaging materials and inspect the frother for any damage.
- Clean: Before first use, clean the inside of the jug and the whisk with warm soapy water. Wipe the exterior with a damp cloth. Ensure all parts are dry before assembly.
- Place on Base: Place the frother jug securely onto the power base.
- Connect Power: Plug the power base into a standard electrical outlet.
Operating Instructions
The Keenstar Electric Milk Frother offers 4-in-1 functionality. Always ensure the correct whisk is installed for your desired function and observe the fill lines inside the jug.

Image: Diagram illustrating the four functions: Thick Hot Milk Froth, Thin Hot Milk Froth, Hot Milk, and Cold Milk Froth, with corresponding button presses.
General Usage Tips:
- For best frothing results, use milk with a fat content greater than 3%.
- Maximum capacity for heating: 8.12oz/240ml.
- Maximum capacity for frothing: 3.9oz/115ml.
- Minimum capacity for heating & frothing: 2.7oz/80ml.
- Do not overfill the jug beyond the MAX fill line for frothing to prevent overflow.
Functions:
- Warm Thick Foam:
- Ensure the frothing whisk is installed.
- Add milk up to the frothing MAX line.
- Press the power button once. The indicator light will turn red.
- The frother will automatically stop when the process is complete.

Image: A cup of coffee with thick, warm milk foam, illustrating the result of the warm thick foam function.
- Warm Light Foam:
- Ensure the frothing whisk is installed.
- Add milk up to the frothing MAX line.
- Press the power button twice. The indicator light will turn red.
- The frother will automatically stop when the process is complete.

Image: A cup of coffee with light, warm milk foam, demonstrating the outcome of the warm light foam function.
- Warm Milk or Chocolate (No Foam):
- Replace the frothing whisk with the heating whisk (if not already installed).
- Add milk or chocolate up to the heating MAX line.
- Press the power button three times. The indicator light will turn red.
- The frother will automatically stop when the process is complete.

Image: A mug of warm chocolate, showing the result of the warm milk/chocolate function without foam.
- Cold Foam:
- Ensure the frothing whisk is installed.
- Add cold milk up to the frothing MAX line.
- Press the power button four times. The indicator light will turn blue.
- The frother will automatically stop when the process is complete.

Image: A glass of iced coffee with cold milk foam, demonstrating the outcome of the cold foam function.
Maintenance and Cleaning
Proper cleaning ensures the longevity and hygiene of your milk frother.
- Unplug: Always unplug the frother from the power outlet and allow it to cool down completely before cleaning.
- Remove Whisk: Carefully remove the whisk from the bottom of the jug.
- Hand Wash Jug: The stainless steel jug has a non-stick coating. Rinse the interior of the jug under running water and wipe it dry with a soft cloth. Do not use abrasive cleaners or scourers.
- Clean Lid and Whisk: Wash the lid and whisk with warm soapy water and rinse thoroughly.
- Clean Exterior: Wipe the exterior of the frother and the power base with a damp cloth. Do not immerse the frother jug or power base in water.
- Drying: Ensure all parts are completely dry before reassembling or storing.
Important: The frother jug is not dishwasher safe. Hand wash only.
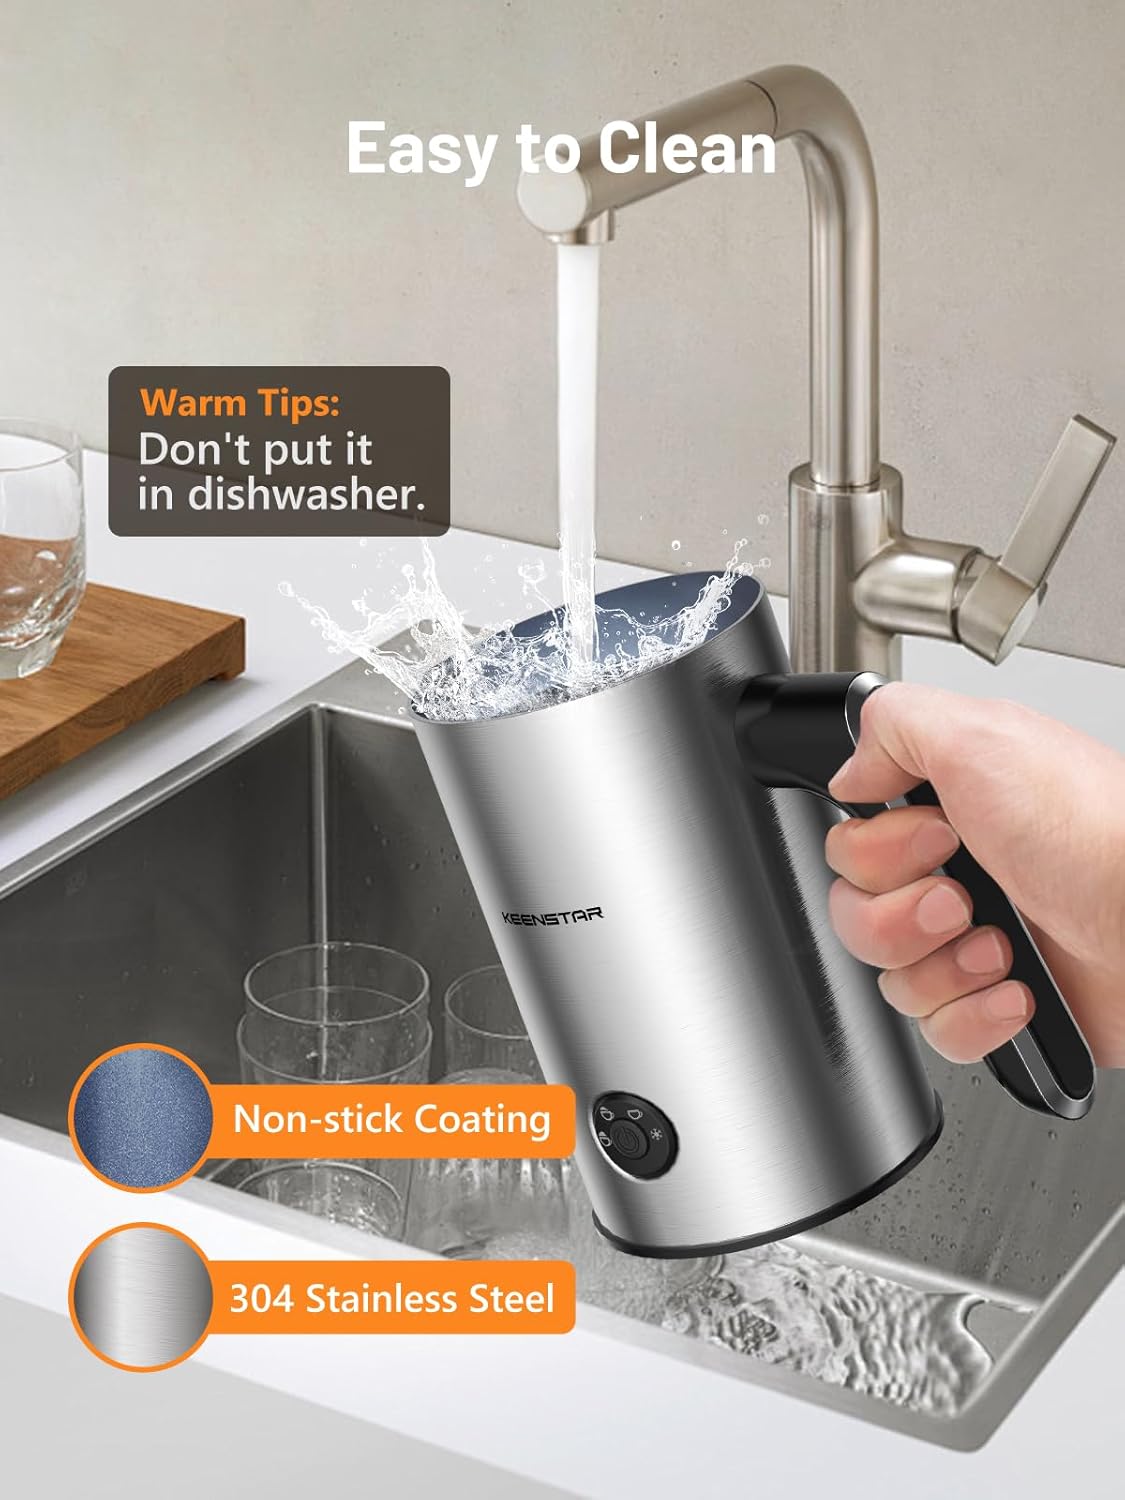
Image: A person hand-washing the interior of the Keenstar Electric Milk Frother jug under running water, emphasizing the non-stick coating.
Troubleshooting
If you encounter any issues with your Keenstar Electric Milk Frother, please refer to the following common problems and solutions:
| Problem | Possible Cause | Solution |
|---|---|---|
| Frother does not turn on. | Not plugged in; power outage; frother not correctly placed on base. | Check power connection; ensure frother is seated properly on the base. |
| Milk is not frothing or foam is poor. | Incorrect whisk used; insufficient milk fat content; milk level too low/high. | Ensure frothing whisk is installed; use milk with >3% fat; check milk levels against MIN/MAX lines. |
| Milk is not heating. | Heating whisk not installed (if applicable); incorrect mode selected. | Ensure heating whisk is installed for heating-only functions; select appropriate mode. |
| Burning smell or milk sticking. | Overfilling; residue from previous use. | Do not exceed MAX fill line; clean thoroughly after each use. |
If the problem persists, please contact customer support.
Specifications
| Feature | Detail |
|---|---|
| Brand | KEENSTAR |
| Model Name | MK701N |
| Material | Stainless Steel |
| Color | Silver |
| Power Source | Corded Electric |
| Wattage | 500 watts |
| Capacity (Heating) | 8.12 oz / 240 ml |
| Capacity (Frothing) | 3.9 oz / 115 ml |
| Minimum Capacity | 2.7 oz / 80 ml |
| Item Weight | 1.7 Pounds |
| Special Features | Lightweight, Non-Stick, Auto Shut Off, Temperature Control, 30 Minutes Auto-Warming |
| Product Care | Hand Wash Only |

Image: The Keenstar Electric Milk Frother next to a smartphone for size comparison, showing its compact dimensions (7.3in/18.5cm height, 4.3in/11cm width).
Warranty and Support
Keenstar offers a 30-day money-back guarantee and a free replacement within 1 year from the date of purchase. We also provide lifetime after-customer service to ensure your satisfaction.
For any questions, concerns, or support needs, please contact our customer service team through the retailer's platform or visit the official Keenstar website for contact information.