RayCue PU1001
RayCue USB C Docking Station
Model: PU1001
User Manual
1. Introduction
The RayCue USB C Docking Station (Model PU1001) is a versatile 13-port solution designed to expand the connectivity of your laptop. It features dual 4K display support, 160W max USB-C power output, a 2.26-inch LCD smart display, 10Gbps USB A/C ports, and Gigabit Ethernet. This manual provides instructions for setup, operation, and troubleshooting to ensure optimal performance with your macOS or Windows system.

Image: RayCue USB C Docking Station connected to a laptop with dual external monitors, showcasing its multi-display and charging capabilities.
2. Package Contents
Please check the package contents upon unboxing:
- RayCue USB C Docking Station (Model PU1001)
- AC Power Adapter
- USB-C to USB-C Cable (for host connection)
- User Manual
3. Key Features
- 13-in-1 Connectivity: Provides 3 x 100W USB-C ports, 1 x USB-A PD port, 2 x 4K60 HDMI ports, 2 x 10Gbps USB-C data ports, 1 x 10Gbps USB-A data port, 1 x USB-A 2.0 port, Gigabit Ethernet, and a power button.
- 160W Total Power Output: Delivers a combined 160W, capable of charging up to four devices simultaneously (three USB-C ports at 100W max each, one USB-A port at 12W max).
- Dual 4K60Hz Display Support: Connects two external monitors for extended display at 4K resolution and 60Hz refresh rate. Compatible with macOS and Windows.
- Smart Screen Display: A 2.26-inch LCD screen provides real-time updates on charging power, display performance, and port connection status.
- Screen-Lock Button: Allows securing sensitive information by toggling the display.
- 10Gbps Data Transfer: Features USB 3.2 Gen 2 ports (2 USB-C and 1 USB-A) for high-speed data transfer.
- Gigabit Ethernet: Provides a stable and fast wired network connection up to 1000Mbps.
- Broad Compatibility: Supports USB-C, USB4, and Thunderbolt connections, compatible with Windows 10/11, ChromeOS, and macOS, for laptops supporting DP Alt Mode and Power Delivery.
4. Product Overview
Port Layout
The RayCue docking station features a comprehensive array of ports on both its front and rear panels to accommodate various devices and connectivity needs.

Image: Detailed view of the docking station's front and rear panels, illustrating the location and type of each port, including USB-C, USB-A, HDMI, Ethernet, and AC input.
Front Panel Ports:
- Power Button: Press to toggle display, press and hold for 2 seconds to turn off.
- USB-C x 2 (Data Port, 10Gbps): For high-speed data transfer.
- USB-A (10Gbps): For high-speed data transfer.
- USB-C x 2 (100W Max): For power delivery and charging devices.
- USB-A (5V 2.4A): For charging devices.
Rear Panel Ports:
- USB-C Upstream (100W Max, 10Gbps): Connects to your host laptop for power, data, and display signals.
- USB-A (480Mbps): Standard USB-A port.
- HDMI x 2 (4K@60Hz): Connects to external monitors for video output.
- Ethernet (1000Mbps): For wired network connection.
- AC IN: Power input for the docking station.
5. Setup Guide
- Connect Power: Plug the provided AC power adapter into the "AC IN" port on the rear of the docking station, then connect it to a power outlet.
- Connect to Host Laptop: Use the included USB-C to USB-C cable to connect the "USB-C Upstream" port on the rear of the docking station to a compatible USB-C, USB4, or Thunderbolt port on your laptop.
- Connect Displays: Connect your external monitors to the "HDMI x 2" ports on the rear of the docking station using HDMI cables. Ensure your monitors are powered on.
- Connect Peripherals: Plug your USB devices (keyboard, mouse, external drives, etc.) into the available USB-A and USB-C data ports on the front panel.
- Connect Network (Optional): For a wired internet connection, connect an Ethernet cable from your router or modem to the "Ethernet" port on the rear of the docking station.
- Power On: The docking station should power on automatically once connected to your laptop. If not, press the power button on the front panel.
Upon successful connection, your laptop should detect the docking station and connected devices. You may need to adjust display settings in your operating system for optimal dual monitor configuration.
6. Operating Instructions
Smart Display Functionality
The 2.26-inch LCD smart display provides real-time information about the docking station's operation.
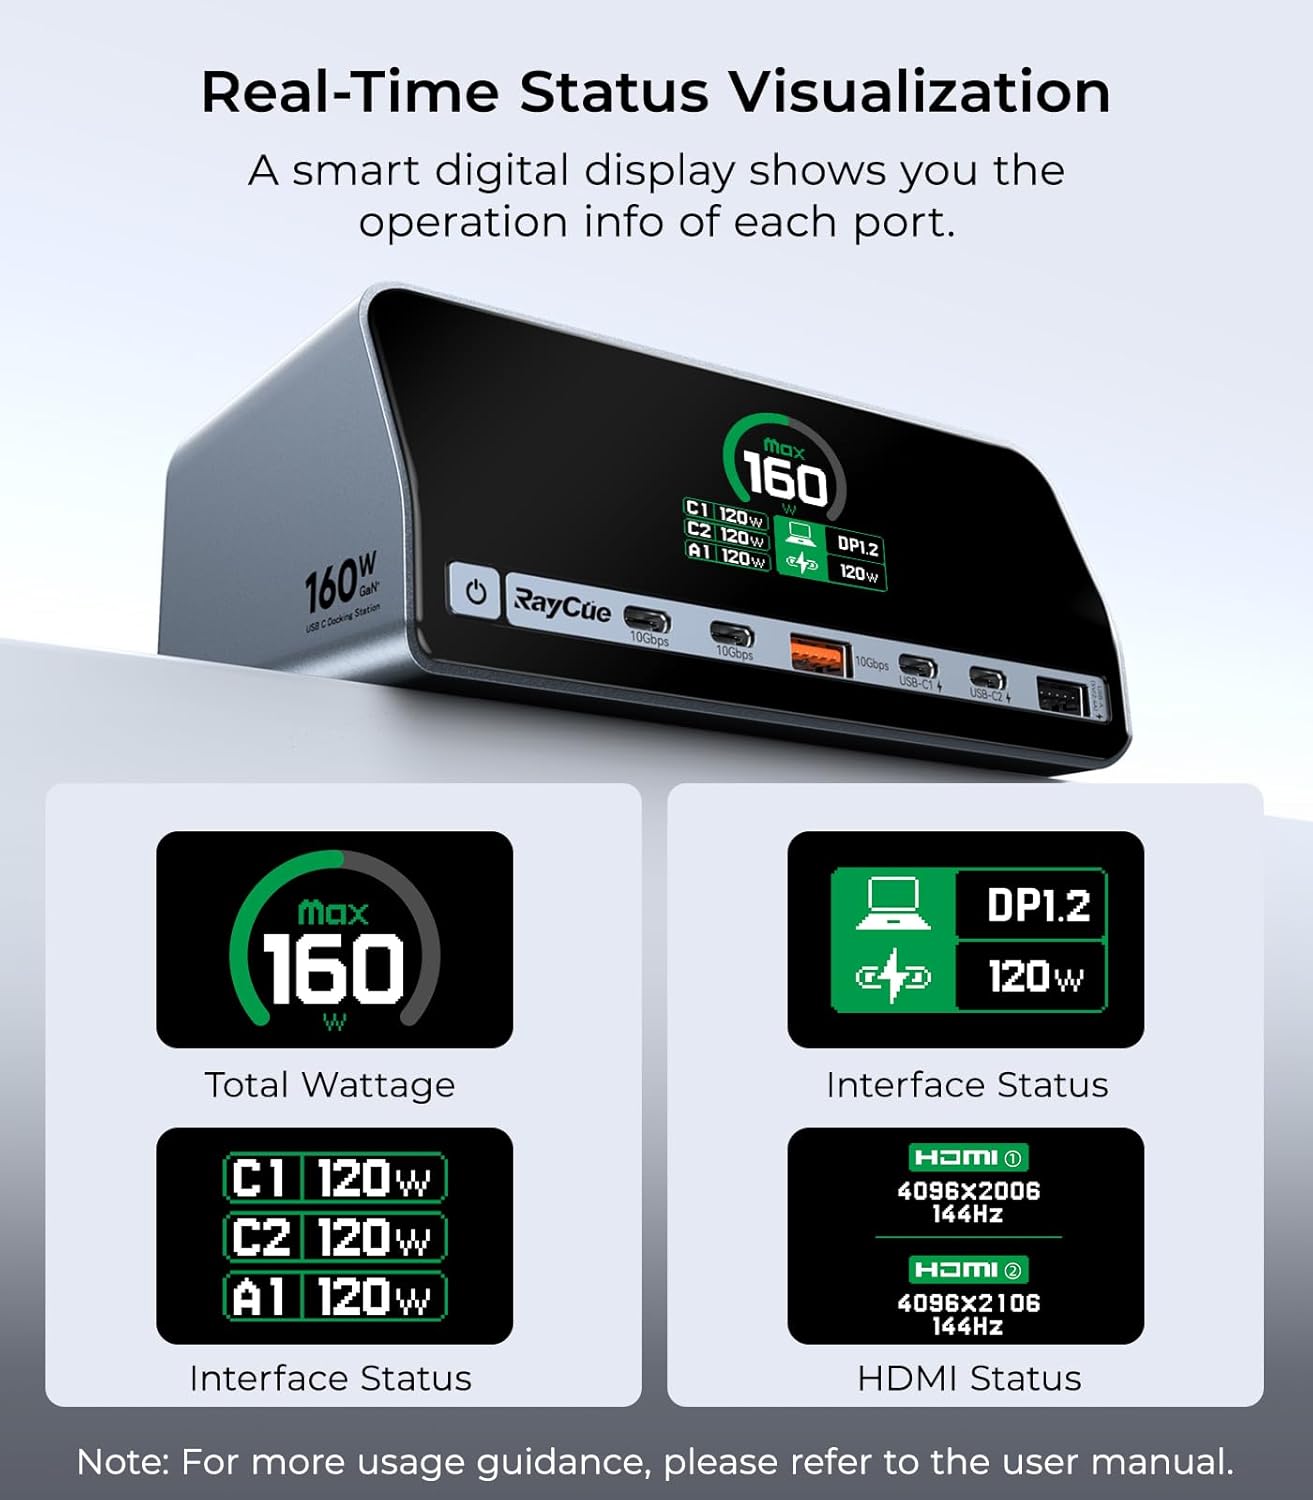
Image: The smart display showing total wattage (Max 160W), individual port power delivery (C1 120W, C2 120W, A1 120W), interface status (DP1.2 120W), and HDMI resolution/refresh rate (4096x2006 144Hz, 4096x2106 144Hz).
- Total Wattage: Displays the total power being drawn by connected devices.
- Interface Status: Shows the power delivery status for individual USB-C and USB-A ports.
- HDMI Status: Indicates the resolution and refresh rate of connected HDMI displays.
- Connection Status: Provides visual cues for active port connections.
Power Button Controls
The power button on the front panel has multiple functions:

Image: Illustration of the power button's functionality, including turning the device on/off and toggling the smart display.
- Press Once: To turn on the docking station.
- Press and Hold (2 seconds): To turn off the docking station.
- Short Press Once (when on): To toggle the smart display, useful for securing sensitive information or reducing light output.
Dual Display Configuration
The docking station supports dual 4K displays for both Windows and macOS systems. The configuration options may vary slightly depending on your operating system and laptop's capabilities.

Image: Visual representation of various dual monitor setups for Windows and macOS, including extended and mirrored display modes.
- Windows: Supports extended desktop modes (A+B, A+B+C) and mirrored displays.
- macOS: Supports extended desktop modes (A+B, A+B+C) and mirrored displays.
Adjust display settings via your operating system's display preferences (e.g., System Preferences > Displays on macOS, or Display Settings on Windows) to configure resolution, arrangement, and mirroring options.
Power Distribution
The docking station intelligently distributes its 160W total power output across connected devices. The smart display will show the power allocation for each port.

Image: Diagrams showing how the 160W total power is distributed among the USB-C and USB-A charging ports under different load conditions, such as HOST+C1+C2 (100W+30W+30W) or C1+C2+A1 (100W+45W+12W).
7. Compatibility
This docking station is designed for broad compatibility with various laptops and operating systems. However, specific functionality depends on your laptop's USB-C port capabilities.

Image: Visual guide to identifying compatible USB-C port types on laptops, including Thunderbolt 3/4, Full Function USB-C, and USB4 ports, which support data, charging, and display.
Supported Port Types:
- Fully Functional USB-C Ports: Required for full functionality (data transfer, charging, and display output).
- Thunderbolt 3/4 Ports: Fully supported.
- USB4 Ports: Fully supported.
Note: Ports that only support data transfer or only charging will not provide full docking station functionality. Ensure your laptop's USB-C port supports DisplayPort Alternate Mode (DP Alt Mode) and Power Delivery.
Operating System Compatibility:

Image: A compatibility chart listing supported laptop brands (MacBook Pro, HP, Lenovo, Dell, ASUS, Microsoft) and operating systems (Windows, macOS, iPad OS, Android, Chrome OS).
- Windows 10 and 11
- macOS
- ChromeOS
- iPad OS (for compatible models)
- Android (for compatible models)
8. Maintenance
To ensure the longevity and optimal performance of your docking station, follow these maintenance guidelines:
- Cleaning: Use a soft, dry cloth to wipe the exterior of the docking station. Avoid using liquid cleaners or abrasive materials.
- Storage: When not in use for extended periods, store the docking station in a cool, dry place away from direct sunlight and extreme temperatures.
- Cable Management: Avoid sharp bends or kinks in cables, especially the host connection cable, to prevent damage.
- Ventilation: Ensure the docking station's ventilation openings are not blocked to prevent overheating.
9. Troubleshooting
If you encounter issues with your RayCue docking station, please refer to the following tips:

Image: A summary of warm tips covering power, display, 4K@60Hz support, and general compatibility advice.
- No Power/Charging: Ensure the docking station's power supply is securely connected to both the unit and a wall outlet. Verify your laptop's USB-C port supports Power Delivery.
- No Display Output:
- Confirm your laptop's USB-C port supports DisplayPort Alternate Mode (DP Alt Mode).
- Check all HDMI cable connections between the docking station and monitors.
- Adjust display settings in your operating system.
- If using DP1.2, extending to 2 displays might be limited by your processor's support. For 4K@60Hz, confirm your laptop's USB-C port is DP1.4 or above. If only DP1.2, it may reach up to 4K@30Hz.
- Data Transfer Issues: Ensure devices are connected to the correct 10Gbps USB ports. Check cable integrity.
- Network Connectivity Issues: Verify the Ethernet cable is properly connected to both the docking station and your router/modem. Check network settings on your laptop.
- General Compatibility: We do not recommend using any other converters with the docking station as we cannot guarantee compatibility.
If problems persist, please contact RayCue customer support for assistance.
10. Specifications
| Feature | Detail |
|---|---|
| Model Number | PU1001 |
| Total Ports | 13 |
| USB-C Ports (PD) | 3 (100W Max each) |
| USB-A PD Port | 1 (12W Max) |
| HDMI Ports | 2 (4K@60Hz) |
| USB-C Data Ports | 2 (10Gbps) |
| USB-A Data Ports | 1 (10Gbps) |
| USB-A 2.0 Port | 1 |
| Ethernet Port | 1 (Gigabit, 1000Mbps) |
| Total Power Output | 160W Max |
| Smart Display | 2.26-inch LCD |
| Package Dimensions | 7.95 x 7.32 x 3.19 inches |
| Item Weight | 3.87 ounces (0.11 Kilograms) |
| Manufacturer | RayCue |
11. Safety Information
- Do not expose the device to liquids, moisture, or extreme temperatures.
- Avoid dropping or subjecting the device to strong impacts.
- Do not attempt to disassemble or repair the device yourself. Refer all servicing to qualified personnel.
- Use only the provided power adapter and cables to prevent damage and ensure safe operation.
- Keep the device away from children.
12. Warranty and Support
RayCue products come with a standard manufacturer's warranty. For detailed warranty information, please refer to the warranty card included with your product or visit the official RayCue website.
For technical support, troubleshooting assistance, or any operational questions, please contact RayCue customer service. Contact information can typically be found on the product packaging or the official RayCue website.