SKDW G501-1
SKDW G501-1 4-Channel Mirror Dash Cam User Manual
Model: G501-1
1. Introduction
Thank you for choosing the SKDW G501-1 4-Channel Mirror Dash Cam. This device is designed to enhance your driving safety and provide comprehensive vehicle surveillance with its advanced recording capabilities. This manual provides detailed instructions for installation, operation, and maintenance to ensure optimal performance of your dash cam.
2. Package Contents
Please verify that all items listed below are included in your package:
- DVR (Mirror Dash Cam) x 1
- Power Adapter Cable x 1
- Cigarette Lighter Cable x 1
- Left Blind Spot Camera Kit x 1
- Left Turn Signal Extension Cord x 1 (Spare accessory)
- Right Blind Spot Camera Kit x 1
- Right Turn Signal Extension Cord x 1 (Spare accessory)
- Rear Camera x 1
- Rear Camera Extension Cable x 1
- Binding Strap x 4
- Installed Crowbar x 1
- Screwdriver x 1
- Lint-free Cloth x 1
- 128GB Memory Card x 1 (Pre-installed or included separately)

Image: All components included in the SKDW G501-1 Mirror Dash Cam package.
3. Product Overview
The SKDW G501-1 is a 12-inch touchscreen mirror dash cam featuring a 4-channel recording system. It captures video from the front, rear, left, and right sides of your vehicle simultaneously, providing a comprehensive 360-degree view.
Key Features:
- 4-Channel Recording: Simultaneous 1080P recording from front, rear, left, and right cameras.
- 12-inch IPS Touch Screen: Provides a wide viewing angle and intuitive control for video playback and settings.
- Wide Angle Lenses: Front camera with 145° view, side cameras with 120° view, and rear camera with 138° view for extensive coverage.
- Built-in WiFi: Connects to a mobile app for easy viewing, downloading, and sharing of footage.
- G-Sensor: Automatically locks and saves footage during sudden impacts or collisions.
- Loop Recording: Overwrites older, unprotected files when the memory card is full.
- 24-Hour Parking Monitor: Triggers recording upon impact or movement when the vehicle is parked (requires hardwire kit, sold separately).
- Reversing Assistance: Displays parking guidelines on the screen when reversing.
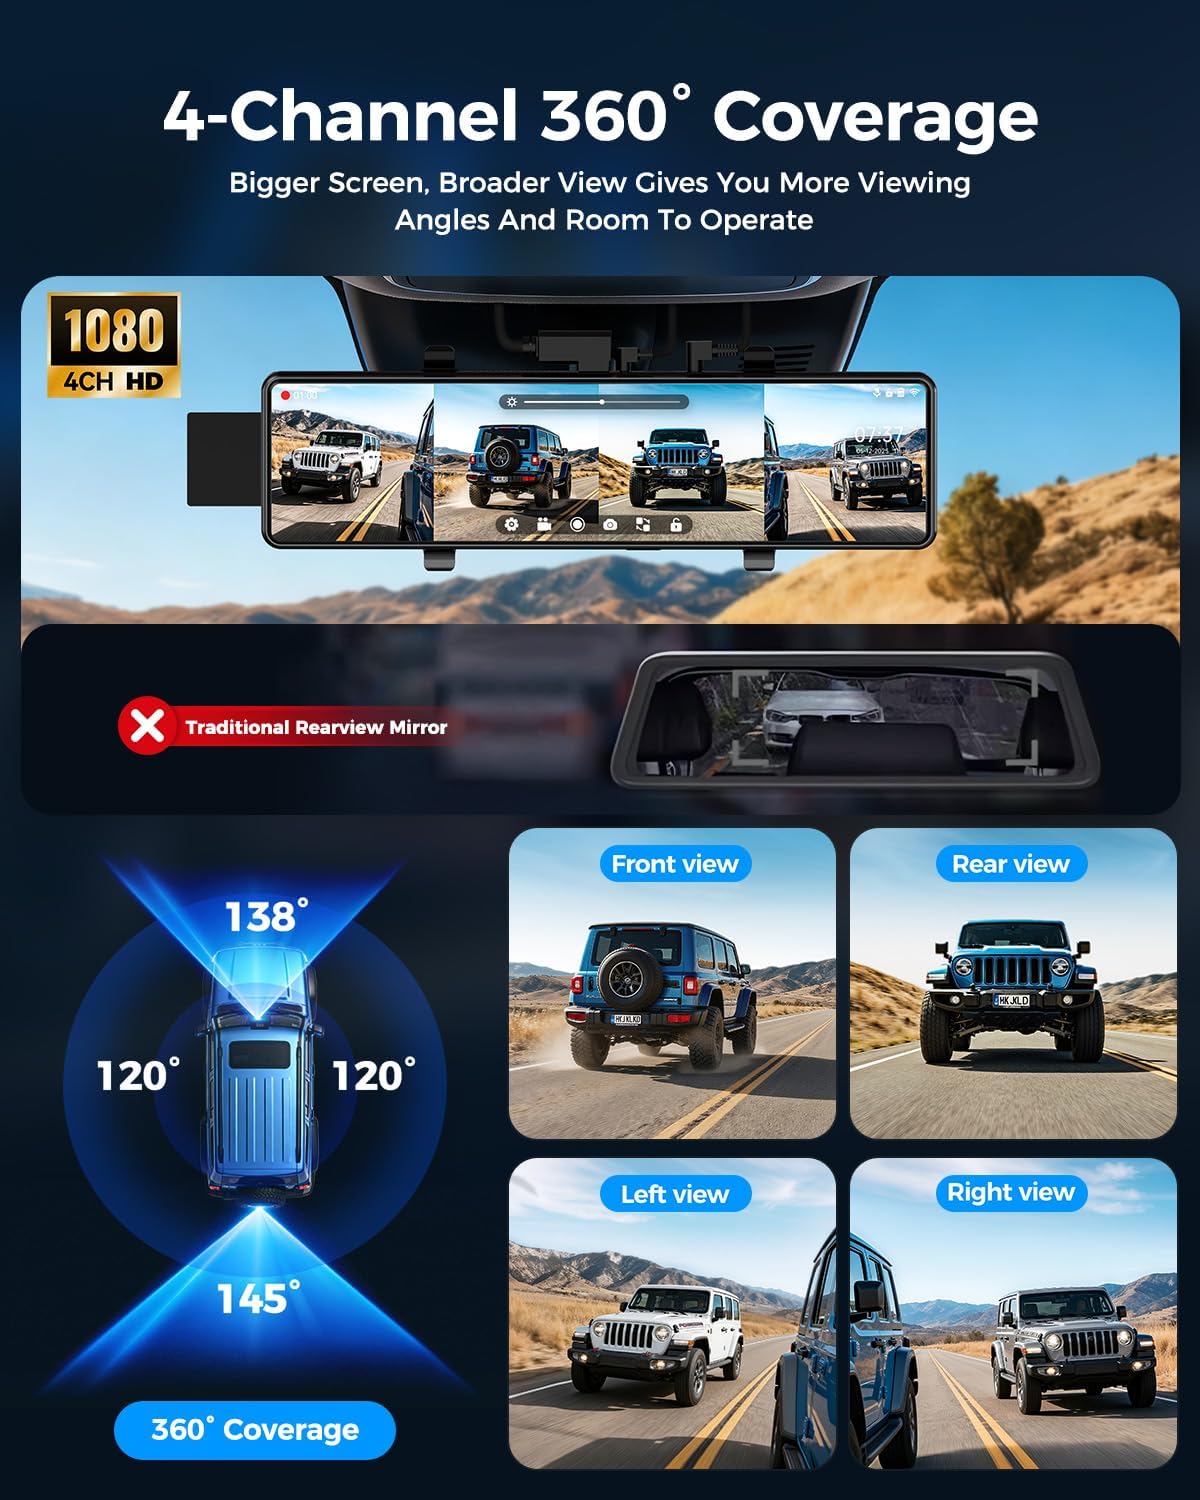
Image: Visual representation of the 4-channel 360-degree coverage provided by the dash cam system.

Image: Detailed view of the detached left and right side cameras, highlighting their flexible installation.

Image: Comparison demonstrating enhanced visibility in dark and rainy conditions using the dash cam compared to traditional mirrors.
4. Setup and Installation
Follow these steps to properly install your SKDW G501-1 Mirror Dash Cam.
4.1 Mounting the Mirror Dash Cam
- Secure the main mirror dash cam unit over your existing rearview mirror using the provided binding straps. Ensure it is firmly attached and does not obstruct your view.
- Adjust the angle of the front camera lens on the mirror unit to capture the desired view of the road ahead.
4.2 Connecting the Cameras
The system includes a front camera (integrated), a rear camera, and two side cameras (left and right).
- Rear Camera: Mount the rear camera at the back of your vehicle, typically above the license plate or on the rear window. Connect it to the main unit using the rear camera extension cable. Ensure the cable is routed discreetly and securely.
- Side Cameras (Left & Right): Install the left and right blind spot cameras on the sides of your vehicle, usually near the side mirrors or on the fender. Connect them to the main unit using their respective cables. The turn signal extension cords are spare accessories and may be used for specific wiring configurations if needed.
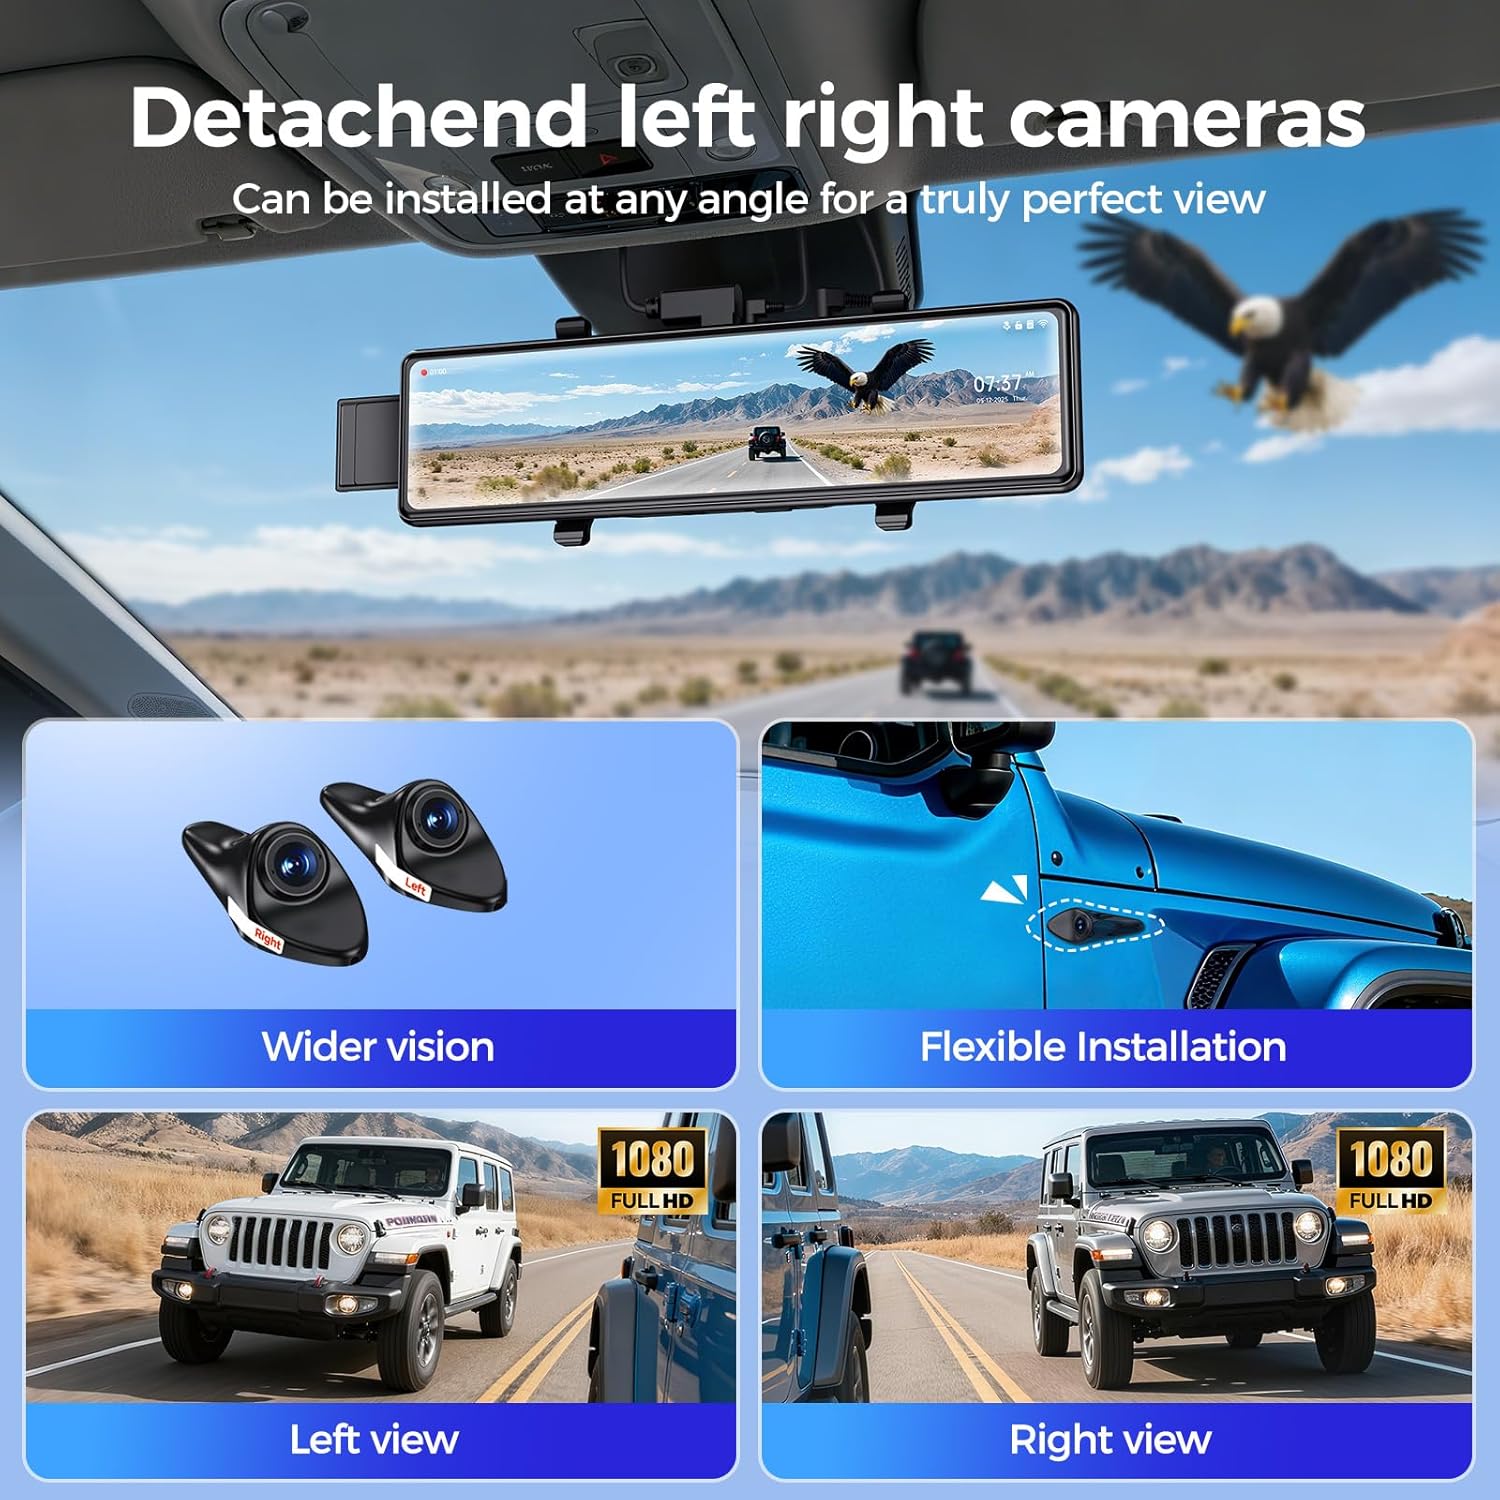
Image: Illustration of flexible installation points for the detached left and right side cameras.
4.3 Power Connection
- Connect the cigarette lighter cable to the main dash cam unit and plug the other end into your vehicle's 12V power outlet.
- Route the power cable neatly along the windshield trim and dashboard to avoid obstruction.
4.4 Initial Setup
- Once powered on, the dash cam will boot up. Follow the on-screen prompts to select your preferred language and set the correct date and time zone.
- Ensure the included 128GB memory card is inserted correctly into the designated slot. The device will typically prompt you to format the card upon first use.

Image: The 12-inch touchscreen displaying initial setup options and settings menu.
5. Operating Instructions
5.1 Basic Recording
- The dash cam automatically powers on and begins recording when your vehicle's ignition is turned on.
- Recording stops automatically when the ignition is turned off.
- The screen will display live views from all four cameras. You can switch between different display modes (e.g., full screen front, split screen) via the touchscreen.
5.2 Touchscreen Operation
- Tap the screen to access menu options and settings.
- Swipe left or right to navigate through different camera views or playback modes.
- Swipe up or down on the left side of the screen to adjust the camera's vertical viewing angle (if supported).
5.3 WiFi and App Control
- Download the designated mobile application (e.g., "Journey nice APP" as indicated in promotional materials) from the App Store or Google Play.
- Enable WiFi on your dash cam via the settings menu.
- Connect your smartphone to the dash cam's WiFi network (SSID and password usually displayed on the dash cam screen).
- Use the app to view live footage, play back recorded videos, download files to your phone, and adjust settings remotely.

Image: The dash cam's WiFi connectivity and mobile app interface for managing recordings.
5.4 G-Sensor and Loop Recording
- G-Sensor: In the event of a sudden impact or collision, the built-in G-sensor will automatically detect the event and lock the current video segment, preventing it from being overwritten.
- Loop Recording: When the memory card is full, the dash cam will automatically overwrite the oldest unprotected video files to continue recording. Locked files are protected from this process.
5.5 24-Hour Parking Monitor
- To enable 24-hour parking monitoring, a hardwire kit (not included) is required to provide continuous power to the dash cam when the vehicle is off.
- Once enabled, the dash cam will automatically trigger recording if it detects impacts or movements around your parked vehicle, providing surveillance against incidents like hit-and-runs or vandalism.
5.6 Reversing Assistance
- When the vehicle is shifted into reverse, the dash cam automatically displays the rear camera view on the full screen, along with parking guidelines.
- These guidelines assist in safe parking and maneuvering.

Image: The dash cam displaying reverse assistance with dynamic parking lines and wide field of view.
6. Maintenance
6.1 Cleaning the Device
- Use the provided lint-free cloth to gently wipe the screen and camera lenses.
- Do not use abrasive cleaners or solvents, as they may damage the device.
6.2 Memory Card Management
- Regularly format the memory card (at least once a month) through the dash cam's settings menu to ensure optimal performance and prevent data corruption.
- Back up any important video files to your computer or cloud storage before formatting.
7. Troubleshooting
If you encounter issues with your dash cam, refer to the following common problems and solutions:
- Dash Cam Not Powering On:
Ensure the cigarette lighter cable is securely connected to both the dash cam and the vehicle's 12V power outlet. Check if the vehicle's power outlet is functioning. - Recording Issues (e.g., not recording, freezing):
Format the memory card. Ensure the memory card is a high-speed (Class 10 or U3) card. If issues persist, try a different memory card. - WiFi Connection Problems:
Ensure WiFi is enabled on the dash cam and your smartphone. Restart both the dash cam and your phone. Verify you are connecting to the correct WiFi network. - Screen Not Responding to Touch:
Restart the dash cam. If the issue continues, contact customer support. - Poor Video Quality:
Clean the camera lenses with the lint-free cloth. Ensure the protective film has been removed from the lenses. Check settings to confirm recording resolution is set to 1080P.
8. Specifications
| Feature | Specification |
|---|---|
| Model Name | G501-1 |
| Product Dimensions | 10.8 x 3.6 x 0.7 inches |
| Item Weight | 2.93 pounds |
| Display | 12-inch IPS Touch Screen |
| Video Capture Resolution | 1080p (All 4 channels) |
| Field Of View | 360 Degrees (Combined) |
| Connectivity Technology | Wi-Fi |
| Special Features | 360 Degree Coverage, G-Sensor, Loop Recording, Parking Monitor, Reversing Assistance |
| Mounting Type | Rearview Mirror Mount |
| Vehicle Service Type | Car |
| Color | Black |
9. Warranty and Support
For warranty information, technical support, or any inquiries regarding your SKDW G501-1 Mirror Dash Cam, please refer to the contact information provided with your purchase or visit the official SKDW website. Please retain your proof of purchase for warranty claims.
Ask a question about this manual
Ask about setup, troubleshooting, compatibility, parts, safety, or missing instructions. Manuals+ will review the question and use this page’s manual context to help answer it.