1. Introduction
This manual provides essential instructions for the safe and effective operation, setup, and maintenance of your SSIMDER MIG-250 Multiprocess Welder and Plasma Cutter. The MIG-250 is a versatile 6-in-1 machine designed for various welding and cutting tasks, supporting Gas MIG, CO2 MIG, Gasless MIG (flux core), Lift TIG, Stick (MMA) welding, and Plasma Cutting. It operates on dual voltage (110V/220V) and delivers up to 160 Amps, suitable for a range of materials including thin metal, mild steel, cast iron, stainless steel, and all conductive metals for plasma cutting.

Image 1.1: The SSIMDER MIG-250 Multiprocess Welder and Plasma Cutter with included accessories.
2. Safety Information
Operating welding and plasma cutting equipment involves significant risks. Always adhere to the following safety precautions to prevent injury or damage to property.
- Electric Shock: Can kill. Ensure proper grounding. Do not touch live electrical parts. Wear dry welding gloves.
- Fumes and Gases: Can be hazardous to your health. Work in a well-ventilated area. Use fume extractors if necessary.
- Arc Rays: Can injure eyes and burn skin. Wear a welding helmet with appropriate shade filter and protective clothing.
- Fire and Explosion: Welding and cutting can cause fire or explosion. Keep flammable materials away from the work area. Have a fire extinguisher readily available.
- Hot Parts: Can cause severe burns. Allow equipment and workpieces to cool before handling.
- Noise: Excessive noise can damage hearing. Wear ear protection.
- Plasma Cutting Hazards: High-voltage arc and molten metal spray. Ensure proper eye and body protection.
Always read and understand all safety warnings and instructions provided with your equipment and consumables.
3. Product Overview
3.1 Key Features
- 6-in-1 Multiprocess: Supports Gas MIG, CO2 MIG, Gasless MIG (Flux Core), Lift TIG, Stick (MMA) welding, and Plasma Cutting.
- Dual Voltage: Operates on both 110V and 220V power supplies.
- 160 Amp Output: Provides sufficient power for various applications.
- Synergic & Manual Control: Offers simplified settings for beginners (Synergic) and precise control for experienced users (Manual).
- Advanced Protection: Includes over-current, over-voltage, over-heat, and over-load protection for enhanced safety and durability.

Image 3.1: Visual representation of the 6-in-1 multiprocess capabilities.
3.2 Components and Controls
Familiarize yourself with the main components and controls of the MIG-250 unit.

Image 3.2: Front and rear panel controls and connections of the MIG-250.
- Cutting Mode Grounding Connector
- TIG / Cutting Torch Connector
- Positive Terminal
- Negative Terminal
- MIG Gun Connector (EURO Connect)
- Polarity Output for Gas MIG / Flux Cored MIG
- Two-Pin Control Switch for TIG / Cutting Torch
- Three-Pin Control Switch for Spool Gun
- Spool Gun Mode ON / OFF Switch
- Current / Wire Speed Button
- Voltage / Post Flow Button
- Digital Display
- Function / Synergic / Manual Mode Switch
- Power Switch Button
- TIG / MIG Gas Tube Connector
- Power Cord
- Cut Gas Tube Connector
- Air Regulator for CUT
- Cooling Fan
3.3 Included Accessories

Image 3.3: All components and accessories included with the MIG-250.
4. Setup
4.1 Power Connection
- The MIG-250 supports both 110V and 220V power. Ensure the correct power cord and adapter (if needed) are used for your power source.
- Connect the power cord (16) to a suitable grounded electrical outlet.
4.2 Gas/Air Connection
- For Gas MIG/TIG: Connect the gas hose (included) to the TIG/MIG Gas Tube Connector (15) on the rear panel and to your shielding gas cylinder (Argon/CO2 mix for MIG, pure Argon for TIG).
- For Plasma Cutting: Connect the air hose to the Cut Gas Tube Connector (17) and ensure the Air Regulator (18) is properly installed and set to the recommended pressure (typically 60-90 PSI).
4.3 Wire Spool Installation (MIG/Flux Core)

Image 4.1: Internal wire spool compartment, supporting 2lb and 10lb spools.
- Open the side panel of the welder.
- Place the wire spool (0.030"-0.035" MIG wire or flux core wire) onto the spindle. The MIG-250 supports both 2lb and 10lb spools.
- Thread the wire through the feeder mechanism, ensuring it is seated correctly in the drive roller groove that matches your wire size.
- Close the side panel.
4.4 Torch/Electrode Holder Connection
- MIG Welding: Connect the MIG Gun (EURO Connect) to the MIG Gun Connector (5). Ensure the polarity is set correctly via the Polarity Output (6) for Gas MIG (positive) or Flux Cored MIG (negative).
- Lift TIG Welding: Connect the TIG Torch to the TIG / Cutting Torch Connector (2). Connect the ground clamp to the Negative Terminal (4).
- Stick (MMA) Welding: Connect the Electrode Holder to the Positive Terminal (3) and the ground clamp to the Negative Terminal (4).
- Plasma Cutting: Connect the Plasma Cutting Torch to the TIG / Cutting Torch Connector (2). Connect the ground clamp to the Cutting Mode Grounding Connector (1).
5. Operating Instructions
5.1 General Operation
- Turn on the power using the Power Switch Button (14).
- Use the Function / Synergic / Manual Mode Switch (13) to select the desired welding/cutting process (MIG, TIG, MMA, CUT).
- The Digital Display (12) will show current settings.
- Adjust Current/Wire Speed (10) and Voltage/Post Flow (11) as needed for your application.

Image 5.1: Digital display and control interface, showing Synergic and Manual modes.
5.2 MIG Welding (Gas & Gasless Flux Core)
- Select MIG mode.
- For Gas MIG, ensure gas is connected and flowing. For Gasless (Flux Core), no external gas is needed.
- Set polarity: Positive for Gas MIG (Argon/CO2), Negative for Gasless Flux Core.
- Adjust wire speed and voltage according to the material thickness and wire type (0.030"-0.035").
- The synergic mode simplifies settings by automatically adjusting parameters based on wire type and material. Manual mode allows for fine-tuning.
5.3 Lift TIG Welding
- Select TIG mode.
- Ensure pure Argon gas is connected and flowing.
- Connect the TIG torch and ground clamp as described in Section 4.4.
- Set the desired amperage.
- Initiate the arc by gently touching the tungsten electrode to the workpiece and lifting it slightly.
- Lift TIG provides cleaner, high-quality welds on stainless steel and other materials.
5.4 Stick (MMA) Welding
- Select MMA mode.
- Connect the electrode holder and ground clamp as described in Section 4.4.
- Insert the appropriate electrode (e.g., 7018, 6010, 6013) into the holder.
- Adjust the amperage based on the electrode type and material thickness.
- Suitable for heavy-duty repair jobs, rusty metals, and thick materials.
5.5 Plasma Cutting
- Select CUT mode.
- Ensure compressed air is connected and the air regulator is set correctly.
- Connect the plasma cutting torch and ground clamp as described in Section 4.4.
- Set the desired cutting current.
- The plasma cutter is capable of clean cuts up to 1/2" (12mm) and severance cuts up to 5/8" (16mm).
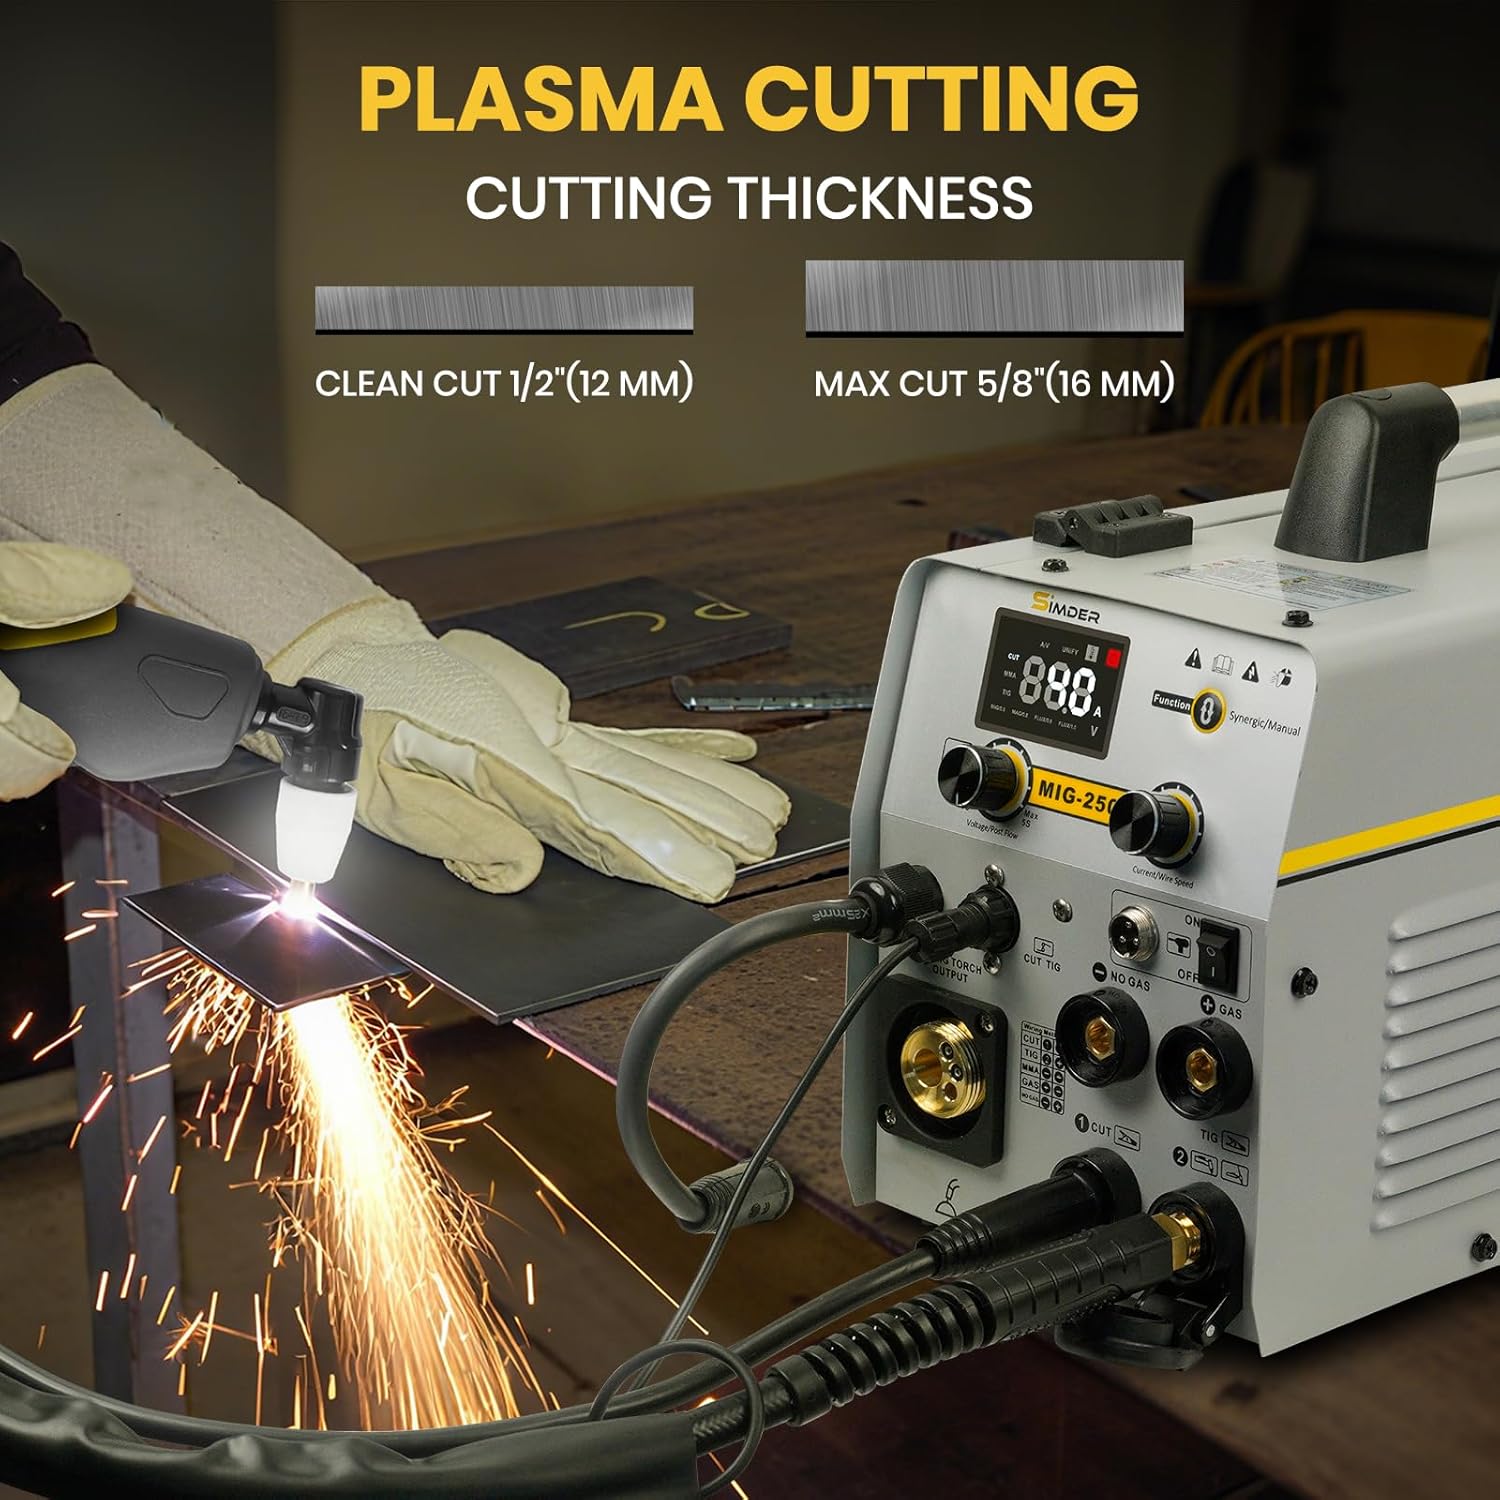
Image 5.2: Plasma cutting operation, demonstrating clean and precise cuts.
6. Maintenance
Regular maintenance ensures the longevity and optimal performance of your MIG-250 unit.
- Cleaning: Regularly clean the exterior of the machine with a dry cloth. Use compressed air to clear dust from internal components and cooling vents.
- Check Connections: Periodically inspect all electrical and gas/air connections for tightness and wear. Ensure ground clamp connections are secure.
- Consumables: Replace worn MIG contact tips, TIG tungsten electrodes, plasma cutting nozzles, and electrodes as needed. Refer to the specific torch manuals for replacement procedures.
- Wire Feeder: Keep the wire feeder mechanism clean and free of debris. Ensure drive rollers are appropriate for the wire size and are not worn.
- Air Filter (Plasma): Check and clean or replace the air filter on the air regulator (18) regularly to ensure clean air supply for plasma cutting.
7. Troubleshooting
This section addresses common issues you might encounter with your MIG-250.
| Problem | Possible Cause | Solution |
|---|---|---|
| No power to the unit | Power switch off, loose power cord, circuit breaker tripped, internal connection loose. | Ensure power switch is ON. Check power cord connection. Reset circuit breaker. Inspect internal connections (if comfortable and qualified). |
| Poor weld quality (MIG) | Incorrect wire speed/voltage, wrong polarity, no shielding gas (Gas MIG), dirty workpiece, worn contact tip. | Adjust wire speed and voltage. Verify polarity setting. Check gas supply/flow. Clean workpiece. Replace contact tip. |
| TIG arc difficult to start or unstable | Dull or contaminated tungsten, incorrect gas flow, poor ground connection. | Regrind or replace tungsten. Check Argon gas flow. Ensure ground clamp is securely attached to clean metal. |
| Plasma cutter not cutting or poor cut quality | Insufficient air pressure, worn consumables (nozzle/electrode), poor ground connection, incorrect cutting speed/amperage. | Check air pressure and flow. Replace plasma torch consumables. Ensure ground clamp is secure. Adjust cutting speed and amperage. |
| Overheat protection activated | Exceeded duty cycle, blocked cooling vents, high ambient temperature. | Allow the machine to cool down. Ensure cooling vents are clear. Operate in a cooler environment. |
If issues persist after troubleshooting, contact SSIMDER customer support for assistance.
8. Specifications
| Feature | Specification |
|---|---|
| Model Number | MIG-250 |
| Power Source | AC/DC Dual Voltage (110V/220V) |
| Max Output Current | 160 Amps |
| Welding Processes | Gas MIG, CO2 MIG, Gasless MIG (Flux Core), Lift TIG, Stick (MMA) |
| Plasma Cutting Capacity | Clean Cut: 1/2" (12mm), Severance Cut: 5/8" (16mm) |
| MIG Wire Diameter | 0.030" - 0.035" |
| Stick Electrode Types | 7018, 6010, 6013 |
| Item Weight | 34.9 pounds (approx. 15.8 kg) |
| Product Dimensions | 17.32 x 7.48 x 9.45 inches (approx. 44 x 19 x 24 cm) |
| Included Components | MIG-250 Welder Cutter Combo, TIG Torch, Plasma Cutting Torch, Ground Clamp, Electrode Holder, MIG Torch, Flux Core Welding Wire, Gas Hose, Operations Manual, various accessories. |

Image 8.1: Dimensions and weight of the MIG-250 unit.
9. Warranty and Support
For warranty information, technical support, or service inquiries, please contact SSIMDER customer service. Refer to the contact details provided in the packaging or on the official SSIMDER website.
Please retain your purchase receipt as proof of purchase for warranty claims.