1. Setup
This section guides you through the initial setup of your Mecpow M1 Mini 5W Laser Engraver.
1.1 Unboxing and Initial Inspection
Carefully unpack all components and ensure everything is present and undamaged. The package typically includes the laser engraver unit, power adapter, USB cable, screwdriver, wrench, hex key, safety glasses, focus plate, and sample materials.
1.2 Power and USB Connection
- Place the laser engraver on a stable, level surface.
- Connect the power adapter to the DC 12V 5A port on the back of the engraver. Plug the other end into a suitable power outlet.
- Connect the provided USB cable to the Type-C port on the engraver and the other end to your computer.
Refer to the official product video for visual guidance on connections (0:10 - 0:27).

Image: The Mecpow M1 Mini Laser Engraver highlighting its versatile connection options including USB for direct computer link.
1.3 Material Placement and Focusing
- Open the safety cover of the engraver.
- Place the material you wish to engrave or cut onto the working platform. Ensure it lies flat and is within the 100x100mm engraving area.
- Use the provided focus plate (black plate with white outlines) to assist in positioning your material. Place it on the platform, then position your material on top of it.
- Adjust the laser module's height until the focus lever just touches the surface of your material. Secure the module in place.
- Remove the focus plate before starting any operation.
Refer to the official product video for visual guidance on material placement and focusing (0:36 - 0:55).
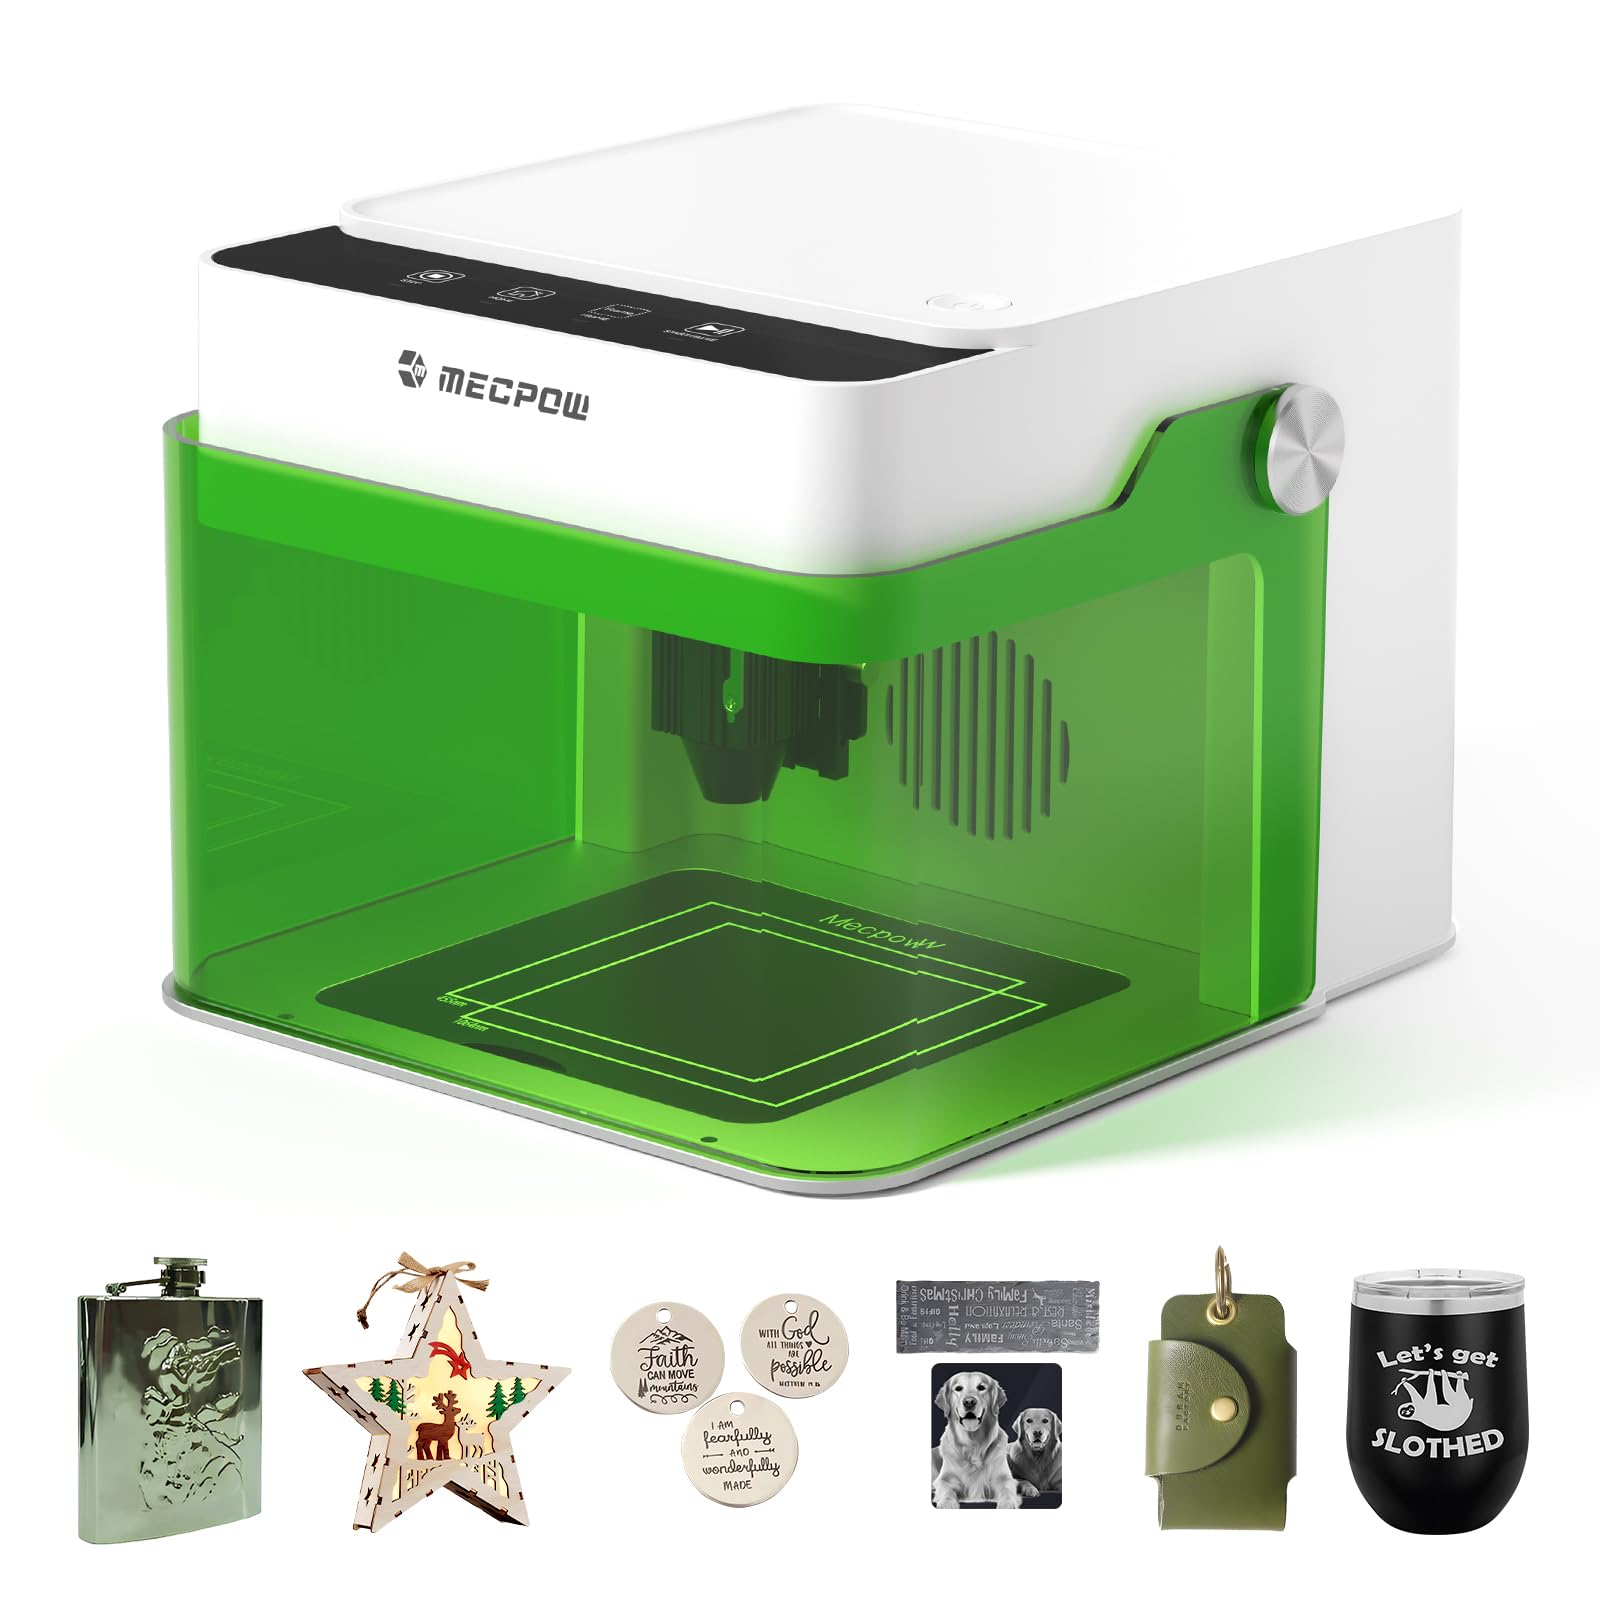
Image: The Mecpow M1 Mini Laser Engraver with a material sample ready for engraving, demonstrating the working area.
1.4 Safety Cover
Always ensure the green safety cover is closed during operation. This cover filters 99% of the laser light, protecting your eyes. The device features an auto-stop function if the cover is opened during operation.

Image: Highlighting the Class 1 safety certification and enclosed design of the Mecpow M1 Mini, ensuring a safer working environment.
2. Operating the Laser Engraver
Learn how to control your Mecpow M1 Mini for various engraving and cutting tasks.
2.1 Basic Controls
The top panel of the engraver features four intuitive buttons for basic operations:
- Stop: Immediately halts the current operation.
- Home: Moves the laser module to its home position.
- Frame: Outlines the working area on your material, allowing you to verify placement before starting.
- Start/Pause: Initiates or pauses the engraving/cutting process.
Refer to the official product video for a demonstration of basic controls (0:28 - 0:35).

Image: Close-up of the Mecpow M1 Mini's control panel, illustrating the four main function buttons for ease of use.
2.2 Software and App Connection
The Mecpow M1 Mini supports multiple connection methods and software for design and control:
- Computer Connection (USB): Compatible with software like CutLabX, LightBurn, and LaserGRBL. Connect the engraver to your computer via USB and use the software to send designs and control the device.
- MKS Laser APP (Wi-Fi): For wireless control, connect your smartphone or tablet to the engraver's Wi-Fi network (e.g., "Mecpow_M1_XXXXXX"). Use the MKS Laser APP to upload designs, set parameters, and start engraving.
- TF Card (Offline Operation): Load designs onto a TF card and insert it into the engraver for offline operation, eliminating the need for a continuous computer or app connection.
Refer to the official product video for MKS Laser APP connection (2:09 - 2:34).
2.3 Starting an Engraving/Cutting Job
- Prepare your design in your chosen software (CutLabX, LightBurn, LaserGRBL) or select one from the MKS Laser APP.
- Set the appropriate engraving/cutting parameters (power, speed, passes) based on your material.
- Use the Frame button on the engraver or in the software/app to preview the working area on your material. Adjust material placement if necessary.
- Close the safety cover.
- Press the Start/Pause button on the engraver or in the software/app to begin the job.
2.4 Material Compatibility
The Mecpow M1 Mini 5W laser engraver can work with a wide range of materials:
- Engraving: Wood, plywood, paper, leather, acrylic, fabric, ceramics, stone, and more.
- Cutting: Up to 3mm plywood and 5mm pine wood.
- Metal Engraving: With the optional 1.2W R1 Infrared Laser Module, it can engrave metals.
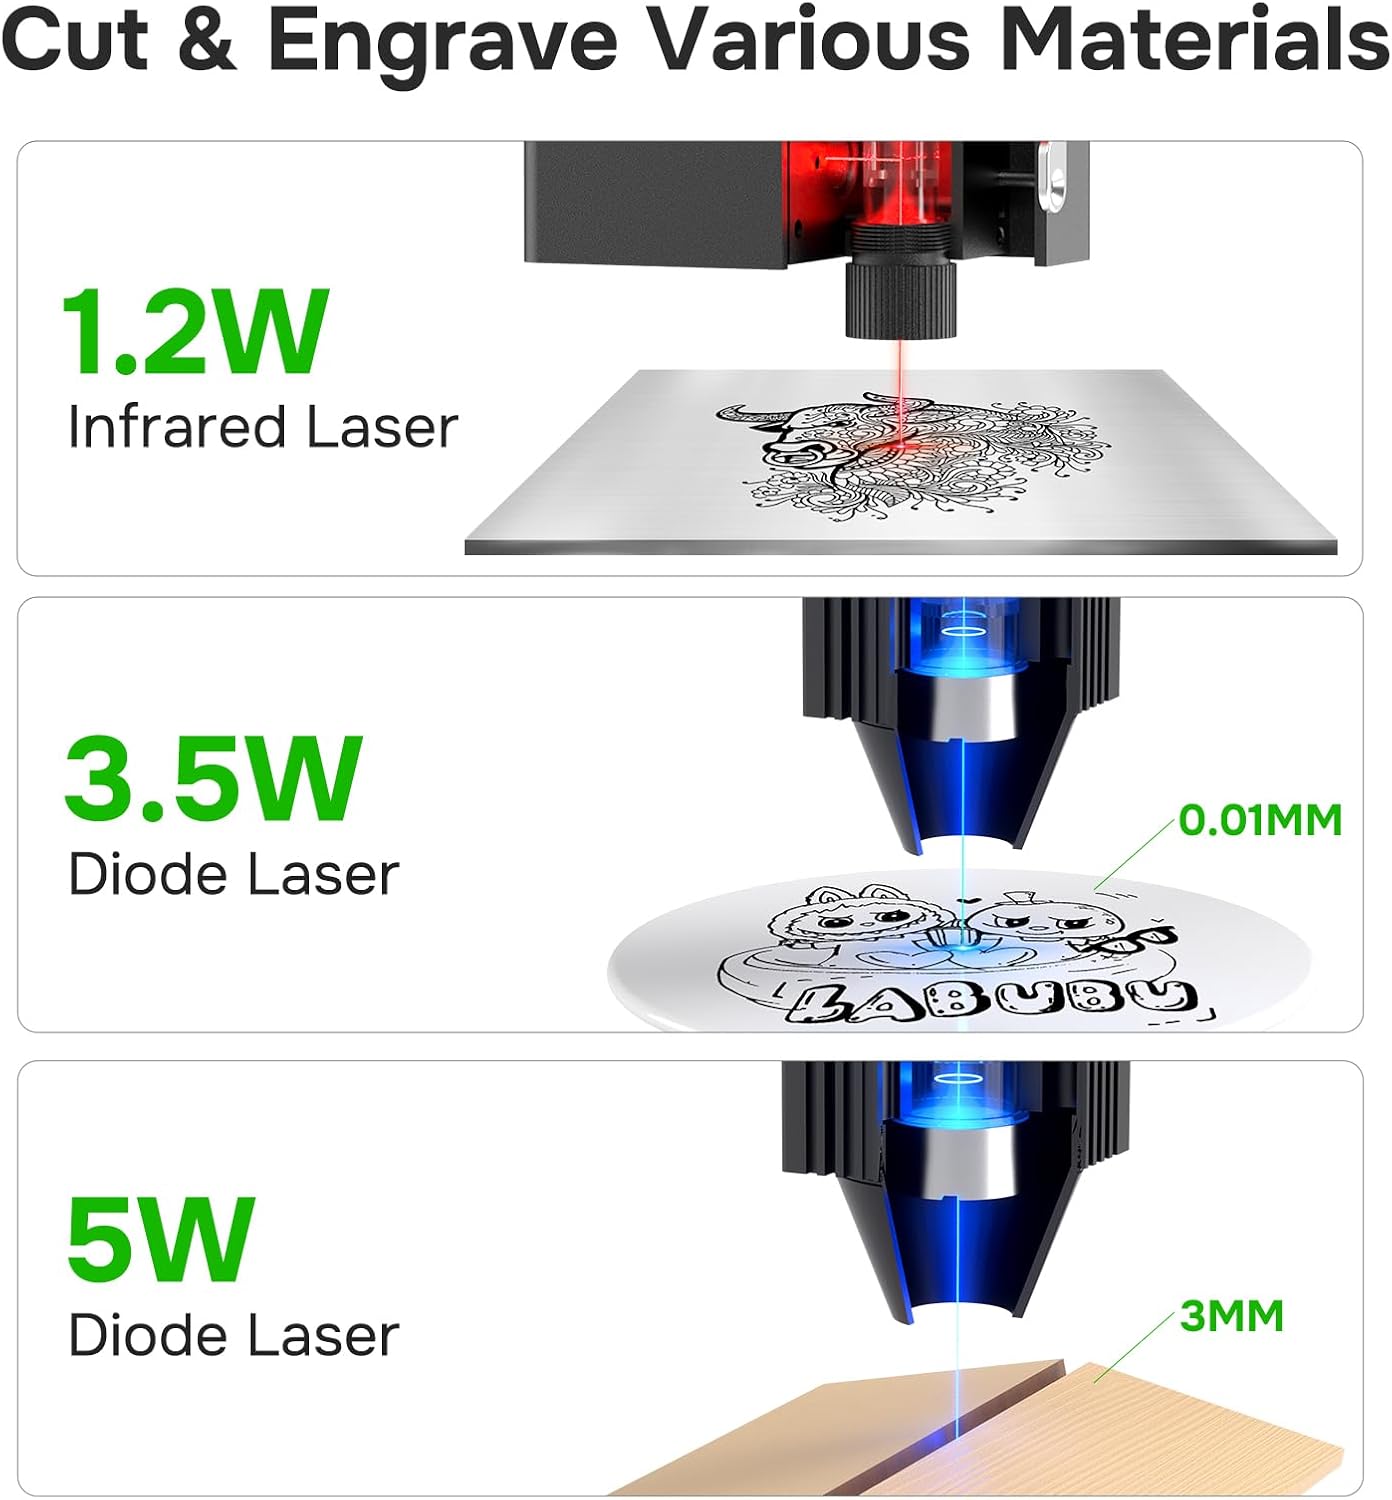
Image: Illustrates the versatility of the Mecpow M1 Mini with different laser modules for cutting and engraving various materials.
2.5 Safety Features
Your Mecpow M1 Mini is designed with safety in mind:
- Class 1 Safety Certification: Ensures the device meets high safety standards for laser products.
- Fully Enclosed Design: The green safety cover protects users from direct laser exposure.
- Auto-Stop Function: The laser automatically stops if the safety cover is opened during operation.
3. Maintenance and Accessories
Proper maintenance and the use of optional accessories can enhance your engraving experience.
3.1 Fume Extraction System (Optional P50)
For a cleaner and safer working environment, especially when engraving materials that produce smoke or odors, consider installing the optional P50 Fume Extractor.
- Attach the exhaust port to the designated opening on the back of the engraver using the provided screws and screwdriver.
- Connect the flexible hose to the exhaust port on the engraver and the inlet of the P50 Fume Extractor, securing it with the clamp.
- Connect the power adapter to the P50 Fume Extractor and plug it into a power outlet.
- Turn on the fume extractor before starting your engraving job.
Refer to the official product video for P50 Fume Extractor installation (1:10 - 1:59).

Image: The Mecpow M1 Mini with its optional accessories, including the P50 Fume Extractor and G3 Pro Rotary Roller Module, for expanded capabilities.
3.2 Rotary Roller Module (Optional G3 Pro/G5)
To engrave cylindrical objects like bottles or cups, you can use the optional G3 Pro or G5 Rotary Roller Module.
- Install the height risers (legs) onto the bottom of the M1 Mini to elevate the engraver, providing space for the rotary module.
- Place the rotary module on your work surface beneath the elevated engraver.
- Connect the rotary module to the designated port on the engraver (usually labeled "Roller").
- Place your cylindrical object on the rotary module and adjust its position.
- Adjust software settings to enable rotary engraving.
Refer to the official product video for G3 Pro Rotary Roller Module installation (2:35 - 2:57).

Image: Demonstrates the height adjustment feature of the Mecpow M1 Mini, allowing for the use of a rotary module for cylindrical objects.
3.3 Laser Module Replacement (Optional R1 Infrared Module)
To engrave metals, you will need to replace the standard diode laser module with the optional R1 Infrared Laser Module.
- Ensure the engraver is powered off and unplugged.
- Carefully remove the existing diode laser module by unscrewing its retaining screws and disconnecting its cable.
- Insert the R1 Infrared Laser Module into the module slot, ensuring it is properly seated.
- Secure the R1 module with its retaining screws and connect its cable.
- Adjust the focus for the R1 module as needed.
Refer to the official product video for R1 Infrared Laser Module replacement (2:58 - 3:59).
3.4 Cleaning
Regular cleaning helps maintain optimal performance:
- Wipe down the exterior of the engraver with a soft, dry cloth.
- Gently clean the laser lens with a lens cleaning wipe or a soft, lint-free cloth to ensure clear laser path.
- Remove any debris or dust from the working platform and ventilation areas.
4. Troubleshooting
This section addresses common issues you might encounter with your Mecpow M1 Mini.
4.1 Device Not Powering On
- Check Power Connection: Ensure the power adapter is securely connected to both the engraver and a working power outlet.
- Verify Power Adapter: Confirm the power adapter is the correct one for the device (DC 12V 5A).
4.2 Connection Issues (USB/Wi-Fi)
- USB Connection: Try a different USB port on your computer or a different USB cable. Ensure the necessary drivers are installed for your operating system.
- Wi-Fi Connection: Ensure your smartphone/tablet is connected to the engraver's Wi-Fi network. Restart both the engraver and your device. Check the MKS Laser APP for connection status.
4.3 Poor Engraving/Cutting Quality
- Focus Adjustment: Incorrect focus is a common cause. Re-adjust the laser module height using the focus plate to ensure the laser is precisely focused on the material surface.
- Power and Speed Settings: Adjust the laser power and speed settings in your software. Different materials require different parameters. Consult material test guides or perform small test engravings.
- Material Condition: Ensure your material is clean, flat, and free from defects.
- Laser Lens Cleanliness: A dirty laser lens can scatter the laser beam. Clean the lens gently as described in the Maintenance section.
4.4 Device Stops Unexpectedly
- Safety Cover: The engraver will automatically stop if the safety cover is opened during operation. Ensure it is fully closed.
- Overheating: Ensure proper ventilation around the device. If the device feels excessively hot, allow it to cool down before resuming operation.
- Software/App Error: Check your software or app for any error messages. Restart the application or device if necessary.
5. Specifications
| Feature | Detail |
|---|---|
| Manufacturer | Mecpow |
| Model Number | M1 5W |
| Product Dimensions | 22 x 26.4 x 19.4 cm |
| Weight | 2.4 Kilograms |
| Laser Wattage | 5000 Milliwatt (5W) |
| Engraving Area | 100x100mm |
| Engraving Speed | Up to 10000 mm/min |
| Precision | Up to 0.01 mm |
| Connectivity | USB, Wi-Fi, TF Card |
| Software Compatibility | CutLabX, LightBurn, LaserGRBL |
| Safety Certification | Class 1 |

Image: The sleek and compact design of the Mecpow M1 Mini, with its dimensions clearly indicated.
6. Warranty & Support
6.1 Warranty Information
The Mecpow M1 Mini 5W Diode Laser Engraver comes with a 1-year warranty from the date of purchase, covering manufacturing defects and malfunctions under normal use. Please retain your proof of purchase for warranty claims.
6.2 Customer Support
For technical assistance, troubleshooting, or warranty inquiries, please contact Mecpow customer support:
- Email: support@mecpow.com
7. Official Product Video Instructions
Watch the comprehensive official product video for detailed visual instructions on setup, operation, and accessory installation.
Video: Official Mecpow M1 Mini Laser Engraver instruction video, demonstrating various setup, operation, and accessory installation steps.
- 0:04 - 0:06: Unboxing and included components.
- 0:10 - 0:18: Connecting the power adapter.
- 0:19 - 0:27: Connecting the USB cable to a computer.
- 0:28 - 0:35: Overview of basic control buttons (Start/Pause, Home, Frame, Stop).
- 0:36 - 0:44: Placing material and using the focus plate.
- 0:45 - 0:55: Adjusting the laser focus.
- 0:56 - 1:09: Demonstration of engraving a rose design on wood.
- 1:10 - 1:59: Installation of the optional P50 Fume Extractor.
- 2:00 - 2:08: Engraving a rabbit design on wood with the fume extractor active.
- 2:09 - 2:34: Connecting to the MKS Laser APP and initiating an engraving task.
- 2:35 - 2:57: Installation of the optional G3 Pro Rotary Roller Module (including height risers).
- 2:58 - 3:59: Replacement of the standard laser module with the R1 Infrared Laser Module and metal engraving demonstration.