1. Introduction
This manual provides essential information for the safe and efficient operation of your Axiscreat CNC Router Machine 6060-1. This professional-grade CNC machine is designed for precision carving and cutting across various materials, including wood, acrylic, and aluminum. It features NEMA 23 closed-loop stepper motors, dual linear rails, and ball screws for enhanced performance and stability. Please read this manual thoroughly before setup and operation.

Figure 1.1: Overview of the Axiscreat CNC Router Machine 6060-1.
2. Key Features
- NEMA23 Closed-Loop Stepper Motors: Equipped with four NEMA23 closed-loop stepper motors (3A current, 2.2 N·m torque) for faster, smoother, and quieter operation, minimizing step loss and enhancing performance.
- All Axis Linear Rails and Ball Screws: Features dual HG-H15 linear rails and ball screws on all axes, ensuring high efficiency, precision, speed, stability, and rigidity. Includes a 4.3-inch touch screen for intuitive operation.
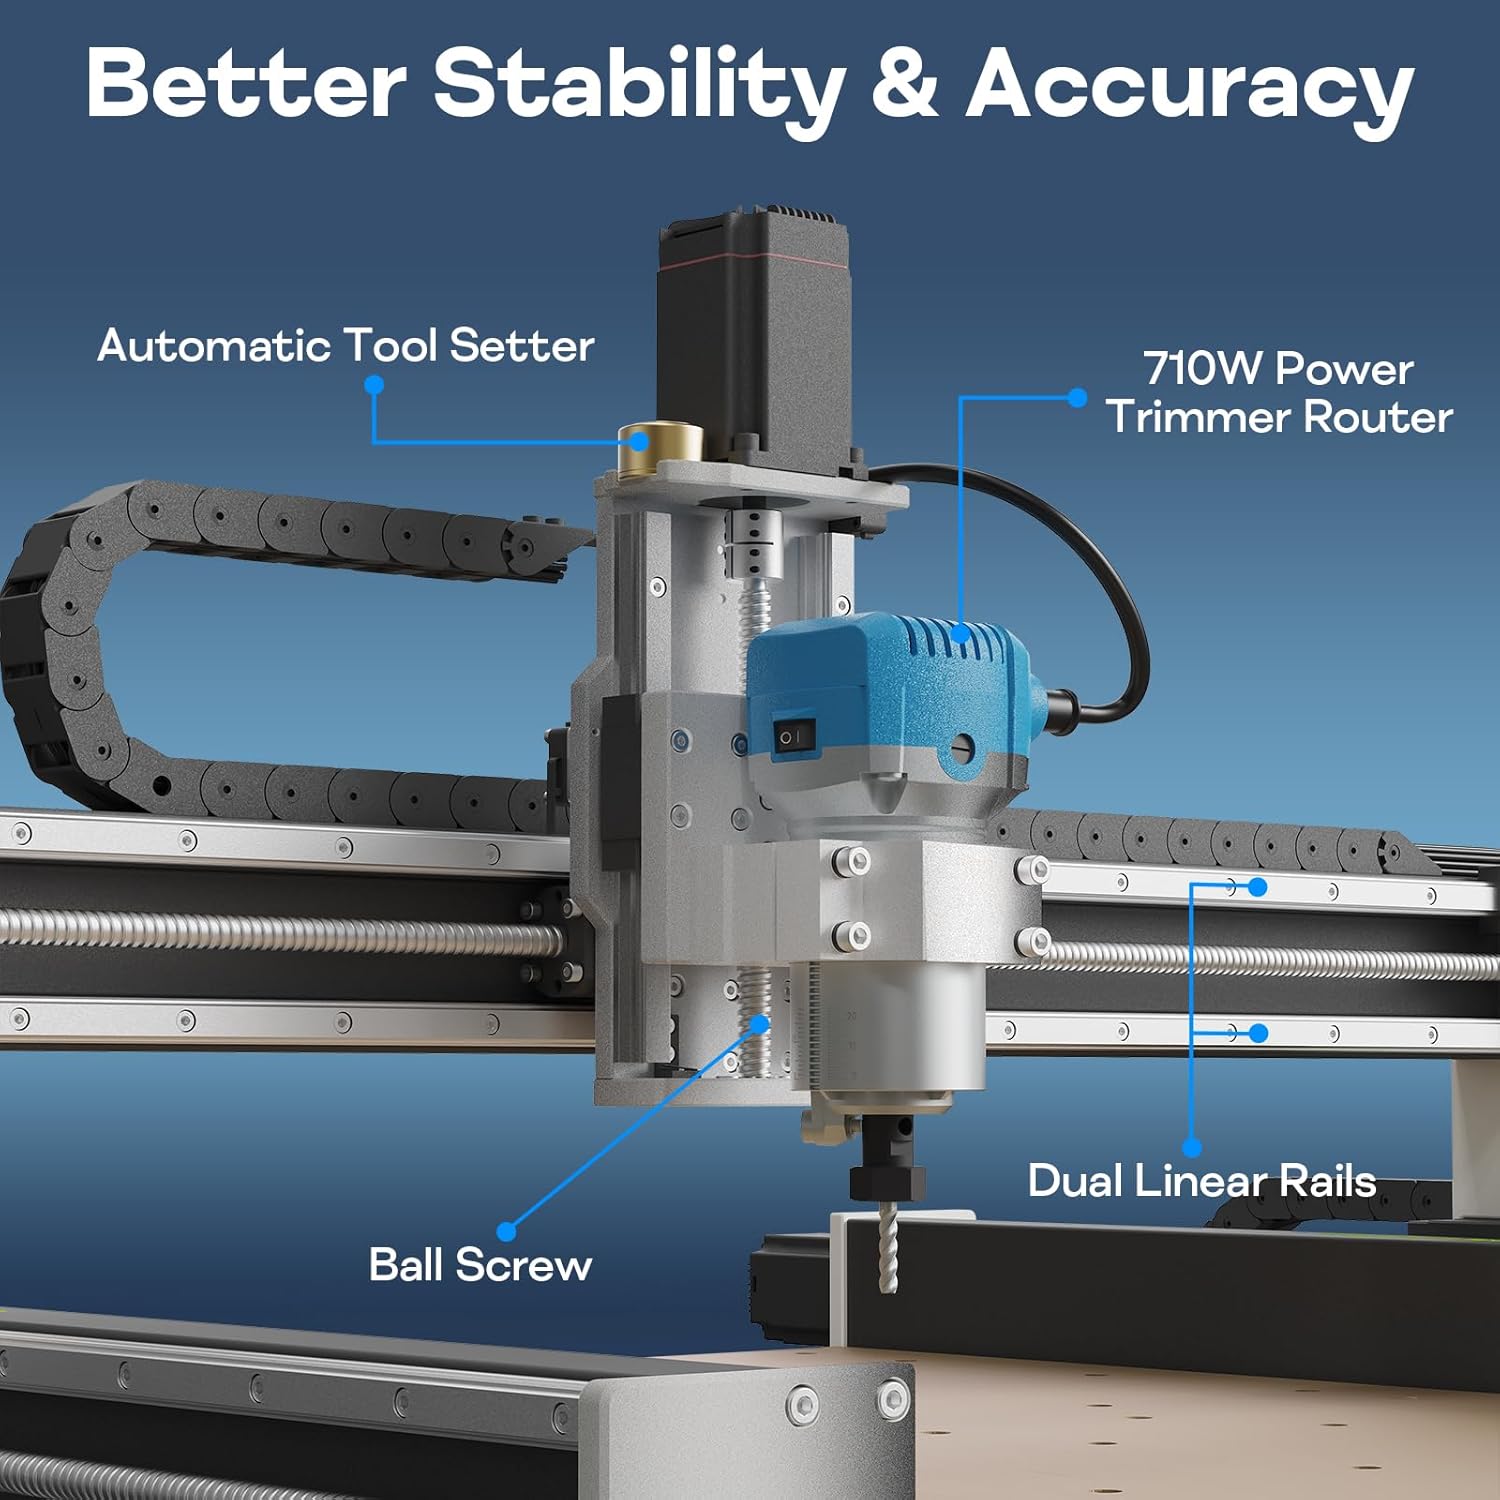
Figure 2.1: Detail of the dual linear rails and ball screw system, highlighting stability and accuracy components.
- Larger Work Area: Provides a generous 23.6 × 23.6 × 4.33 inch (600 × 600 × 110 mm) work area, suitable for large-scale projects.

Figure 2.2: Visual representation of the CNC machine's large working area and travel dimensions.
- 710W Powerful Trimming Spindle: Equipped with an upgraded 710W high-power carving spindle, reaching a maximum speed of 30,000 RPM for efficient cutting and engraving.
- Modular Design: Pre-assembled modular structure allows for quick setup in approximately 20 minutes.
- Expansion Functions: Based on open-source FluidNC v3.8.4 with a replaceable dual-core 32-bit driver chip and Wi-Fi support. Offers laser output interface, VFD spindle control interface, and support for water-cooled spindles.

Figure 2.3: Examples of various spindle options and expansion capabilities.
3. Setup and Assembly
The Axiscreat CNC Router Machine 6060-1 features a modular design for simplified assembly. Follow the steps below and refer to the provided video for detailed instructions.
3.1 Mechanical Assembly
- Pre-position the X-axis: Carefully place the X-axis assembly onto the Y-axis rails.
- Loosen Coupling Screws: Use an M3 wrench to loosen the screw on the right side of the coupling.
- Loosen X-axis Connecting Plate Screws: Use an M4 wrench to loosen the 5 screws on the right-side X-axis connecting plate. Do not remove them completely. Pull the plate outward slightly to facilitate alignment.
- Align and Secure X-axis: Lift the X-axis and align the lower holes with the Y-axis slider sheet metal, ensuring they are correctly seated. Align the left and right X-axis connecting plates with the Y-axis slider sheet metal. Tighten the 5 screws on the right side of the X-axis and the screw on the right side of the coupling.
- Install Motor Mount: Use M6x75 screws to secure the motor mount. Slightly tighten the four screws of the motor mount, but do not fully tighten them yet. This allows for perpendicularity adjustment later.
- Install Spindle Motor: Place the spindle motor into the motor mount. Align a square horizontally against the spindle motor to check perpendicularity. If not aligned, manually push the spindle motor until it is flush. After alignment, fully tighten the two right-side screws on the motor mount to secure it. This completes the perpendicularity calibration.
- Adjust Y-axis Bilateral Alignment: Use a straight ruler to measure the distance from the right X-Y axis connecting plate to the front edge. Then measure the distance from the left X-Y axis connecting plate to the front edge. If the distances are different, rotate the Y-axis coupling until the distances are equal. This completes the Y-axis bilateral adjustment.
Video 3.1: Axiscreat X6060 Model Assembly Tutorial. This video demonstrates the step-by-step mechanical assembly of the CNC machine, including X-axis and Y-axis alignment and spindle motor installation.
3.2 Electrical Connections
Proper electrical connection is crucial for safe and correct operation. Follow these steps carefully:
- Cable Carrier Routing: Route the cable carrier according to its designated path.
- Secure Cable Carrier Connections: Secure the cable carrier connection at the rear of the Z-axis and at the end of the X-axis. Secure the Y-axis cable carrier connection. Secure the connection between the cable carrier and the control box.
- Connect Z-axis Motor: Ensure the male connector keying is aligned and connect it to the Z-axis motor. Secure the connector port using a flat-head screwdriver.
- Connect Y-axis Motors: Ensure the male connector keying is aligned and connect to the Y-axis motor. Both sides use the same method. Secure the connector ports on both sides using a flat-head screwdriver.
- Connect X-axis Motor: Ensure the male connector keying is aligned and connect to the X-axis motor. Secure the connector port using a flat-head screwdriver.
- Connect Aviation Plug: Pay attention to the aviation plug keyway position. Insert the plug and tighten it securely.
- Connect Motor Socket: Plug the motor cable into the motor socket on the control box.
Video 3.2: Axiscreat X6060 Model Wiring Tutorial. This video guides you through the electrical wiring process, including connecting motors, limit switches, and the control box.
3.3 Power Supply Notice
The machine is factory-set to 110V. If using 220V mains, first switch the Power Switch on the control box to 220V before powering on to protect the control box. The included router spindle is 110V only. For safety, it is strongly recommended to use a step-down transformer to convert your 220V mains power to 110V before connecting either the control box or the spindle.

Figure 3.1: Control box with power switch and connection interfaces.
4. Operating Instructions
The Axiscreat CNC Router Machine 6060-1 is operated via its 4.3-inch touch screen interface. Basic operation involves powering on, homing the machine, loading your G-code, and initiating the carving or cutting process.
- Power On: Ensure all electrical connections are secure and the power supply is correctly configured (110V or 220V). Turn on the main power switch on the control box.
- Homing: Use the touch screen interface to initiate the homing sequence. This calibrates the machine's position to its home (zero) coordinates.
- Material Setup: Securely mount your material onto the work area. Ensure it is flat and properly clamped to prevent movement during operation.
- Tool Setting: Use the automatic tool setter to accurately set the Z-axis zero point for your cutting tool.
- Load G-code: Load your prepared G-code file via the SD card slot or USB Type-C port on the control box.
- Start Operation: Follow the on-screen prompts to start your carving or cutting job. Monitor the machine during operation.
- Spindle Speed Adjustment: The 710W trimming spindle offers 6-speed adjustable settings from 6000 to 30000 RPM. Adjust the speed according to the material and cutting tool.
4.1 Material Compatibility
This CNC router is capable of working with a variety of materials, including:
- Wood (Plywood, Solid wood)
- Acrylic
- Aluminum
- MDF
- Leather
- Other soft metals and plastics

Figure 4.1: Examples of materials compatible with the CNC machine.

Figure 4.2: CNC machine in operation, carving a design.

Figure 4.3: Example of a detailed carving on wood.

Figure 4.4: Example of a multi-layered carving on wood.
5. Routine Maintenance
Regular maintenance ensures the stability, precision, and long-term performance of your CNC machine.
- Check Coupling Screws: Regularly inspect the set screws on the couplings of all three axes for looseness. Tighten them promptly if needed to maintain precision.
- Lubrication & Cleanliness: Ensure the linear rails and ball screws on all three axes are properly lubricated. If dry, apply a small amount of appropriate lubricant. Wipe the surfaces clean of dust or debris regularly.
- Clear the Work Area: Before each operation, check the worktable for any obstructions that might interfere with axis movement. Foreign objects can trigger alarms and cause axis misalignment, affecting machining accuracy.
6. Troubleshooting
This section provides general troubleshooting tips for common issues. For more complex problems, please contact customer support.
| Problem | Possible Cause | Solution |
|---|---|---|
| Machine not powering on | Power cable disconnected, power switch off, incorrect voltage setting. | Check power cable connection. Ensure power switch is ON. Verify voltage switch on control box matches mains voltage. |
| Motors not moving / No response | Motor cables loose, emergency stop engaged, software not connected. | Check all motor cable connections. Release the emergency stop button. Ensure control software is properly connected and communicating. |
| Inaccurate carving / Skipping steps | Loose coupling screws, insufficient lubrication, material not secured, incorrect cutting parameters. | Inspect and tighten coupling screws. Lubricate linear rails and ball screws. Secure material firmly. Adjust feed rates and depth of cut in G-code. |
| Spindle not rotating | Spindle power cable disconnected, spindle switch off, spindle motor fault. | Check spindle power connection. Ensure spindle switch is ON. If problem persists, contact support. |
7. Specifications
| Attribute | Value |
|---|---|
| Manufacturer | Axiscreat |
| Model Number | AT-CNC-X6060-2 |
| Item Weight | 107.8 pounds |
| Package Dimensions | 41.5 x 38 x 10.5 inches |
| Style | 6060-1 |
| Material | Aluminum + Wood |
| Power Source | AC/DC |
| Voltage | 24 Volts (Control System) |
| Wattage | 710 watts (Spindle) |
| Work Area (X×Y×Z) | 23.6 × 23.6 × 4.33 inches (600 × 600 × 110 mm) |
| Spindle Speed | Up to 30,000 RPM |
| Motor Type | NEMA 23 Closed-Loop Stepper Motors |
| Motion System | Dual HG-H15 Linear Rails & Ball Screws on all axes |
| Control System | Open-source FluidNC v3.8.4 with Wi-Fi support |
8. Warranty and Support
For warranty information, technical support, or any inquiries regarding your Axiscreat CNC Router Machine 6060-1, please refer to the product packaging or contact Axiscreat customer service directly. Keep your purchase receipt for warranty claims.