1. Product Overview
The SogesHome Power Tower is a multi-functional strength training fitness station designed for comprehensive home gym workouts. It supports various exercises including pull-ups, dips, knee raises, and push-ups, catering to adults, children, fitness enthusiasts, and the elderly. Its compact design allows for efficient space utilization in any home, office, or gym setting.

Figure 1: SogesHome Power Tower Pull Up Bar and Dip Station

Figure 2: Multi-purpose gym equipment in use, demonstrating various exercises.
2. Safety Information
- Always consult with a healthcare professional before starting any new exercise program.
- Ensure all bolts and nuts are securely tightened before each use. Regularly check for any loose components.
- Place the power tower on a stable, level surface to prevent tipping.
- Do not exceed the maximum weight recommendation of 330 pounds.
- Perform warm-up exercises before using the equipment.
- Children should only use the equipment under adult supervision.
- Wear appropriate athletic footwear and clothing during workouts.
- Stop exercising immediately if you feel pain, dizziness, or shortness of breath.
3. Package Contents
Verify that all components are present before beginning assembly. Refer to the included parts diagram in your physical manual for detailed identification.
- Main Frame Components (Base, Vertical Supports, Top Bar)
- Dip Station Handles
- Elbow Pads and Back Pad
- Assembly Hardware (Screws, Bolts, Washers, Safety Lock Nuts)
- Anti-slip Foot Pads
- Assembly Tools (Wrenches)
4. Setup and Assembly
Follow these steps to assemble your SogesHome Power Tower. It is recommended to assemble the product from the bottom up. Initially, hand-tighten all fasteners to ensure correct alignment, then fully tighten them after all parts are in place.
- Assemble the Base: Attach the horizontal base bars to the vertical support posts using the provided screws, bolts, and washers. Ensure the anti-slip foot pads are correctly positioned.
- Connect Vertical Supports: Install the brace between the two main vertical supports. Line up the holes, insert screws, washers, and nuts, then hand-tighten.
- Install Dip Handles: Slide the dip handles onto the vertical supports at your desired height. Secure them using the provided locking mechanism. The handles are adjustable to accommodate various user heights and exercise preferences.
- Attach Top Pull-Up Bar: Place the top pull-up bar onto the upper section of the vertical supports. Insert one bolt to temporarily hold it in place, then align and insert the remaining bolts. This bar is also adjustable for height.
- Secure All Fasteners: Once all components are assembled and aligned, use the provided tools to fully tighten all screws, bolts, and safety lock nuts. Double-check every connection for stability.
- Attach Pads: Secure the elbow pads and back pad to their designated positions for comfort during exercises.
For a visual guide on assembly, please refer to the video below:
Video 1: Assembly demonstration of the power tower station.

Figure 3: The power tower features 10 adjustable height levels, suitable for various users.
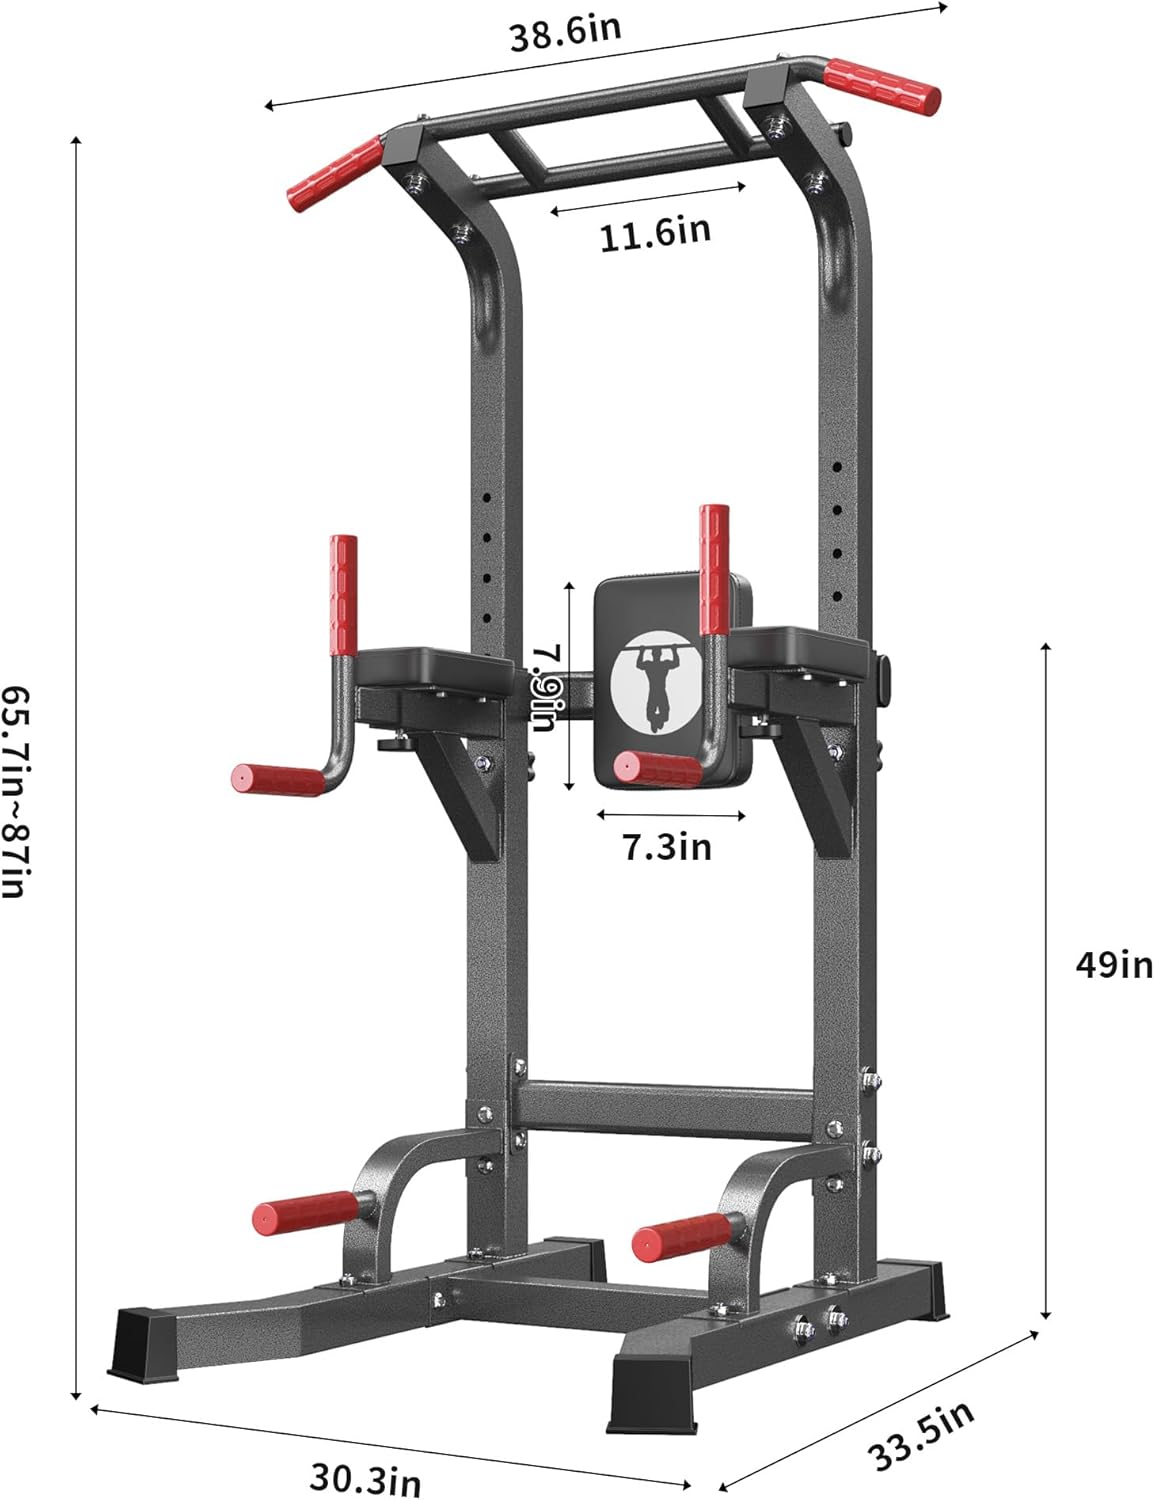
Figure 4: Product dimensions for planning placement.
5. Operating Instructions
The SogesHome Power Tower offers a versatile range of exercises. Adjust the height of the pull-up bar and dip handles to suit your body and exercise requirements.
5.1 Pull-ups
- Grasp the pull-up bar with an overhand grip, hands slightly wider than shoulder-width apart.
- Hang with arms fully extended.
- Pull your body upwards until your chin clears the bar.
- Lower yourself slowly and with control back to the starting position.
The multi-grip design allows for various pull-up variations to target different muscle groups.
Video 2: Demonstration of pull-up bar usage.
5.2 Dips
- Grasp the dip handles with a neutral grip, palms facing each other.
- Support your body with arms fully extended, keeping your core engaged.
- Lower your body by bending your elbows until your shoulders are below your elbows.
- Push back up to the starting position, extending your arms.
Video 3: Demonstration of dip station usage.
5.3 Vertical Knee Raises
- Position yourself on the dip station, resting your forearms on the elbow pads and your back against the back pad.
- Grasp the handles for stability.
- Keeping your back pressed against the pad, slowly raise your knees towards your chest.
- Lower your legs with control.
5.4 Elevated Push-ups
- Utilize the lower handles for elevated push-ups.
- Grasp the handles and assume a plank position.
- Lower your chest towards the handles, keeping your body in a straight line.
- Push back up to the starting position.
For a general overview of the power tower's capabilities, watch the video below:
Video 4: Overview of the SogesHome Power Tower Pull Up Bar Stand for Home.
6. Maintenance
- Regular Inspection: Periodically check all nuts, bolts, and connections to ensure they are tight and secure. Tighten any loose fasteners immediately.
- Cleaning: Wipe down the equipment with a damp cloth after each use to remove sweat and dirt. Avoid using abrasive cleaners.
- Storage: Store the power tower in a dry environment to prevent rust and corrosion.
- Pad Care: Inspect elbow and back pads for wear and tear. Clean them with a mild soap solution if necessary.
7. Troubleshooting
- Equipment Wobbles: Ensure the power tower is placed on a flat, level surface. Check and tighten all assembly bolts. Adjust the anti-slip foot pads if necessary to stabilize the unit.
- Difficulty Adjusting Height: Ensure the locking pins are fully disengaged before attempting to adjust height. Check for any obstructions in the adjustment holes.
- Squeaking Noises: Apply a small amount of lubricant to moving parts or connection points if squeaking occurs. Ensure all bolts are properly tightened.
8. Specifications
| Attribute | Detail |
|---|---|
| Brand | SogesHome |
| Model Number | NSDUS-40YKMF6210A-Pro |
| Material | Alloy Steel |
| Color | Black |
| Product Dimensions (L x W x H) | 30.3" x 33.5" x 87" |
| Adjustable Height Range | 65.7" to 87" (10 levels) |
| Maximum Weight Recommendation | 330 Pounds |
| Item Weight | 44.97 Pounds |
| Included Components | Power Tower |

Figure 5: Detailed view of product features including grip, cushioning, and structural elements.

Figure 6: The outward-angled square tube design ensures a super stable base.
9. Warranty and Support
SogesHome is committed to providing high-quality products and excellent customer service. If you have any questions or concerns regarding your Power Tower, please do not hesitate to contact us. Our service purpose is to ensure customer satisfaction.
Please refer to your purchase documentation for specific warranty details and contact information.